2015 MERCEDES-BENZ E-CLASS COUPE heating
[x] Cancel search: heatingPage 104 of 345
Problems with the steering wheel heating
Problem
Possible causes/consequences and
M
MSolutions The steering wheel heat-
ing has switched itself
off prematurely or can-
not be switched on. The on-board voltage is too low because too many electrical consum-
ers are switched on.
X Switch off electrical consumers that you do not need, such as the
rear window heating or interior lighting.
Once the battery is sufficiently charged, the steering wheel heating
will switch back on automatically. EASY-ENTRY/EXIT feature
Important safety notes G
WARNING
When the EASY-ENTRY/EXIT feature adjusts
the steering wheel, you and other vehicle
occupants – particularly children – could
become trapped. There is a risk of injury.
While the EASY-ENTRY/EXIT feature is mak-
ing adjustments, make sure that no one has
any body parts in the sweep of the steering
wheel.
Move the steering wheel adjustment lever if
there is a risk of entrapment by the steering
wheel. The adjustment process is stopped.
Vehicles with a memory function: if there is a
risk of becoming trapped by the steering wheel, you can also press one of the memory function
position buttons. The adjustment process is
stopped. G
WARNING
If children activate the EASY-ENTRY/EXIT fea- ture, they can become trapped, particularly
when unattended. There is a risk of injury.
When leaving the vehicle, always take the key with you and lock the vehicle. Never leave
children unattended in the vehicle. G
WARNING
If you drive off while the EASY-ENTRY/EXIT
feature is making adjustments, you could lose
control of the vehicle. There is a risk of an
accident. Always wait until the adjustment process is
complete before driving off.
The EASY-ENTRY/EXIT feature makes getting in
and out of your vehicle easier.
You can activate and deactivate the EASY-
ENTRY/EXIT feature in the on-board computer
(Y page 220).
Position of the steering wheel when the EASY-ENTRY/EXIT feature is active The steering wheel tilts upwards if you:
R remove the key from the ignition lock
R with KEYLESS-GO: open the driver's door;
KEYLESS-GO must be in position 1
R with the key: open the driver's door; the key
must be in position 0or 1in the ignition lock
(Y page 132)
i The steering wheel only moves upwards if it
has not already reached the upper stop.
Position of the steering wheel for driv-
ing The steering wheel is moved to the previously
set position if:
R the driver's door is closed and
R with KEYLESS-GO: you press the Start/Stop
button once
or
R with the key: you insert the key into the igni-
tion lock
If you close the driver's door with the key inser-
ted in the ignition lock, the steering wheel is
automatically moved to the previously set posi- tion. Steering wheel
101Seats, steering wheel and mirrors Z
Page 105 of 345

The last position of the steering wheel is stored
when you switch off the ignition or when you
store the setting with the memory function
(Y page 104).
Crash-responsive EASY-EXIT feature If the crash-responsive EASY-EXIT feature is trig-
gered in an accident, the steering column will
move upwards when the driver's door is opened. This occurs irrespective of the position of the
key in the ignition lock. This makes it easier to
exit the vehicle and rescue the occupants.
The crash-responsive EASY-EXIT feature is only
operational if the EASY-EXIT/ENTRY feature is
activated in the on-board computer
(Y page 220). Mirrors
Rear-view mirror
X
Anti-dazzle mode: pivot anti-dazzle
switch :forwards or back. Exterior mirrors
Adjusting the exterior mirrors G
WARNING
You could lose control of the vehicle while
driving if you:
R adjust the driver's seat, steering wheel or
mirrors
R fasten the seat belt
There is a risk of an accident. Adjust the driver's seat, head restraint, steer-
ing wheel and mirrors and fasten your seat
belt before starting the engine. G
WARNING
The exterior mirrors reduce the size of the
image. Objects visible in the mirrors are
closer than they appear. You could misjudge
the distance from road users driving behind
you when changing lanes, for instance. There is a risk of an accident.
You should therefore always look over your
shoulder to determine the actual distance
from road users driving behind you. X
Turn the key to position 1or 2in the ignition
(Y page 132).
X Press button :for the left-hand exterior mir-
ror or button ;for the right-hand exterior
mirror.
The indicator lamp in the corresponding but-
ton lights up in red.
The indicator lamp goes out again after some
time. You can adjust the selected mirror using
adjustment button =as long as the indicator
lamp is lit.
X Press adjustment button =up, down, or to
the left or right until you have adjusted the
exterior mirror to the correct position. You
should have a good overview of traffic condi-
tions.
The convex exterior mirrors provide a larger field of vision.
After the engine has been started, the exterior
mirrors are automatically heated if the rear win-
dow heating is switched on and the outside tem- perature is low. Heating takes a maximum of tenminutes. 102
MirrorsSeats, steering wheel and mirrors
Page 106 of 345

i
The exterior mirrors can also be heated
manually by switching on the rear window
heating.
Folding the exterior mirrors in/out elec- trically X
Turn the key to position 1or 2in the ignition
(Y page 132).
X Briefly press button :.
Both exterior mirrors fold in or out.
i Make sure that the exterior mirrors are
always folded out fully while driving. They
could otherwise vibrate.
i If you are driving faster than 47 km/h,
you
can no longer fold in the exterior mirrors.
Resetting the exterior mirrors If the battery has been disconnected or com-
pletely discharged, the exterior mirrors must be
reset. The exterior mirrors will otherwise not
fold in when you select the "Fold in mirrors whenlocking" function in the on-board computer
(Y page 220).
X Turn the key to position 1in the ignition lock
(Y page 132).
X Briefly press button :.
Folding the exterior mirrors in/out
automatically If the "Fold in mirrors when locking" function is
activated in the on-board computer
(Y page 220):
R the exterior mirrors fold in automatically as
soon as you lock the vehicle from the outside
R the exterior mirrors fold out again automati-
cally as soon as you unlock the vehicle and then open the driver's or front-passenger
door
i If the exterior mirrors have been folded in
manually, they do not fold out.
Exterior mirror pushed out of position If an exterior mirror has been pushed out of
position (forwards or backwards), proceed as
follows:
X Vehicles without electrically folding exte-
rior mirrors: manually move the exterior mir-
ror into the correct position.
X Vehicles with electrically folding exterior
mirrors: press and hold mirror-folding button
until you hear a click and the mirror engages
in position audibly (Y page 103).
The mirror housing is engaged again and you
can adjust the exterior mirrors as usual
(Y page 102). Automatic anti-dazzle mirrors
G
WARNING
Electrolyte may escape if the glass of an auto- matic anti-dazzle mirror breaks. Electrolyte is
harmful and causes irritation. It must not
come into contact with your skin, eyes, res-
piratory organs or clothing or be swallowed.
There is a risk of injury.
If you come into contact with electrolyte,
observe the following:
R immediately rinse off electrolyte from your
skin with water.
R immediately and thoroughly rinse electro-
lyte out of eyes using clean water.
R if electrolyte is swallowed, immediately
rinse out your mouth thoroughly. Do not
induce vomiting.
R if electrolyte comes into contact with skin
or eyes or is swallowed, seek medical atten-
tion immediately.
R immediately change out of clothing that has
been in contact with electrolyte.
R if an allergic reaction occurs, seek medical
attention immediately. Mir
rors
103Seats, ste ering wheel and mirrors Z
Page 119 of 345
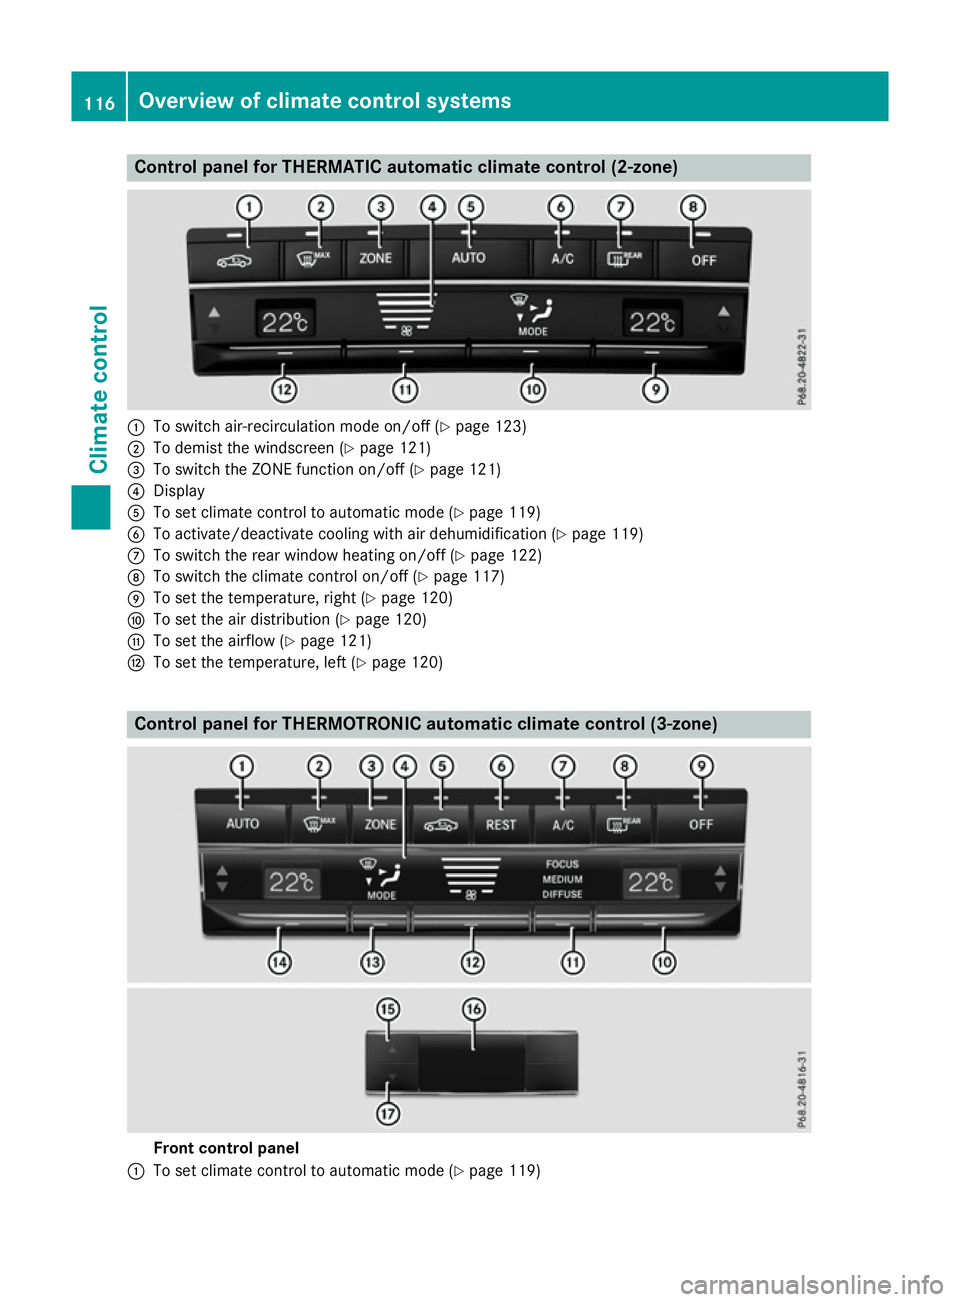
Control panel for THERMATIC automatic climate control (2-zone)
:
To switch air-recirculation mode on/off (Y page 123)
; To demist the windscreen (Y page 121)
= To switch the ZONE function on/off (Y page 121)
? Display
A To set climate control to automatic mode (Y page 119)
B To activate/deactivate cooling with air dehumidification (Y page 119)
C To switch the rear window heating on/off (Y page 122)
D To switch the climate control on/off (Y page 117)
E To set the temperature, right (Y page 120)
F To set the air distribution (Y page 120)
G To set the airflow (Y page 121)
H To set the temperature, left (Y page 120)Control panel for THERMOTRONIC automatic climate control (3-zone)
Front control panel
: To set climate control to automatic mode (Y page 119)116
Overview of climate control systemsClimate control
Page 120 of 345
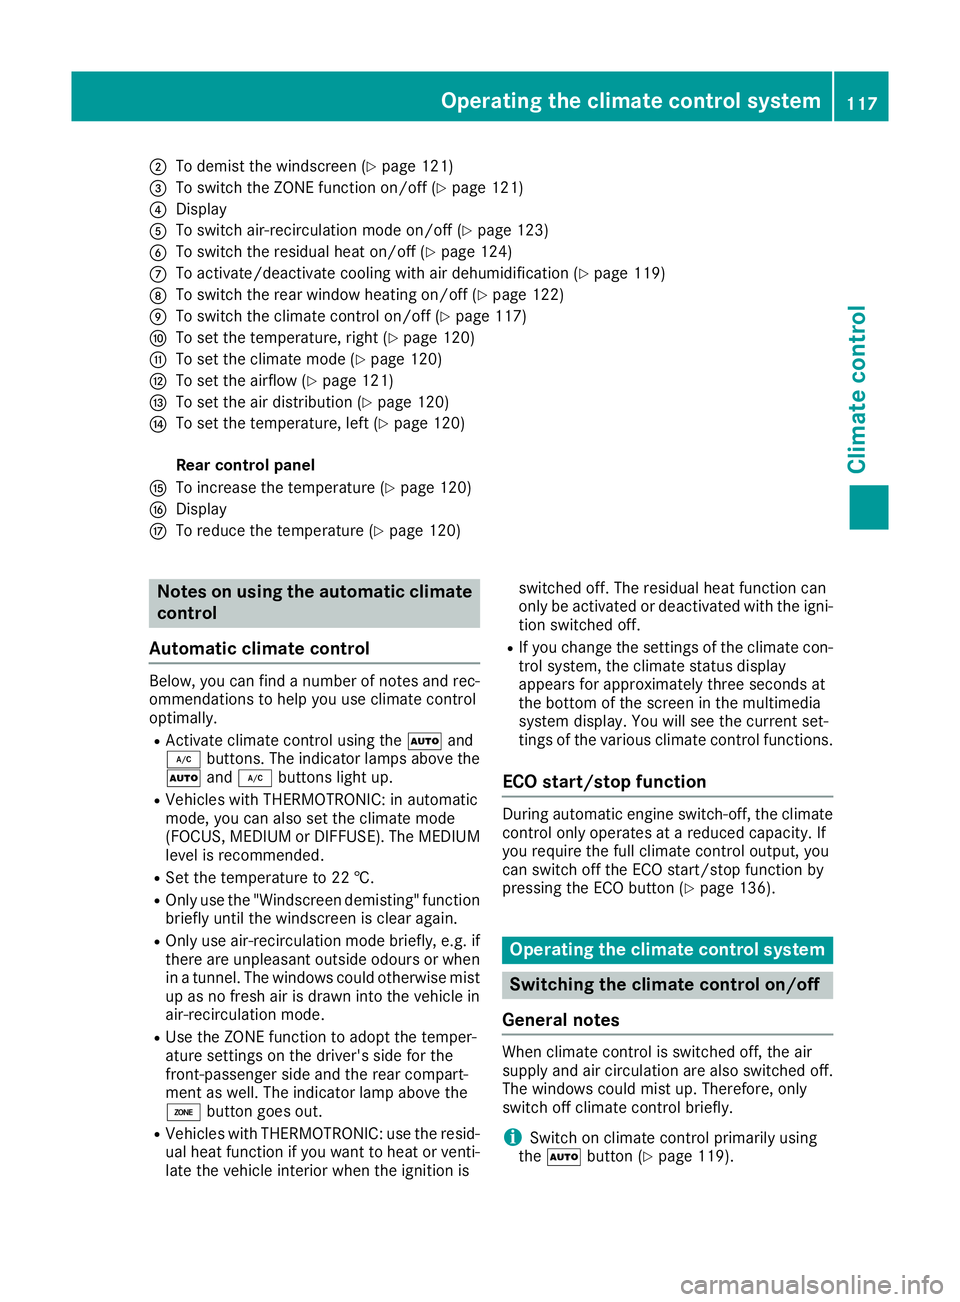
;
To demist the windscreen (Y page 121)
= To switch the ZONE function on/off (Y page 121)
? Display
A To switch air-recirculation mode on/off (Y page 123)
B To switch the residual heat on/off (Y page 124)
C To activate/deactivate cooling with air dehumidification (Y page 119)
D To switch the rear window heating on/off (Y page 122)
E To switch the climate control on/off (Y page 117)
F To set the temperature, right (Y page 120)
G To set the climate mode (Y page 120)
H To set the airflow (Y page 121)
I To set the air distribution (Y page 120)
J To set the temperature, left (Y page 120)
Rear control panel
K To increase the temperature (Y page 120)
L Display
M To reduce the temperature (Y page 120)Notes on using the automatic climate
control
Automatic climate control Below, you can find a number of notes and rec-
ommendations to help you use climate control
optimally.
R Activate climate control using the Ãand
¿ buttons. The indicator lamps above the
à and¿ buttons light up.
R Vehicles with THERMOTRONIC: in automatic
mode, you can also set the climate mode
(FOCUS, MEDIUM or DIFFUSE). The MEDIUM
level is recommended.
R Set the temperature to 22 †.
R Only use the "Windscreen demisting" function
briefly until the windscreen is clear again.
R Only use air-recirculation mode briefly, e.g. if
there are unpleasant outside odours or when
in a tunnel. The windows could otherwise mist
up as no fresh air is drawn into the vehicle in air-recirculation mode.
R Use the ZONE function to adopt the temper-
ature settings on the driver's side for the
front-passenger side and the rear compart-
ment as well. The indicator lamp above the
á button goes out.
R Vehicles with THERMOTRONIC: use the resid-
ual heat function if you want to heat or venti-
late the vehicle interior when the ignition is switched off. The residual heat function can
only be activated or deactivated with the igni-
tion switched off.
R If you change the settings of the climate con-
trol system, the climate status display
appears for approximately three seconds at
the bottom of the screen in the multimedia
system display. You will see the current set-
tings of the various climate control functions.
ECO start/stop function During automatic engine switch-off, the climate
control only operates at a reduced capacity. If
you require the full climate control output, you
can switch off the ECO start/stop function by
pressing the ECO button (Y page 136). Operating the climate control system
Switching the climate control on/off
General notes When climate control is switched off, the air
supply and air circulation are also switched off.
The windows could mist up. Therefore, only
switch off climate control briefly.
i Switch on climate control primarily using
the à button (Y page 119). Operating the climate control system
117Climate control
Page 122 of 345
Activating/deactivating cooling with air dehumidification
General notes If you deactivate the "Cooling with air dehumidification" function, the air inside the vehicle will not
be cooled. The air inside the vehicle will also not be dehumidified. The windows can mist up more
quickly. Therefore, deactivate the "Cooling with air dehumidification" function only briefly.
The "Cooling with air dehumidification" function is only available when the engine is running. The air inside the vehicle is cooled and dehumidified according to the temperature selected.
Condensation may drip from the underside of the vehicle when cooling mode is active. This is normal
and not a sign that there is a malfunction.
Activating/deactivating X
To switch on: press the¿button.
The indicator lamp above the ¿button lights up.
i In vehicles with auxiliary heating, one of the indicator lamps on the auxiliary heating button lights
up when the "Cooling with air dehumidification" function is activated.
X To switch off: press the¿button.
The indicator lamp above the ¿button goes out. The cooling with air dehumidification function
has a delayed switch-off feature.
Problems with the "Cooling with air dehumidification" function Problem
Possible causes/consequences and
M MSolutions The indicator lamp over
the
¿ button flashes
three times or remains
off. The cooling with air
dehumidification func-
tion cannot be activated. The cooling with air dehumidification function has been deactivated
due to a malfunction.
X Consult a qualified specialist workshop. Setting climate control to automatic
mode
General notes In automatic mode, the set temperature is main-
tained automatically at a constant level. The
system automatically regulates the temperature of the dispensed air, the airflow and the air dis- tribution.
The "Cooling with air dehumidification" function
is activated automatically in automatic mode. Automatic control X
Turn the key to position 2in the ignition lock
(Y page 132).
X Set the desired temperature.
X To activate: press theÃbutton.
The indicator lamp above the Ãbutton
lights up. Automatic air distribution and air-
flow are activated.
i THERMOTRONIC automatic climate control:
when automatic mode is activated, you can
set the climate mode (Y page 120).
X To switch to manual mode:
THERMATIC automatic climate control: press
air distribution adjustment switch F
(Y page 116). Operating the climate control system
119Climate control
Page 125 of 345
X
Adjust the side air vents so that the heated air
is directed towards the side windows.
X If the windows continue to mist up, activate
the "Windscreen demisting" function ¬.
i You should only select this setting until the
windscreen is clear again.
Windows misted up on the outside X
THERMATIC automatic climate control: press
air distribution adjustment switch Fup or
down (Y page 116), until the PorO
symbol appears in the display.
X THERMOTRONIC automatic climate control:
press air distribution adjustment switch Iup
or down (Y page 116), until the PorO
symbol appears in the display.
X Adjust the side air vents so that no air is
directed towards the side windows. Rear window heating
General notes The rear window heating has a high current
draw. You should therefore switch it off as soon
as the window is clear. It otherwise switches off automatically after several minutes.
If the battery voltage is too low, the rear window
heating may switch off.
Switching on/off X
Turn the key to position 2in the ignition lock
(Y page 132).
X Press the ¤button.
The indicator lamp above the ¤button
lights up or goes out. 122
Operating the climate control systemClimate control
Page 126 of 345
Problems with the rear window heating
Problem
Possible causes/consequences and
M
MSolutions The rear window heating
has switched off prema-
turely or cannot be acti-
vated. The battery has not been sufficiently charged.
X Switch off any consumers that are not required, e.g. reading lamps,
interior lighting or the seat heating.
When the battery is sufficiently charged, the rear window heating
can be activated again. Switching air-recirculation mode
on/off
General notes You can deactivate the flow of fresh air if
unpleasant odours are entering the vehicle from
outside. The air already inside the vehicle will
then be recirculated.
If you activate air-recirculation mode, the win-
dows can mist up more quickly, in particular at
low temperatures. Only use air-recirculation
mode briefly to prevent the windows misting up.
Activating/deactivating X
Turn the key to position 2in the ignition lock
(Y page 132).
X To activate: press thegbutton.
The indicator lamp above the gbutton
lights up.
X To deactivate: press thegbutton.
The indicator lamp above the gbutton
goes out.
i Air-recirculation mode is deactivated auto-
matically:
R after approximately five minutes at outside
temperatures below approximately 5 †
R after approximately five minutes if cooling
with air dehumidification is deactivated
R after approximately 30 minutes at outside
temperatures above approximately 5 † if
the "Cooling with air dehumidification"
function is activated Convenience opening or closing using
the air-recirculation button G
WARNING
When the convenience closing feature is oper- ating, parts of the body could become trapped
in the closing area of the side window and the
sliding sunroof. There is a risk of injury.
Observe the complete closing procedure
when the convenience closing feature is oper-
ating. When closing make sure that no parts of the body are in the closing area. G
WARNING
During convenience opening parts of the body could be drawn in or become trapped
between the side window and window frame.
There is a risk of injury.
When opening, make sure that nobody is
touching the side window. If someone
becomes trapped, immediately press
the W switch in the door to stop the move-
ment of the side windows. To continue closing
the side window, pull on the Wswitch.
X Convenience closing feature: press and
hold the gbutton until the side windows
and the panorama sliding sunroof are closed.
The indicator lamp above the gbutton
lights up. Air-recirculation mode is activated.
If parts of the body are in the closing area during convenience closing, proceed as follows:
X Press the Wbutton to stop the side win-
dows.
The side windows stop.
X To then open the side windows, press the
W button again. Operating the climate control system
123Climate control Z