2015 MERCEDES-BENZ E-CLASS CABRIOLET service
[x] Cancel search: servicePage 301 of 349

Cleaning vehicle parts
Cleaning the soft top !
Never use any of the following to clean the
soft top:
R petrol
R thinner
R tar or stain remover
R other organic solvents
! Remove bird droppings immediately as they
are corrosive and, therefore, can make the
soft-top fabric leak. Do not use high-pressure cleaning equipment to clean the vehicle. Do
not use sharp-edged equipment to remove ice
and snow.
X Light soiling: you can clean the soft top while
it is dry or rinse it with clear water.
X Normal to heavy soiling: clean the roof with
a brush and clear water. Clean stains and
other dirt with a brush and a Mercedes-Benz
recommended and approved cleaning agent.
Always brush from front to back in the direc-
tion of the fabric.
Frequent cleaning reduces the soft top's resist- ance to dirt.
To restore this resistance to dirt, clean the soft
top using soft-top cleaning agents that have
been recommended and approved by
Mercedes-Benz.
Incorrect cleaning and care, as well as ageing,
can cause the soft-top seams to leak. Have the
soft-top seams sealed at a qualified specialist
workshop, e.g. at a Mercedes-Benz Service
Centre.
i Cover the soft top appropriately if you plan
to leave the vehicle outside for a long period
of time.
Cleaning AIRCAP Cleaning the wind deflector
! Do not use high-pressure cleaning equip-
ment to clean the net.
Clean the wind deflector on the windscreen with
the soft top closed.
X Apply the parking brake firmly.
X Vehicles with key: turn the key to position
2 (Y page 139) in the ignition lock. X
Vehicles with KEYLESS-GO: press the
Start/Stop button twice (Y page 139).
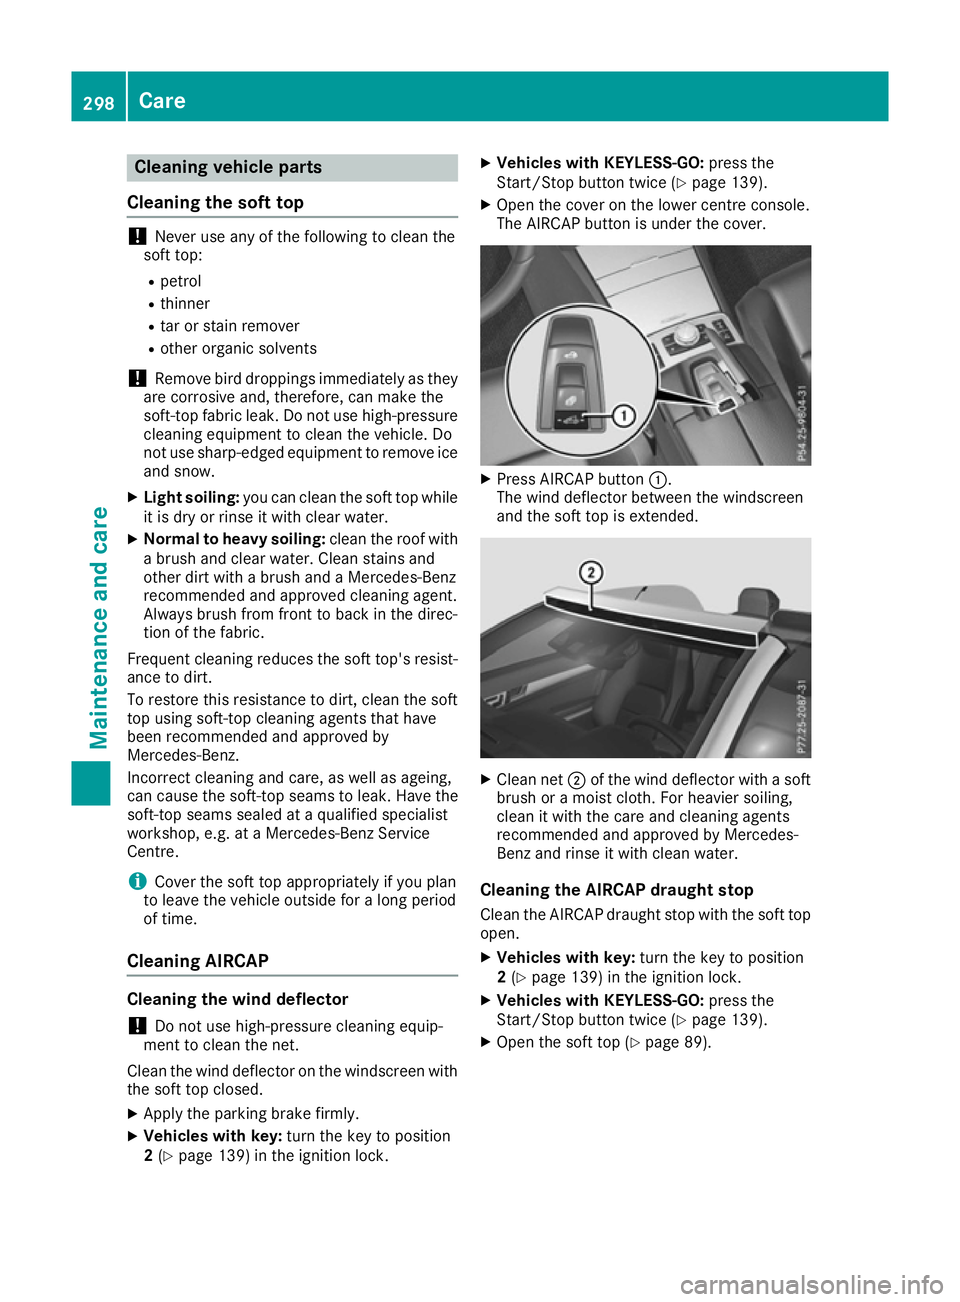
X Open the cover on the lower centre console.
The AIRCAP button is under the cover. X
Press AIRCAP button :.
The wind deflector between the windscreen
and the soft top is extended. X
Clean net ;of the wind deflector with a soft
brush or a moist cloth. For heavier soiling,
clean it with the care and cleaning agents
recommended and approved by Mercedes-
Benz and rinse it with clean water.
Cleaning the AIRCAP draught stop
Clean the AIRCAP draught stop with the soft top
open.
X Vehicles with key: turn the key to position
2 (Y page 139) in the ignition lock.
X Vehicles with KEYLESS-GO: press the
Start/Stop button twice (Y page 139).
X Open the soft top (Y page 89).298
CareMaintenance and care
Page 312 of 349

Tyre pressure not reached
If a pressure of 180 kPa (1.8 bar/26 psi) has not
been attained after five minutes:
X Switch off the tyre inflation compressor.
X Unscrew the filler hose from the valve of the
faulty tyre.
Please note that tyre sealant may leak out
when unscrewing the filler hose.
X Very slowly drive forwards or reverse approx-
imately 10 m.
X Pump up the tyre again.
After a maximum of five minutes the tyre
pressure must be at least 180 kPa (1.8 bar/
26 psi). G
WARNING
If the required tyre pressure is not reached
after the specified time, the tyre is too badly
damaged. The tyre sealant cannot repair the
tyre in this instance. Damaged tyres and a tyre pressure that is too low can significantly
impair the vehicle's braking and driving char-
acteristics. There is a risk of accident.
Do not continue driving. Contact a qualified
specialist workshop.
Tyre pressure reached G
WARNING
A tyre temporarily sealed with tyre sealant
impairs the driving characteristics and is not
suitable for higher speeds. There is a risk of
accident.
You should therefore adapt your driving style
accordingly and drive carefully. Do not exceed the specified maximum speed with a tyre that
has been repaired using tyre sealant.
The maximum speed for a tyre sealed with tyre
sealant is 80 km/h. The upper part of the
TIREFIT sticker must be affixed to the instru-
ment cluster where it will be easily seen by the
driver.
! After use, excess tyre sealant may run out of
the filler hose. This could cause stains.
Therefore, place the tyre sealant bottle with
filler hose in the plastic bag which is con-
tained the TIREFIT kit. H
Environmental note
Have the used tyre sealant bottle disposed of professionally, e.g. at a qualified specialist
workshop.
If a tyre pressure of 180 kPa (1.8 bar/26 psi) has been attained after five minutes:
X Switch off the tyre inflation compressor.
X Unscrew the filler hose from the valve of the
faulty tyre.
X Stow the tyre sealant bottle, the tyre inflation
compressor and the warning triangle.
X Pull away immediately.
X Stop after driving for approximately ten
minutes and check the tyre pressure with the
tyre inflation compressor.
The tyre pressure must now be at least
130 kPa (1.3 bar/19 psi). G
WARNING
If the required tyre pressure is not reached
after driving for a short period, the tyre is too badly damaged. The tyre sealant cannot
repair the tyre in this instance. Damaged tyres and a tyre pressure that is too low can signif-
icantly impair the vehicle's braking and driv-
ing characteristics. There is a risk of accident.
Do not continue driving. Contact a qualified
specialist workshop.
i In your vehicle, you will find a sticker with
the Mercedes-Benz Service24h telephone
number, e.g. on the B-pillar on the driver's
side.
X Correct the tyre pressure if it is still at least
130 kPa (1.3 ba r/19 psi). See the tyre pres-
sure table on the fuel filler flap for values.
X To increase the tyre pressure: switch on
the tyre inflation compressor. Flat tyre
309Breakdown assistance Z
Page 314 of 349

R
It is important that you observe the descri-
bed order of the battery terminals when
connecting and disconnecting a battery.
R When jump-starting, make sure that the
battery poles with identical polarity are
connected.
R It is particularly important to observe the
described order when connecting and dis-
connecting the jump leads.
R Never connect or disconnect the battery
terminals while the engine is running. G
WARNING
Battery acid is caustic. There is a risk of injury. Avoid contact with the skin, eyes or clothing.
Do not breathe in any battery gases. Do not
lean over the battery. Keep the batteries out
of the reach of children. Immediately rinse off
battery acid thoroughly with plenty of clean
water and seek medical attention at once. H
Environmental note Batteries contain pollutants.
It is illegal to dispose of them with the household rubbish.
They must be collected sep-
arately and disposed of in anenvironmentally responsible
recycling system. Dispose of batteries in an
environmentally responsible
manner. Take discharged
batteries to a qualified spe-
cialist workshop or to a col-
lection point for used batter-
ies.
! Have the battery checked regularly at a
qualified specialist workshop.
Observe the service intervals in the Service
Booklet or contact a qualified specialist work- shop for more information. !
Always have work on the batteries carried
out at a qualified specialist workshop. Should
it, in exceptional circumstances, be abso-
lutely necessary to disconnect the 12-volt
battery yourself, please observe the follow-
ing:
R secure the vehicle to prevent it from rolling
away.
R switch the ignition off.
R first, disconnect the negative terminal, fol-
lowed by the positive terminal.
Vehicles with automatic transmission: the
transmission is locked in position Pafter dis-
connecting the battery.
After the work has been completed, firmly
reinstall the battery and the cover of the pos- itive terminal.
Comply with safety precautions and take pro-
tective measures when handling batteries. Risk of explosion
Fire, naked flames and smoking are
prohibited when handling the bat-
tery. Avoid creating sparks.
Battery acid is caustic. Avoid contact
with the skin, eyes or clothing.
Wear suitable protective clothing, in
particular gloves, an apron and a
face mask.
Immediately rinse acid splashes off
with clean water. Consult a doctor if necessary. Wear eye protection.
Keep children away.
Observe this Owner's Manual.
For safety reasons, Mercedes-Benz recom-
mends that you only use batteries which have
been tested and approved for your vehicle by
Mercedes-Benz. These batteries provide
increased impact protection to prevent vehicle Battery (vehicle)
311Breakdown assistance Z
Page 315 of 349

occupants from suffering acid burns should the
battery be damaged in the event of an accident.
In order for the battery to achieve the maximum possible service life, it must always be suffi-
ciently charged.
Like other batteries, the vehicle battery may
discharge over time if you do not use the vehicle. In such cases, have the battery disconnected ata qualified specialist workshop. You can also
charge the battery with a charger recommended
by Mercedes-Benz. For more information,
please contact a qualified specialist workshop.
Have the battery charge checked more fre-
quently if you use the vehicle mainly for short
trips or if you leave it standing idle for a lengthy period. Consult a qualified specialist workshop
if you wish to leave your vehicle parked up for a
long period of time.
When you park the vehicle, remove the key if you do not require any electrical consumers. The
vehicle will then use very little energy, thus con- serving battery power.
If the power supply has been interrupted, e.g. if the battery was discharged, you will have to:
R set the clock. Information on setting the clock
can be found in the Digital Owner's Manual.
On vehicles with a multimedia system, the
time is set automatically.
R reset the function for folding the exterior mir-
rors in/out automatically, by folding the mir-
rors out once (Y page 111). Charging the battery
G
WARNING
During charging and jump-starting, explosive
gases can escape from the battery. There is a risk of an explosion.
Particularly avoid fire, naked flames, creating
sparks and smoking. Ensure there is sufficient
ventilation while charging and jump-starting.
Do not lean over a battery. G
WARNING
Battery acid is caustic. There is a risk of injury. Avoid contact with the skin, eyes or clothing.
Do not breathe in any battery gases. Do not
lean over the battery. Keep the batteries out
of the reach of children. Immediately rinse off battery acid thoroughly with plenty of clean
water and seek medical attention at once. G
WARNING
A discharged battery can freeze at tempera-
tures below freezing point. When jump-start-
ing the vehicle or charging the battery, gases can escape from the battery. There is a risk of
an explosion.
Allow the frozen battery to thaw out before
charging it or jump-starting.
! Only use battery chargers with a maximum
charging voltage of 14.8 V.
! Only charge the battery using the jump-start
connection point.
The jump-starting connection point is in the
engine compartment (Y page 313).
X Open the bonnet.
X Connect the battery charger to the positive
terminal and earth point in the same order as
when connecting the donor battery in the
jump-starting procedure (Y page 313).
If the indicator/warning lamps do not light up at
low temperatures, it is very likely that the dis-
charged battery has frozen. In this case, you
may neither charge the battery nor jump-start
the vehicle. The service life of a battery that has been thawed may be reduced. The starting char-
acteristics may be impaired, especially at low
temperatures. Have the thawed battery
checked at a qualified specialist workshop.
Never charge a battery still installed in the vehi-
cle unless a battery charger unit approved by
Mercedes-Benz is being used. A battery charger unit specially adapted for Mercedes-Benz vehi-
cles and tested and approved by Mercedes-
Benz is available as an accessory. This device
permits charging of the battery in position. Con-
tact a Mercedes-Benz Service Centre for infor-
mation and availability. Read the battery charg- er's operating instructions before charging the
battery. 312
Battery (vehicle)Breakdown assistance
Page 316 of 349

Jump-starting
For the jump-starting procedure, use only the jump-starting connection point, consisting of a pos- itive terminal and an earth point, in the engine compartment. G
WARNING
Battery acid is caustic. There is a risk of injury.
Avoid contact with the skin, eyes or clothing. Do not breathe in any battery gases. Do not lean over the battery. Keep the batteries out of the reach of children. Immediately rinse off battery acid
thoroughly with plenty of clean water and seek medical attention at once. G
WARNING
During charging and jump-starting, explosive gases can escape from the battery. There is a risk of an explosion.
Particularly avoid fire, naked flames, creating sparks and smoking. Ensure there is sufficient
ventilation while charging and jump-starting. Do not lean over a battery. G
WARNING
During the charging process, a battery produces hydrogen gas. If a short circuit occurs or sparks
are created, the hydrogen gas can ignite. There is a risk of an explosion.
R Make sure that the positive terminal of a connected battery does not come into contact with
vehicle parts.
R Never place metal objects or tools on a battery.
R It is important that you observe the described order of the battery terminals when connecting
and disconnecting a battery.
R When jump-starting, make sure that the battery poles with identical polarity are connected.
R It is particularly important to observe the described order when connecting and disconnecting
the jump leads.
R Never connect or disconnect the battery terminals while the engine is running. G
WARNING
A discharged battery can freeze at temperatures below freezing point. When jump-starting the
vehicle or charging the battery, gases can escape from the battery. There is a risk of an explosion.
Allow the frozen battery to thaw out before charging it or jump-starting.
! Vehicles with a petrol engine:
avoid repeated and lengthy starting attempts. Otherwise, the
non-combusted fuel may damage the catalytic converter.
If the indicator/warning lamps do not light up at low temperatures, it is very likely that the dis-
charged battery has frozen. In this case you may neither jump-start the vehicle nor charge the
battery. The service life of a battery that has been thawed may be reduced. The starting charac-
teristics may be impaired, especially at low temperatures. Have the thawed battery checked at a
qualified specialist workshop. Jump-starting
313Breakdown assistance Z
Page 321 of 349

X
Vehicles with manual transmission:
depress the clutch pedal fully and engage
neutral.
X Vehicles with automatic transmission:
turn the key to position
2in the ignition lock.
X Shift the automatic transmission to position
N.
As soon as the vehicle is loaded: X Prevent the vehicle from rolling away by
applying the parking brake.
X Vehicles with manual transmission:
depress the clutch pedal fully and engage first
or reverse gear.
X Vehicles with automatic transmission:
shift the automatic transmission to position
P.
X Turn the key to position 0in the ignition lock
and remove it.
X Secure the vehicle. Tow-starting (emergency engine
starting)
! Vehicles with automatic transmission must
not be tow-started. The transmission may
otherwise be damaged.
i You can find information on "Jump-starting"
under (Y page 313).
Before tow-starting, the following conditions
must be fulfilled:
R the battery is connected
R the engine has cooled down
R the exhaust system has cooled down
When tow-starting, it is important that you
observe the safety notes (Y page 315) and the
legal requirements in each respective country.
X Switch on the hazard warning lamps
(Y page 116).
X Fit the towing eye (Y page 316).
X Secure the rigid towing bar or the towing
rope.
X Depress the brake pedal and keep it
depressed.
X Turn the key to position 2in the ignition lock.
X Depress the clutch pedal fully, engage second
gear and continue to keep the clutch pedal
fully depressed.
X Release the brake pedal. X
Tow-start the vehicle.
X Release the clutch pedal slowly, do not
depress the accelerator pedal while doing so.
X When the engine has been started, immedi-
ately depress the clutch pedal fully and shift
to neutral.
X Pull over at a suitable place and stop the vehi-
cle safely, paying attention to road and traffic
conditions.
X Depress the parking brake.
X Remove the rigid towing bar or towing rope.
X Remove the towing eye (Y page 317).
X Switch off the hazard warning lamps. Electrical fuses
Important safety notes
G
WARNING
If you manipulate, bridge or replace a faulty
fuse with a fuse of a higher amperage, the
electric cables could be overloaded. This may result in a fire. There is a risk of an accident
and injury.
Always replace faulty fuses with specified new fuses of the correct amperage.
Blown fuses must be replaced with fuses of the same rating, which you can recognise by the
colour and fuse rating. The fuse ratings are listed
in the fuse allocation chart.
The fuse allocation chart is located in the vehicle tool kit in the stowage compartment under the
boot floor (Y page 305).
If the newly inserted fuse also blows, have the
cause traced and rectified at a qualified special- ist workshop, e.g. a Mercedes-Benz Service
Centre.
! Only use fuses that have been approved for
Mercedes-Benz vehicles and which have the
correct fuse rating for the system concerned.
Otherwise, components or systems could be
damaged.
! Make sure that no moisture can enter the
fuse box when the cover is open.
! When closing the cover, make sure that it is
lying correctly on the fuse box. Moisture seep-
ing in or dirt could otherwise impair the oper- ation of the fuses. 318
Electrical fusesBreakdown assistance
Page 324 of 349

Important safety notes
G
WARNING
If wheels and tyres of the wrong size are used, the wheel brakes or suspension components
may be damaged. There is a risk of an acci-
dent.
Always replace wheels and tyres with those
that fulfil the specifications of the original
part.
When replacing wheels, make sure to fit the
correct:
R designation
R type
When replacing tyres, make sure to fit the
correct:
R designation
R manufacturer
R type G
WARNING
A flat tyre severely impairs the driving, steer-
ing and braking characteristics of the vehicle.
There is a risk of accident.
Tyres without run-flat characteristics:
R do not drive with a flat tyre.
R immediately replace the flat tyre with your
emergency spare wheel or spare wheel, or
consult a qualified specialist workshop.
Tyres with run-flat characteristics:
R pay attention to the information and warn-
ing notices on MOExtended tyres (tyres
with run-flat characteristics).
Accessories that are not approved for your vehi-
cle by Mercedes-Benz or are not being used cor- rectly can impair the operating safety.
Before purchasing and using non-approved
accessories, visit a qualified specialist work-
shop and enquire about:
R suitability
R legal stipulations
R factory recommendations Further information regarding wheels and tyres
can be found under "Wheel/tyre combinations"
(Y page 333).
You can ask for information regarding permitted
wheel-tyre combinations at a Mercedes-Benz
Service Centre.
Information on tyre pressures can be found:
R in the tyre pressure table in the fuel filler flap
(Y page 155)
R under "Tyre pressure" (Y page 324)
Modification work on the brake system and
wheels is not permitted. The use of spacers or
brake dust shields is not permitted. This inva-
lidates the general operating permit for the vehi- cle.
i Further information on wheels and tyres can
be obtained at any qualified specialist work-
shop. Operation
Information on driving
Check the tyre pressures when the vehicle is
heavily laden and adjust prior to a trip.
While driving, pay attention to vibrations, noises
and unusual handling characteristics, e.g. pull-
ing to one side. This may indicate that the
wheels or tyres are damaged. If you suspect that a tyre is defective, reduce your speed immedi-
ately. Stop the vehicle as soon as possible to
check the wheels and tyres for damage. Hidden
tyre damage could also be causing the unusual
handling characteristics. If you find no signs of
damage, have the tyres and wheels checked at a qualified specialist workshop.
When parking your vehicle, make sure not to
squash the tyre sidewalls. If this cannot be avoi-ded, drive slowly over obstacles, e.g. kerbs, and
only at an obtuse angle. You could otherwise
damage the wheel rims and tyres. Regular checking of wheels and tyres
G
WARNING
Damaged tyres can cause tyre inflation pres-
sure loss. As a result, you could lose control of your vehicle. There is a risk of accident. Operation
321Wheels and ty res
Z
Page 325 of 349

Check the tyres regularly for signs of damage
and replace any damaged tyres immediately.
Check wheels and tyres for damage at least
once a month. Check wheels and tyres after
driving off-road or on rough roads. Damaged
wheels can cause a loss of tyre pressure. Pay
particular attention to damage such as:
R cuts in the tyres
R punctures
R tears in the tyres
R bulges on the tyres
R deformation or severe corrosion on wheels
Regularly check the tyre tread depth and the
condition of the tread across the whole width of
the tyre (Y page 322). If necessary, turn the
front wheels to full lock in order to inspect the
inner side of the tyre surface.
All wheels must have a valve cap to protect the valve against dirt and moisture. Do not fit any-
thing onto the valve other than the standard
valve cap or other valve caps approved for your
vehicle by Mercedes-Benz. Do not fit any other
valve caps or systems, e.g. tyre pressure moni-
toring systems.
Regularly check the pressure of all the tyres,
particularly prior to long trips. Adjust the tyre
pressure as necessary (Y page 324).
Observe the notes on the emergency spare
wheel (Y page 333).
The service life of tyres depends on various fac- tors, including the following:
R driving style
R tyre pressure
R mileage Notes on the tyre tread
G
WARNING
Insufficient tyre tread will reduce tyre trac-
tion. The tyre is no longer able to dissipate
water. This means that on wet road surfaces, the risk of aquaplaning increases, in particularwhere speed is not adapted to suit the driving
conditions. There is a risk of accident.
If the tyre pressure is too high or too low, tyres may exhibit different levels of wear at differ-
ent locations on the tyre tread. Thus, you should regularly check the tread depth and
the condition of the tread across the entire
width of all tyres.
Minimum tyre tread depth for:
R summer tyres: 3 mm
R M+S tyres: 4 mm
For safety reasons, replace the tyres before
the legally prescribed limit for the minimum
tyre tread depth is reached. Selecting, fitting and replacing tyres
G
WARNING
Exceeding the stated tyre load-bearing capa-
city and the approved maximum speed could
lead to tyre damage or the tyre bursting. There is a risk of accident.
Therefore, only use tyre types and sizes
approved for your vehicle model. Observe the
tyre load rating and speed rating required for your vehicle.
Pay special attention to country-specific
requirements for tyre approval. These require-
ments can stipulate a specific tyre type for your
vehicle. Furthermore, the use of certain tyre
types in certain regions and areas of operation
can be highly beneficial. You can find further
information regarding tyres at specialist tyre
retailers, at qualified specialist workshops or at
any Mercedes-Benz Service Centre.
R Only fit tyres and wheels of the same type and
make.
Exception: it is permissible to fit a different
type or make in the event of a flat tyre.
Observe the "MOExtended tyres (tyres with
run-flat characteristics)" section
(Y page 306).
R Only fit tyres of the correct size onto the
wheels.
R Run in new tyres at moderate speeds for the
first 100 km. They only reach their full per-
formance after this distance.
R Do not drive with tyres which have too little
tread depth. This otherwise significantly 322
OperationWheels and tyres