2015 MERCEDES-BENZ E-CLASS CABRIOLET service
[x] Cancel search: servicePage 61 of 349

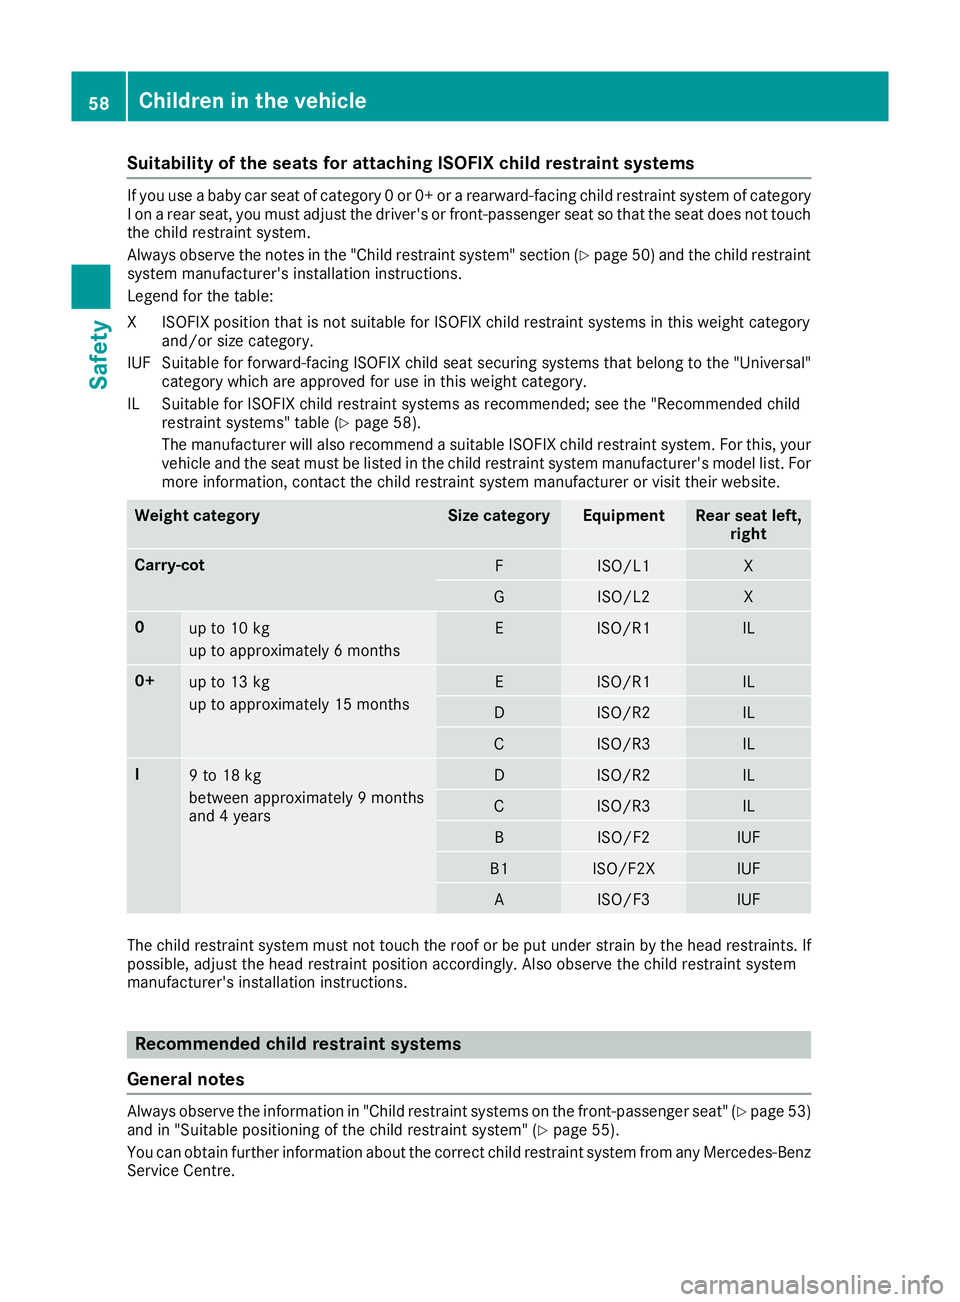
Suitability of the seats for attaching ISOFIX child restraint systems
If you use a baby car seat of category 0 or 0+ or a rearward-facing child restraint system of category
I on a rear seat, you must adjust the driver's or front-passenger seat so that the seat does not touch the child restraint system.
Always observe the notes in the "Child restraint system" section (Y page 50) and the child restraint
system manufacturer's installation instructions.
Legend for the table:
XI SOFIX position that is not suitable for ISOFIX child restraint systems in this weight category
and/or size category.
IUF Suitable for forward-facing ISOFIX child seat securing systems that belong to the "Universal" category which are approved for use in this weight category.
IL Suitable for ISOFIX child restraint systems as recommended; see the "Recommended child restraint systems" table (Y page 58).
The manufacturer will also recommend a suitable ISOFIX child restraint system. For this, your
vehicle and the seat must be listed in the child restraint system manufacturer's model list. For more information, contact the child restraint system manufacturer or visit their website. Weight category Size category Equipment Rear seat left,
right Carry-cot
F ISO/L1 X
G ISO/L2 X
0
up to 10 kg
up to approximately 6 months E ISO/R1 IL
0+
up to 13 kg
up to approximately 15 months E ISO/R1 IL
D ISO/R2 IL
C ISO/R3 IL
I
9 to 18 kg
between approximately 9 months
and 4 years D ISO/R2 IL
C ISO/R3 IL
B ISO/F2 IUF
B1 ISO/F2X IUF
A ISO/F3 IUF
The child restraint system must not touch the roof or be put under strain by the head restraints. If
possible, adjust the head restraint position accordingly. Also observe the child restraint system
manufacturer's installation instructions. Recommended child restraint systems
General notes Always observe the information in "Child restraint systems on the front-passenger seat" (Y
page 53)
and in "Suitable positioning of the child restraint system" (Y page 55).
You can obtain further information about the correct child restraint system from any Mercedes-Benz
Service Centre. 58
Children in the vehicleSafety
Page 67 of 349

Function
To avoid a collision, BAS PLUS calculates the
brake force necessary if:
R you approach an obstacle and
R BAS PLUS has detected a risk of a collision
When driving at a speed under 30 km/h: if
you depress the brake pedal, BAS PLUS is acti-
vated. Braking assistance from BAS PLUS is car-
ried out at the last possible moment.
When driving at a speed above 30 km/h: if
you depress the brake pedal sharply, BAS PLUS automatically increases the brake pressure to adegree suited to the traffic situation.
BAS PLUS provides braking assistance in haz-
ardous situations with vehicles in front within a
speed range between 7 km/h and 250 km/h.
Up to a speed of approximately 70 km/h, BAS
PLUS may react to:
R stationary objects in the path of your vehicle,
e.g. stopped or parked vehicles
R pedestrians in the path of your vehicle
R obstacles crossing your path, which move in
the detection range of the sensors and are
detected
i If BAS PLUS demands particularly high brak-
ing force, preventative passenger protection
measures (PRE-SAFE ®
) are activated simulta-
neously.
X Keep the brake pedal depressed until the
emergency braking situation is over.
ABS prevents the wheels from locking.
BAS PLUS is deactivated and the brakes func-
tion as usual, if:
R you release the brake pedal
R there is no longer a risk of collision
R no obstacle is detected in front of your vehicle
R you depress the accelerator pedal
R you activate kickdown COLLISION PREVENTION ASSIST
PLUS
General notes i
Observe the "Important safety notes" sec-
tion (Y page 61).
COLLISION PREVENTION ASSIST PLUS consists of a distance warning function with an autono- mous braking function and Adaptive Brake
Assist.
COLLISION PREVENTION ASSIST PLUS can help
you to minimise the risk of a collision with the
vehicle in front or reduce the effects of such a
collision.
If COLLISION PREVENTION ASSIST PLUS
detects that there is a risk of a collision, you will
be warned visually and acoustically. If you do not react to the visual and audible collision warning,
autonomous braking can be initiated in critical
situations. If you apply the brake yourself in a
critical situation, the COLLISION PREVENTION
ASSIST PLUS Adaptive Brake Assist assists you.
Important safety notes In particular, the detection of obstacles can be
impaired in the case of:
R dirt on the sensors or obscured sensors
R snow or heavy rain
R interference by other radar sources
R strong radar reflections, for example, in multi-
storey car parks
R a narrow vehicle travelling in front, e.g. a
motorcycle
R a vehicle travelling in front on a different line
R new vehicles or after a service on the COLLI-
SION PREVENTION ASSIST PLUS system
Please observe the information in the section on running-in the vehicle (Y page 138).
Following damage to the front end of the vehicle, have the configuration and operation of the
radar sensor checked at a qualified specialist
workshop. This also applies to collisions at slow speeds where there is no visible damage to thefront of the vehicle.
Activating/deactivating The COLLISION PREVENTION ASSIST PLUS is
automatically active after switching on the igni-
tion.
You can activate or deactivate COLLISION PRE-
VENTION ASSIST PLUS in the on-board com-
puter (Y page 221). When deactivated, the dis-
tance warning function and the autonomous
braking function are also deactivated.
If COLLISION PREVENTION ASSIST PLUS is
deactivated, the æsymbol appears in the
assistance graphics display. 64
Driving safety systemsSafety
Page 122 of 349

The interior lighting automatically switches on if
you:
R unlock the vehicle
R open a door
R remove the key from the ignition lock
The interior lighting is activated for a short time
when the key is removed from the ignition lock.
You can activate this delayed switch-off using
the on-board computer (Y page 225).Replacing bulbs
Important safety notes
G
WARNING
Bulbs, lamps and plug connectors can
become very hot during use. When replacing a bulb, you could burn yourself on these com-
ponents. There is a risk of injury.
Allow these components to cool down before replacing the bulb.
Vehicles with static LED headlamps:
Do not use a bulb that has been dropped or if its glass tube has been scratched.
The bulb may explode if:
R you touch it
R it is hot
R you drop it
R you scratch it
Only operate bulbs in enclosed lamps designed
for that purpose. Only fit spare bulbs of the same
type and the specified voltage.
Marks on the glass tube reduce the service life
of the bulbs. Do not touch the glass tube with
your bare hands. If necessary, clean the glass
tube when cold with alcohol or spirit and rub it
off with a lint-free cloth.
Protect bulbs from moisture during operation.
Do not allow bulbs to come into contact with
liquids.
Only replace the bulbs listed (Y page 119).
Have the bulbs that you cannot replace yourself
replaced at a qualified specialist workshop.
If you require assistance replacing bulbs, con-
sult a qualified specialist workshop.
If the new bulb still does not light up, consult a
qualified specialist workshop. Headlamps and lights are an important aspect of
vehicle safety. You must therefore make sure
that these function correctly at all times. Have
the headlamp setting checked regularly.
Vehicles with Intelligent Light System
The front and rear light clusters of your vehicle
are equipped with LED light bulbs. Do not
replace the bulbs yourself. Contact a qualified
specialist workshop, which has the necessary
specialist knowledge and tools to carry out the
work required.
Lamps are an important aspect of vehicle safety. You must therefore make sure that these func-
tion correctly at all times. Have the headlamp
setting checked regularly. Overview of bulb replacement – bulbs
You can replace the following bulbs. The details
for the bulb type can be found in the legend. Static LED headlamps
:
Main-beam headlamp: H7 55 W Replacing bulbs
119Lights and windscreen wipers Z
Page 126 of 349

Overview of climate control systems
General notes
Observe the settings recommended on the fol-
lowing pages. The windows could otherwise
mist up.
To prevent the windows from misting up:
R switch off climate control only briefly
R activate air-recirculation mode only briefly
R switch on "Cooling with air dehumidification"
R activate the windscreen demisting function
briefly, if required
Climate control regulates the temperature and
the humidity in the vehicle interior and filters
undesirable substances out of the air.
Climate control is only operational when the
engine is running. Optimum operation is only
achieved when the side windows and the roof
are closed.
The "Residual heat" function can only be activa- ted or deactivated with the ignition switched off
(Y page 132).
i Ventilate the vehicle for a brief period during
warm weather. This will speed up the cooling process and the desired interior temperaturewill be reached more quickly.
i The integrated filter filters out most parti-
cles of dust and soot and completely filters
out pollen. It also reduces gaseous pollutants
and odours. A clogged filter reduces the
amount of air supplied to the vehicle interior.
For this reason, you should always observe
the interval for replacing the filter, which is
specified in the Service Booklet. As this
depends on environmental conditions, e.g.
heavy air pollution, the interval may be
shorter than stated in the Service Booklet.
i It is possible that the residual heat function
may be activated automatically an hour after
the key has been removed. The vehicle is then ventilated for 30 minutes to dry the automaticclimate control. Overview of climate control systems
123Climate control
Page 162 of 349

Parking brake
G
WARNING
If you must brake the vehicle with the parking brake, the braking distance is considerably
longer and the wheels could lock. This increa-
ses the risk of skidding and an accident.
Only use the parking brake to brake the vehi- cle when the service brake is faulty. Do not
apply the parking brake too firmly. If the
wheels lock, release the parking brake until
the wheels begin turning again. G
WARNING
If you leave children unattended in the vehi-
cle, they may be able to set the vehicle in
motion if, for example, they:
R release the parking brake
R shift the automatic transmission out of park
position Por shift manual transmission into
neutral
R start the engine
In addition, they may operate vehicle equip-
ment and become trapped. There is a risk of
an accident and injury.
When leaving the vehicle, always take the key with you and lock the vehicle. Never leave
children unattended in the vehicle. The brake lights do not light up when you brake
the vehicle with the parking brake. X
To apply: depress parking brake ;firmly.
The J indicator lamp in the instrument
cluster lights up if the engine is running.
X To release: depress the brake pedal and keep
it depressed.
X Pull release handle :.
The J indicator lamp in the instrument
cluster goes out. Parking up the vehicle
If you leave the vehicle parked up for longer than
four weeks, the battery may be damaged by
exhaustive discharging.
If you leave the vehicle parked up for longer than six weeks, it may suffer from lack of use.
X Contact a qualified specialist workshop and
seek advice.
i You can obtain information about trickle
chargers from a qualified specialist work-
shop. Driving tips
General notes
G
WARNING
If you switch off the ignition while driving,
safety-relevant functions are only available
with limitations, or not at all. This could affect, for example, the power steering and the brake
boosting effect. You will require considerably
more effort to steer and brake. There is a risk of an accident.
Do not switch off the ignition while driving. ECO display
The ECO display provides feedback on how eco-
nomical your driving characteristics are. The Driving tips
159Driving and parking Z
Page 200 of 349

The evaluation of your attention level is deleted
and restarted when continuing the journey, if:
R you switch off the engine
R you take off your seat belt and open the driv-
er's door, e.g. for a change of drivers or to
take a break
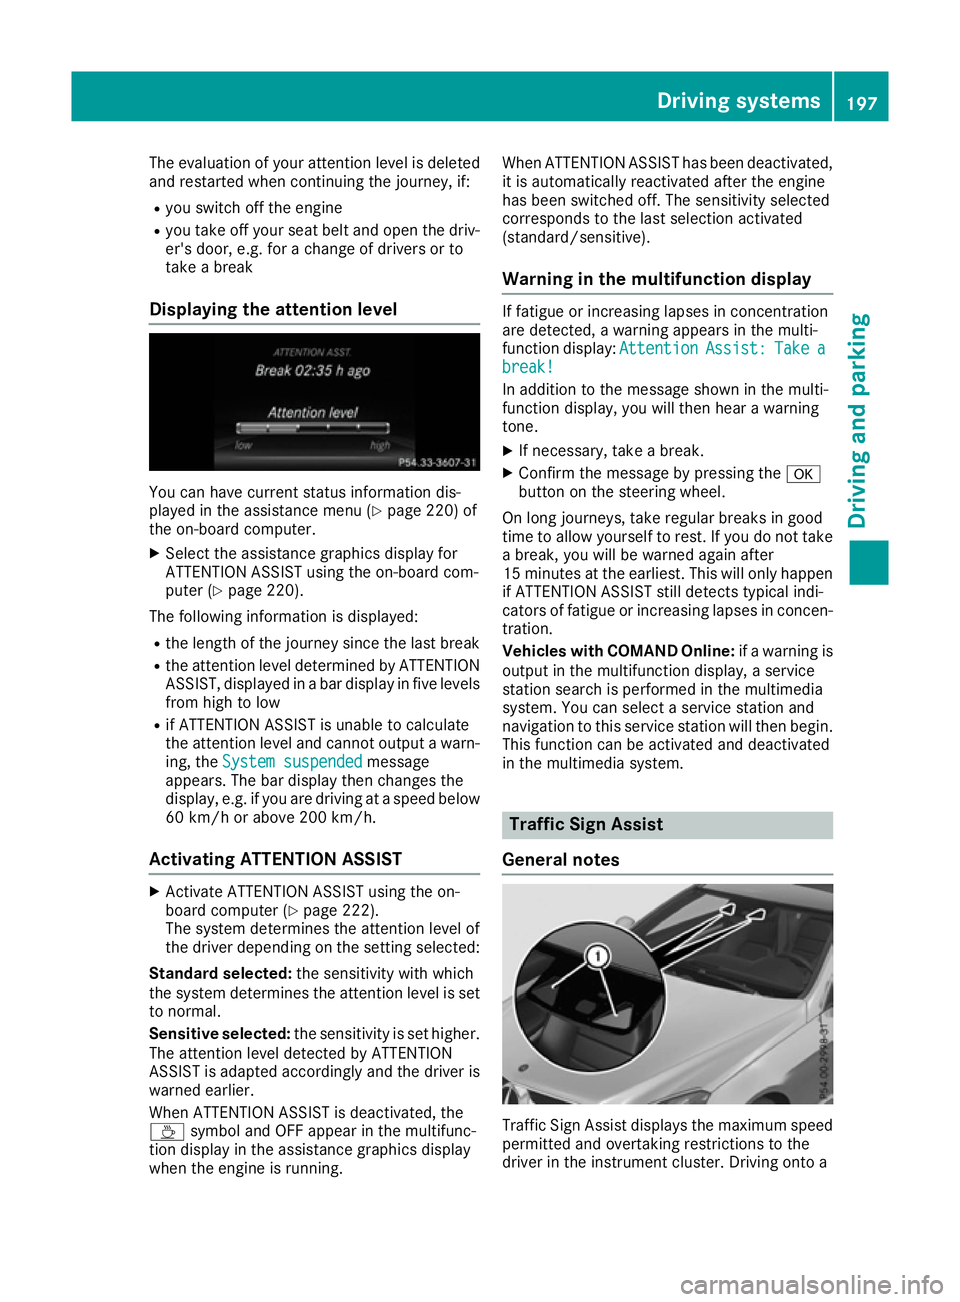
Displaying the attention level You can have current status information dis-
played in the assistance menu (Y page 220) of
the on-board computer.
X Select the assistance graphics display for
ATTENTION ASSIST using the on-board com-
puter (Y page 220).
The following information is displayed:
R the length of the journey since the last break
R the attention level determined by ATTENTION
ASSIST, displayed in a bar display in five levels from high to low
R if ATTENTION ASSIST is unable to calculate
the attention level and cannot output a warn-
ing, the System suspended
System suspended message
appears. The bar display then changes the
display, e.g. if you are driving at a speed below
60 km/h or above 200 km/h.
Activating ATTENTION ASSIST X
Activate ATTENTION ASSIST using the on-
board computer (Y page 222).
The system determines the attention level of
the driver depending on the setting selected:
Standard selected: the sensitivity with which
the system determines the attention level is set
to normal.
Sensitive selected: the sensitivity is set higher.
The attention level detected by ATTENTION
ASSIST is adapted accordingly and the driver is
warned earlier.
When ATTENTION ASSIST is deactivated, the
À symbol and OFF appear in the multifunc-
tion display in the assistance graphics display
when the engine is running. When ATTENTION ASSIST has been deactivated,
it is automatically reactivated after the engine
has been switched off. The sensitivity selected
corresponds to the last selection activated
(standard/sensitive).
Warning in the multifunction display If fatigue or increasing lapses in concentration
are detected, a warning appears in the multi-
function display:
Attention AttentionAssist:
Assist:Take
Take a
a
break!
break!
In addition to the message shown in the multi-
function display, you will then hear a warning
tone.
X If necessary, take a break.
X Confirm the message by pressing the a
button on the steering wheel.
On long journeys, take regular breaks in good
time to allow yourself to rest. If you do not take a break, you will be warned again after
15 minutes at the earliest. This will only happen
if ATTENTION ASSIST still detects typical indi-
cators of fatigue or increasing lapses in concen- tration.
Vehicles with COMAND Online: if a warning is
output in the multifunction display, a service
station search is performed in the multimedia
system. You can select a service station and
navigation to this service station will then begin. This function can be activated and deactivated
in the multimedia system. Traffic Sign Assist
General notes Traffic Sign Assist displays the maximum speed
permitted and overtaking restrictions to the
driver in the instrument cluster. Driving onto a Driving systems
197Driving and parking Z
Page 222 of 349

X
Switch on the multimedia system and select
video DVD (see the separate operating
instructions).
X Press the =or; button on the steering
wheel to select the Audio Audiomenu.
X To select the next or previous scene:
briefly press the
9or: button.
X To select a scene from the scene list
(rapid scrolling): press and hold the 9
or : button until desired scene :
appears.
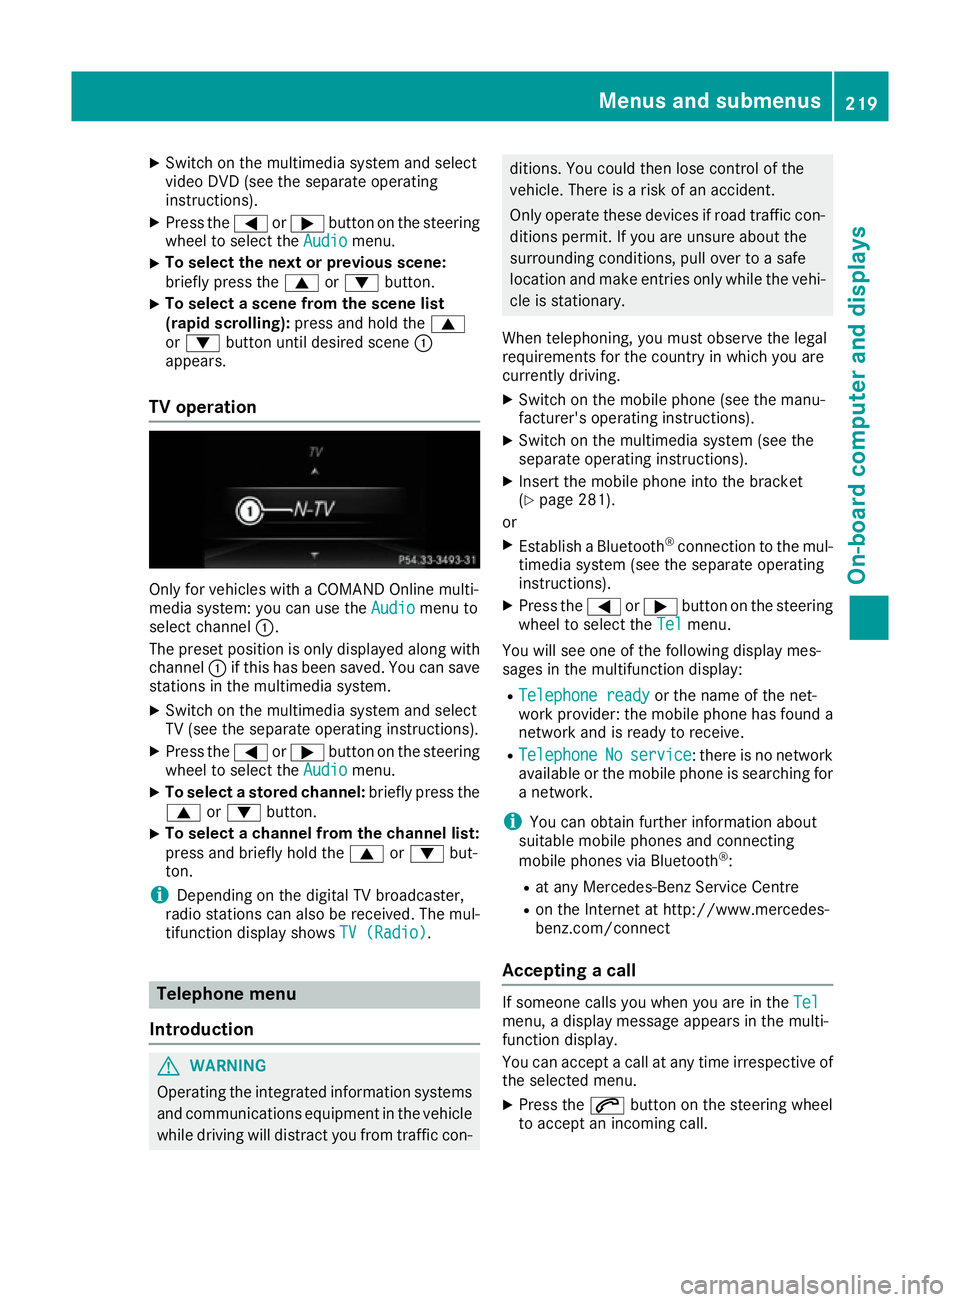
TV operation Only for vehicles with a COMAND Online multi-
media system: you can use the Audio Audiomenu to
select channel :.
The preset position is only displayed along with
channel :if this has been saved. You can save
stations in the multimedia system.
X Switch on the multimedia system and select
TV (see the separate operating instructions).
X Press the =or; button on the steering
wheel to select the Audio
Audio menu.
X To select a stored channel: briefly press the
9 or: button.
X To select a channel from the channel list:
press and briefly hold the
9or: but-
ton.
i Depending on the digital TV broadcaster,
radio stations can also be received. The mul-
tifunction display shows TV (Radio) TV (Radio).Telephone menu
Introduction G
WARNING
Operating the integrated information systems and communications equipment in the vehicle
while driving will distract you from traffic con- ditions. You could then lose control of the
vehicle. There is a risk of an accident.
Only operate these devices if road traffic con-
ditions permit. If you are unsure about the
surrounding conditions, pull over to a safe
location and make entries only while the vehi-
cle is stationary.
When telephoning, you must observe the legal
requirements for the country in which you are
currently driving. X Switch on the mobile phone (see the manu-
facturer's operating instructions).
X Switch on the multimedia system (see the
separate operating instructions).
X Insert the mobile phone into the bracket
(Y page 281).
or
X Establish a Bluetooth ®
connection to the mul-
timedia system (see the separate operating
instructions).
X Press the =or; button on the steering
wheel to select the Tel Telmenu.
You will see one of the following display mes-
sages in the multifunction display:
R Telephone ready
Telephone ready or the name of the net-
work provider: the mobile phone has found a network and is ready to receive.
R Telephone
Telephone No
Noservice
service : there is no network
available or the mobile phone is searching for
a network.
i You can obtain further information about
suitable mobile phones and connecting
mobile phones via Bluetooth ®
:
R at any Mercedes-Benz Service Centre
R on the Internet at http://www.mercedes-
benz.com/connect
Accepting a call If someone calls you when you are in the
Tel Tel
menu, a display message appears in the multi-
function display.
You can accept a call at any time irrespective of
the selected menu.
X Press the 6button on the steering wheel
to accept an incoming call. Menus and submenus
219On-board computer and displays Z
Page 225 of 349

X
Press ato confirm.
The current selection appears.
X To activate/deactivate: press theabut-
ton again.
If COLLISION PREVENTION ASSIST PLUS is
deactivated, the assistance graphic shows
the æ symbol in the multifunction display.
Further information about COLLISION PREVEN- TION ASSIST PLUS (Y page 64).
Activating/deactivating Steering
Assist and Stop&Go Pilot X
Press the =or; button on the steering
wheel to select the Assist.
Assist. menu.
X Using 9or:, select DTR+: steer. DTR+: steer.
asst.
asst.
X Press ato confirm.
The current selection appears.
X To activate/deactivate: press theabut-
ton again.
When Steering Assist and Stop&Go Pilot are
activated, the multifunction display shows the DTR+: steering assistant DTR+: steering assistant On
Onmessage.
Further information about DISTRONIC PLUS
with Steering Assist and Stop&Go Pilot
(Y page 176).
Activating/deactivating ATTENTION
ASSIST X
Press the =or; button on the steering
wheel to select the Assist.
Assist. menu.
X Press the 9or: button to select
Attention Assist
Attention Assist.
X Press ato confirm your selection.
The current selection appears.
X Press ato confirm.
X Press the :or9 button to set Off
Off,
Standard
Standard orSensitive
Sensitive.
X Press the abutton to save the setting.
When ATTENTION ASSIST is deactivated, the
é symbol appears in the multifunction dis-
play in the assistance graphic display.
For further information about ATTENTION
ASSIST, see (Y page 196). Activating/deactivating Blind Spot
Assist X
Press the =or; button on the steering
wheel to select the Assist. Assist.menu.
X Press the 9or: button to select
Blind Spot Assist
Blind Spot Assist.
X Press the abutton.
The current selection appears.
X To activate/deactivate: press theabut-
ton again.
Further information about Blind Spot Assist
(Y page 200).
Further information about Active Blind Spot
Assist (Y page 203).
Activating/deactivating Lane Keeping
Assist X
Press the =or; button on the steering
wheel to select the Assist. Assist.menu.
X Press the 9or: button to select
Lane Keep. Assist
Lane Keep. Assist.
X Press the abutton.
The current selection appears.
X Press ato confirm.
X Press the :or9 button to set Off
Off,
Standard
Standard orAdaptive
Adaptive.
X Press the abutton to save the setting.
When Lane Keeping Assist or Active Lane
Keeping Assist is activated, the multifunction display shows the lane markings as bright
lines in the assistance graphic.
Further information about Lane Keeping Assist
(Y page 202).
Further information about Active Lane Keeping
Assist (Y page 206). Service menu
Depending on the equipment fitted in the vehi-
cle, you have the following options in the Serv. Serv.
menu:
R Calling up display messages in the message
memory (Y page 229)
R Restarting the tyre pressure loss warning sys-
tem (Y page 326) 222
Menus and submenusOn-board computer and displays