2015 MERCEDES-BENZ E-CLASS CABRIOLET display
[x] Cancel search: displayPage 121 of 349

Adaptive Highbeam Assist Plus cannot take into
account road, weather or traffic conditions.
Adaptive Highbeam Assist Plus is only an aid.
You are responsible for adjusting the vehicle's
lighting to the prevailing light, visibility and traf-
fic conditions.
In particular, the detection of obstacles can be
restricted if there is:
R poor visibility, e.g. due to fog, heavy rain or
snow
R dirt on the sensors or if the sensors are
obscured
Switching Adaptive Highbeam Assist
Plus on/off X
To switch on: turn the light switch to Ã.
X Press the combination switch beyond the
pressure point in the direction of arrow :.
The _ indicator lamp in the multifunction
display lights up when it is dark and the light
sensor switches on the dipped-beam head-
lamps.
At speeds above approx. 25 km/h: the
headlamp range is automatically controlled
according to the distance to other road users.
At speeds above approx. 30 km/h:
R If no other road users are detected, the
main-beam headlamps are automatically
switched on.
R If other road users are detected, the partial
main-beam headlamps are automatically
switched on.
The K indicator lamp in the instrument
cluster also lights up.
At speeds below approx. 25 km/h or
when there is sufficient street lighting:
R The partial main-beam headlamps are
switched off automatically.
R The main-beam headlamps are switched off
automatically.
The K indicator lamp in the instrument
cluster goes out. The _indicator lamp in
the multifunction display remains lit.
X To switch off: move the combination switch
back to its normal position or move the light
switch to another position.
The _ indicator lamp in the multifunction
display goes out. Headlamps misted up on the inside
Certain climatic and physical conditions may
cause moisture to form in the headlamp. This
moisture does not affect the functionality of the headlamp. Interior lighting
Overview of interior lighting
:
u Switches the interior lighting on/off
; | Switches the automatic interior light-
ing control on/off
= p Switches the right-hand reading lamp
on/off
? c Switches the front interior lighting on/
off
A p Switches the left-hand reading lamp
on/off Interior lighting control
General notes In order to prevent the vehicle's battery from
discharging, the interior lighting functions are
automatically deactivated after some time
except for when the key is in position 2in the
ignition lock.
Automatic interior lighting control X
To switch on/off: press the|button.
When the automatic interior lighting control is
switched on, the button is flush with the over- head control panel. 118
Interior lightingLights and
windscreen wipers
Page 127 of 349
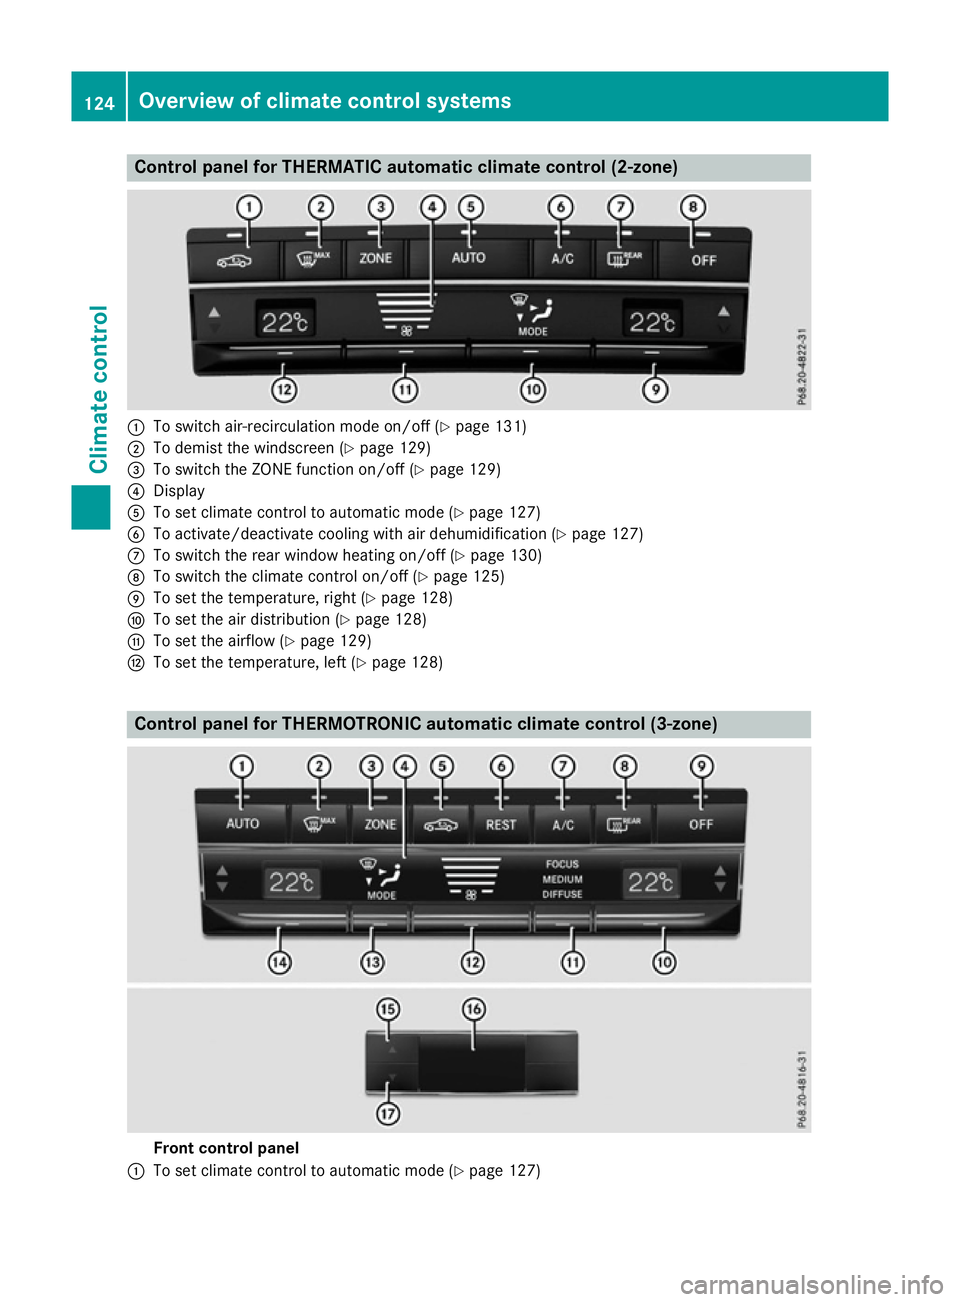
Control panel for THERMATIC automatic climate control (2-zone)
:
To switch air-recirculation mode on/off (Y page 131)
; To demist the windscreen (Y page 129)
= To switch the ZONE function on/off (Y page 129)
? Display
A To set climate control to automatic mode (Y page 127)
B To activate/deactivate cooling with air dehumidification (Y page 127)
C To switch the rear window heating on/off (Y page 130)
D To switch the climate control on/off (Y page 125)
E To set the temperature, right (Y page 128)
F To set the air distribution (Y page 128)
G To set the airflow (Y page 129)
H To set the temperature, left (Y page 128)Control panel for THERMOTRONIC automatic climate control (3-zone)
Front control panel
: To set climate control to automatic mode (Y page 127)124
Overview of climate control systemsClimate control
Page 128 of 349
;
To demist the windscreen (Y page 129)
= To switch the ZONE function on/off (Y page 129)
? Display
A To switch air-recirculation mode on/off (Y page 131)
B To switch the residual heat on/off (Y page 132)
C To activate/deactivate cooling with air dehumidification (Y page 127)
D To switch the rear window heating on/off (Y page 130)
E To switch the climate control on/off (Y page 125)
F To set the temperature, right (Y page 128)
G To set the climate mode (Y page 128)
H To set the airflow (Y page 129)
I To set the air distribution (Y page 128)
J To set the temperature, left (Y page 128)
Rear control panel
K To increase the temperature (Y page 128)
L Display
M To reduce the temperature (Y page 128)Notes on using the automatic climate
control
Automatic climate control Below, you can find a number of notes and rec-
ommendations to help you use climate control
optimally.
R Activate climate control using the Ãand
¿ buttons. The indicator lamps above the
à and¿ buttons light up.
R Vehicles with THERMOTRONIC: in automatic
mode, you can also set the climate mode
(FOCUS, MEDIUM or DIFFUSE). The MEDIUM
level is recommended.
R Set the temperature to 22 †.
R Only use the "Windscreen demisting" function
briefly until the windscreen is clear again.
R Only use air-recirculation mode briefly, e.g. if
there are unpleasant outside odours or when
in a tunnel. The windows could otherwise mist
up as no fresh air is drawn into the vehicle in air-recirculation mode.
R Use the ZONE function to adopt the temper-
ature settings on the driver's side for the
front-passenger side and the rear compart-
ment as well. The indicator lamp above the
á button goes out.
R Vehicles with THERMOTRONIC: use the resid-
ual heat function if you want to heat or venti-
late the vehicle interior when the ignition is switched off. The residual heat function can
only be activated or deactivated with the igni-
tion switched off.
R If you change the settings of the climate con-
trol system, the climate status display
appears for approximately three seconds at
the bottom of the screen in the multimedia
system display. You will see the current set-
tings of the various climate control functions.
ECO start/stop function During automatic engine switch-off, the climate
control only operates at a reduced capacity. If
you require the full climate control output, you
can switch off the ECO start/stop function by
pressing the ECO button (Y page 143). Operating the climate control system
Switching the climate control on/off
General notes When climate control is switched off, the air
supply and air circulation are also switched off.
The windows could mist up. Therefore, only
switch off climate control briefly.
i Switch on climate control primarily using
the à button (Y page 127). Operating the climate control system
125Climate control
Page 132 of 349
i
Regardless of the air distribution setting,
airflow is always directed through the side air
vents. The side air vents can only be closed
when the controls on the side air vents are
turned downwards.
Setting the air distribution X
Turn the key to position 2in the ignition lock
(Y page 139).
X THERMATIC automatic climate control: press
air distribution adjustment switch Fup or
down, until the desired symbol appears in the
display (Y page 124).
X THERMOTRONIC automatic climate control:
press air distribution adjustment switch Iup
or down, until the desired symbol appears in
the display (Y page 124). Setting the airflow
THERMATIC automatic climate control X
Turn the key to position 2in the ignition lock
(Y page 139).
X To increase or reduce: press airflow adjust-
ment switch Gup or down (Y page 124).
THERMOTRONIC automatic climate
control X
Turn the key to position 2in the ignition lock
(Y page 139).
X To increase or reduce: press airflow adjust-
ment switch Hup or down (Y page 124).
If the battery is not charged sufficiently, the
blower output may be reduced. Once the battery
is sufficiently charged again, full blower output
will be available. Switching the ZONE function on/off
X To activate: press theábutton.
The indicator lamp above the ábutton
lights up.
THERMATIC automatic climate control: the
temperature setting for the driver's side is not
adopted for the front-passenger side.
THERMOTRONIC automatic climate control:
the temperature setting for the driver's side is not adopted for the front-passenger side and
the rear compartment.
X To deactivate: press theábutton.
The indicator lamp above the ábutton
goes out.
THERMATIC automatic climate control: the
temperature setting for the driver's side is
adopted for the front-passenger side.
THERMOTRONIC automatic climate control:
the temperature setting for the driver's side is adopted for the front-passenger side and the
rear compartment. Demisting the windscreen
You can use this function to defrost the wind-
screen or to demist the inside of the windscreen and the side windows.
Switch off the windscreen demisting function as
soon as the windscreen is clear again.
X Turn the key to position 2in the ignition lock
(Y page 139).
X To activate: press the¬button.
The indicator lamp above the ¬button
lights up.
The climate control system switches to the
following functions:
R high airflow
R high temperature
R air distribution to the windscreen and front
side windows
R air-recirculation mode off
If the battery is not charged sufficiently, the
blower output may be reduced. Once the battery is sufficiently charged again, full blower output
will be available again.
X To deactivate: press the¬button.
The indicator lamp above the ¬button
goes out. The previous settings are reactiva-
ted. Air-recirculation mode remains deactiva- ted. Demisting the windows
Windows misted up on the inside X
Activate the ¿cooling with air dehumidi-
fication function.
X Activate automatic mode Ã. Operating the climate control system
129Climate control
Page 133 of 349
X
Adjust the side air vents so that the heated air
is directed towards the side windows.
X If the windows continue to mist up, activate
the "Windscreen demisting" function ¬.
i You should only select this setting until the
windscreen is clear again.
Windows misted up on the outside X
THERMATIC automatic climate control: press
air distribution adjustment switch Fup or
down (Y page 124), until the PorO
symbol appears in the display.
X THERMOTRONIC automatic climate control:
press air distribution adjustment switch Iup
or down (Y page 124), until the PorO
symbol appears in the display.
X Adjust the side air vents so that no air is
directed towards the side windows. Rear window heating
General notes The rear window heating has a high current
draw. You should therefore switch it off as soon
as the window is clear. It otherwise switches off automatically after several minutes.
If the battery voltage is too low, the rear window
heating may switch off.
Switching on/off X
Turn the key to position 2in the ignition lock
(Y page 139).
X Press the ¤button.
The indicator lamp above the ¤button
lights up or goes out. 130
Operating the climate control systemClimate control
Page 137 of 349

R
the remote control being in an unfavourable
position in relation to the vehicle
R transmitting from an enclosed space
If the remote control battery is low, the battery
symbol on the left of the display is shown as
empty. Replace the remote control battery and
observe the important safety notes when doing so (Y page 135).
Switching the auxiliary heating/ventila-
tion on or off Remote control
:
Display
; u Switches on the auxiliary heating or
auxiliary ventilation
Checks the status
= . Sets the departure time
? ^ Switches off the auxiliary heating or
auxiliary ventilation
A , Sets the departure time
X To switch on: press and hold the ubut-
ton.
ON is shown in the remote control display.
X To switch off: press and hold the ^but-
ton.
OFF is shown in the remote control display.
Checking the status of the auxiliary heat- ing or auxiliary ventilation
X Briefly press the ubutton.
The following messages may appear in the dis-
play: Display Meaning
The auxiliary heating or
auxiliary ventilation is
switched off. The auxiliary ventilation is
switched on. The number
in the display shows the
remaining time (in
minutes) for the auxiliary
ventilation.
The auxiliary heating is
switched on. The number
in the display shows the
remaining time (in
minutes) for the auxiliary
heating.
A departure time has been
activated. The departure
time appears in the dis-
play. A departure time has been
activated. The auxiliary
ventilation is currently
activated. The number in
the display shows the
remaining time (in
minutes) for the auxiliary
ventilation. If the vehicle is
not started after this time, the running time is
increased by five minutes. A departure time has been
activated. The auxiliary
heating is currently activa-
ted. The number in the dis- play shows the remaining
time (in minutes) for the
auxiliary heating. If the
vehicle is not started after
this time, the running time is increased by five
minutes. If the engine has not yet reached operating tem-
perature when it is started, the auxiliary heating running time is increased. The auxiliary heating
continues to run until the operating temperature
is reached. If this is the case, the ysymbol
appears in the remote control display and the
running time is zero minutes.
Setting the departure time
Make sure that the time set in the vehicle is
correct before setting the departure time (see
the separate operating instructions). Otherwise, the auxiliary heating may switch on at the wrong 134
Operating the climate control systemClimate control
Page 138 of 349
time and at an unsuitable location. When setting
the departure time, also observe the important
safety notes (Y page 132).
X Briefly press the ubutton.
X Press the ,or. button repeatedly
until the time to be changed appears in the
display.
X Press the uand^ buttons simultane-
ously.
The Îsymbol in the remote control display
flashes.
X Press the ,or. button to set the
desired departure time.
i The longer you press the
,or. but-
ton, the faster the time changes.
X Press the uand^ button simultane-
ously.
The new departure time is stored.
Activating the set departure time
X Briefly press the ubutton.
X Press the ,or. button repeatedly
until the desired departure time appears in
the display.
X Press the ubutton.
The Ísymbol, the departure time and,
depending on the selected departure time,
the letter A, BorCappear in the display.
Deactivating the set departure time
X Briefly press the ubutton.
The status of the auxiliary heating is shown in the display.
X Press the .button.
The first departure time stored appears in the
display.
X Press the ^button.
OFF is shown in the remote control display.
Replacing the remote control battery Important safety notes
G
WARNING
Batteries contain toxic and corrosive substan- ces. If batteries are swallowed, it can result in
severe health problems. There is a risk of fatal injury. Keep batteries out of the reach of children. If
a battery is swallowed, seek medical attention
immediately. H
Environmental note Batteries contain pollutants.
It is illegal to dispose of them
with the household rubbish.
They must be collected sep-
arately and disposed of in anenvironmentally responsible
recycling system. Dispose of batteries in an
environmentally responsible
manner. Take discharged
batteries to a qualified spe-
cialist workshop or to a col-
lection point for used batter-
ies.
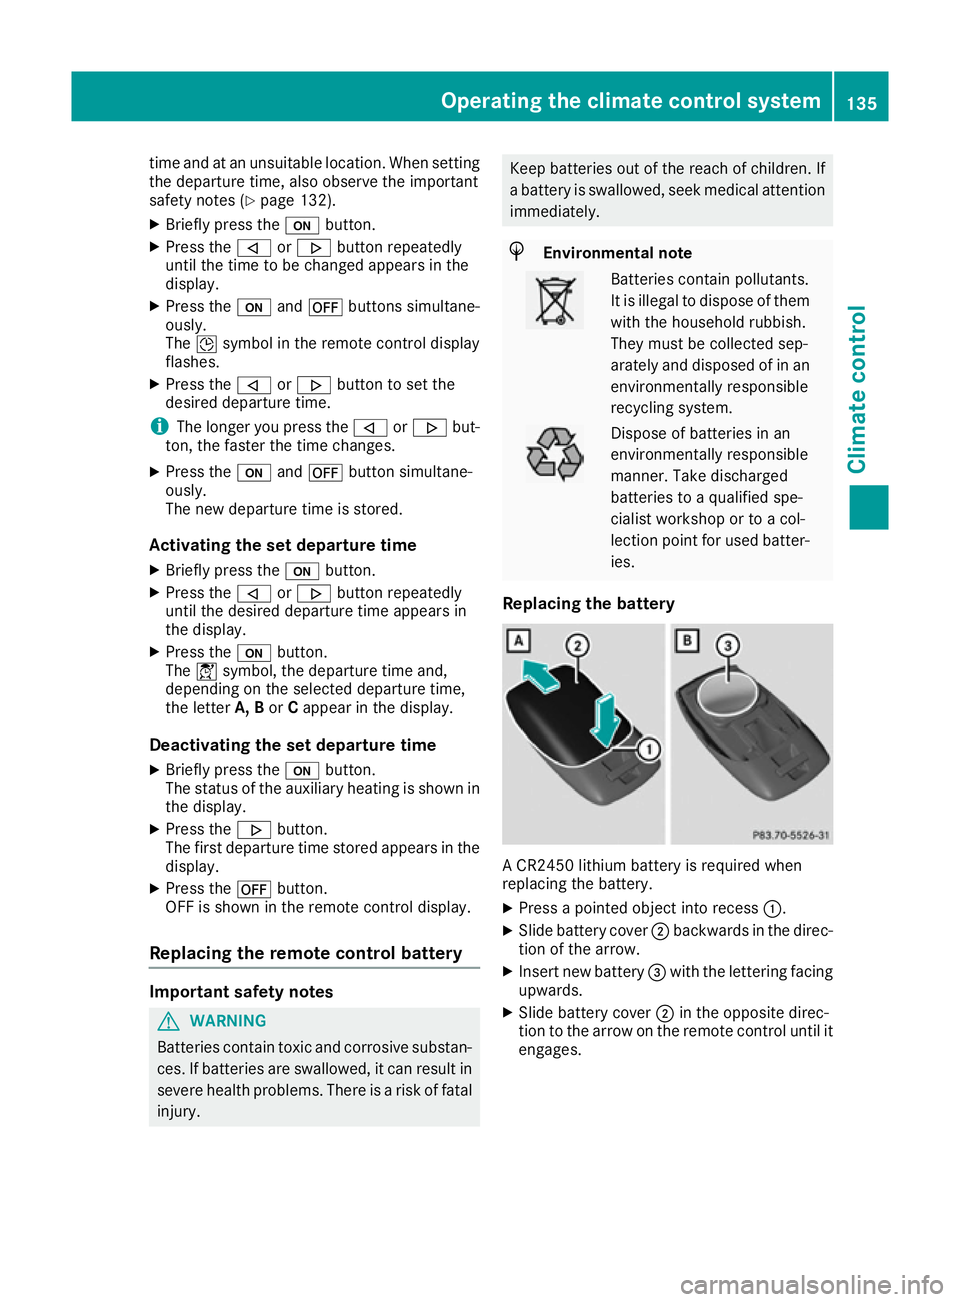
Replacing the battery A CR2450 lithium battery is required when
replacing the battery.
X Press a pointed object into recess :.
X Slide battery cover ;backwards in the direc-
tion of the arrow.
X Insert new battery =with the lettering facing
upwards.
X Slide battery cover ;in the opposite direc-
tion to the arrow on the remote control until it engages. Operating the climate control system
135Climate control Z
Page 144 of 349
General notes
i
Vehicles with a petrol engine:
the cata-
lytic converter is preheated for up 30 seconds
after a cold start. The sound of the engine may change during this time.
Manual transmission X
Depress the brake pedal and keep it
depressed.
X Fully depress the clutch pedal.
X Shift to neutral N.
Automatic transmission X
Shift the transmission to position P.
The transmission position indicator in the
multifunction display shows P.
i You can start the engine in transmission
position Pand N.
Starting procedure with the key i
To start the engine using the key instead of
KEYLESS-GO, pull the Start/Stop button out
of the ignition lock.
X Vehicles with diesel engine: turn the key to
position 2in the ignition lock (Y page 139).
The % preglow indicator lamp in the instru-
ment cluster lights up.
X Turn the key to position 3in the ignition lock
and release it as soon as the engine is running (Y page 139).
i Vehicles with a diesel engine:
you can
start the engine without preglow if the engine
is warm.
Using KEYLESS-GO to start the engine i
The Start/Stop button can be used to start
the vehicle manually without inserting the key into the ignition lock. The key must be in the
vehicle and the Start/Stop button must be
inserted in the ignition lock. This mode for
starting the engine operates independently of the ECO start/stop automatic engine start
function. X
Depress the brake pedal and keep it
depressed.
X Press the Start/Stop button once
(Y page 139).
Vehicles with a petrol engine: the engine
starts.
Vehicles with a diesel engine: preglow is
activated and the engine starts. Pulling away
General notes G
WARNING
Vehicles with automatic transmission:
If the engine speed is above the engine idling speed and you then engage transmission
position Dor R, the vehicle may accelerate
suddenly. There is a risk of an accident.
When engaging transmission position Dor R,
always keep the brake pedal firmly depressed
and do not depress the accelerator pedal at
the same time.
! Vehicles with manual transmission:
change gear in good time and avoid spinning
the wheels. You could otherwise damage the
vehicle.
! If a warning tone sounds and the
Release Release
park. brake
park. brake message appears in the multi-
function display, the parking brake is still
applied. Release the parking brake.
Depress the accelerator carefully when pulling
away.
The vehicle locks centrally once you have pulled
away. The locking knobs in the doors drop down.
You can open the doors from the inside at any
time.
You can also deactivate the automatic locking
feature (Y page 225).
Vehicles with automatic transmission: it is
only possible to shift the transmission from posi-
tion Pto the desired position if you depress the
brake pedal. If you do not depress the brake
pedal, the DIRECT SELECT lever can still be
moved but the parking lock remains engaged.
i Vehicles with automatic transmission:
upshifts take place at higher engine speeds Driving
141Driving and parking Z