2015 MERCEDES-BENZ E-CLASS CABRIOLET child seat
[x] Cancel search: child seatPage 73 of 349

PRE-SAFE
®
Brake warns you. Terminate the
intervention in a non-critical driving situation. G
WARNING
PRE-SAFE ®
Brake cannot always clearly iden-
tify people, especially if they are moving. In
these cases, PRE-SAFE ®
Brake cannot inter-
vene. There is a risk of an accident.
Always pay particular attention to the traffic
situation and be ready to brake, especially if
PRE-SAFE ®
Brake warns you.
In order to maintain the appropriate distance to
the vehicle in front and thus prevent a collision, you must apply the brakes yourself. G
WARNING
PRE-SAFE ®
Brake does not react:
R to small people, e.g. children
R to animals
R to oncoming vehicles
R to crossing traffic
R when cornering
As a result, PRE-SAFE ®
Brake may neither
give warnings nor intervene in all critical sit-
uations. There is a risk of an accident.
Always pay careful attention to the traffic sit- uation and be ready to brake.
In the event of snowfall or heavy rain, detection can be impaired.
Detection by the radar sensor system is also
impaired in the event of:
R dirt on the sensors or obscured sensors
R interference by other radar sources
R strong radar reflections, for example, in multi-
storey car parks
R a narrow vehicle travelling in front, e.g. a
motorcycle
R a vehicle travelling in front on a different line
Detection by the camera system is also impaired in the event of:
R dirt on the camera or if the camera is covered
R glare on the camera system, e.g. from the sun
being low in the sky R
darkness
R if:
- pedestrians move quickly, e.g. into the path
of the vehicle
- the camera system no longer detects a
pedestrian as a person due to special cloth-
ing or other objects
- a pedestrian is concealed by other objects
- the typical outline of a person is not distin-
guishable from the background
Following damage to the front end of the vehicle, have the radar sensor settings and operation
checked at a qualified specialist workshop. This
also applies to collisions at slow speeds where
there is no visible damage to the front of the
vehicle.
Following damage to the windscreen, have the
configuration and operation of the camera sys-
tem checked at a qualified specialist workshop.
Function X
To activate/deactivate: activate or deacti-
vate PRE-SAFE ®
Brake in the on-board com-
puter (Y page 221).
If the PRE-SAFE ®
Brake is not activated, the
æ symbol appears in the multifunction dis-
play.
This function will issue a warning if: R at a speed of approximately 30 km/ho r more
the distance maintained to the vehicle travel- ling in front is insufficient for several seconds
The · distance warning lamp then lights
up in the instrument cluster.
R at a speed of approximately 7 km/h or more,
you rapidly approach a vehicle in front
An intermittent warning tone will then sound
and the ·distance warning lamp will light
up in the instrument cluster.
X Brake immediately to defuse the situation.
or X Take evasive action provided it is safe to do
so.
The PRE-SAFE ®
Brake function can also brake
the vehicle automatically under the following
conditions:
R the driver and front passenger have their seat
belts fastened 70
Driving safety systemsSafety
Page 83 of 349

Problem
Possible causes/consequences and
M
MSolutions The engine cannot be
started using the key. The on-board voltage is too low.
X Switch off non-essential consumers, e.g. seat heating or interior
lighting, and try to start the engine again.
If this does not work:
X Check the starter battery and charge it if necessary (Y page 312).
or X Jump-start the vehicle (Y page 313).
or X Consult a qualified specialist workshop. Only for vehicles with
manual transmission:
The engine cannot be
started using the key. The steering lock is mechanically blocked.
X Remove the key and reinsert it into the ignition lock. While doing
this, turn the steering wheel in both directions. The engine cannot be
started using KEYLESS-
GO. The key is in the
vehicle. The vehicle is locked.
X Unlock the vehicle and try to start the vehicle again. There is interference from a powerful source of radio waves.
X Start your vehicle with the key in the ignition lock. You have lost a key. X
Have the key deactivated at a qualified specialist workshop.
X Report the loss immediately to the vehicle insurers.
X If necessary, have the locks changed as well. You have lost the emer-
gency key element. X
Report the loss immediately to the vehicle insurers.
X If necessary, have the locks changed as well. Doors
Important safety notes
United Kingdom only: G
WARNING
When the double locks are activated, the
doors can no longer be opened from the
inside. People in the vehicle can no longer get out, e.g. in hazardous situations. There is a
risk of injury.
Therefore, do not leave any people unsuper-
vised in the vehicle, particularly children, eld-
erly people or people in need of special assis-
tance. Do not activate the double lock when
people are in the vehicle. If the vehicle has been locked from the outside,
the double lock function is activated as stand-
ard. It is then not possible to open the doors
from inside the vehicle. You can deactivate the
double lock function by deactivating the interior
motion sensor (Y page 73). The doors can then
be opened from the inside after the vehicle has
been locked from the outside. The anti-theft
alarm system is triggered if the door is opened
from the inside. Switch off the alarm
(Y page 71).
All countries: 80
DoorsOpening and closing
Page 102 of 349
Correct driver's seat position
G
WARNING
You could lose control of the vehicle while
driving if you:
R adjust the driver's seat, steering wheel or
mirrors
R fasten the seat belt
There is a risk of an accident.
Adjust the driver's seat, head restraint, steer-
ing wheel and mirrors and fasten your seat
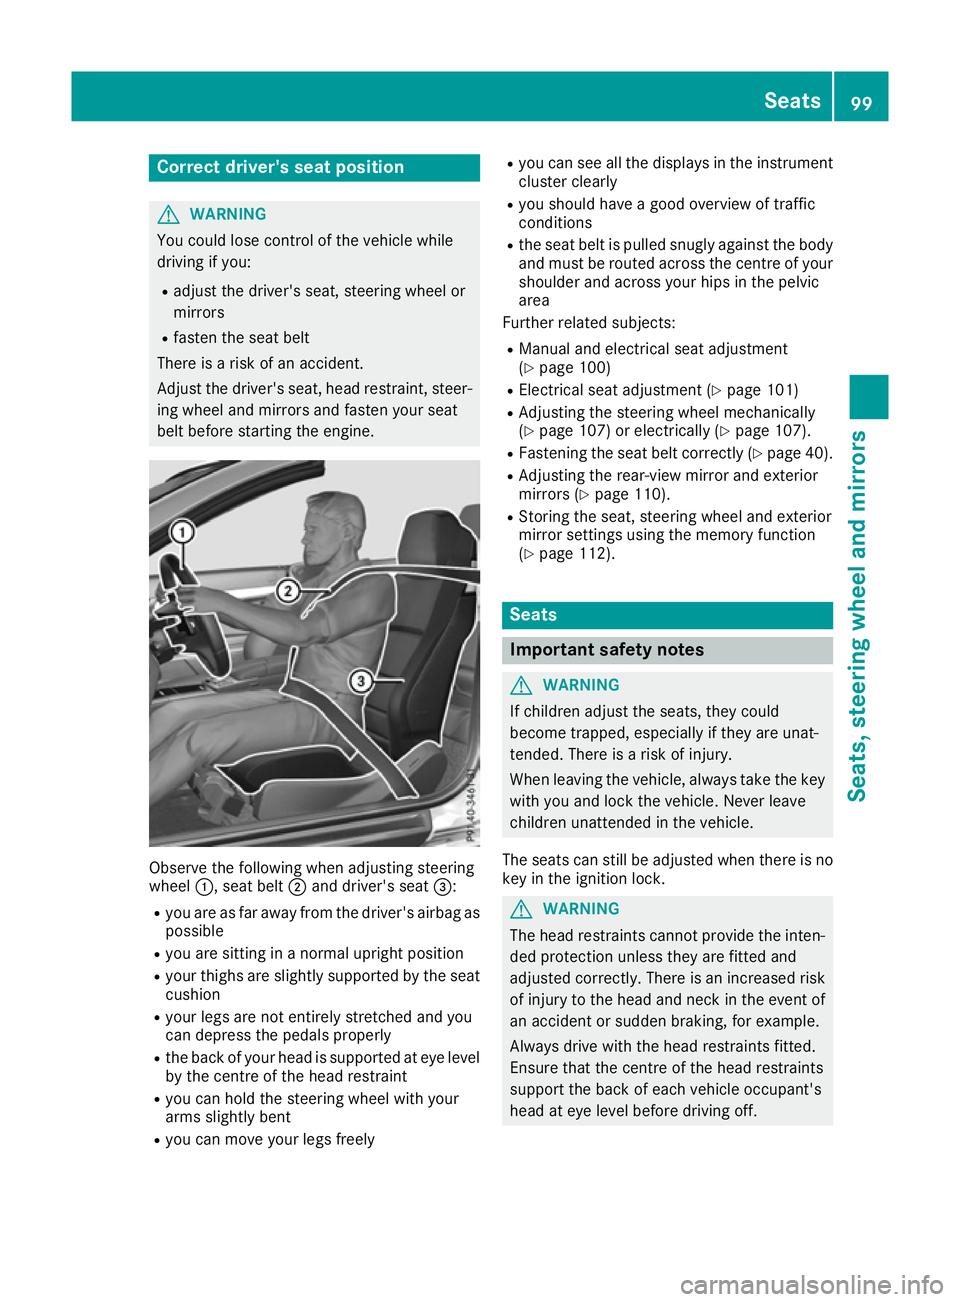
belt before starting the engine. Observe the following when adjusting steering
wheel
:, seat belt ;and driver's seat =:
R you are as far away from the driver's airbag as
possible
R you are sitting in a normal upright position
R your thighs are slightly supported by the seat
cushion
R your legs are not entirely stretched and you
can depress the pedals properly
R the back of your head is supported at eye level
by the centre of the head restraint
R you can hold the steering wheel with your
arms slightly bent
R you can move your legs freely R
you can see all the displays in the instrument
cluster clearly
R you should have a good overview of traffic
conditions
R the seat belt is pulled snugly against the body
and must be routed across the centre of your
shoulder and across your hips in the pelvic
area
Further related subjects:
R Manual and electrical seat adjustment
(Y page 100)
R Electrical seat adjustment (Y page 101)
R Adjusting the steering wheel mechanically
(Y page 107) or electrically (Y page 107).
R Fastening the seat belt correctly (Y page 40).
R Adjusting the rear-view mirror and exterior
mirrors (Y page 110).
R Storing the seat, steering wheel and exterior
mirror settings using the memory function
(Y page 112). Seats
Important safety notes
G
WARNING
If children adjust the seats, they could
become trapped, especially if they are unat-
tended. There is a risk of injury.
When leaving the vehicle, always take the key with you and lock the vehicle. Never leave
children unattended in the vehicle.
The seats can still be adjusted when there is no
key in the ignition lock. G
WARNING
The head restraints cannot provide the inten-
ded protection unless they are fitted and
adjusted correctly. There is an increased risk of injury to the head and neck in the event of
an accident or sudden braking, for example.
Always drive with the head restraints fitted.
Ensure that the centre of the head restraints
support the back of each vehicle occupant's
head at eye level before driving off. Seats
99Seats, steering wheel and mirrors Z
Page 103 of 349
Observe the safety notes on "Airbags"
(Y
page 42) and "Children in the vehicle"
(Y page 49). G
WARNING
You could lose control of the vehicle while
driving if you:
R adjust the driver's seat, steering wheel or
mirrors
R fasten the seat belt
There is a risk of an accident.
Adjust the driver's seat, head restraint, steer-
ing wheel and mirrors and fasten your seat
belt before starting the engine. G
WARNING
If you adjust the seat height carelessly, you or other vehicle occupants could be trapped andthereby injured. Children in particular could
accidentally press the electrical seat adjust-
ment buttons and become trapped. There is a
risk of injury.
While moving the seats, make sure that your
hands or other body parts do not get under the
lever assembly of the seat adjustment sys-
tem. G
WARNING
When adjusting a seat, you or another vehicle occupant could become trapped by the guiderail of the seat, for instance. There is a risk of
injury.
Make sure that no one has any part of their
body within the sweep of the seat when
adjusting it.
! To avoid damage to the seats and the seat
heating, observe the following information:
R do not spill any liquids on the seats. If liquid
is spilled on the seats, dry them as soon as possible.
R if the seat covers are damp or wet, do not
switch on the seat heating. The seat heat-
ing should also not be used to dry the seats.
R clean the seat covers as recommended;
see "Interior care".
R do not transport heavy loads on the seats.
Do not place sharp objects on the seat cushions, e.g. knives, nails or tools. The
seats should only be occupied by passen-
gers, if possible.
R when the seat heating is in operation, do
not cover the seats with insulating materi-
als, e.g. blankets, coats, bags, seat covers,
child seats or booster seats.
! Make sure that there are no objects in the
footwell under or behind the seats when mov- ing the seats back. There is a risk that the
seats and/or the objects could be damaged.
i The head restraints in the front seats are
fitted with the NECK-PRO system (Y page 47).
For this reason, it is not possible to remove
the head restraints from the front seats.
For more information, contact a qualified spe-
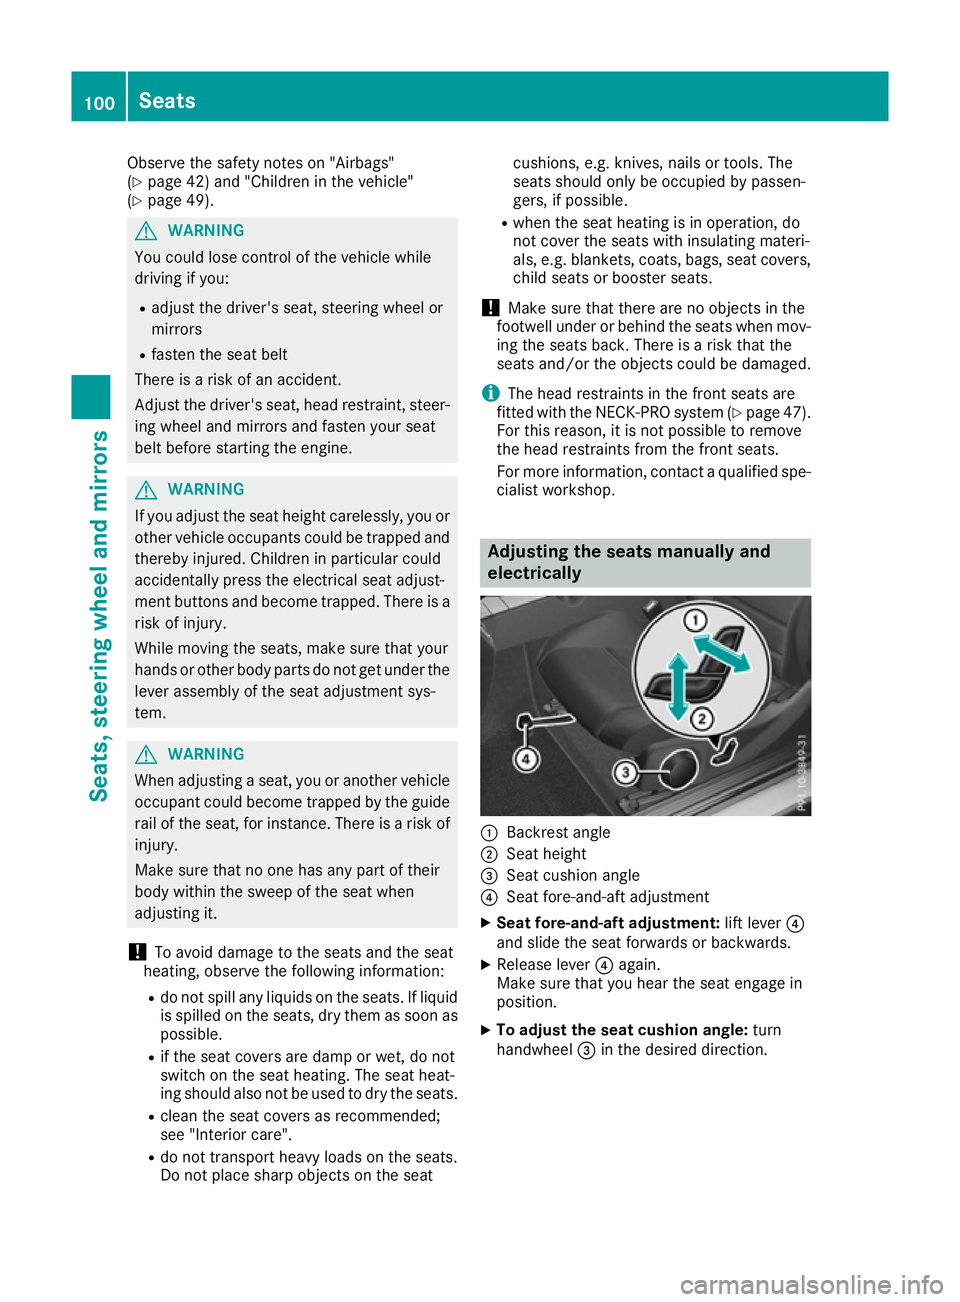
cialist workshop. Adjusting the seats manually and
electrically :
Backrest angle
; Seat height
= Seat cushion angle
? Seat fore-and-aft adjustment
X Seat fore-and-aft adjustment: lift lever?
and slide the seat forwards or backwards.
X Release lever ?again.
Make sure that you hear the seat engage in
position.
X To adjust the seat cushion angle: turn
handwheel =in the desired direction. 100
SeatsSeats, steering wheel and mirrors
Page 109 of 349
Problems with the seat heating or seat ventilation
Problem
Possible causes/consequences and
M
MSolutions The seat heating or seat
ventilation has switched
off prematurely or can-
not be switched on. The on-board voltage is too low because too many electrical consum-
ers are switched on.
X Switch off electrical consumers that you do not need, such as the
rear window heating or interior lighting.
Once the battery is sufficiently charged, the seat heating or seat
ventilation can be switched back on manually. AIRSCARF
G
WARNING
When AIRSCARF is switched on, very hot air
can flow from the vents in the head restraints. This could result in burns in the immediate
vicinity of the air vents. There is a risk of injury.
Reduce the heater output before it becomes
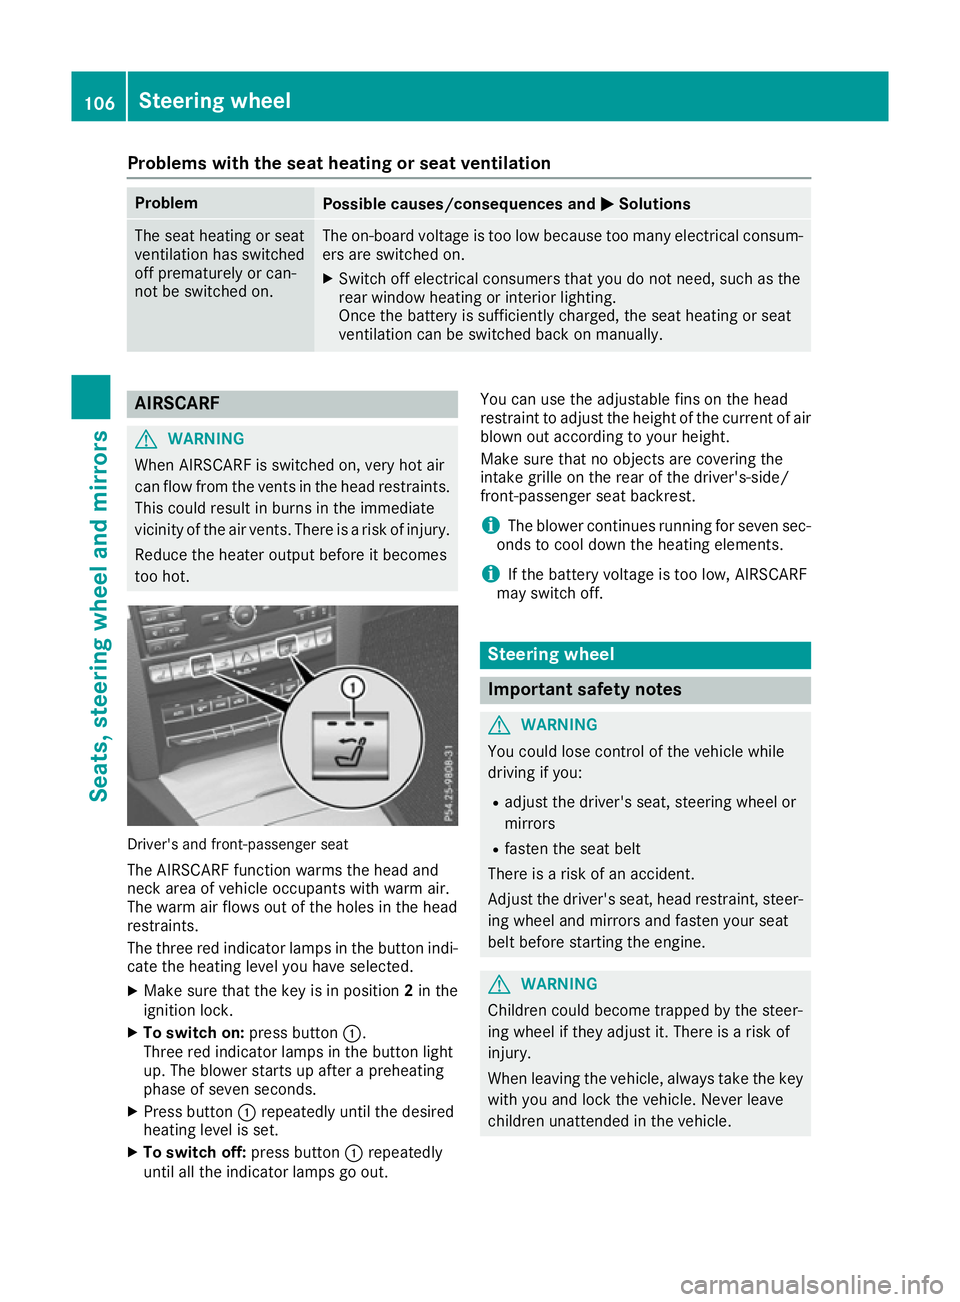
too hot. Driver's and front-passenger seat
The AIRSCARF function warms the head and
neck area of vehicle occupants with warm air.
The warm air flows out of the holes in the head
restraints.
The three red indicator lamps in the button indi-
cate the heating level you have selected.
X Make sure that the key is in position 2in the
ignition lock.
X To switch on: press button:.
Three red indicator lamps in the button light
up. The blower starts up after a preheating
phase of seven seconds.
X Press button :repeatedly until the desired
heating level is set.
X To switch off: press button:repeatedly
until all the indicator lamps go out. You can use the adjustable fins on the head
restraint to adjust the height of the current of air
blown out according to your height.
Make sure that no objects are covering the
intake grille on the rear of the driver's-side/
front-passenger seat backrest.
i The blower continues running for seven sec-
onds to cool down the heating elements.
i If the battery voltage is too low, AIRSCARF
may switch off. Steering wheel
Important safety notes
G
WARNING
You could lose control of the vehicle while
driving if you:
R adjust the driver's seat, steering wheel or
mirrors
R fasten the seat belt
There is a risk of an accident.
Adjust the driver's seat, head restraint, steer-
ing wheel and mirrors and fasten your seat
belt before starting the engine. G
WARNING
Children could become trapped by the steer-
ing wheel if they adjust it. There is a risk of
injury.
When leaving the vehicle, always take the key with you and lock the vehicle. Never leave
children unattended in the vehicle. 106
Steering wheelSeats, steering wheel and mirrors
Page 112 of 349
Problems with the steering wheel heating
Problem
Possible causes/consequences and
M
MSolutions The steering wheel heat-
ing has switched itself
off prematurely or can-
not be switched on. The on-board voltage is too low because too many electrical consum-
ers are switched on.
X Switch off electrical consumers that you do not need, such as the
rear window heating or interior lighting.
Once the battery is sufficiently charged, the steering wheel heating
will switch back on automatically. EASY-ENTRY/EXIT feature
Important safety notes G
WARNING
When the EASY-ENTRY/EXIT feature adjusts
the steering wheel, you and other vehicle
occupants – particularly children – could
become trapped. There is a risk of injury.
While the EASY-ENTRY/EXIT feature is mak-
ing adjustments, make sure that no one has
any body parts in the sweep of the steering
wheel.
Move the steering wheel adjustment lever if
there is a risk of entrapment by the steering
wheel. The adjustment process is stopped.
Vehicles with a memory function: if there is a
risk of becoming trapped by the steering wheel, you can also press one of the memory function
position buttons. The adjustment process is
stopped. G
WARNING
If children activate the EASY-ENTRY/EXIT fea- ture, they can become trapped, particularly
when unattended. There is a risk of injury.
When leaving the vehicle, always take the key with you and lock the vehicle. Never leave
children unattended in the vehicle. G
WARNING
If you drive off while the EASY-ENTRY/EXIT
feature is making adjustments, you could lose
control of the vehicle. There is a risk of an
accident. Always wait until the adjustment process is
complete before driving off.
The EASY-ENTRY/EXIT feature makes getting in
and out of your vehicle easier.
You can activate and deactivate the EASY-
ENTRY/EXIT feature in the on-board computer
(Y page 227).
Position of the steering wheel when the EASY-ENTRY/EXIT feature is active The steering wheel tilts upwards if you:
R remove the key from the ignition lock
R with KEYLESS-GO: open the driver's door;
KEYLESS-GO must be in position 1
R with the key: open the driver's door; the key
must be in position 0or 1in the ignition lock
(Y page 139)
i The steering wheel only moves upwards if it
has not already reached the upper stop.
Position of the steering wheel for driv-
ing The steering wheel is moved to the previously
set position if:
R the driver's door is closed and
R with KEYLESS-GO: you press the Start/Stop
button once
or
R with the key: you insert the key into the igni-
tion lock
If you close the driver's door with the key inser-
ted in the ignition lock, the steering wheel is
automatically moved to the previously set posi- tion. Steering wheel
109Seats, steering wheel and mirrors Z
Page 116 of 349
Only use the memory function on the driver's
side while the vehicle is stationary. G
WARNING
If children activate the memory function, they
could become trapped, especially if they are
unattended. There is a risk of injury.
When leaving the vehicle, always take the key with you and lock the vehicle. Never leave
children unattended in the vehicle. G
WARNING
When the memory function adjusts the seat or steering wheel, you and other vehicle occu-
pants – particularly children – could become
trapped. There is a risk of injury.
While the memory function is making adjust-
ments, make sure that no one has any body
parts in the sweep of the seat or steering
wheel. If somebody becomes trapped, imme-
diately release the memory function position
button. The adjustment process is stopped.
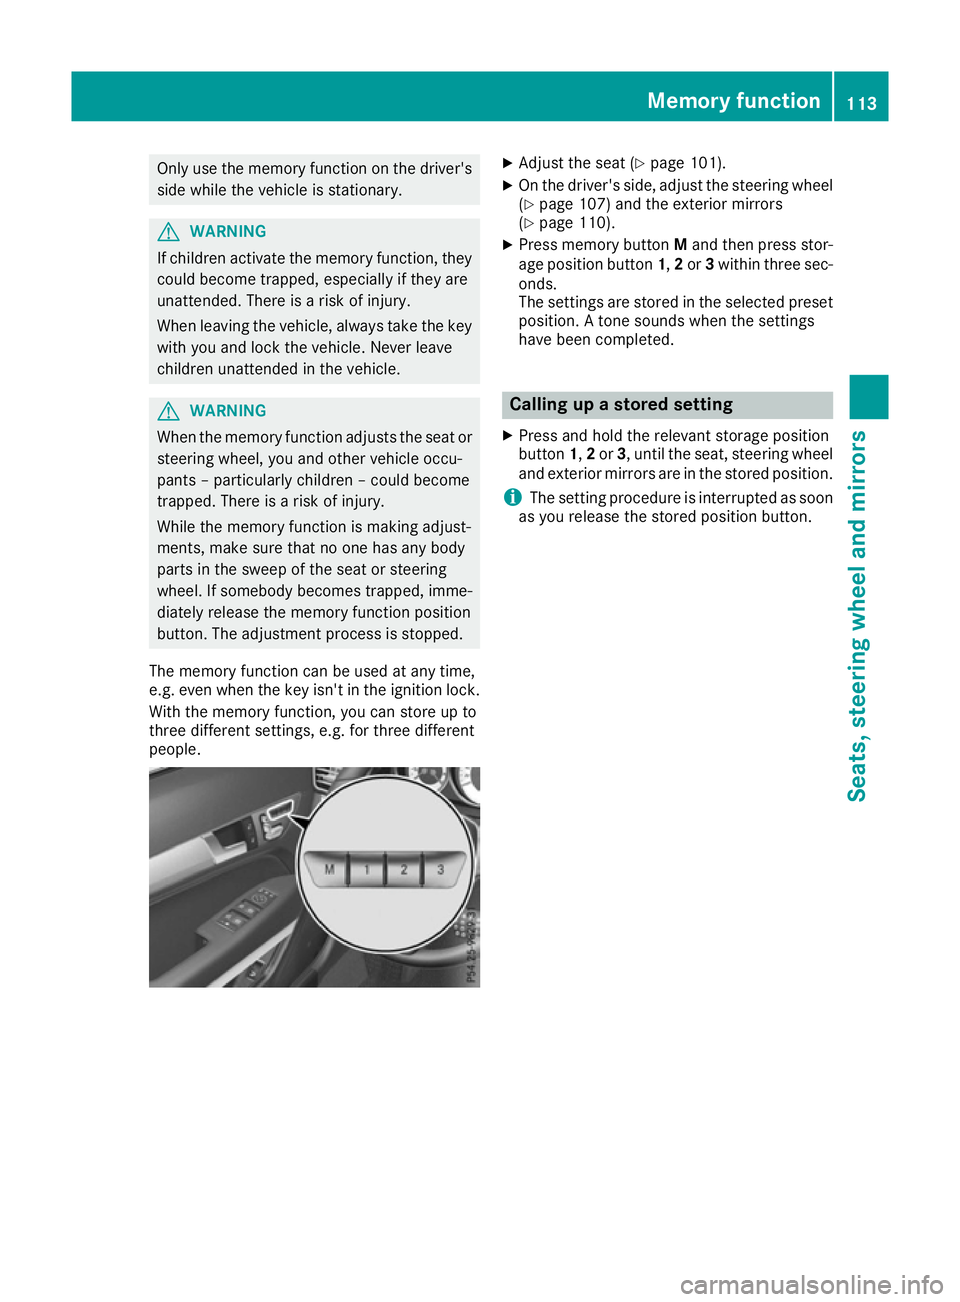
The memory function can be used at any time,
e.g. even when the key isn't in the ignition lock.
With the memory function, you can store up to
three different settings, e.g. for three different
people. X
Adjust the seat (Y page 101).
X On the driver's side, adjust the steering wheel
(Y page 107) and the exterior mirrors
(Y page 110).
X Press memory button Mand then press stor-
age position button 1,2or 3within three sec-
onds.
The settings are stored in the selected preset position. A tone sounds when the settings
have been completed. Calling up a stored setting
X Press and hold the relevant storage position
button 1,2or 3, until the seat, steering wheel
and exterior mirrors are in the stored position.
i The setting procedure is interrupted as soon
as you release the stored position button. Memory function
113Seats, steering wheel and mirrors Z
Page 230 of 349
Selecting the departure time or deactivat-
ing a selected departure time
X Press the =or; button on the steering
wheel to select the Settings
Settingsmenu.
X Press the :or9 button to select the
Heating
Heating submenu.
X Press ato confirm.
You will see the selected setting.
X Press ato confirm.
X Press the :or9 button to select one
of the three departure times or Timer
Timeroff
off(no
timer active).
X Press ato confirm.
If a departure time is selected, the yellow
indicator lamp lights up on the auxiliary heat- ing button.
Changing the departure time
X Press the =or; button on the steering
wheel to select the Settings Settingsmenu.
X Press the :or9 button to select the
Heating
Heating submenu.
X Press ato confirm.
You will see the selected setting.
X Press the :or9 button to select A
A,B
B
or Change C
Change C.
X Press ato confirm.
You can now change the departure time.
X Press the =or; button to select the
display to be changed: hours, minutes.
X Press the :or9 button to set the
selected display.
X Press the abutton to store the entry.
The yellow indicator lamp on the auxiliary
heating button lights up.
Comfort Activating/deactivating the EASY-
ENTRY/EXIT feature G
WARNING
When the EASY-ENTRY/EXIT feature adjusts
the steering wheel, you and other vehicle
occupants – particularly children – could
become trapped. There is a risk of injury.
While the EASY-ENTRY/EXIT feature is mak-
ing adjustments, make sure that no one has
any body parts in the sweep of the steering
wheel. If someone is trapped:
R press one of the memory function position
buttons, or
R move the switch for steering wheel adjust-
ment in the opposite direction to that in
which the steering wheel is moving.
The adjustment process is stopped.
X Press the =or; button on the steering
wheel to select the Settings Settingsmenu.
X Press the :or9 button to select the
Convenience
Convenience submenu.
X Press ato confirm.
X Using :or9, select the Easy
EasyEntry/
Entry/
Exit
Exit function.
If the Easy
Easy Entry/Exit
Entry/Exit function is activated,
the vehicle steering wheel is displayed in
orange in the multifunction display.
X Press the abutton to save the setting.
Further information on the EASY-ENTRY/EXIT
feature (Y page 109).
Switching belt adjustment on/off
X Press the =or; button on the steering
wheel to select the Settings
Settings menu.
X Press the :or9 button to select the
Convenience Convenience submenu.
X Press ato confirm.
X Press the :or9 button to select the
Belt adjustment
Belt adjustment function.
When the Belt adjustment
Belt adjustment function is acti-
vated, the seat belt is displayed in orange in
the multifunction display.
X Press the abutton to save the setting.
For further information on belt adjustment, see
(Y page 41).
Switching the fold mirrors in when lock-
ing function on/off This function is only available when the vehicle is
equipped with the electrical fold-in function.
When you switch on the Auto. fold in Auto. fold infunc-
tion, the exterior mirrors are folded in when the
vehicle is locked. If you unlock the vehicle and
then open the driver's or front-passenger door,
the exterior mirrors fold out again. Menus and submenus
227On-board computer and displays Z