2015 MERCEDES-BENZ E-CLASS CABRIOLET seats
[x] Cancel search: seatsPage 61 of 349
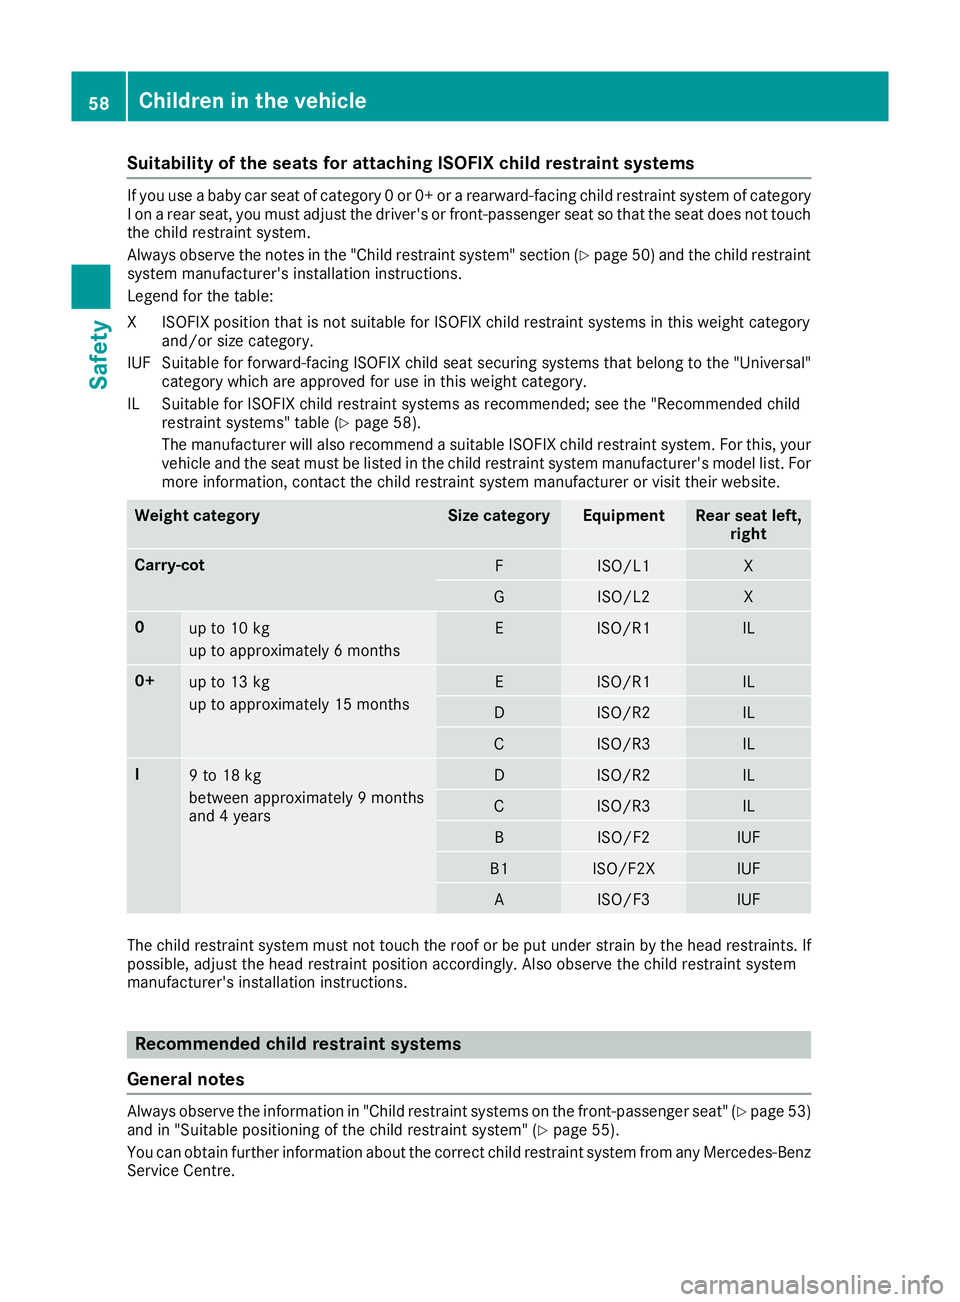
Suitability of the seats for attaching ISOFIX child restraint systems
If you use a baby car seat of category 0 or 0+ or a rearward-facing child restraint system of category
I on a rear seat, you must adjust the driver's or front-passenger seat so that the seat does not touch the child restraint system.
Always observe the notes in the "Child restraint system" section (Y page 50) and the child restraint
system manufacturer's installation instructions.
Legend for the table:
XI SOFIX position that is not suitable for ISOFIX child restraint systems in this weight category
and/or size category.
IUF Suitable for forward-facing ISOFIX child seat securing systems that belong to the "Universal" category which are approved for use in this weight category.
IL Suitable for ISOFIX child restraint systems as recommended; see the "Recommended child restraint systems" table (Y page 58).
The manufacturer will also recommend a suitable ISOFIX child restraint system. For this, your
vehicle and the seat must be listed in the child restraint system manufacturer's model list. For more information, contact the child restraint system manufacturer or visit their website. Weight category Size category Equipment Rear seat left,
right Carry-cot
F ISO/L1 X
G ISO/L2 X
0
up to 10 kg
up to approximately 6 months E ISO/R1 IL
0+
up to 13 kg
up to approximately 15 months E ISO/R1 IL
D ISO/R2 IL
C ISO/R3 IL
I
9 to 18 kg
between approximately 9 months
and 4 years D ISO/R2 IL
C ISO/R3 IL
B ISO/F2 IUF
B1 ISO/F2X IUF
A ISO/F3 IUF
The child restraint system must not touch the roof or be put under strain by the head restraints. If
possible, adjust the head restraint position accordingly. Also observe the child restraint system
manufacturer's installation instructions. Recommended child restraint systems
General notes Always observe the information in "Child restraint systems on the front-passenger seat" (Y
page 53)
and in "Suitable positioning of the child restraint system" (Y page 55).
You can obtain further information about the correct child restraint system from any Mercedes-Benz
Service Centre. 58
Children in the vehicleSafety
Page 93 of 349

Opening and closing with the key
Important safety notes G
WARNING
When opening or closing the soft top, there is a risk that parts of the body could become
trapped by moving parts such as the roof
mechanism, the boot lid, or the side windows.
There is a risk of injury.
When opening or closing the roof, make sure
that no parts of the body are in the vicinity of moving parts. Release the switch if somebody
becomes trapped.
Opening and closing The key must be near the door handle.
X To open: press the %button in the key
until the soft top is completely opened.
The Top in operation
Top in operation message appears in
the multifunction display. The seat ventilation
is switched on. The rear side windows open.
X To close: press the&button in the key
until the soft top is completely closed.
The Top in operation
Top in operation message appears in
the multifunction display. The soft top and the
side windows close. Closing the soft top manually
Important safety notes G
WARNING
Closing the soft top manually is a complex,
technically challenging procedure which can
also be physically demanding. It could lead to you trapping yourself or other persons. There
is a risk of injury.
Where possible, have the soft top closed man-
ually at a qualified specialist workshop.
If the soft top cannot be closed automatically,
check the following points:
R Is the boot separator engaged (Y page 94)?
R Are the head restraints on the rear bench
seats extended? R
Is the boot lid closed?
R Is the on-board voltage sufficient?
Start the engine if necessary.
If automatic operation still does not work, the
soft top can be closed manually.
The help of a second person is required in car-
rying out this procedure.
Closing the soft top X
Apply the parking brake.
X Open the side windows.
X Lower the head restraints automatically
(Y page 102) or manually (Y page 102).
X Remove the key from the ignition lock.
X Open the boot.
X Take the two straps out of the vehicle tool kit
(Y page 305).
X Take the Allen key out of the Owner's Manual
wallet and keep it with you. X
Turn rotary catch :anti-clockwise and fold
cover ;down. X
Insert Allen key =into valve screw ?on the
hydraulic pump.
X Turn valve screw ?of the hydraulic pump
with Allen key =anti-clockwise a full turn. 90
Soft topOpening and closing
Page 97 of 349
i
Press the soft-top compartment cover again
if the boot lid cannot be opened.
! Do not under any circumstances open the
boot lid with the emergency key. You could
otherwise damage the boot lid and the soft-
top compartment cover. Relocking the soft top
Important safety notes G
WARNING
If you do not fully open/close the soft top, the soft-top hydraulics depressurise after a short time. This causes the soft top to lower unex-
pectedly and may cause you or others to be
trapped. There is a risk of injury.
Always open or close the soft top completely.
The soft top is not locked if: R the Top in operation
Top in operation message appears in
the multifunction display
R you hear a warning tone for up to ten seconds
when pulling away or while driving
Locking You can lock the soft top again if it is not locked
fully.
X Pull over and stop the vehicle safely as soon
as possible, paying attention to road and traf-
fic conditions.
X Turn the key to position 2in the ignition lock.
X Press the soft-top switch (Y page 89).Boot separator
General notes !
In order to avoid damaging the soft top or
stowed loads, please adhere to the following
while the soft top is open:
R Do not place any long objects inside or
behind the side stowage nets when the
boot separator is open. These objects could obstruct the boot separator or cause
damage to the open soft top.
R Make sure that the load does not push the
boot separator upwards.
The soft top can only be opened when the boot
separator is closed.
The boot separator can be used to cover luggage
and loads in the boot.
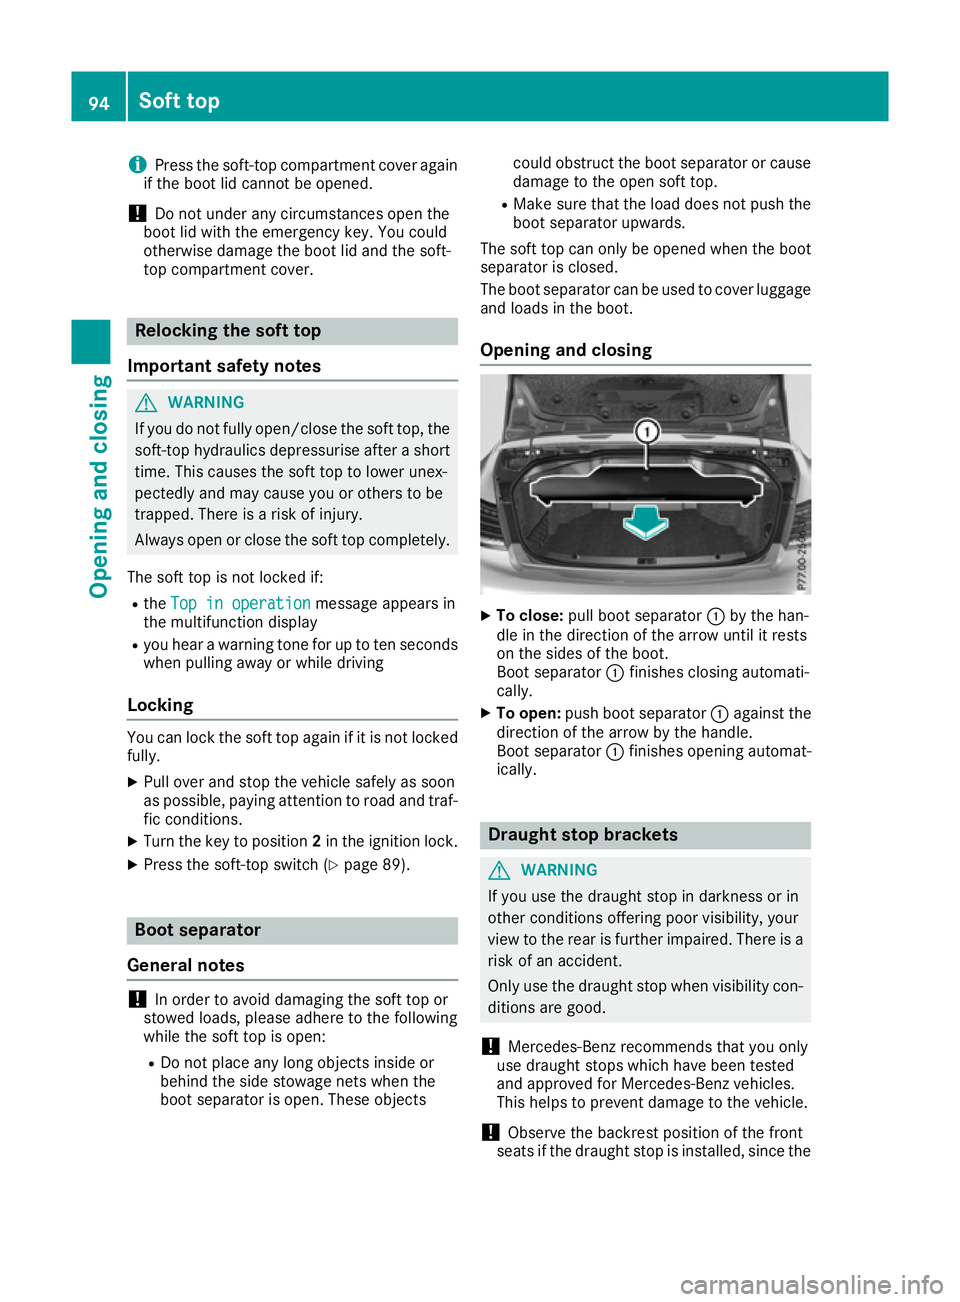
Opening and closing X
To close: pull boot separator :by the han-
dle in the direction of the arrow until it rests
on the sides of the boot.
Boot separator :finishes closing automati-
cally.
X To open: push boot separator :against the
direction of the arrow by the handle.
Boot separator :finishes opening automat-
ically. Draught stop brackets
G
WARNING
If you use the draught stop in darkness or in
other conditions offering poor visibility, your
view to the rear is further impaired. There is a
risk of an accident.
Only use the draught stop when visibility con- ditions are good.
! Mercedes-Benz recommends that you only
use draught stops which have been tested
and approved for Mercedes-Benz vehicles.
This helps to prevent damage to the vehicle.
! Observe the backrest position of the front
seats if the draught stop is installed, since the 94
Soft topOpening and closing
Page 98 of 349
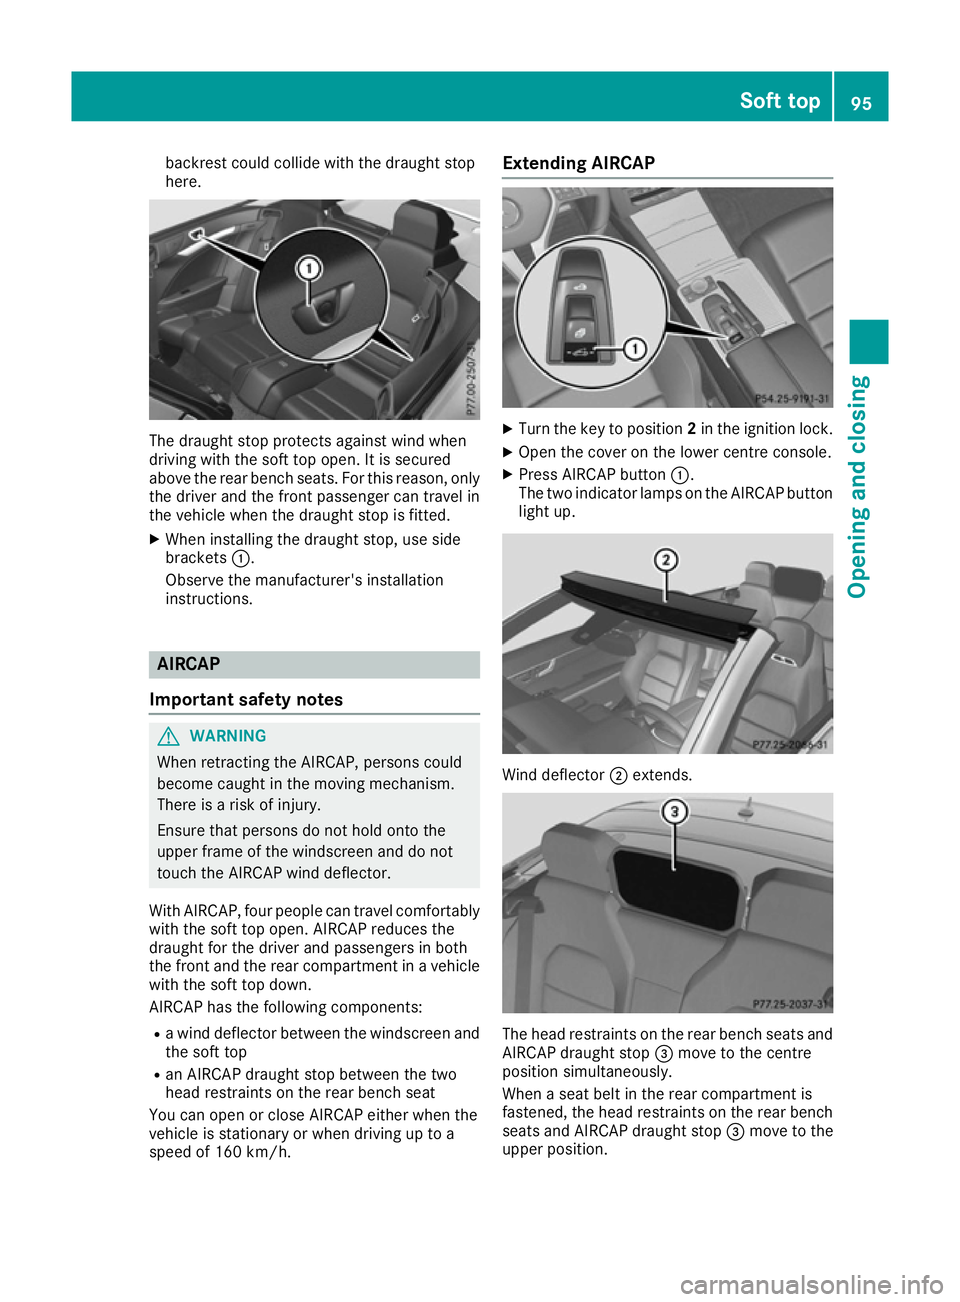
backrest could collide with the draught stop
here. The draught stop protects against wind when
driving with the soft top open. It is secured
above the rear bench seats. For this reason, only the driver and the front passenger can travel in
the vehicle when the draught stop is fitted.
X When installing the draught stop, use side
brackets :.
Observe the manufacturer's installation
instructions. AIRCAP
Important safety notes G
WARNING
When retracting the AIRCAP, persons could
become caught in the moving mechanism.
There is a risk of injury.
Ensure that persons do not hold onto the
upper frame of the windscreen and do not
touch the AIRCAP wind deflector.
With AIRCAP, four people can travel comfortably with the soft top open. AIRCAP reduces the
draught for the driver and passengers in both
the front and the rear compartment in a vehicle
with the soft top down.
AIRCAP has the following components:
R a wind deflector between the windscreen and
the soft top
R an AIRCAP draught stop between the two
head restraints on the rear bench seat
You can open or close AIRCAP either when the
vehicle is stationary or when driving up to a
speed of 160 km/h. Extending AIRCAP
X
Turn the key to position 2in the ignition lock.
X Open the cover on the lower centre console.
X Press AIRCAP button :.
The two indicator lamps on the AIRCAP button light up. Wind deflector
;extends. The head restraints on the rear bench seats and
AIRCAP draught stop =move to the centre
position simultaneously.
When a seat belt in the rear compartment is
fastened, the head restraints on the rear bench seats and AIRCAP draught stop =move to the
upper position. Soft top
95Opening and closing Z
Page 99 of 349
If you park your vehicle with the soft top down
and remove the key, the wind deflector and the
head restraints in the rear compartment retract automatically. When you restart your engine
after having been parked, the wind deflector and
the head restraints in the rear compartment
extend again automatically.
AIRCAP cannot be extended or retracted if the
vehicle speed exceeds approximately
160 km/h.
Retracting AIRCAP X
Turn the key to position 2in the ignition lock.
X Open the cover on the lower centre console.
X Press AIRCAP button :.
The two indicator lamps on the AIRCAP button
go out. Wind deflector ;retracts.
The head restraints on the rear bench seats and
AIRCAP draught stop =move to the lowest
position simultaneously.
If there are passengers wearing seat belts in the rear compartment, the head restraints on the
rear bench seats and the AIRCAP draught stop
remain in the upper position.
Retracting the head restraints on the
rear bench seats from the driver's seat To improve the rear view, you can retract the
head restraints on the rear bench seats individ- ually (Y page 102). The wind deflector remains
in its current position. Fitting/removing the AIRCAP draught
stop
Preparation You will need a 4 mm Allen key to fit and remove
the AIRCAP draught stop.
Before fitting or removing the AIRCAP draught
stop:
X Turn the key to position 2in the ignition lock.
X Open the folding roof fully (Y page 89).
X Extend the head restraints in the rear com-
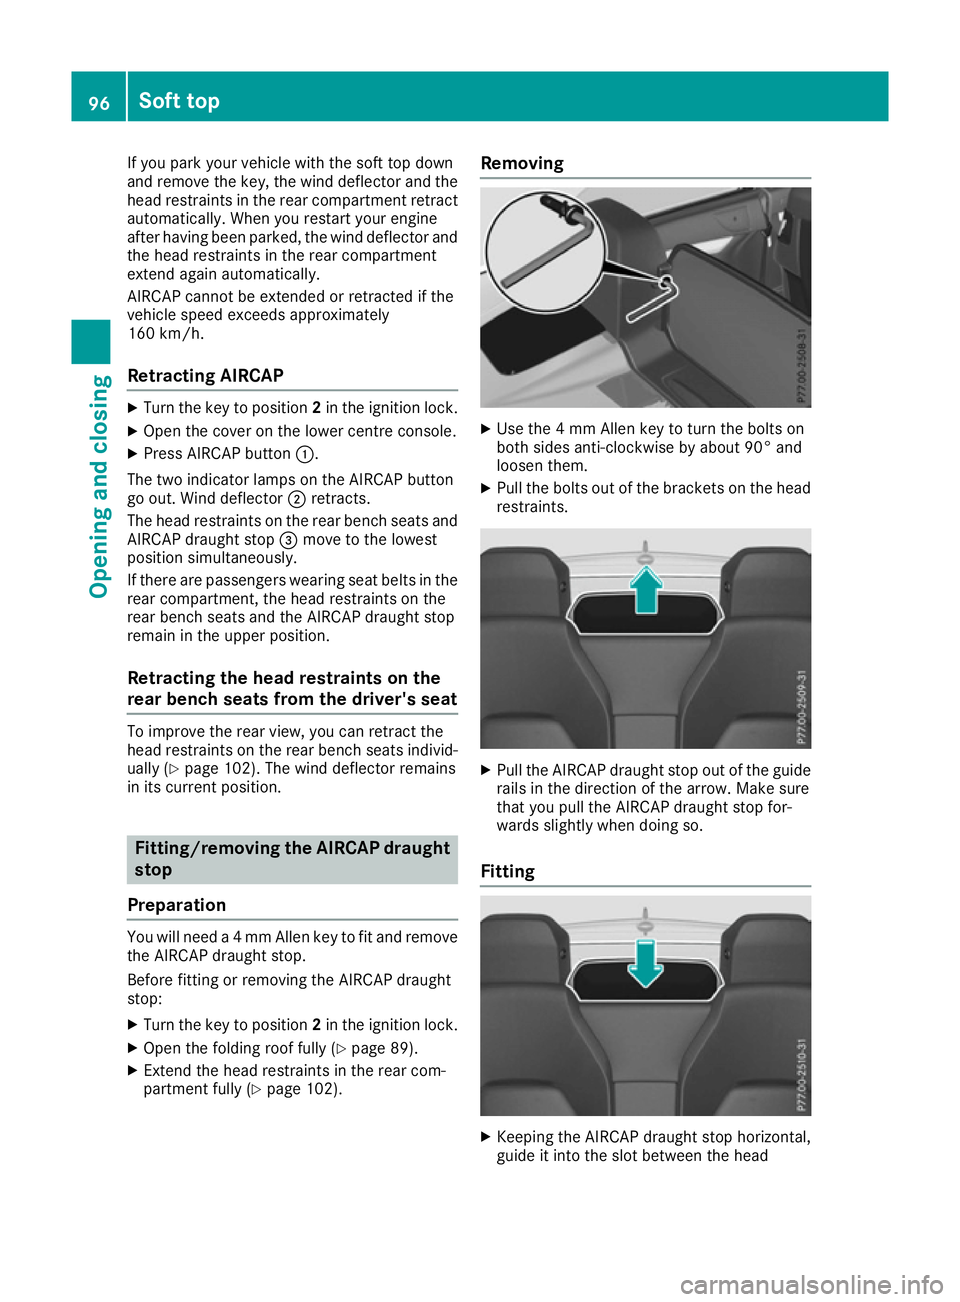
partment fully (Y page 102). Removing
X
Use the 4 mm Allen key to turn the bolts on
both sides anti-clockwise by about 90° and
loosen them.
X Pull the bolts out of the brackets on the head
restraints. X
Pull the AIRCAP draught stop out of the guide
rails in the direction of the arrow. Make sure
that you pull the AIRCAP draught stop for-
wards slightly when doing so.
Fitting X
Keeping the AIRCAP draught stop horizontal,
guide it into the slot between the head 96
Soft topOpening and closing
Page 102 of 349
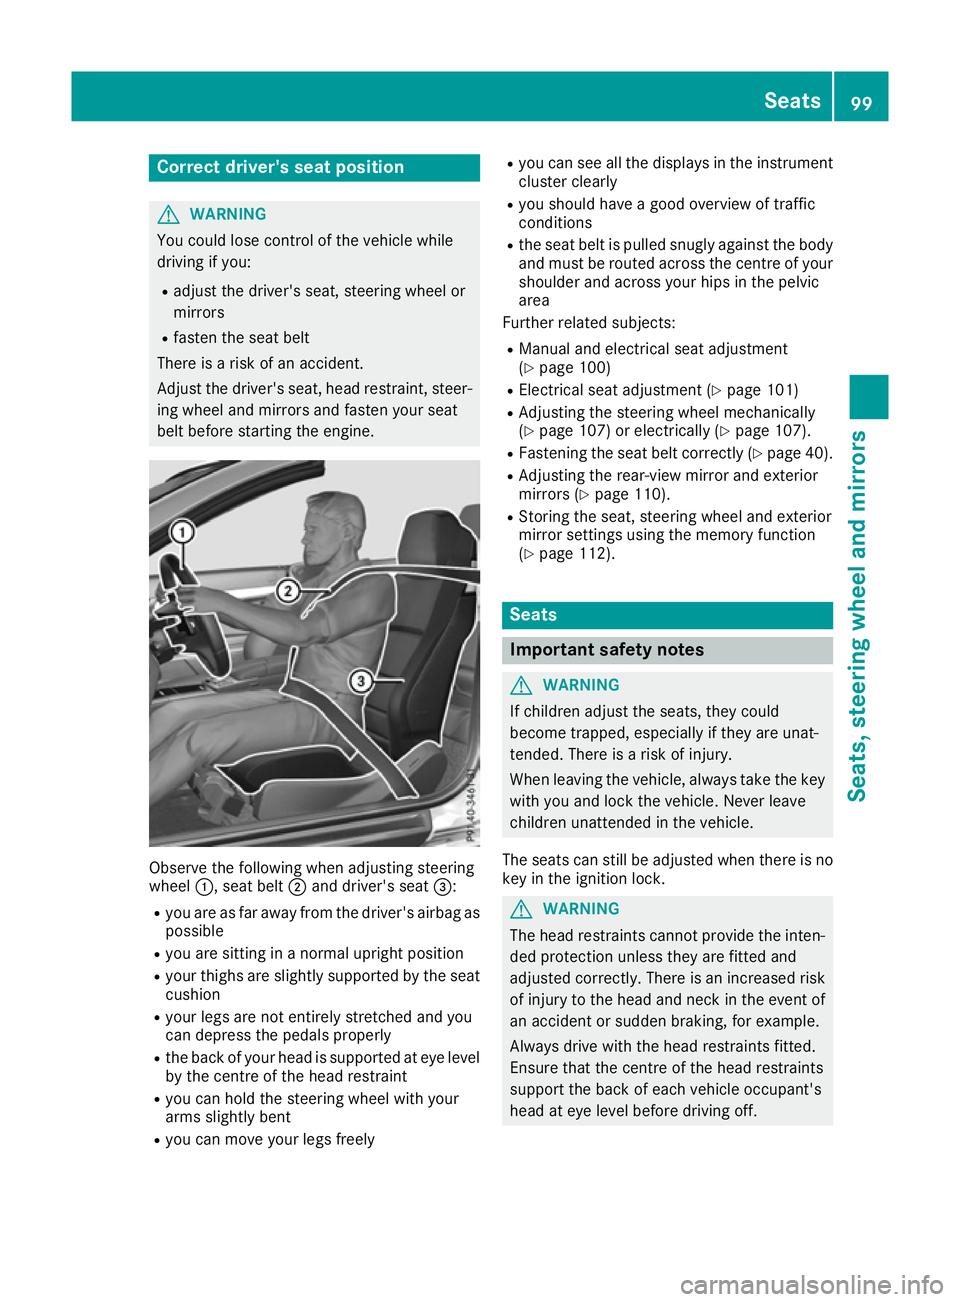
Correct driver's seat position
G
WARNING
You could lose control of the vehicle while
driving if you:
R adjust the driver's seat, steering wheel or
mirrors
R fasten the seat belt
There is a risk of an accident.
Adjust the driver's seat, head restraint, steer-
ing wheel and mirrors and fasten your seat
belt before starting the engine. Observe the following when adjusting steering
wheel
:, seat belt ;and driver's seat =:
R you are as far away from the driver's airbag as
possible
R you are sitting in a normal upright position
R your thighs are slightly supported by the seat
cushion
R your legs are not entirely stretched and you
can depress the pedals properly
R the back of your head is supported at eye level
by the centre of the head restraint
R you can hold the steering wheel with your
arms slightly bent
R you can move your legs freely R
you can see all the displays in the instrument
cluster clearly
R you should have a good overview of traffic
conditions
R the seat belt is pulled snugly against the body
and must be routed across the centre of your
shoulder and across your hips in the pelvic
area
Further related subjects:
R Manual and electrical seat adjustment
(Y page 100)
R Electrical seat adjustment (Y page 101)
R Adjusting the steering wheel mechanically
(Y page 107) or electrically (Y page 107).
R Fastening the seat belt correctly (Y page 40).
R Adjusting the rear-view mirror and exterior
mirrors (Y page 110).
R Storing the seat, steering wheel and exterior
mirror settings using the memory function
(Y page 112). Seats
Important safety notes
G
WARNING
If children adjust the seats, they could
become trapped, especially if they are unat-
tended. There is a risk of injury.
When leaving the vehicle, always take the key with you and lock the vehicle. Never leave
children unattended in the vehicle.
The seats can still be adjusted when there is no
key in the ignition lock. G
WARNING
The head restraints cannot provide the inten-
ded protection unless they are fitted and
adjusted correctly. There is an increased risk of injury to the head and neck in the event of
an accident or sudden braking, for example.
Always drive with the head restraints fitted.
Ensure that the centre of the head restraints
support the back of each vehicle occupant's
head at eye level before driving off. Seats
99Seats, steering wheel and mirrors Z
Page 103 of 349
Observe the safety notes on "Airbags"
(Y
page 42) and "Children in the vehicle"
(Y page 49). G
WARNING
You could lose control of the vehicle while
driving if you:
R adjust the driver's seat, steering wheel or
mirrors
R fasten the seat belt
There is a risk of an accident.
Adjust the driver's seat, head restraint, steer-
ing wheel and mirrors and fasten your seat
belt before starting the engine. G
WARNING
If you adjust the seat height carelessly, you or other vehicle occupants could be trapped andthereby injured. Children in particular could
accidentally press the electrical seat adjust-
ment buttons and become trapped. There is a
risk of injury.
While moving the seats, make sure that your
hands or other body parts do not get under the
lever assembly of the seat adjustment sys-
tem. G
WARNING
When adjusting a seat, you or another vehicle occupant could become trapped by the guiderail of the seat, for instance. There is a risk of
injury.
Make sure that no one has any part of their
body within the sweep of the seat when
adjusting it.
! To avoid damage to the seats and the seat
heating, observe the following information:
R do not spill any liquids on the seats. If liquid
is spilled on the seats, dry them as soon as possible.
R if the seat covers are damp or wet, do not
switch on the seat heating. The seat heat-
ing should also not be used to dry the seats.
R clean the seat covers as recommended;
see "Interior care".
R do not transport heavy loads on the seats.
Do not place sharp objects on the seat cushions, e.g. knives, nails or tools. The
seats should only be occupied by passen-
gers, if possible.
R when the seat heating is in operation, do
not cover the seats with insulating materi-
als, e.g. blankets, coats, bags, seat covers,
child seats or booster seats.
! Make sure that there are no objects in the
footwell under or behind the seats when mov- ing the seats back. There is a risk that the
seats and/or the objects could be damaged.
i The head restraints in the front seats are
fitted with the NECK-PRO system (Y page 47).
For this reason, it is not possible to remove
the head restraints from the front seats.
For more information, contact a qualified spe-
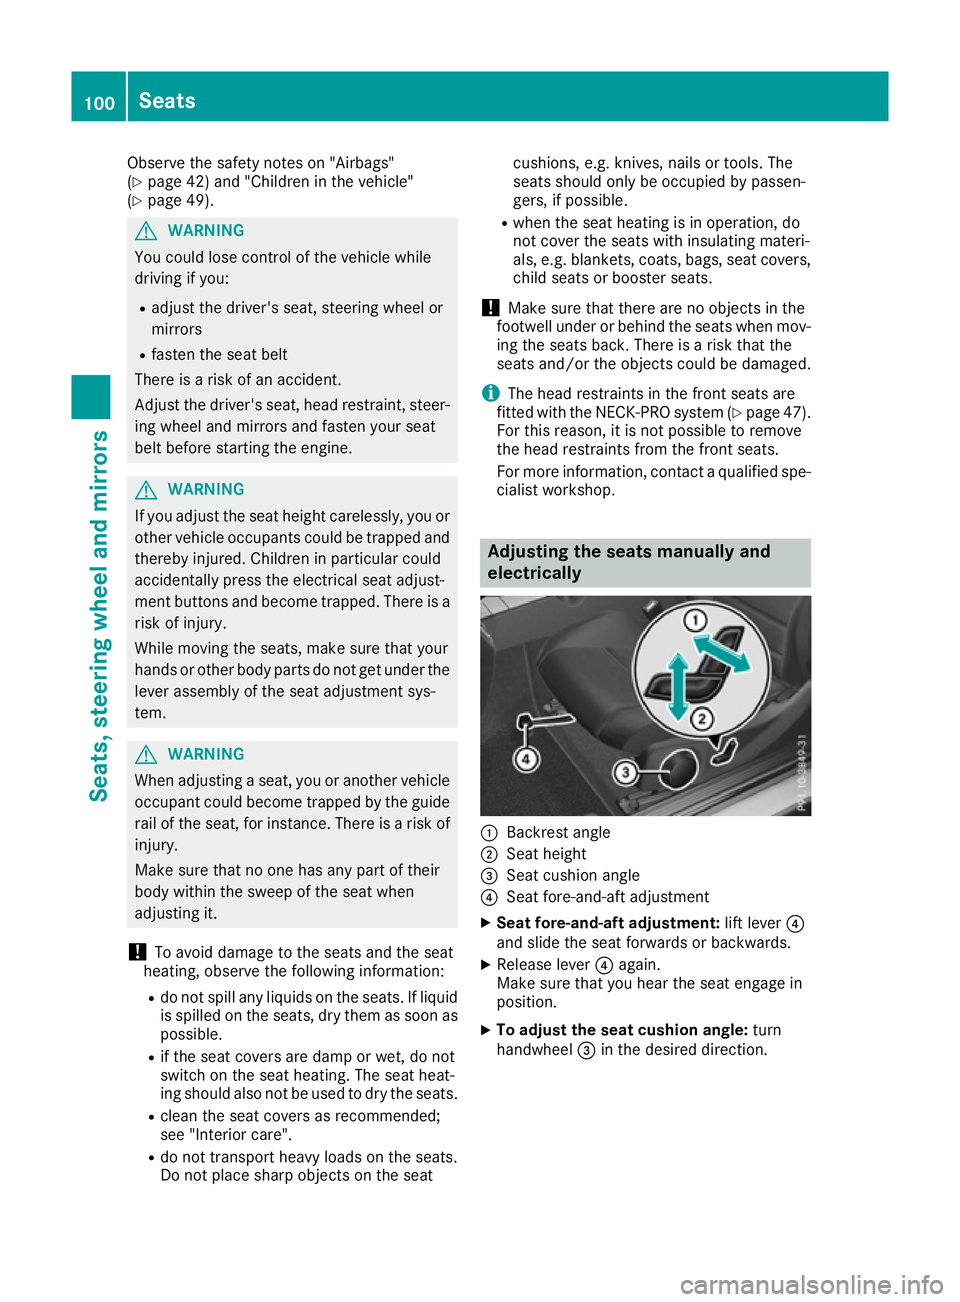
cialist workshop. Adjusting the seats manually and
electrically :
Backrest angle
; Seat height
= Seat cushion angle
? Seat fore-and-aft adjustment
X Seat fore-and-aft adjustment: lift lever?
and slide the seat forwards or backwards.
X Release lever ?again.
Make sure that you hear the seat engage in
position.
X To adjust the seat cushion angle: turn
handwheel =in the desired direction. 100
SeatsSeats, steering wheel and mirrors
Page 104 of 349
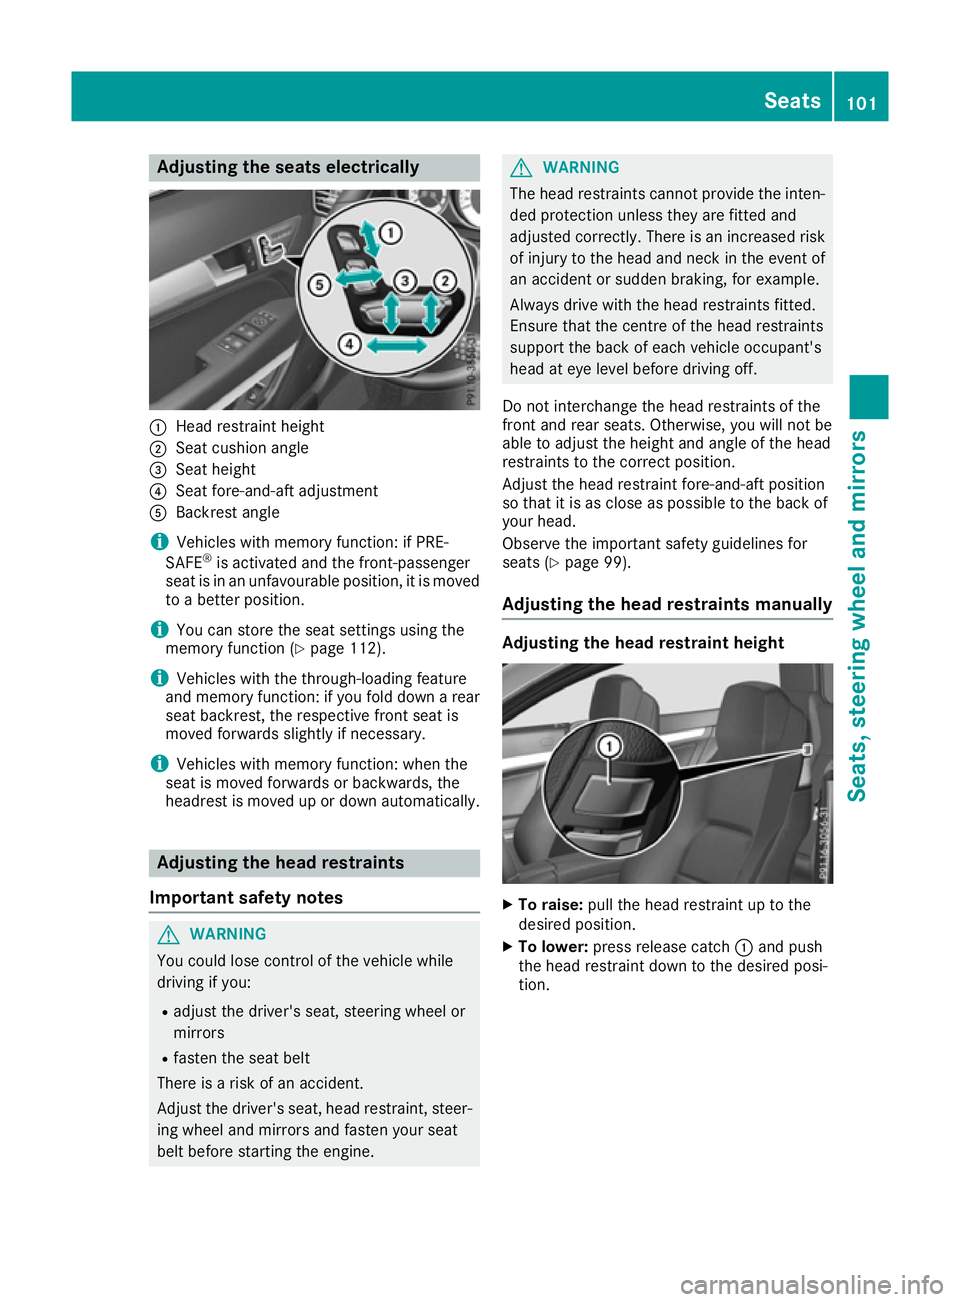
Adjusting the seats electrically
:
Head restraint height
; Seat cushion angle
= Seat height
? Seat fore-and-aft adjustment
A Backrest angle
i Vehicles with memory function: if PRE-
SAFE ®
is activated and the front-passenger
seat is in an unfavourable position, it is moved to a better position.
i You can store the seat settings using the
memory function (Y page 112).
i Vehicles with the through-loading feature
and memory function: if you fold down a rear
seat backrest, the respective front seat is
moved forwards slightly if necessary.
i Vehicles with memory function: when the
seat is moved forwards or backwards, the
headrest is moved up or down automatically. Adjusting the head restraints
Important safety notes G
WARNING
You could lose control of the vehicle while
driving if you:
R adjust the driver's seat, steering wheel or
mirrors
R fasten the seat belt
There is a risk of an accident.
Adjust the driver's seat, head restraint, steer-
ing wheel and mirrors and fasten your seat
belt before starting the engine. G
WARNING
The head restraints cannot provide the inten-
ded protection unless they are fitted and
adjusted correctly. There is an increased risk of injury to the head and neck in the event of
an accident or sudden braking, for example.
Always drive with the head restraints fitted.
Ensure that the centre of the head restraints
support the back of each vehicle occupant's
head at eye level before driving off.
Do not interchange the head restraints of the
front and rear seats. Otherwise, you will not be
able to adjust the height and angle of the head
restraints to the correct position.
Adjust the head restraint fore-and-aft position
so that it is as close as possible to the back of
your head.
Observe the important safety guidelines for
seats (Y page 99).
Adjusting the head restraints manually Adjusting the head restraint height
X
To raise: pull the head restraint up to the
desired position.
X To lower: press release catch :and push
the head restraint down to the desired posi-
tion. Seats
101Seats, steering wheel and mirrors Z