2015 MERCEDES-BENZ E-CLASS CABRIOLET trip computer
[x] Cancel search: trip computerPage 18 of 349

Menu overview .............................. 215
Message memory .......................... 229
Navigation menu ............................2
17
Operating the TV ............................ 219
Operating video DVD ..................... 218
Operation ....................................... 214
Service menu ................................. 222
Settings menu ............................... 223
Standard displa y............................ 215
Telephone menu ............................ 219
Trip menu ...................................... 215
Vehicle submenu ........................... 225
Operating instructions
Vehicle equipment ........................... 25
Operating safety
Declaration of conformity ................ 26
Important safety note ...................... 25
Operating system
see On-board computer
Operation
Digital Owner's Manua l.................... 23
Outside temperature display ........... 213
Overhead control panel ...................... 35
Override feature
Rear side window s........................... 61 P
Paint code .......................................... 336
Paintwork (cleaning instructions) ... 297
Panic alarm .......................................... 37
Parking
Important safety notes .................. 157
Parking brake ................................ 159
Position of exterior mirror, front-
passenger side ............................... 112
Reversing camera .......................... 188
see PARKTRONIC
Parking aid
Active Parking Assist ..................... 183
see Exterior mirrors
see PARKTRONIC
Parking assistance
see PARKTRONIC
Parking brake
Display message ............................ 232
Notes/function .............................. 159
Warning lamp ................................. 255 Parking lamps
Display message ............................ 236
Switching on/of f........................... 115
PARKTRONIC
Deactivating/activating ................. 181
Driving system ............................... 179
Function/note s............................. 179
Important safety notes .................. 179
Problem (fault) ............................... 183
Sensor rang e................................. 180
Trailer towing ................................. 181
Warning display ............................. 181
PASSENGER AIR BAG OFF
Indicator lamp .................................. 38
Problems (malfunctions) .................. 55
Petrol .................................................. 338
Pets in the vehicle ............................... 61
Phone book
See also Digital Owner's Manua l... 263
Plastic trim (cleaning instruc-
tions) .................................................. 302
Power windows
see Side windows
PRE-SAFE ®
(anticipatory occupant
protection)
Operation ......................................... 47
PRE-SAFE ®
(preventive occupant
safety system)
Display message ............................ 233
PRE-SAFE ®
Brake
Activating/deactivating ................. 221
Display message ............................ 233
Function/note s................................ 69
Important safety notes .................... 69
Warning lamp ................................. 261
PRE-SAFE ®
PLUS (anticipatory
occupant protection PLUS)
Display message ............................ 233
Operation ......................................... 48
Program selector button .................. 150
Protection against theft
ATA (Anti-Theft Alarm system )......... 71
Immobiliser ...................................... 71
Interior motion sensor ..................... 72
Tow-away protection ........................ 72
Protection of the environment
General notes .................................. 24 Index
15
Page 23 of 349
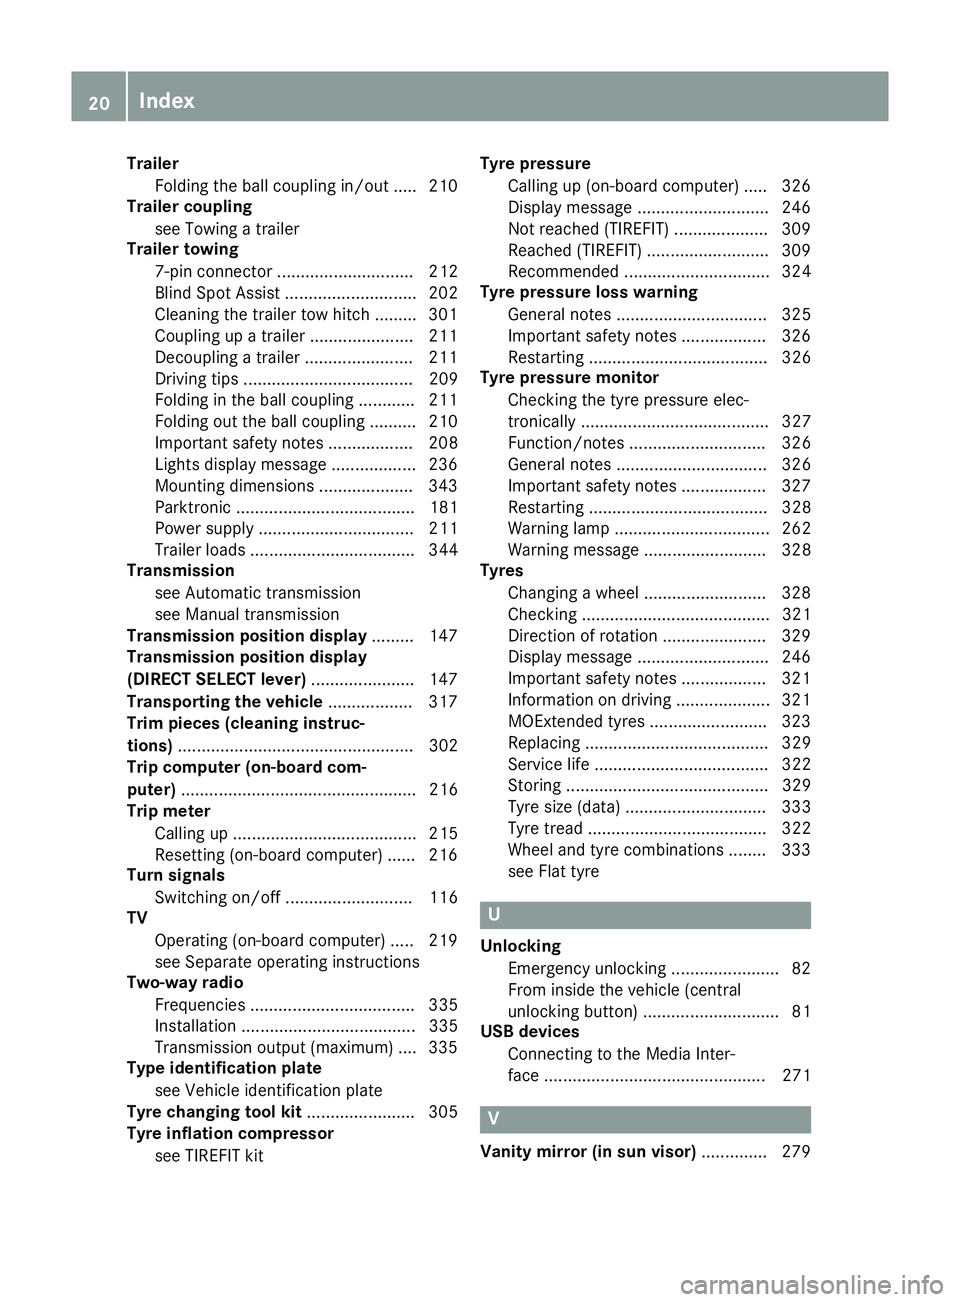
Trailer
Folding the ball coupling in/out ..... 210
Trailer coupling
see Towing a trailer
Trailer towing
7-pin connector ............................. 212
Blind Spot Assist ............................ 202
Cleaning the trailer tow hitch ......... 301
Coupling up a traile r...................... 211
Decoupling a trailer ....................... 211
Driving tips .................................... 209
Folding in the ball coupling ............ 211
Folding out the ball coupling .......... 210
Important safety notes .................. 208
Lights display message .................. 236
Mounting dimensions .................... 343
Parktronic ...................................... 181
Power supply ................................. 211
Trailer load s................................... 344
Transmission
see Automatic transmission
see Manual transmission
Transmission position display ......... 147
Transmission position display
(DIRECT SELECT lever) ...................... 147
Transporting the vehicle .................. 317
Trim pieces (cleaning instruc-
tions) .................................................. 302
Trip computer (on-board com-
puter) .................................................. 216
Trip meter
Calling up ....................................... 215
Resetting (on-board computer) ...... 216
Turn signals
Switching on/of f........................... 116
TV
Operating (on-board computer) ..... 219
see Separate operating instructions
Two-way radio
Frequencies ................................... 335
Installation ..................................... 335
Transmission output (maximum) .... 335
Type identification plate
see Vehicle identification plate
Tyre changing tool kit ....................... 305
Tyre inflation compressor
see TIREFIT kit Tyre pressure
Calling up (on-board computer) ..... 326
Display message ............................ 246
Not reached (TIREFIT) .................... 309
Reached (TIREFIT) .......................... 309
Recommended ............................... 324
Tyre pressure loss warning
General notes ................................ 325
Important safety notes .................. 326
Restarting ...................................... 326
Tyre pressure monitor
Checking the tyre pressure elec-
tronically ........................................ 327
Function/note s............................. 326
General notes ................................ 326
Important safety notes .................. 327
Restarting ...................................... 328
Warning lamp ................................. 262
Warning message .......................... 328
Tyres
Changing a whee l.......................... 328
Checking ........................................ 321
Direction of rotation ...................... 329
Display message ............................ 246
Important safety notes .................. 321
Information on driving .................... 321
MOExtended tyre s......................... 323
Replacing ....................................... 329
Service life ..................................... 322
Storing ........................................... 329
Tyre size (data ).............................. 333
Tyre tread ...................................... 322
Wheel and tyre combinations ........ 333
see Flat tyre U
Unlocking Emergency unlocking ....................... 82
From inside the vehicle (central
unlocking button) ............................. 81
USB devices
Connecting to the Media Inter-
face ............................................... 271 V
Vanity mirror (in sun visor) .............. 27920
Index
Page 218 of 349
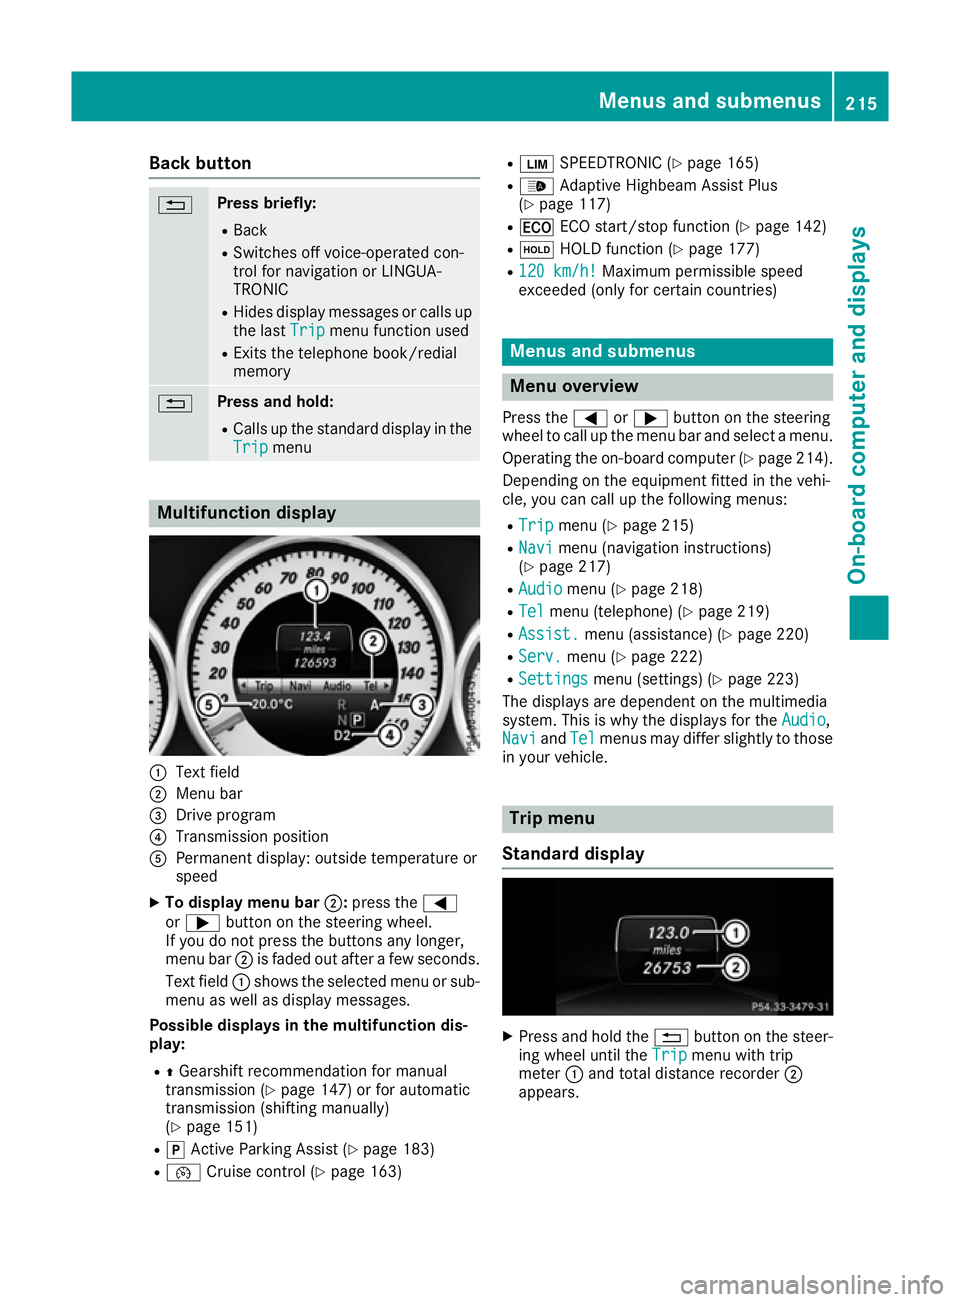
Back button
% Press briefly:
R Back
R Switches off voice-operated con-
trol for navigation or LINGUA-
TRONIC
R Hides display messages or calls up
the last Trip Tripmenu function used
R Exits the telephone book/redial
memory % Press and hold:
R
Calls up the standard display in the
Trip
Trip menu Multifunction display
:
Text field
; Menu bar
= Drive program
? Transmission position
A Permanent display: outside temperature or
speed
X To display menu bar ;:press the =
or ; button on the steering wheel.
If you do not press the buttons any longer,
menu bar ;is faded out after a few seconds.
Text field :shows the selected menu or sub-
menu as well as display messages.
Possible displays in the multifunction dis-
play:
R ZGearshift recommendation for manual
transmission (Y page 147) or for automatic
transmission (shifting manually)
(Y page 151)
R j Active Parking Assist (Y page 183)
R ¯ Cruise control (Y page 163) R
È SPEEDTRONIC (Y page 165)
R _ Adaptive Highbeam Assist Plus
(Y page 117)
R ¤ ECO start/stop function (Y page 142)
R ë HOLD function (Y page 177)
R 120 km/h! 120 km/h! Maximum permissible speed
exceeded (only for certain countries) Menus and submenus
Menu overview
Press the =or; button on the steering
wheel to call up the menu bar and select a menu.
Operating the on-board computer (Y page 214).
Depending on the equipment fitted in the vehi-
cle, you can call up the following menus:
R Trip Trip menu (Y page 215)
R Navi
Navi menu (navigation instructions)
(Y page 217)
R Audio
Audio menu (Y page 218)
R Tel
Tel menu (telephone) (Y page 219)
R Assist.
Assist. menu (assistance) (Y page 220)
R Serv.
Serv. menu (Y page 222)
R Settings
Settings menu (settings) (Y page 223)
The displays are dependent on the multimedia
system. This is why the displays for the Audio Audio,
Navi
Navi andTel
Tel menus may differ slightly to those
in your vehicle. Trip menu
Standard display X
Press and hold the %button on the steer-
ing wheel until the Trip
Tripmenu with trip
meter :and total distance recorder ;
appears. Menus and submenus
215On-board computer and displays Z
Page 219 of 349
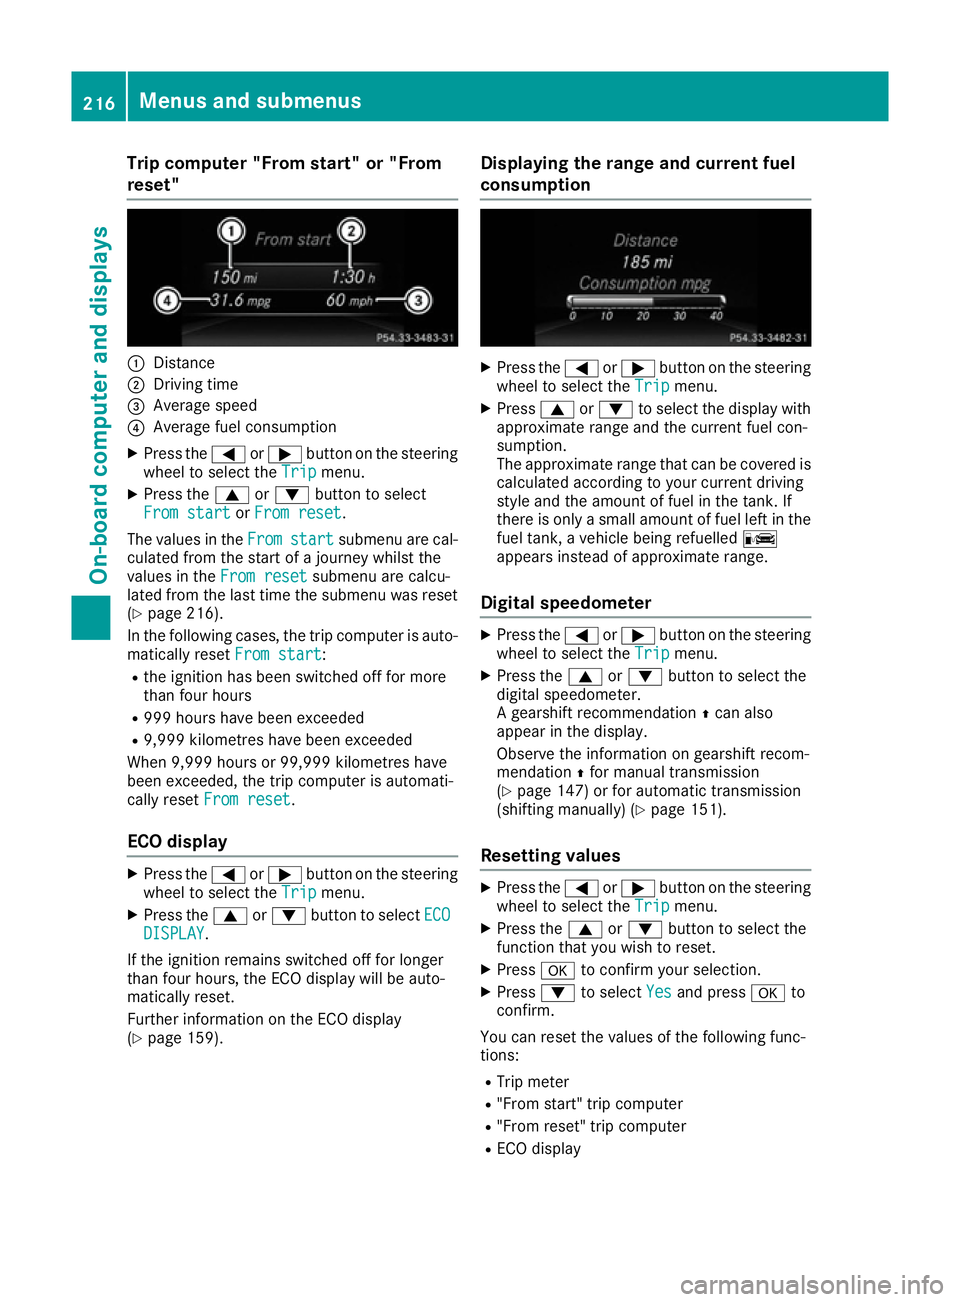
Trip computer "From start" or "From
reset" :
Distance
; Driving time
= Average speed
? Average fuel consumption
X Press the =or; button on the steering
wheel to select the Trip
Tripmenu.
X Press the 9or: button to select
From start
From start orFrom reset
From reset.
The values in the From
Fromstart
start submenu are cal-
culated from the start of a journey whilst the
values in the From reset From resetsubmenu are calcu-
lated from the last time the submenu was reset
(Y page 216).
In the following cases, the trip computer is auto-
matically reset From start
From start:
R the ignition has been switched off for more
than four hours
R 999 hours have been exceeded
R 9,999 kilometres have been exceeded
When 9,999 hours or 99,999 kilometres have
been exceeded, the trip computer is automati-
cally reset From reset From reset.
ECO display X
Press the =or; button on the steering
wheel to select the Trip
Tripmenu.
X Press the 9or: button to select ECO
ECO
DISPLAY
DISPLAY.
If the ignition remains switched off for longer
than four hours, the ECO display will be auto-
matically reset.
Further information on the ECO display
(Y page 159). Displaying the range and current fuel
consumption X
Press the =or; button on the steering
wheel to select the Trip Tripmenu.
X Press 9or: to select the display with
approximate range and the current fuel con-
sumption.
The approximate range that can be covered is calculated according to your current driving
style and the amount of fuel in the tank. If
there is only a small amount of fuel left in the
fuel tank, a vehicle being refuelled C
appears instead of approximate range.
Digital speedometer X
Press the =or; button on the steering
wheel to select the Trip Tripmenu.
X Press the 9or: button to select the
digital speedometer.
A gearshift recommendation Zcan also
appear in the display.
Observe the information on gearshift recom-
mendation Zfor manual transmission
(Y page 147) or for automatic transmission
(shifting manually) (Y page 151).
Resetting values X
Press the =or; button on the steering
wheel to select the Trip Tripmenu.
X Press the 9or: button to select the
function that you wish to reset.
X Press ato confirm your selection.
X Press :to select Yes
Yesand press ato
confirm.
You can reset the values of the following func-
tions: R Trip meter
R "From start" trip computer
R "From reset" trip computer
R ECO display 216
Menus and submenusOn-board computer and displays
Page 220 of 349
i
If you reset the values in the "ECO display",
the values in the "From start" trip computer
are also reset. If you reset the values in the
"From start" trip computer, the values in the
"ECO display" are also reset. Navigation menu
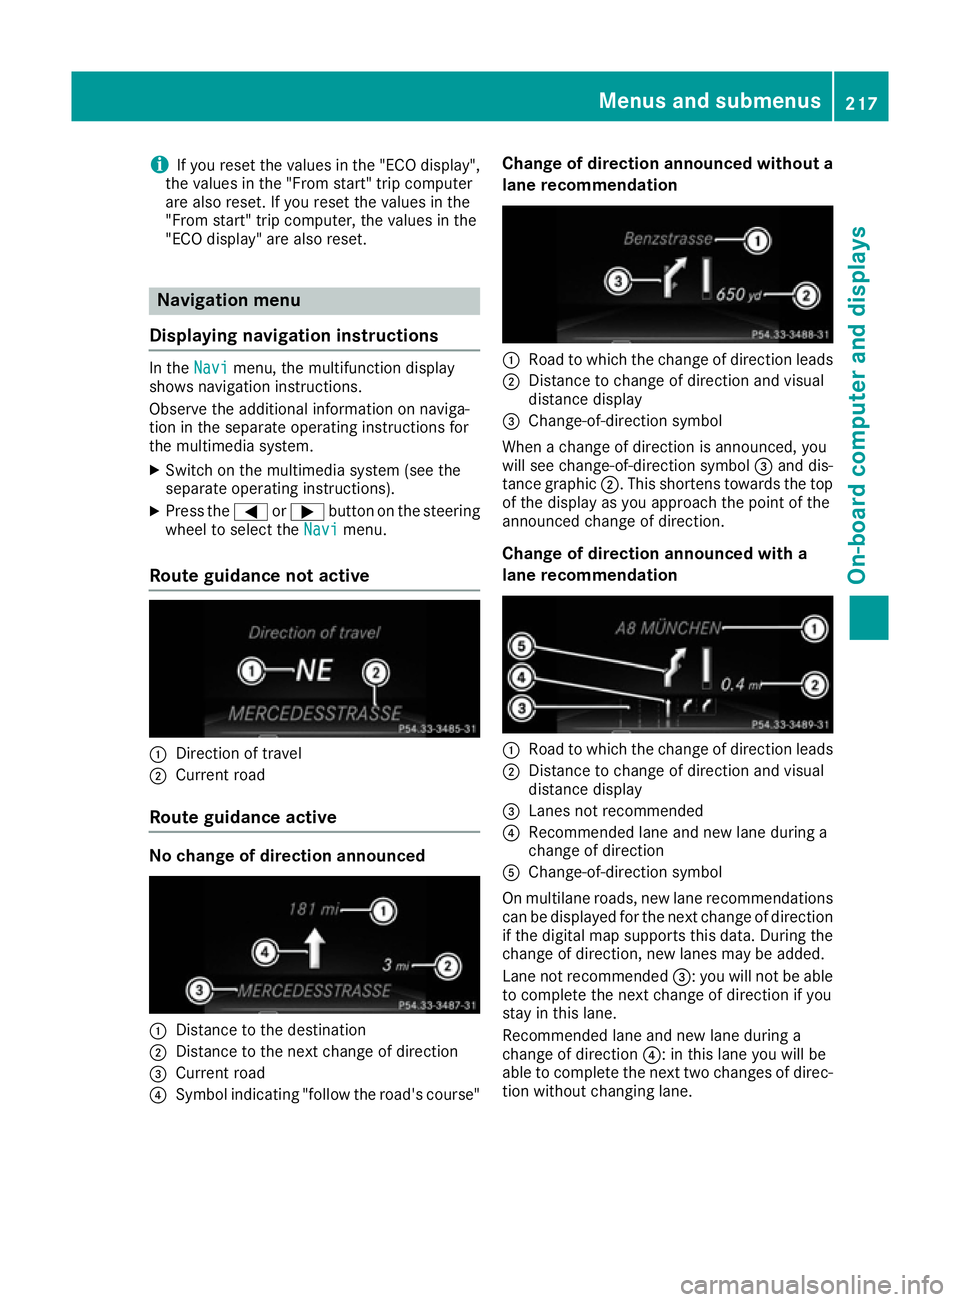
Displaying navigation instructions In the
Navi
Navi menu, the multifunction display
shows navigation instructions.
Observe the additional information on naviga-
tion in the separate operating instructions for
the multimedia system.
X Switch on the multimedia system (see the
separate operating instructions).
X Press the =or; button on the steering
wheel to select the Navi
Navi menu.
Route guidance not active :
Direction of travel
; Current road
Route guidance active No change of direction announced
:
Distance to the destination
; Distance to the next change of direction
= Current road
? Symbol indicating "follow the road's course" Change of direction announced without a
lane recommendation :
Road to which the change of direction leads
; Distance to change of direction and visual
distance display
= Change-of-direction symbol
When a change of direction is announced, you
will see change-of-direction symbol =and dis-
tance graphic ;. This shortens towards the top
of the display as you approach the point of the
announced change of direction.
Change of direction announced with a
lane recommendation :
Road to which the change of direction leads
; Distance to change of direction and visual
distance display
= Lanes not recommended
? Recommended lane and new lane during a
change of direction
A Change-of-direction symbol
On multilane roads, new lane recommendations
can be displayed for the next change of direction
if the digital map supports this data. During the change of direction, new lanes may be added.
Lane not recommended =: you will not be able
to complete the next change of direction if you
stay in this lane.
Recommended lane and new lane during a
change of direction ?: in this lane you will be
able to complete the next two changes of direc- tion without changing lane. Menus and submenus
217On-board computer and displays Z
Page 226 of 349
R
Checking the tyre pressure electronically
(Y page 326)
R Calling up the service due date
(Y page 294) Settings menu
Introduction Depending on the equipment fitted in the vehi-
cle, In the
Settings Settings menu you have the follow-
ing options:
R Changing the instrument cluster settings
(Y page 223)
R Changing the light settings (Y page 223)
R Changing the vehicle settings (Y page 225)
R Changing the heating settings (Y page 226)
R Changing the convenience settings
(Y page 227)
R Restoring the factory settings (Y page 228)
Instrument cluster Selecting the distance unit
The Display unit Speed-/odometer:
Display unit Speed-/odometer: func-
tion allows you to choose whether certain dis-
plays appear in kilometres or miles in the mul-
tifunction display.
X Press the =or; button on the steering
wheel to select the Settings Settingsmenu.
X Press the :or9 button to select the
Instrument cluster
Instrument cluster submenu.
X Press ato confirm.
X Press the :or9 button to select the
Display unit Speed-/odometer
Display unit Speed-/odometer function.
You will see the selected setting: km
kmormiles
miles.
X Press the abutton to save the setting.
The selected unit of measurement for distance
applies to the: R the digital speedometer in the Trip
Trip menu
R the total distance recorder and trip meter
R the trip computer
R the current consumption and the range
R the navigation instructions in the Navi
Navi menu
R cruise control
R SPEEDTRONIC
R DISTRONIC PLUS
R ASSYST PLUS service interval display Switching the additional speedometer
on/off
Vehicles for the United Kingdom: this function is unavailable.
Only vehicles with manual transmission have
this function.
If the additional speedometer is switched on,
the speed is shown in the status bar of the mul-tifunction display instead of the outside tem-
perature.
The speed display is inverse to your speedome-
ter.
X Press the =or; button on the steering
wheel to select the Sett.
Sett. menu.
X Press the :or9 button to select the
Instrument cluster Instrument cluster submenu.
X Press ato confirm.
X Press the :or9 button to select the
Dig. speedo [mph]:
Dig. speedo [mph]: orDig. speedo
Dig. speedo
[km/h]:
[km/h]: function.
You will see the selected setting: on
on oroff
off .
X Press the abutton to save the setting.
Selecting permanent display
Vehicles for the United Kingdom: this function is unavailable.
The Permanent display: Permanent display: function allows you
to choose whether the multifunction display
always shows the outside temperature or the
speed.
The speed display is inverse to your speedome-
ter.
X Press the =or; button on the steering
wheel to select the Settings Settingsmenu.
X Press the :or9 button to select the
Instrument cluster
Instrument cluster submenu.
X Press ato confirm.
X Press the :or9 button to select the
Permanent display:
Permanent display: function.
The current setting, outside temperature
outside temperature
or Addit. speedo [mph]:
Addit. speedo [mph]: , appears.
X Press the abutton to save the setting.
Lights Setting the brightness for the instrument
cluster lighting and switches
The lighting in the instrument cluster, in the dis- plays and the controls in the vehicle interior can Menus and submenus
223On-board computer and displays Z