2015 MERCEDES-BENZ E-CLASS CABRIOLET clutch
[x] Cancel search: clutchPage 144 of 349
General notes
i
Vehicles with a petrol engine:
the cata-
lytic converter is preheated for up 30 seconds
after a cold start. The sound of the engine may change during this time.
Manual transmission X
Depress the brake pedal and keep it
depressed.
X Fully depress the clutch pedal.
X Shift to neutral N.
Automatic transmission X
Shift the transmission to position P.
The transmission position indicator in the
multifunction display shows P.
i You can start the engine in transmission
position Pand N.
Starting procedure with the key i
To start the engine using the key instead of
KEYLESS-GO, pull the Start/Stop button out
of the ignition lock.
X Vehicles with diesel engine: turn the key to
position 2in the ignition lock (Y page 139).
The % preglow indicator lamp in the instru-
ment cluster lights up.
X Turn the key to position 3in the ignition lock
and release it as soon as the engine is running (Y page 139).
i Vehicles with a diesel engine:
you can
start the engine without preglow if the engine
is warm.
Using KEYLESS-GO to start the engine i
The Start/Stop button can be used to start
the vehicle manually without inserting the key into the ignition lock. The key must be in the
vehicle and the Start/Stop button must be
inserted in the ignition lock. This mode for
starting the engine operates independently of the ECO start/stop automatic engine start
function. X
Depress the brake pedal and keep it
depressed.
X Press the Start/Stop button once
(Y page 139).
Vehicles with a petrol engine: the engine
starts.
Vehicles with a diesel engine: preglow is
activated and the engine starts. Pulling away
General notes G
WARNING
Vehicles with automatic transmission:
If the engine speed is above the engine idling speed and you then engage transmission
position Dor R, the vehicle may accelerate
suddenly. There is a risk of an accident.
When engaging transmission position Dor R,
always keep the brake pedal firmly depressed
and do not depress the accelerator pedal at
the same time.
! Vehicles with manual transmission:
change gear in good time and avoid spinning
the wheels. You could otherwise damage the
vehicle.
! If a warning tone sounds and the
Release Release
park. brake
park. brake message appears in the multi-
function display, the parking brake is still
applied. Release the parking brake.
Depress the accelerator carefully when pulling
away.
The vehicle locks centrally once you have pulled
away. The locking knobs in the doors drop down.
You can open the doors from the inside at any
time.
You can also deactivate the automatic locking
feature (Y page 225).
Vehicles with automatic transmission: it is
only possible to shift the transmission from posi-
tion Pto the desired position if you depress the
brake pedal. If you do not depress the brake
pedal, the DIRECT SELECT lever can still be
moved but the parking lock remains engaged.
i Vehicles with automatic transmission:
upshifts take place at higher engine speeds Driving
141Driving and parking Z
Page 146 of 349
i
All of the vehicle's systems remain active
when the engine is switched off automati-
cally.
i The engine can be switched off automati-
cally a maximum of four times (initial stop,
then three subsequent stops) in succession.
The ¤ symbol is shown in yellow in the
multifunction display after the engine has
been started automatically for the fourth
time. When the ¤symbol is shown in
green in the multifunction display, automatic
engine switch-off is again possible.
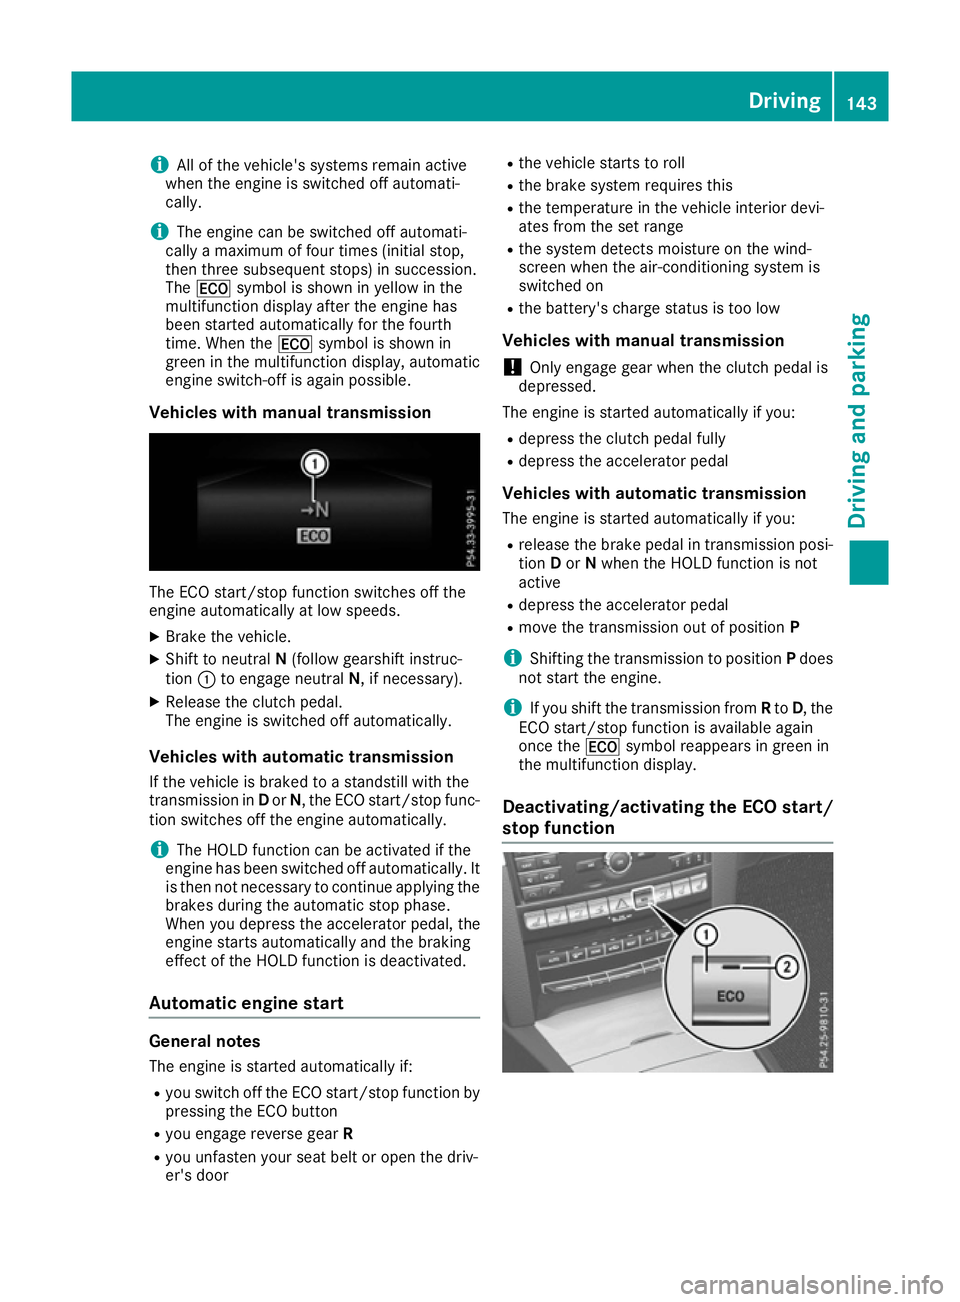
Vehicles with manual transmission The ECO start/stop function switches off the
engine automatically at low speeds.
X Brake the vehicle.
X Shift to neutral N(follow gearshift instruc-
tion :to engage neutral N, if necessary).
X Release the clutch pedal.
The engine is switched off automatically.
Vehicles with automatic transmission
If the vehicle is braked to a standstill with the
transmission in Dor N, the ECO start/stop func-
tion switches off the engine automatically.
i The HOLD function can be activated if the
engine has been switched off automatically. It
is then not necessary to continue applying the brakes during the automatic stop phase.
When you depress the accelerator pedal, the
engine starts automatically and the braking
effect of the HOLD function is deactivated.
Automatic engine start General notes
The engine is started automatically if:
R you switch off the ECO start/stop function by
pressing the ECO button
R you engage reverse gear R
R you unfasten your seat belt or open the driv-
er's door R
the vehicle starts to roll
R the brake system requires this
R the temperature in the vehicle interior devi-
ates from the set range
R the system detects moisture on the wind-
screen when the air-conditioning system is
switched on
R the battery's charge status is too low
Vehicles with manual transmission
! Only engage gear when the clutch pedal is
depressed.
The engine is started automatically if you:
R depress the clutch pedal fully
R depress the accelerator pedal
Vehicles with automatic transmission The engine is started automatically if you:
R release the brake pedal in transmission posi-
tion Dor Nwhen the HOLD function is not
active
R depress the accelerator pedal
R move the transmission out of position P
i Shifting the transmission to position
Pdoes
not start the engine.
i If you shift the transmission from
Rto D, the
ECO start/stop function is available again
once the ¤symbol reappears in green in
the multifunction display.
Deactivating/activating the ECO start/
stop function Driving
143Driving an d parking Z
Page 149 of 349

Problem
Possible causes/consequences and
M
MSolutions The coolant temperature
display is showing more
than 120 †. The coolant warning lamp may also
be on and a warning tone
may sound. The coolant level is too low. The coolant is too hot and the engine is no
longer being cooled sufficiently.
X Stop as soon as possible and allow the engine and the coolant to
cool down.
X Check the coolant level (Y page 292). Observe the warning notes
as you do so and top up the coolant if necessary. If the coolant level is correct, the engine radiator fan may be faulty. The
coolant is too hot and the engine is no longer being cooled sufficiently.
X If the coolant temperature is below 120 †, you can continue driving
to the nearest qualified specialist workshop.
X Avoid heavy loads on the engine as you do so, e.g. driving in moun-
tainous terrain and stop-start traffic. Manual transmission
Gear lever
! Only engage gear when the clutch pedal is
depressed.
! When shifting between
5thand 6thgear,
you should always push the gear lever all the way to the right. Otherwise, you could shift
unintentionally into 3rdor4th gear and dam-
age the transmission.
If you shift down at too high a speed (trans-
mission braking), this can cause the engine to
overrev, leading to engine damage.
Do not use the clutch bite point to keep the
vehicle stationary on uphill gradients. There is otherwise a risk of damaging the clutch.
! On long and steep downhill gradients, espe-
cially if the vehicle is laden or towing a trailer, you must shift into gear 1, 2or3in good time.
This uses the engine's braking effect. This
relieves the load on the brake system and
prevents the brakes from overheating and
wearing too quickly. k
Reverse gear
1 -6
Forward gears Engaging reverse gear
! Only shift into reverse gear
Rwhen the vehi-
cle is stationary. Otherwise, you could dam-
age the transmission.
X Move the gear lever firmly to the left, beyond
the point of resistance, then forwards.
The ECO start/stop function is not available
when reverse gear is engaged. For further infor-
mation on the ECO start/stop function; see
(Y page 142). 146
Manual transmissionDriving and parking
Page 153 of 349
Double-clutch function
E 500 only:
when shifting down, the double-
clutch function is active regardless of the cur-
rently selected drive program. The double-
clutch function reduces load change reactions
and is conducive to a sporty driving style. The
sound generated by the double-clutch function
depends on the drive program selected.
Kickdown Use kickdown for maximum acceleration:
X Depress the accelerator pedal beyond the
pressure point.
The transmission shifts to a lower gear
depending on the engine speed.
X Ease off the accelerator pedal once the
desired speed is reached.
The automatic transmission shifts back up.
Towing a trailer Towing a trailer is not possible with all models.
For further information, see (Y page 209).
X Drive in the middle of the engine speed range
on uphill gradients.
X Manual drive program: depending on the
uphill or downhill gradient, shift into a gear
(Y page 151) in which the engine will run in
the middle of the engine speed range. This
also applies if cruise control, DISTRONIC
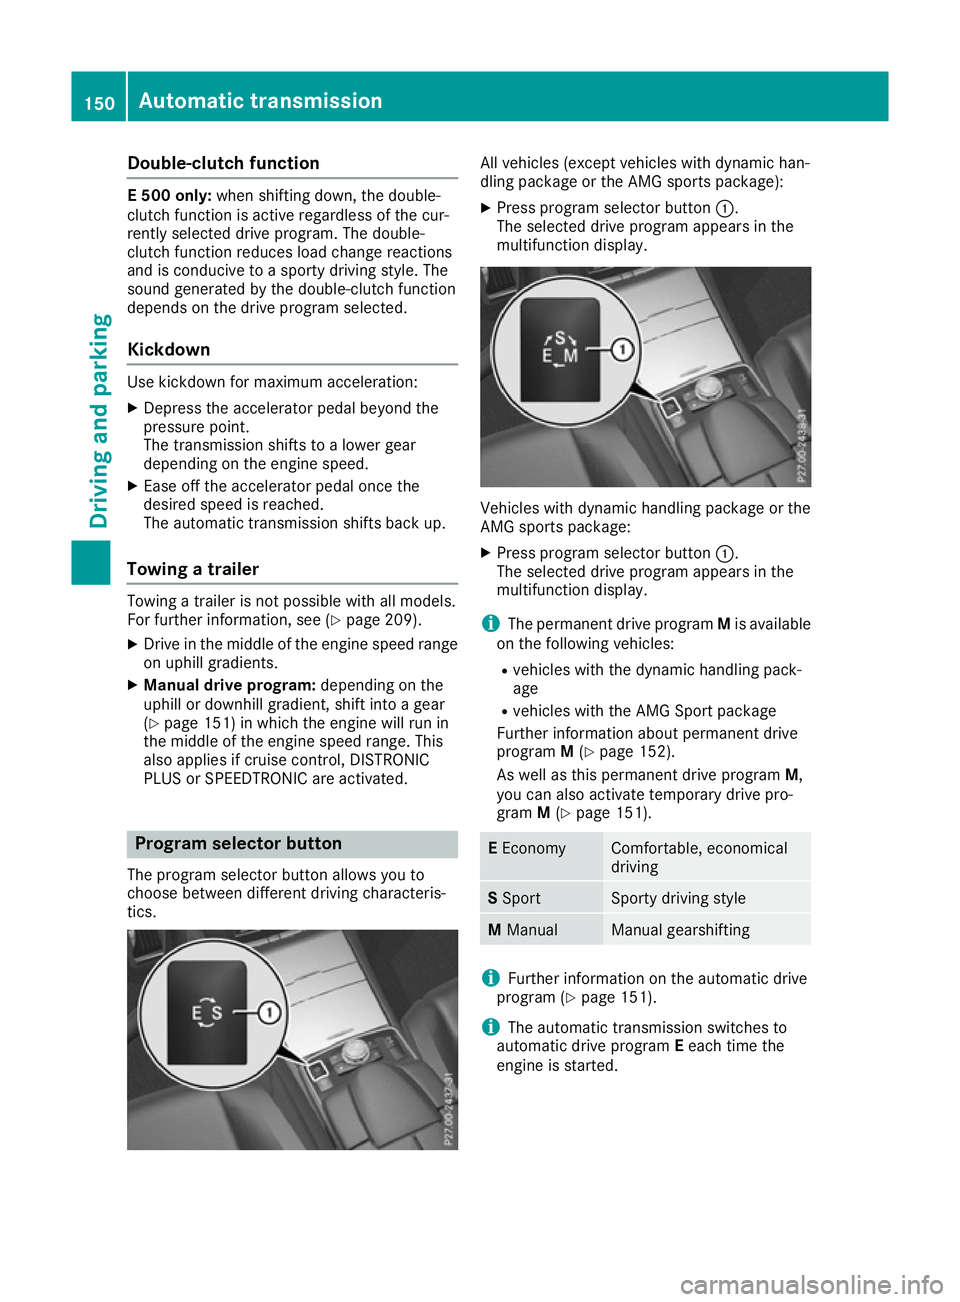
PLUS or SPEEDTRONIC are activated. Program selector button
The program selector button allows you to
choose between different driving characteris-
tics. All vehicles (except vehicles with dynamic han-
dling package or the AMG sports package):
X Press program selector button :.
The selected drive program appears in the
multifunction display. Vehicles with dynamic handling package or the
AMG sports package:
X Press program selector button :.
The selected drive program appears in the
multifunction display.
i The permanent drive program Mis available
on the following vehicles:
R vehicles with the dynamic handling pack-
age
R vehicles with the AMG Sport package
Further information about permanent drive
program M(Y page 152).
As well as this permanent drive program M,
you can also activate temporary drive pro-
gram M(Y page 151). E
Economy Comfortable, economical
driving
S
Sport Sporty driving style
M
Manual Manual gearshifting
i
Further information on the automatic drive
program (Y page 151).
i The automatic transmission switches to
automatic drive program Eeach time the
engine is started. 150
Automatic transmissionDriving and pa
rking
Page 168 of 349
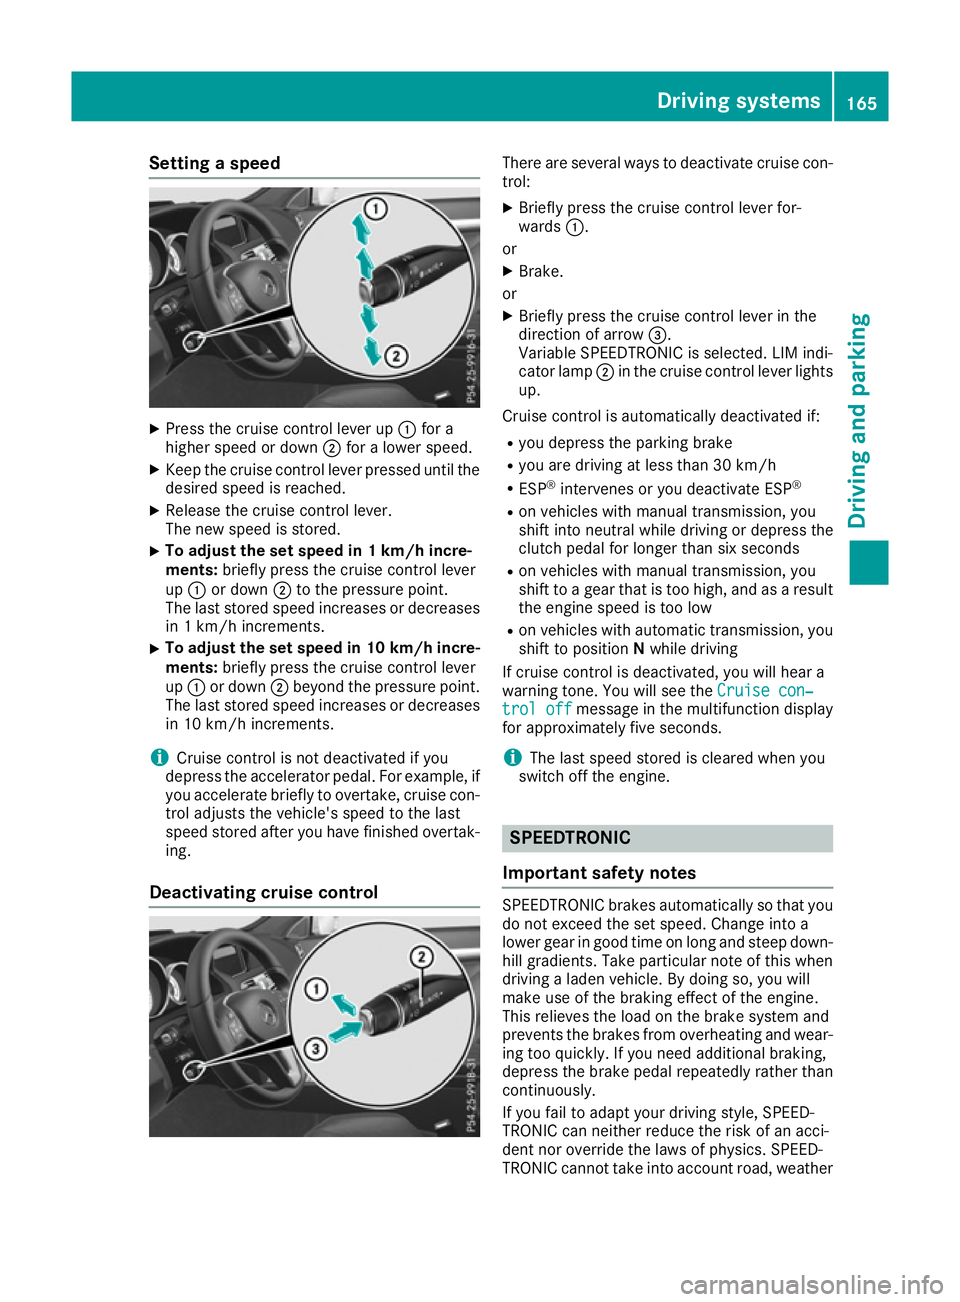
Setting a speed
X
Press the cruise control lever up :for a
higher speed or down ;for a lower speed.
X Keep the cruise control lever pressed until the
desired speed is reached.
X Release the cruise control lever.
The new speed is stored.
X To adjust the set speed in 1 km/h incre-
ments:
briefly press the cruise control lever
up : or down ;to the pressure point.
The last stored speed increases or decreases
in 1 km/h increments.
X To adjust the set speed in 10 km/h incre-
ments: briefly press the cruise control lever
up : or down ;beyond the pressure point.
The last stored speed increases or decreases in 10 km/h increments.
i Cruise control is not deactivated if you
depress the accelerator pedal. For example, if
you accelerate briefly to overtake, cruise con-
trol adjusts the vehicle's speed to the last
speed stored after you have finished overtak-
ing.
Deactivating cruise control There are several ways to deactivate cruise con-
trol:
X Briefly press the cruise control lever for-
wards :.
or X Brake.
or X Briefly press the cruise control lever in the
direction of arrow =.
Variable SPEEDTRONIC is selected. LIM indi-
cator lamp ;in the cruise control lever lights
up.
Cruise control is automatically deactivated if: R you depress the parking brake
R you are driving at less than 30 km/h
R ESP ®
intervenes or you deactivate ESP ®
R on vehicles with manual transmission, you
shift into neutral while driving or depress the
clutch pedal for longer than six seconds
R on vehicles with manual transmission, you
shift to a gear that is too high, and as a result
the engine speed is too low
R on vehicles with automatic transmission, you
shift to position Nwhile driving
If cruise control is deactivated, you will hear a
warning tone. You will see the Cruise con‐ Cruise con‐
trol off
trol off message in the multifunction display
for approximately five seconds.
i The last speed stored is cleared when you
switch off the engine. SPEEDTRONIC
Important safety notes SPEEDTRONIC brakes automatically so that you
do not exceed the set speed. Change into a
lower gear in good time on long and steep down-
hill gradients. Take particular note of this when
driving a laden vehicle. By doing so, you will
make use of the braking effect of the engine.
This relieves the load on the brake system and
prevents the brakes from overheating and wear- ing too quickly. If you need additional braking,
depress the brake pedal repeatedly rather than continuously.
If you fail to adapt your driving style, SPEED-
TRONIC can neither reduce the risk of an acci-
dent nor override the laws of physics. SPEED-
TRONIC cannot take into account road, weather Driving systems
165Driving and parking Z
Page 317 of 349
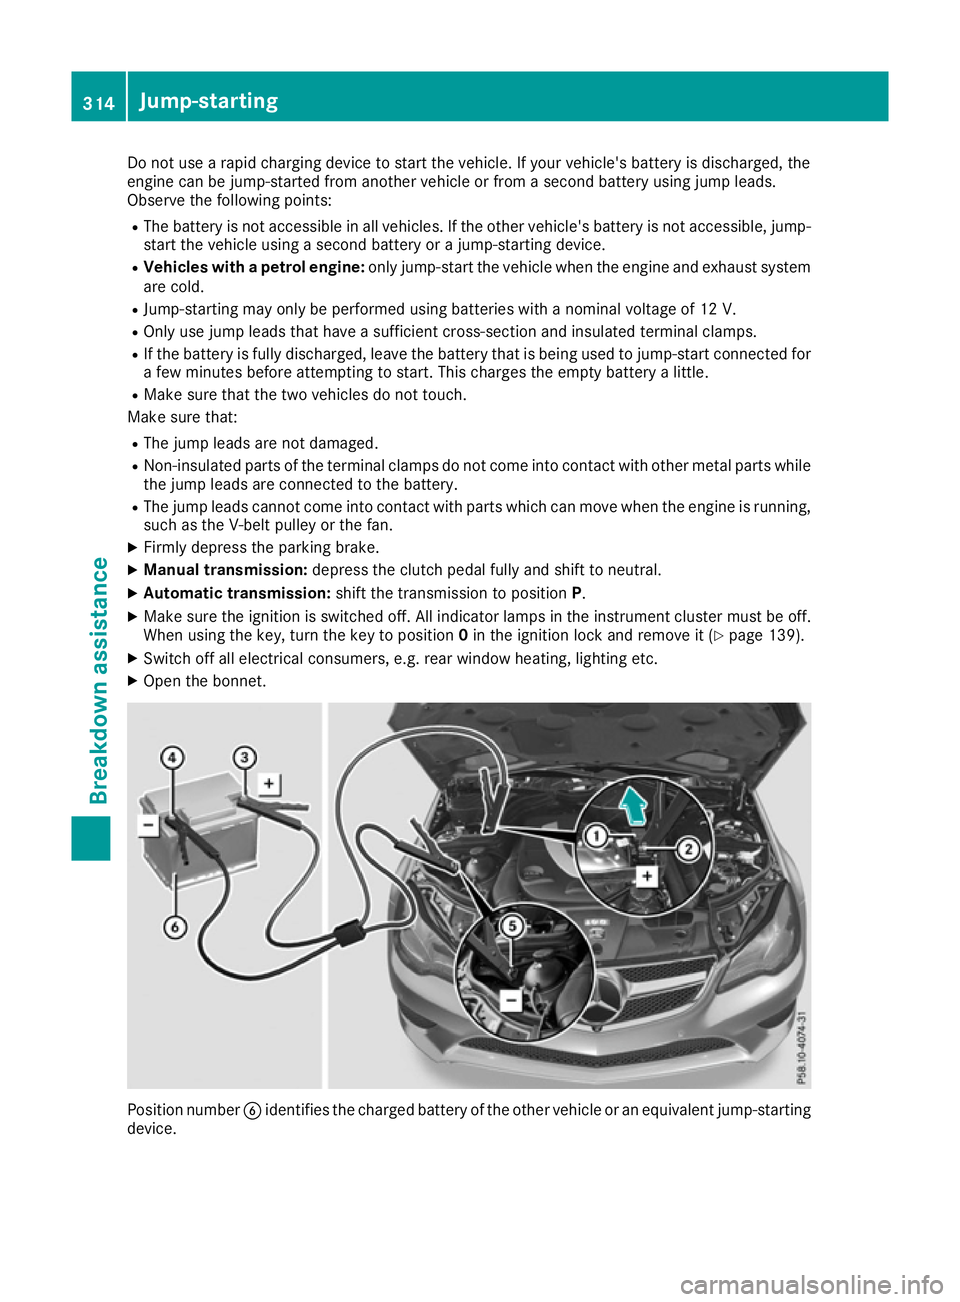
Do not use a rapid charging device to start the vehicle. If your vehicle's battery is discharged, the
engine can be jump-started from another vehicle or from a second battery using jump leads.
Observe the following points:
R The battery is not accessible in all vehicles. If the other vehicle's battery is not accessible, jump-
start the vehicle using a second battery or a jump-starting device.
R Vehicles with a petrol engine: only jump-start the vehicle when the engine and exhaust system
are cold.
R Jump-starting may only be performed using batteries with a nominal voltage of 12 V.
R Only use jump leads that have a sufficient cross-section and insulated terminal clamps.
R If the battery is fully discharged, leave the battery that is being used to jump-start connected for
a few minutes before attempting to start. This charges the empty battery a little.
R Make sure that the two vehicles do not touch.
Make sure that:
R The jump leads are not damaged.
R Non-insulated parts of the terminal clamps do not come into contact with other metal parts while
the jump leads are connected to the battery.
R The jump leads cannot come into contact with parts which can move when the engine is running,
such as the V-belt pulley or the fan.
X Firmly depress the parking brake.
X Manual transmission: depress the clutch pedal fully and shift to neutral.
X Automatic transmission: shift the transmission to position P.
X Make sure the ignition is switched off. All indicator lamps in the instrument cluster must be off.
When using the key, turn the key to position 0in the ignition lock and remove it (Y page 139).
X Switch off all electrical consumers, e.g. rear window heating, lighting etc.
X Open the bonnet. Position number
Bidentifies the charged battery of the other vehicle or an equivalent jump-starting
device. 314
Jump-startingBreakdown assistance
Page 320 of 349
X
Remove cover :from the opening.
X Screw in the towing eye clockwise as far as it
will go and tighten it.
Vehicles with a trailer tow hitch do not have a
bracket at the back for the screw-in towing eye.
Connect the towbar to the trailer tow hitch
(Y page 209).
Removing the towing eye X
Loosen the towing eye and unscrew it.
X Position cover :on top of the bumper and
press it in at the bottom until it engages.
X Place the towing eye in the vehicle tool kit. Towing the vehicle with both axles on
the ground
It is important that you observe the safety
instructions when towing away your vehicle
(Y page 315).
X Turn the key to position 2in the ignition lock.
X When the vehicle is stationary, depress the
brake pedal and keep it depressed.
X Vehicles with manual transmission:
depress the clutch pedal fully and engage
neutral.
or X Vehicles with automatic transmission:
shift the transmission to position N.
X Release the brake pedal.
X Release the parking brake.
In order to signal a change of direction when
towing the vehicle with the hazard warning
lamps switched on, use the combination switch as usual. In this case, only the turn signals for
the desired direction flash. When you reset the
combination switch, the hazard warning lamps
start flashing again. Towing the vehicle away with the rear
axle raised
! Vehicles with automatic transmission must
not be towed with the rear axle raised. The
car/trailer combination may otherwise
swerve or even overturn.
! The ignition must be switched off if you are
towing the vehicle with the rear axle raised. Intervention by ESP
®
could otherwise dam-
age the brake system.
X Switch on the hazard warning lamps
(Y page 116).
X Move the front wheels to the straight-ahead
position.
X Turn the key in the ignition lock to position 0
and remove the key from the ignition lock.
X When leaving the vehicle, take the key with
you.
When towing your vehicle away with the rear
axle raised, it is important that you observe the
safety instructions (Y page 315). Transporting the vehicle
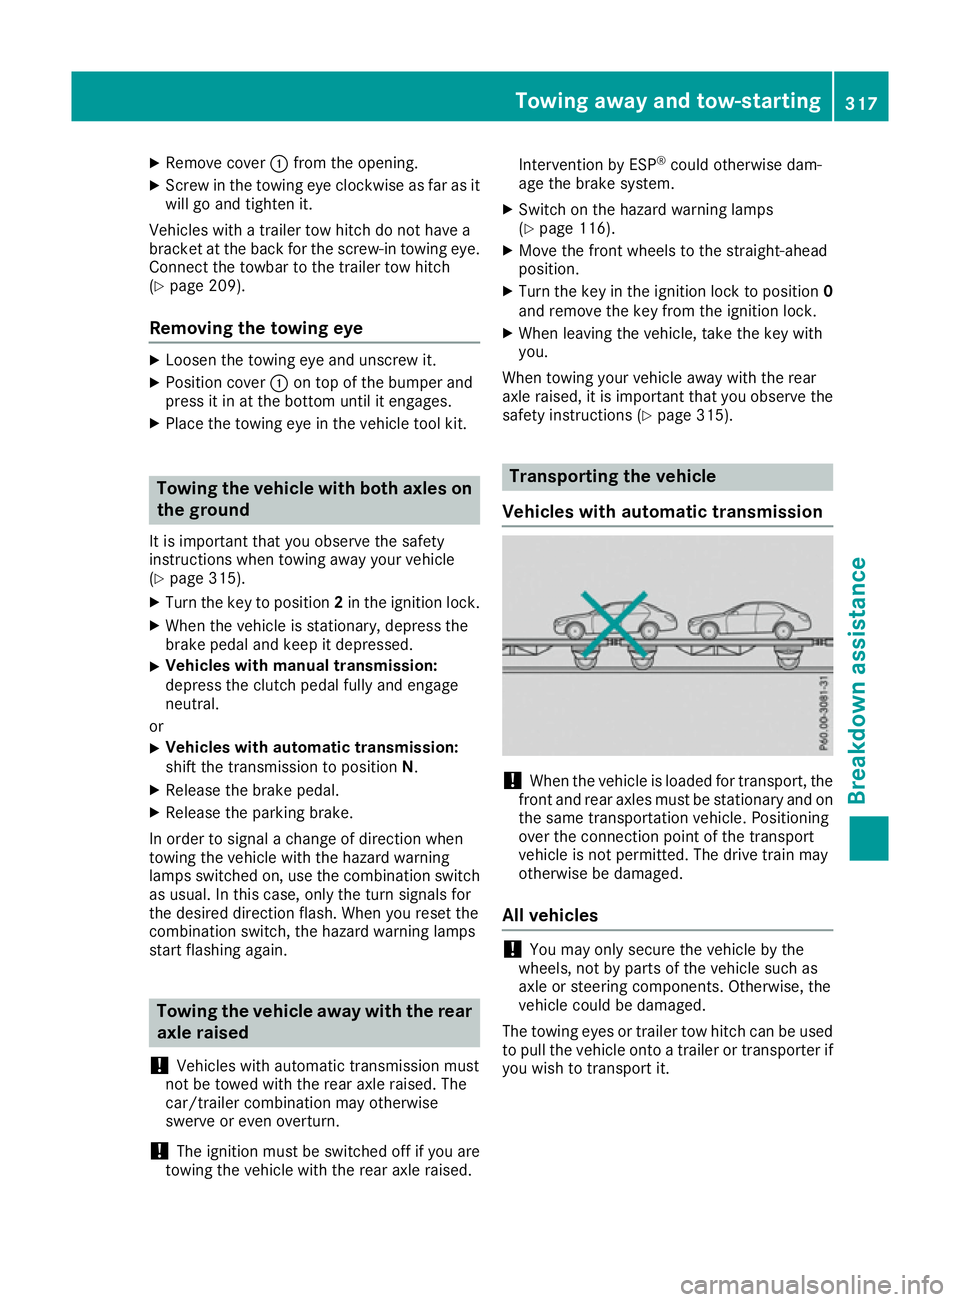
Vehicles with automatic transmission !
When the vehicle is loaded for transport, the
front and rear axles must be stationary and on
the same transportation vehicle. Positioning
over the connection point of the transport
vehicle is not permitted. The drive train may
otherwise be damaged.
All vehicles !
You may only secure the vehicle by the
wheels, not by parts of the vehicle such as
axle or steering components. Otherwise, the
vehicle could be damaged.
The towing eyes or trailer tow hitch can be used to pull the vehicle onto a trailer or transporter if
you wish to transport it. Towing away and tow-starting
317Breakdown assistance Z
Page 321 of 349

X
Vehicles with manual transmission:
depress the clutch pedal fully and engage
neutral.
X Vehicles with automatic transmission:
turn the key to position
2in the ignition lock.
X Shift the automatic transmission to position
N.
As soon as the vehicle is loaded: X Prevent the vehicle from rolling away by
applying the parking brake.
X Vehicles with manual transmission:
depress the clutch pedal fully and engage first
or reverse gear.
X Vehicles with automatic transmission:
shift the automatic transmission to position
P.
X Turn the key to position 0in the ignition lock
and remove it.
X Secure the vehicle. Tow-starting (emergency engine
starting)
! Vehicles with automatic transmission must
not be tow-started. The transmission may
otherwise be damaged.
i You can find information on "Jump-starting"
under (Y page 313).
Before tow-starting, the following conditions
must be fulfilled:
R the battery is connected
R the engine has cooled down
R the exhaust system has cooled down
When tow-starting, it is important that you
observe the safety notes (Y page 315) and the
legal requirements in each respective country.
X Switch on the hazard warning lamps
(Y page 116).
X Fit the towing eye (Y page 316).
X Secure the rigid towing bar or the towing
rope.
X Depress the brake pedal and keep it
depressed.
X Turn the key to position 2in the ignition lock.
X Depress the clutch pedal fully, engage second
gear and continue to keep the clutch pedal
fully depressed.
X Release the brake pedal. X
Tow-start the vehicle.
X Release the clutch pedal slowly, do not
depress the accelerator pedal while doing so.
X When the engine has been started, immedi-
ately depress the clutch pedal fully and shift
to neutral.
X Pull over at a suitable place and stop the vehi-
cle safely, paying attention to road and traffic
conditions.
X Depress the parking brake.
X Remove the rigid towing bar or towing rope.
X Remove the towing eye (Y page 317).
X Switch off the hazard warning lamps. Electrical fuses
Important safety notes
G
WARNING
If you manipulate, bridge or replace a faulty
fuse with a fuse of a higher amperage, the
electric cables could be overloaded. This may result in a fire. There is a risk of an accident
and injury.
Always replace faulty fuses with specified new fuses of the correct amperage.
Blown fuses must be replaced with fuses of the same rating, which you can recognise by the
colour and fuse rating. The fuse ratings are listed
in the fuse allocation chart.
The fuse allocation chart is located in the vehicle tool kit in the stowage compartment under the
boot floor (Y page 305).
If the newly inserted fuse also blows, have the
cause traced and rectified at a qualified special- ist workshop, e.g. a Mercedes-Benz Service
Centre.
! Only use fuses that have been approved for
Mercedes-Benz vehicles and which have the
correct fuse rating for the system concerned.
Otherwise, components or systems could be
damaged.
! Make sure that no moisture can enter the
fuse box when the cover is open.
! When closing the cover, make sure that it is
lying correctly on the fuse box. Moisture seep-
ing in or dirt could otherwise impair the oper- ation of the fuses. 318
Electrical fusesBreakdown assistance