2015 MERCEDES-BENZ CLA SHOOTING BRAKE warning light
[x] Cancel search: warning lightPage 228 of 421
X
Drive forwards and reverse as prompted by
the PARKTRONIC warning displays, several
times if necessary.
X Vehicles with manual transmission:
stop, at the latest when PARKTRONIC
sounds the continuous warning tone.
Once you have exited the parking space com- pletely, the steering wheel is moved to the
straight-ahead position. You hear a tone and
the Park Assist switched off Park Assist switched off message
appears in the multifunction display. You will
then have to steer and merge into traffic on
your own. PARKTRONIC is still available. You
can take over the steering before the vehicle has exited the parking space completely. This
is useful, for example, when you recognise
that it is already possible to pull out of the
parking space.
Cancelling Active Parking Assist X
Stop the movement of the multifunction
steering wheel or steer yourself.
Active Parking Assist will be cancelled at
once. The Park Assist cancelled
Park Assist cancelled mes-
sage appears in the multifunction display.
or
X Press the PARKTRONIC button
(Y page 219).
PARKTRONIC is switched off and Active
Parking Assist is immediately cancelled.
The Park Assist cancelled Park Assist cancelled message
appears in the multifunction display.
Active Parking Assist is cancelled automati-
cally if:
R the electric parking brake is applied
R transmission position Pis selected in vehi-
cles with automatic transmission
R parking using Active Parking Assist is no
longer possible
R you are driving faster than 10 km/h
R a wheel spins and ESP ®
intervenes or fails.
The ÷ warning lamp lights up in the
instrument cluster. A warning tone sounds. The parking symbol
disappears and the multifunction display
shows the Park Assist cancelled Park Assist cancelled mes-
sage.
When Active Parking Assist is cancelled, you
must steer and brake again yourself.
If a system malfunction occurs, the vehicle is braked to a standstill. To drive on, depress the
accelerator pedal again. Reversing camera
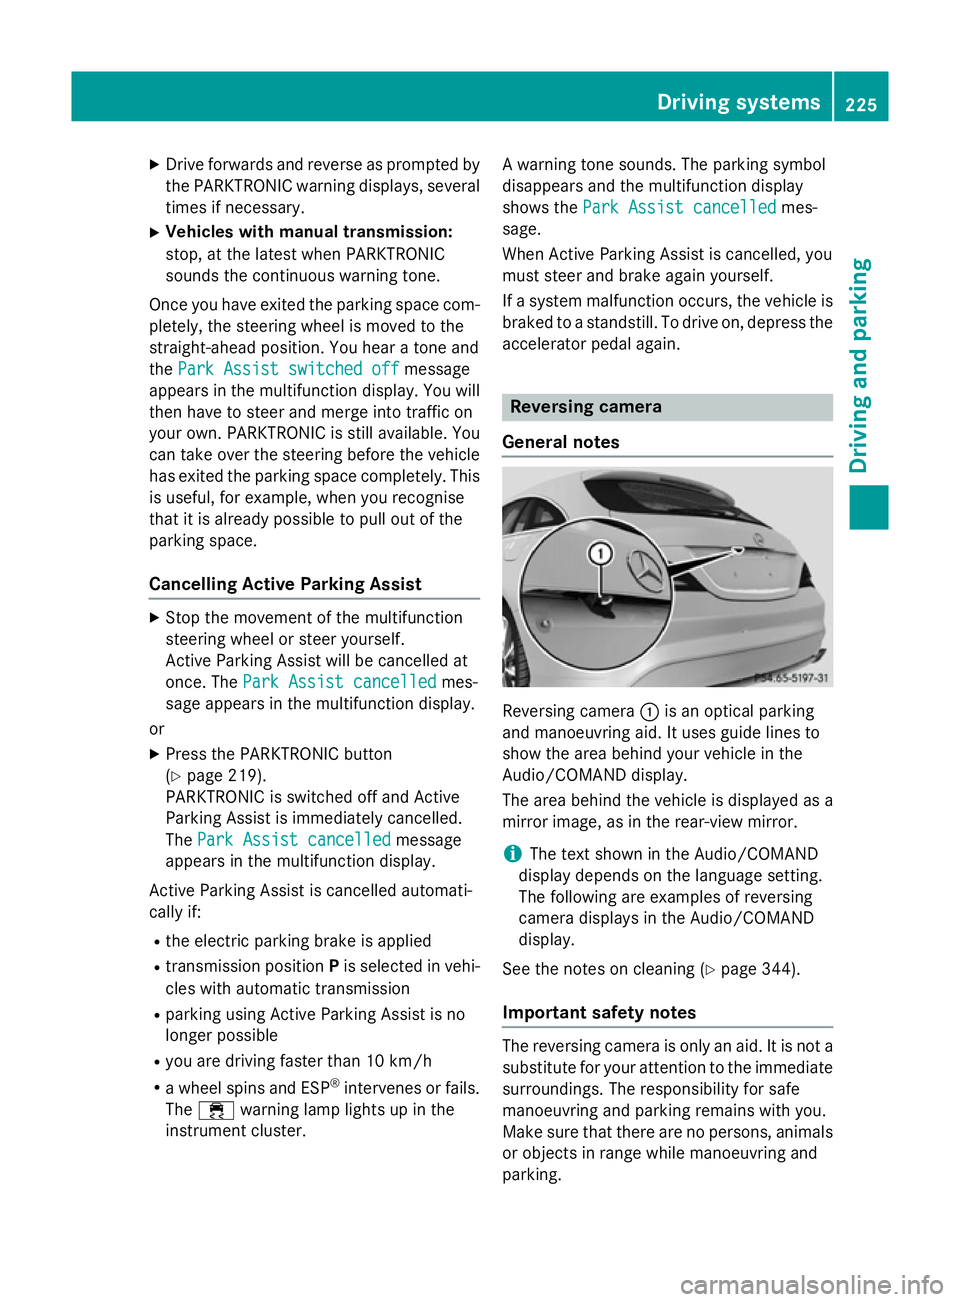
General notes Reversing camera
:is an optical parking
and manoeuvring aid. It uses guide lines to
show the area behind your vehicle in the
Audio/COMAND display.
The area behind the vehicle is displayed as a
mirror image, as in the rear-view mirror.
i The text shown in the Audio/COMAND
display depends on the language setting.
The following are examples of reversing
camera displays in the Audio/COMAND
display.
See the notes on cleaning (Y page 344).
Important safety notes The reversing camera is only an aid. It is not a
substitute for your attention to the immediate surroundings. The responsibility for safe
manoeuvring and parking remains with you.
Make sure that there are no persons, animals
or objects in range while manoeuvring and
parking. Driving systems
225Driving and parking Z
Page 230 of 421
:
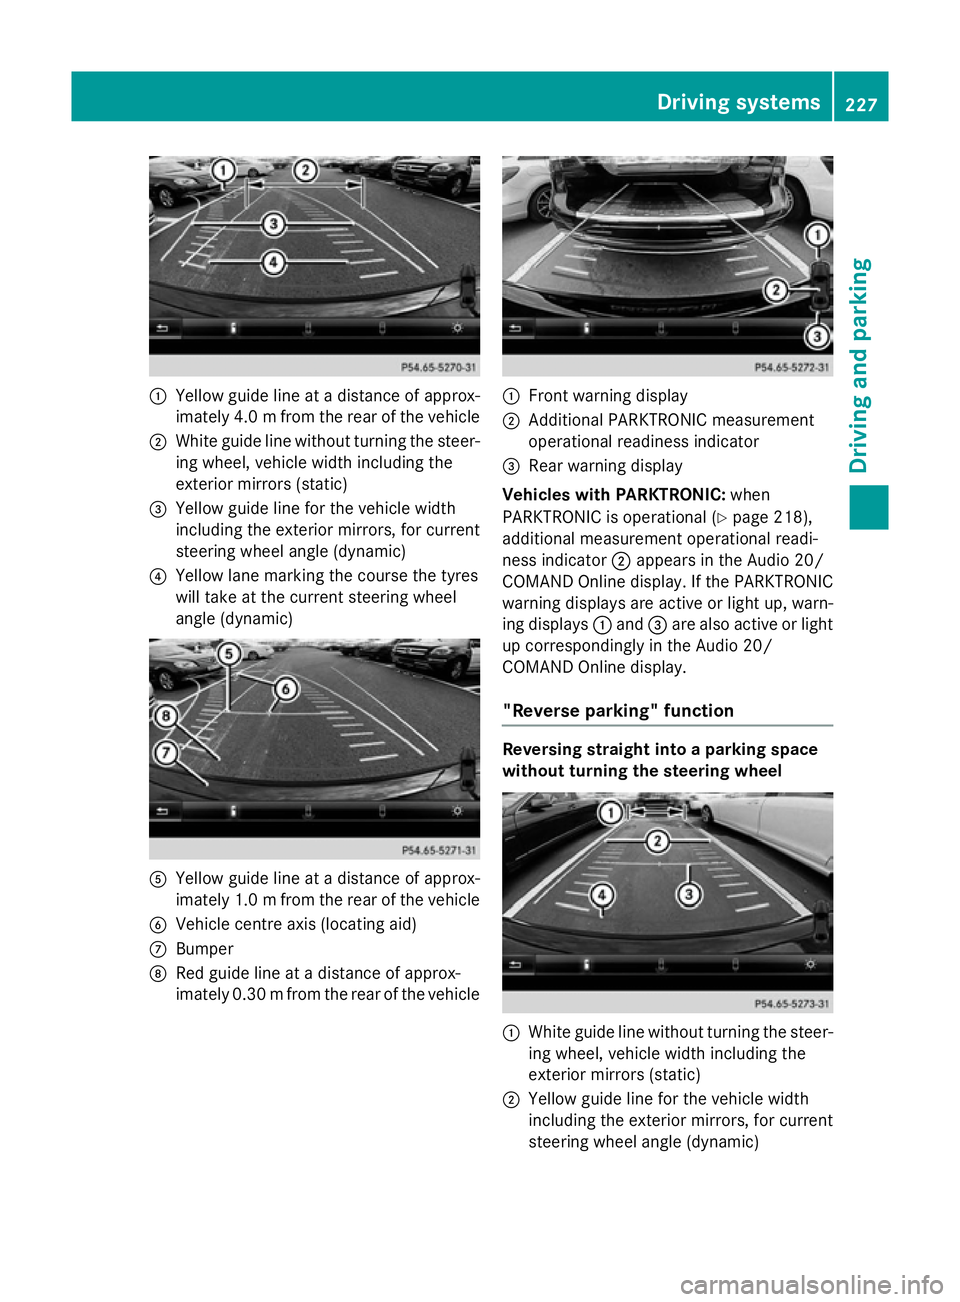
Yellow guide line at a distance of approx-
imately 4.0 mfrom the rear of the vehicle
; White guide line without turning the steer-
ing wheel, vehicle width including the
exterior mirrors (static)
= Yellow guide line for the vehicle width
including the exterior mirrors, for current
steering wheel angle (dynamic)
? Yellow lane marking the course the tyres
will take at the current steering wheel
angle (dynamic) A
Yellow guide line at a distance of approx-
imately 1.0 mfrom the rear of the vehicle
B Vehicle centre axis (locating aid)
C Bumper
D Red guide line at a distance of approx-
imately 0.30 mfrom the rear of the vehicle :
Front warning display
; Additional PARKTRONIC measurement
operational readiness indicator
= Rear warning display
Vehicles with PARKTRONIC: when
PARKTRONIC is operational (Y page 218),
additional measurement operational readi-
ness indicator ;appears in the Audio 20/
COMAND Online display. If the PARKTRONIC warning displays are active or light up, warn-
ing displays :and =are also active or light
up correspondingly in the Audio 20/
COMAND Online display.
"Reverse parking" function Reversing straight into a parking space
without turning the steering wheel
:
White guide line without turning the steer-
ing wheel, vehicle width including the
exterior mirrors (static)
; Yellow guide line for the vehicle width
including the exterior mirrors, for current
steering wheel angle (dynamic) Driving systems
227Driving and parking Z
Page 238 of 421
Vehicles in the monitoring range are then not
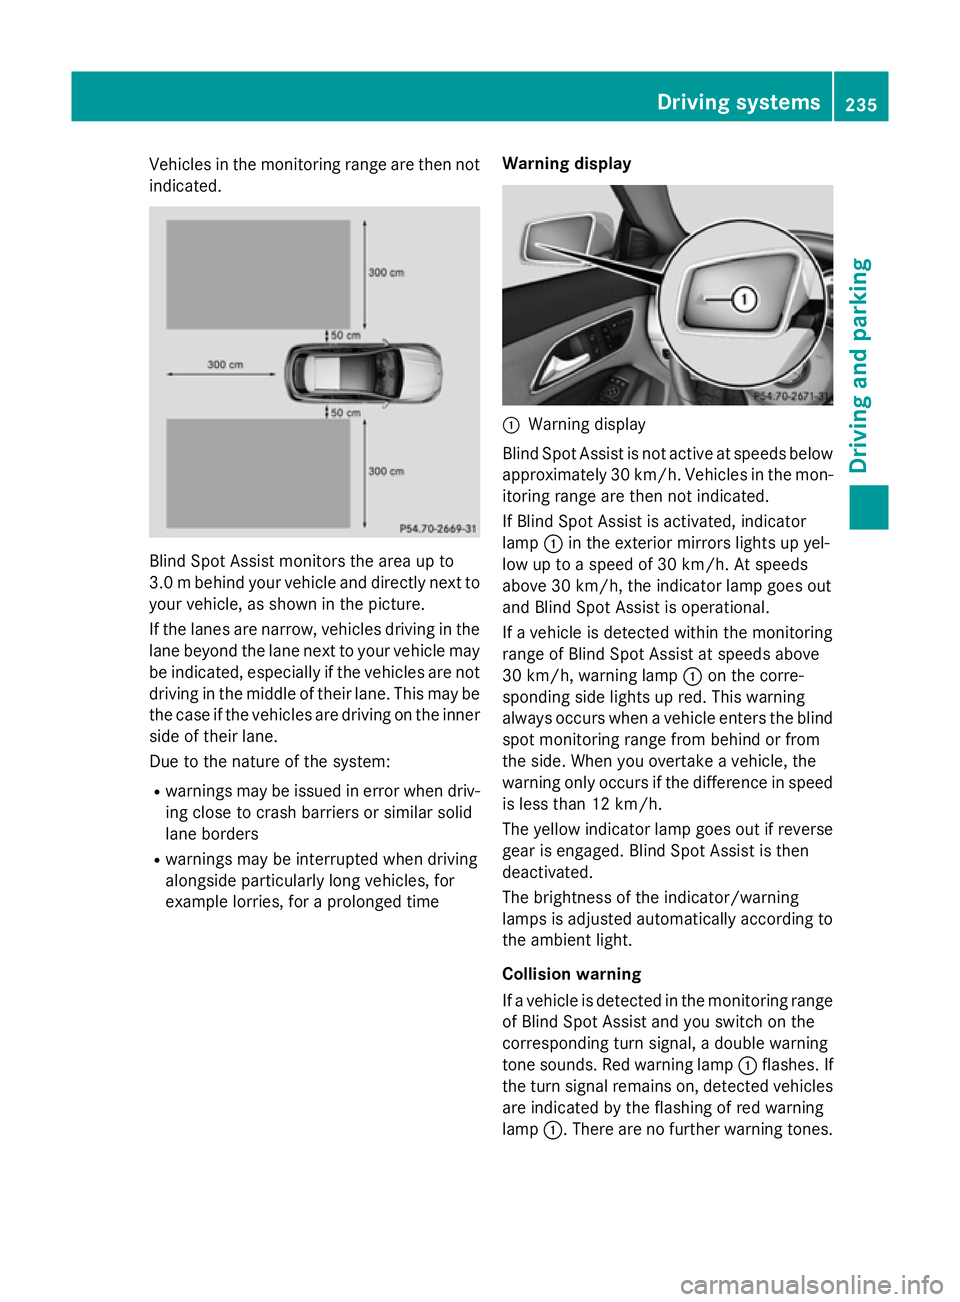
indicated. Blind Spot Assist monitors the area up to
3.0 mbehind your vehicle and directly next to
your vehicle, as shown in the picture.
If the lanes are narrow, vehicles driving in the
lane beyond the lane next to your vehicle may
be indicated, especially if the vehicles are not
driving in the middle of their lane. This may be the case if the vehicles are driving on the inner
side of their lane.
Due to the nature of the system:
R warnings may be issued in error when driv-
ing close to crash barriers or similar solid
lane borders
R warnings may be interrupted when driving
alongside particularly long vehicles, for
example lorries, for a prolonged time Warning display :
Warning display
Blind Spot Assist is not active at speeds below approximately 30 km/h. Vehicles in the mon-
itoring range are then not indicated.
If Blind Spot Assist is activated, indicator
lamp :in the exterior mirrors lights up yel-
low up to a speed of 30 km/h. At speeds
above 30 km/h, the indicator lamp goes out
and Blind Spot Assist is operational.
If a vehicle is detected within the monitoring
range of Blind Spot Assist at speeds above
30 km/h, warning lamp :on the corre-
sponding side lights up red. This warning
always occurs when a vehicle enters the blind
spot monitoring range from behind or from
the side. When you overtake a vehicle, the
warning only occurs if the difference in speed is less than 12 km/h.
The yellow indicator lamp goes out if reverse
gear is engaged. Blind Spot Assist is then
deactivated.
The brightness of the indicator/warning
lamps is adjusted automatically according to the ambient light.
Collision warning
If a vehicle is detected in the monitoring range
of Blind Spot Assist and you switch on the
corresponding turn signal, a double warning
tone sounds. Red warning lamp :flashes. If
the turn signal remains on, detected vehicles
are indicated by the flashing of red warning
lamp :. There are no further warning tones. Driving systems
235Driving and parking Z
Page 239 of 421
Activating Blind Spot Assist
X Make sure that Blind Spot Assist is activa-
ted in the on-board computer
(Y page 257).
X Turn the key to position 2in the ignition
lock.
Warning lamps :in the exterior mirrors
light up red for approximately 1.5 seconds
and then turn yellow.
Towing a trailer
If you couple up a trailer, make sure that you have correctly established the electrical con-
nection. This can be accomplished by check- ing the trailer lighting. Blind Spot Assist is
then deactivated. The indicator lamps in the
exterior mirrors light up yellow and the
Blind
Blind Spot SpotAssist
Assist not
notavailable
available when
when
towing a trailer See Owner's Manual
towing a trailer See Owner's Manual
message appears in the multifunction dis-
play.
i You can deactivate the indicator lamps in
the exterior mirrors.
To do so, you will need to deactivate Blind
Spot Assist if:
R the key is in position 2in the ignition lock
R the engine is not running
R the electrical connection to the trailer
has been established
Lane Keeping Assist General notes
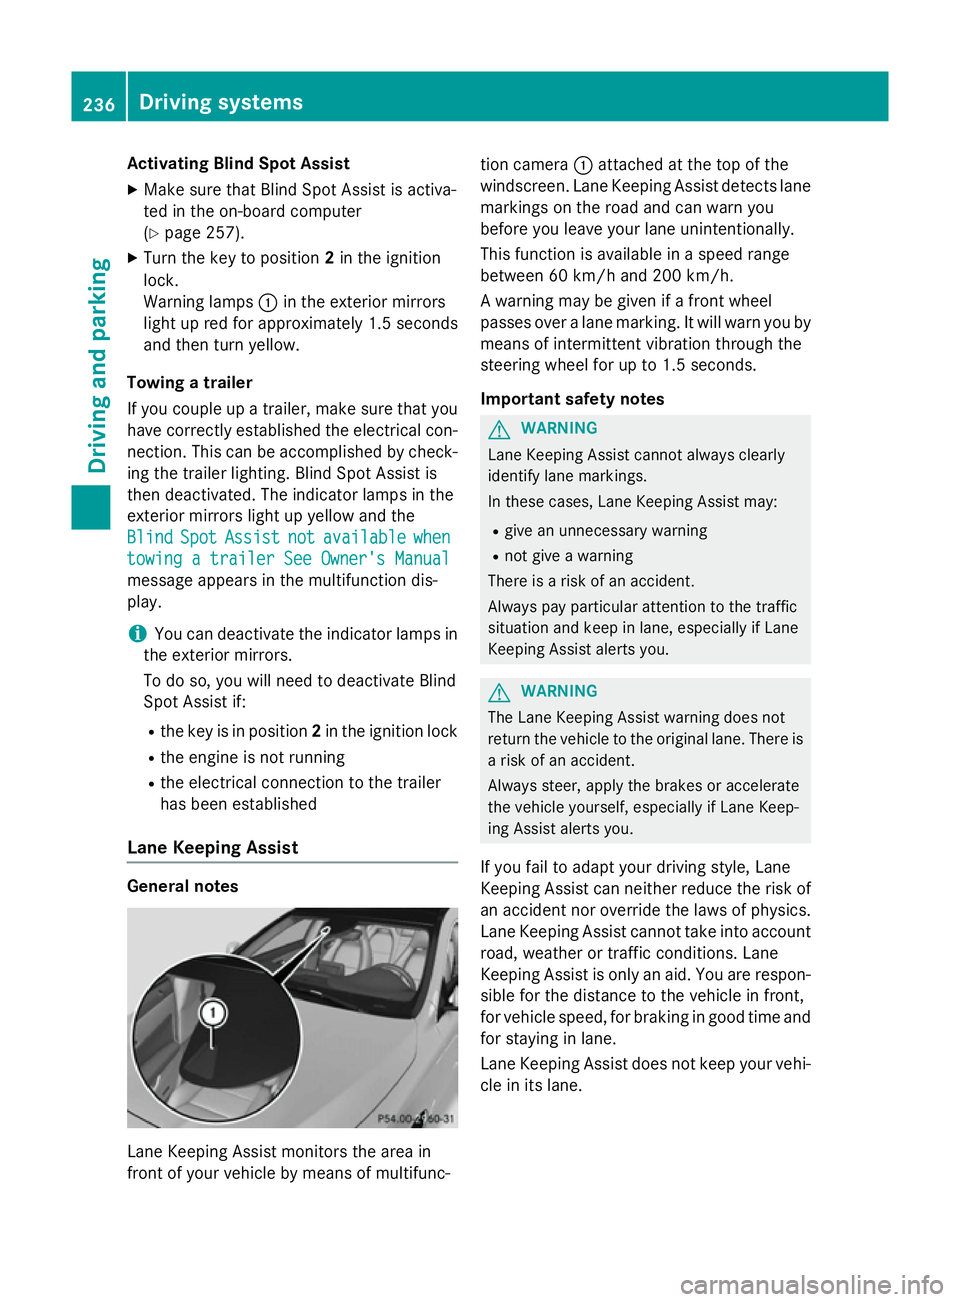
Lane Keeping Assist monitors the area in
front of your vehicle by means of multifunc- tion camera
:attached at the top of the
windscreen. Lane Keeping Assist detects lane markings on the road and can warn you
before you leave your lane unintentionally.
This function is available in a speed range
between 60 km/h and 200 km/h.
A warning may be given if a front wheel
passes over a lane marking. It will warn you by
means of intermittent vibration through the
steering wheel for up to 1.5 seconds.
Important safety notes G
WARNING
Lane Keeping Assist cannot always clearly
identify lane markings.
In these cases, Lane Keeping Assist may:
R give an unnecessary warning
R not give a warning
There is a risk of an accident.
Always pay particular attention to the traffic
situation and keep in lane, especially if Lane
Keeping Assist alerts you. G
WARNING
The Lane Keeping Assist warning does not
return the vehicle to the original lane. There is a risk of an accident.
Always steer, apply the brakes or accelerate
the vehicle yourself, especially if Lane Keep-
ing Assist alerts you.
If you fail to adapt your driving style, Lane
Keeping Assist can neither reduce the risk of
an accident nor override the laws of physics. Lane Keeping Assist cannot take into account
road, weather or traffic conditions. Lane
Keeping Assist is only an aid. You are respon- sible for the distance to the vehicle in front,
for vehicle speed, for braking in good time and
for staying in lane.
Lane Keeping Assist does not keep your vehi- cle in its lane. 236
Driving systemsDriving and pa
rking
Page 244 of 421
Coupling up a trailer
X Make sure that the transmission is in posi-
tion P.
X Apply the electric parking brake.
X Position the trailer horizontally behind the
vehicle.
X Couple up the trailer.
X Establish the electric connection between
the vehicle and the trailer.
X Check that the trailer lighting system is
working.
A connected trailer is only recognised when
the electrical connection is established
correctly and when the lighting system is
working properly. The function of other sys-
tems, such as ESP ®
or PARKTRONIC also
depends on this. Uncoupling a trailer
G
WARNING
If you uncouple a trailer with an engaged over- run brake, you could trap your hand between
the vehicle and the trailer drawbar. This poses a risk of injury.
Do not uncouple a trailer with an engaged
overrun brake.
! Do not disconnect a trailer with an
engaged overrun brake. Otherwise, your
vehicle could be damaged by the rebound- ing of the overrun brake.
! Remove the installed adapter cable
before folding in the ball coupling. Other-
wise, damage may occur to the rear
bumper and the adapter cable.
X Make sure that the transmission is in posi-
tion P.
X Apply the electric parking brake.
X Secure the trailer against rolling away.
X Remove the trailer cable and decouple the
trailer. Folding in the ball coupling
G
WARNING
If you release the ball coupling or it does not
engage correctly when folding in, it will swing out. Within pivoting range of the ball coupling,
there is an increased risk of an accident and
injury.
Only release the ball coupling if the pivoting
range is unobstructed. Always make sure that the ball coupling engages when folding in.
Fold the ball coupling back in if you are not
using the trailer tow hitch.
The release wheel is located behind the left-
hand side panelling in the luggage compart-
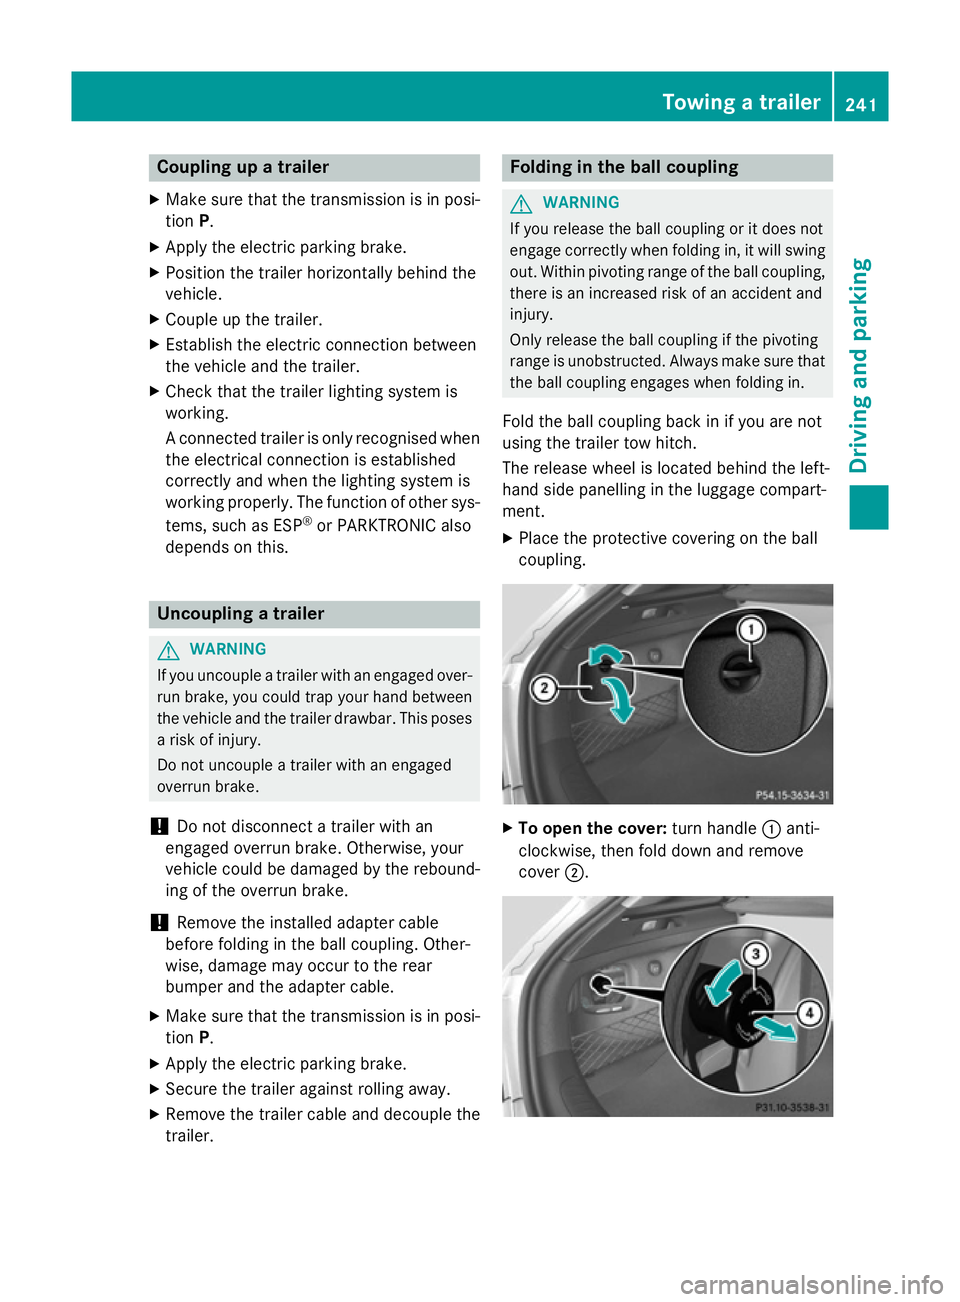
ment.
X Place the protective covering on the ball
coupling. X
To open the cover: turn handle:anti-
clockwise, then fold down and remove
cover ;. Towing a trailer
241Driving and parking Z
Page 249 of 421
Useful information
i This Owner's Manual describes all mod-
els, series and optional equipment for your
vehicle that were available at the time of
going to press. National variations are pos- sible. Note that your vehicle may not be
equipped with all of the functions descri-
bed. This is also the case for systems and
functions relevant to safety.
i Read the information on qualified special-
ist workshops: (Y page 25). Important safety notes
G
WARNING
Operating the integrated information systems and communications equipment in the vehicle
while driving will distract you from traffic con-
ditions. You could then lose control of the
vehicle. There is a risk of an accident.
Only operate these devices if road traffic con-
ditions permit. If you are unsure about the
surrounding conditions, pull over to a safe
location and make entries only while the vehi-
cle is stationary.
You must observe the legal requirements for
the country in which you are currently driving when operating the on-board computer. G
WARNING
If the instrument cluster has failed or mal-
functioned, you may not recognise function
restrictions relevant to safety. The operating
safety of your vehicle may be impaired. There is a risk of an accident.
Drive on carefully. Have the vehicle checked
at a qualified specialist workshop immedi-
ately.
The on-board computer only shows messages
or warnings from certain systems in the mul- tifunction display. You should therefore make
sure your vehicle is operating safely at all
times. If the operating safety of your vehicle is
impaired, park the vehicle safely as soon as
possible. Contact a qualified specialist work-
shop.
For an overview, see the instrument panel
illustration (Y
page 32). Displays and operation
Instrument cluster lighting
The light sensor in the instrument cluster
automatically controls the brightness of the
multifunction display. In daylight, the displays
in the instrument cluster are not illuminated.
The lighting in the instrument cluster, in the
displays and the controls in the vehicle inte-
rior can be adjusted using the brightness con-
trol knob.
The brightness control knob is located on the bottom left of the instrument cluster
(Y page 32).
X Turn the brightness control knob clockwise
or anti-clockwise.
If the light switch is set to the Ã,Tor
L position, the brightness is dependent
upon the brightness of the ambient light. Speedometer with segments
The speedometer is divided into segments
only on vehicles with DISTRONIC PLUS.
The segments in the speedometer indicate
which speed range is available.
R Variable SPEEDTRONIC activated
(Y page 202):
The segments light up from the start of the
scale to the selected limit speed.
R DISTRONIC PLUS activated (Y page 204):
One or two segments in the set speed
range light up.
R DISTRONIC PLUS detects a vehicle in front
moving more slowly than the stored speed: 246
Displays and operationOn-board computer and displays
Page 250 of 421

The segments between the speed of the
vehicle in front and the stored speed light
up. Rev counter
! Do not drive in the overrevving range.
Doing so will damage the engine.
The red band in the rev counter indicates the
engine's overrevving range.
The engine is limited within a range to protect the engine when the red band is reached. Outside temperature display
You should pay special attention to road con-
ditions when temperatures are around freez-
ing point.
Bear in mind that the outside temperature
display indicates the measured air tempera-
ture and not the road surface temperature.
The outside temperature display is in the mul- tifunction display (Y page 249).
There is a short delay before a change in out- side temperature appears in the multifunc-
tion display. Coolant temperature gauge
G
WARNING
If you open the bonnet while the engine is
overheating or while there is a fire in the
engine compartment, you could come into
contact with hot gases or other leaking ser-
vice products. There is a danger of injury.
Allow an overheating engine to cool down
before opening the bonnet. If there is a fire in the engine compartment, leave the bonnet
closed and notify the fire brigade.
The coolant temperature gauge is in the
instrument cluster on the right-hand side
(Y page 32). Under normal operating conditions and with
the specified coolant level, the coolant tem-
perature may rise to 120 †.
At high outside temperatures and when driv-
ing uphill, the coolant temperature may rise
to the end of the scale. Operating the on-board computer
Overview :
Multifunction display
; Right control panel
= Left control panel
X To activate the on-board computer: turn
the key to position 1in the ignition lock.
You can control the multifunction display and
the settings in the on-board computer using
the buttons on the multifunction steering
wheel. Displays and operation
247On-board computer and displays Z
Page 259 of 421

X
Press the =or; button on the steer-
ing wheel to select the Assist.
Assist. menu.
X Press 9or: to select Assistance
Assistance
graphic
graphic.
X Press ato confirm.
The multifunction display shows the
DISTRONIC PLUS distance display in the
assistance graphic.
The assistance graphic shows you the sta-
tus of and/or information from the follow-
ing driving systems or driving safety sys-
tems:
R Traffic Sign Assist (Y page 231)
R DISTRONIC PLUS (Y page 204)
R COLLISION PREVENTION ASSIST PLUS
(Y page 73)
R ATTENTION ASSIST (Y page 230)
R Lane Keeping Assist (Y page 236)
R Rear window wiper (Y page 138)
X Press :to display the ATTEN-
TION ASSIST assessment.
Traffic Sign Assist In the
Traffic Traffic Sign
SignAssist
Assist menu, you can
switch the Traffic Sign Assist message func-
tion on or off. When the message function is
activated, detected traffic signs and informa-
tion appear in the multifunction display for
five seconds.
X Press the =or; button on the steer-
ing wheel to select the Assist.
Assist. menu.
X Press the 9or: button to select
Traffic Sign Assist
Traffic Sign Assist.
X Press ato confirm.
The current selection appears.
X To activate/deactivate the message
function: pressaagain.
Further information about Traffic Sign Assist
(Y page 231).
Deactivating/activating ESP ®Observe the important safety notes on ESP
®
(Y page 77). G
WARNING
If you deactivate ESP ®
, ESP ®
no longer sta-
bilises the vehicle. There is an increased risk
of skidding and an accident.
Only deactivate ESP ®
in the situations descri-
bed in the following.
It may be best to deactivate ESP ®
in the fol-
lowing situations:
R when using snow chains
R in deep snow
R on sand or gravel
Deactivating/activating ESP ®
on Mercedes-
AMG vehicles (Y page 78).
For further information about ESP ®
, see
(Y page 76).
X Start the engine.
X Press the =or; button on the steer-
ing wheel to select the Assist.
Assist. menu.
X Press 9or: to select ESP ESP.
X Press ato confirm.
The current selection appears.
X To activate/deactivate: pressa
again.
ESP ®
is deactivated if the åwarning
lamp in the instrument cluster lights up
continuously when the engine is running.
If the ÷ andå warning lamps light up
continuously, ESP ®
is not available due to a
malfunction.
Observe the information on warning lamps
(Y page 306).
Observe the information on display messages
(Y page 266).
Activating/deactivating COLLISION
PREVENTION ASSIST PLUS X
Press the =or; button on the steer-
ing wheel to select the Assist. Assist.menu.
X Press the 9or: button to select
Collision Prevent. Assist
Collision Prevent. Assist. 256
Menus and submenusOn-board computer and displays