2015 MERCEDES-BENZ CLA SHOOTING BRAKE change wheel
[x] Cancel search: change wheelPage 262 of 421
![MERCEDES-BENZ CLA SHOOTING BRAKE 2015 Owners Manual X
Press the :or9 button to select the
Permanent display:
Permanent display: function.
The current setting, outside tempera‐
outside tempera‐
ture
ture orDig. speedo [mph]:
Dig. speedo [mph]:, appe MERCEDES-BENZ CLA SHOOTING BRAKE 2015 Owners Manual X
Press the :or9 button to select the
Permanent display:
Permanent display: function.
The current setting, outside tempera‐
outside tempera‐
ture
ture orDig. speedo [mph]:
Dig. speedo [mph]:, appe](/manual-img/4/55475/w960_55475-261.png)
X
Press the :or9 button to select the
Permanent display:
Permanent display: function.
The current setting, outside tempera‐
outside tempera‐
ture
ture orDig. speedo [mph]:
Dig. speedo [mph]:, appears.
X Press the abutton to save the setting.
Lights Switching the Intelligent Light System
on/off
X Press the =or; button on the steer-
ing wheel to select the Settings Settingsmenu.
X Press the :or9 button to select the
Lights
Lights submenu.
X Press ato confirm.
X Press the :or9 button to select the
Intell. Light System
Intell. Light System function.
If the Intell. Light Sys.
Intell. Light Sys. function has
been switched on, the cone of light and the
L symbol in the multifunction display
are shown in orange.
X Press the abutton to save the setting.
When you switch Intell. Light System
Intell. Light System
function on, you activate the following func-
tions:
R Motorway mode
R Active light function
R Cornering light function
R Extended range foglamps
If you set the dipped-beam headlamps for
driving on the right/left, the multifunction
display shows the Intell.
Intell. Light LightSystem:
System:
system inoperative Inactive for
system inoperative Inactive for
left-side traffic
left-side traffic orIntell. Light
Intell. Light
System:
System: System
Systeminoperative
inoperative Inactive
Inactive
for right-side traffic
for right-side traffic display message
instead of the Intell.
Intell.Light
Light System
System func-
tion in the Lights
Lightssubmenu.
Further information on the Intelligent Light
System (Y page 130).
Setting the dipped-beam headlamps for
driving on the left/right
This function is only available in vehicles with the Intelligent Light System. You can use this function to switch between
symmetrical and asymmetrical dipped beam
(Y
page 126).
X Press the =or; button on the steer-
ing wheel to select the Settings
Settings menu.
X Press the :or9 button to select the
Lights Lights submenu.
X Press ato confirm.
X Press the :or9 button to select the
Dipped beams Setting for:
Dipped beams Setting for: function.
The current setting Right-side traffic
Right-side traffic
or Left-side traffic
Left-side traffic appears.
X Press the abutton to save the setting.
If you change the setting, conversion does
not take place until the next time the vehi-
cle is stationary.
If you set the dipped-beam headlamps for
driving on the right/left, then motorway
mode and the extended range foglamps are
unavailable. These are only deactivated if the
setting for driving on the left/right is set
opposite to your vehicle's country version.
A qualified specialist workshop can set the
dipped-beam headlamps for driving on the
left/right.
Vehicle Setting permanent SPEEDTRONIC
You can set permanent SPEEDTRONIC using
the
Limit Limit speed
speed(winter
(winter tyres)
tyres)function.
X Press the =or; button on the steer-
ing wheel to select the Settings
Settingsmenu.
X Press the :or9 button to select the
Vehicle
Vehicle submenu.
X Press ato confirm.
X Press :or9 to select the Limit
Limit
speed (winter tyres):
speed (winter tyres): function.
You will see the current setting.
X Press ato confirm.
X Press the :or9 button to adjust
permanent SPEEDTRONIC in increments of
ten (160 km/h 160 km/h to240 km/h
240 km/h). The Off
Offset- Menus and submenus
259On-board computer and displays Z
Page 264 of 421
In the
Heating
Heating submenu, you can select a
stored departure time or change a departure
time.
The auxiliary heating timer function calcu-
lates the switch-on time according to the out-
side temperature so that the vehicle is pre-
heated by the departure time. When the
departure time is reached, the auxiliary heat- ing continues to heat for a further five
minutes and then switches off. The auxiliary
heating adopts the set air conditioning or
THERMOTRONIC temperature setting.
You can switch off the auxiliary heating by
using the remote control or the auxiliary heat- ing button on the centre console.
i Switch the auxiliary heating on regularly
once a month for about ten minutes.
Further information on auxiliary heating
(Y page 156).
Selecting the departure time or deactivat-
ing a selected departure time
X Press the =or; button on the steer-
ing wheel to select the Settings
Settings menu.
X Press the :or9 button to select the
Heating
Heating submenu.
X Press ato confirm.
The current setting appears.
X Press aagain.
X Press the :or9 button to select
one of the three departure times or Timer Timer
off
off (no timer active).
X Press ato confirm.
If a departure time is selected, the yellow
indicator lamp lights up on the auxiliary
heating button.
Changing the departure time
X Press the =or; button on the steer-
ing wheel to select the Settings Settingsmenu.
X Press the :or9 button to select the
Heating
Heating submenu.
X Press ato confirm.
The current setting appears. X
Press the :or9 button to select
Change A Change A, Change B Change BorChange C
Change C.
X Press ato confirm.
You can now change the departure time.
X Press the =or; button to select the
display to be changed: hours, minutes.
X Press the :or9 button to set the
selected display.
X Press the abutton to store the entry.
The yellow indicator lamp on the auxiliary
heating button lights up.
Comfort Switching belt adjustment on/off
X Press the =or; button on the steer-
ing wheel to select the Settings
Settings menu.
X Press the :or9 button to select the
Convenience
Convenience submenu.
X Press ato confirm.
X Press the :or9 button to select the
Belt adjustment Belt adjustment function.
When the Belt adjustment Belt adjustment function is
activated, the seat belt is displayed in
orange in the multifunction display.
X Press the abutton to save the setting.
For further information on belt adjustment,
see (Y page 47).
Switching the fold mirrors in when lock-
ing function on/off
This function is only available when the vehi-
cle is equipped with the electrical fold-in func-
tion.
When you activate the Auto.
Auto. fold-in fold-in mir‐
mir‐
rors
rors function, the exterior mirrors are folded
in when the vehicle is locked. When you
unlock the vehicle and then open the driver's or front-passenger door, the exterior mirrors
fold out again.
If you have switched on the Auto. Auto.fold-in
fold-in
mirrors
mirrors function and you fold in the exterior
mirrors using the button on the door
(Y page 120), they will not fold out automat- Menus and submenus
261On-board computer and displays Z
Page 295 of 421

Tyres
Display messages
Possible causes/consequences and
M
MSolutions Tyre pressure
Tyre pressure
Check tyre(s) Check tyre(s) The tyre pressure loss warning system has detected a significant
loss in pressure.
A warning tone also sounds.
Possible causes:
R you have changed the positions of the wheels and tyres or fitted
new wheels and tyres
R the tyre pressure in one or more tyres has dropped
G WARNING
Underinflated tyres pose the following risks:
R the tyres may burst, especially as the load and vehicle speed
increase
R the tyres may wear excessively and/or unevenly, which may
greatly impair tyre traction
R the driving characteristics, as well as steering and braking, may
be greatly impaired
There is a risk of an accident.
X Stop the vehicle without making any sudden steering or braking
manoeuvres. Pay attention to the traffic conditions as you do so.
X Safeguard the vehicle against rolling away (Y page 192).
X Check the tyres and, if necessary, follow the instructions for a
flat tyre (Y page 352).
X Check the tyre pressures and, if necessary, correct the tyre
pressure.
X Restart the tyre pressure loss warning system when the tyre
pressure is correct (Y page 376).Check tyre pres‐ Check tyre pres‐
sures sures
then
thenrestart
restart
Run Flat Indicator
Run Flat Indicator The tyre pressure loss warning system generated a display mes-
sage and has not been restarted since.
X Set the correct tyre pressure in all four tyres.
X Restart the tyre pressure loss warning system (Y page 376).Run Run
Flat
Flat Indicator
Indicator
inoperative
inoperative The tyre pressure loss warning system is faulty.
X Consult a qualified specialist workshop. Rectify tyre pres‐
Rectify tyre pres‐
sure sure The tyre pressure is too low in at least one of the tyres, or the tyre
pressure difference between the wheels is too great.
X Check the tyre pressures at the next opportunity (Y page 376).
X If necessary, correct the tyre pressure.
X Restart the tyre pressure monitor (Y page 378).292
Display
messagesOn-board computer and displays
Page 343 of 421
Maintaining the time-dependent service
schedule:
X Note down the service due date displayed
in the multifunction display before discon-
necting the battery.
or X After reconnecting the battery, subtract
the battery disconnection periods from the service date shown on the display. Hiding service messages
X Press the aor% button on the steer-
ing wheel. Displaying service messages
X Switch the ignition on.
X Press the =or; button to select the
Serv. Serv. menu.
X Press the 9or: button to select the
ASSYST PLUS
ASSYST PLUS submenu and confirm by
pressing the abutton.
The service due date appears in the multi-
function display. Information about Service
Resetting the ASSYST PLUS service
interval display !
If the ASSYST PLUS service interval dis-
play has been inadvertently reset, this set-
ting can be corrected at a qualified special-
ist workshop.
Have service work carried out as described in the Service Booklet. This may otherwise
lead to increased wear and damage to the
major assemblies or the vehicle.
A qualified specialist workshop, e.g. a
Mercedes-Benz Service Centre, will reset the ASSYST PLUS service interval display after
the service work has been carried out. You can also obtain further information on main-
tenance work, for example.
Special service requirements The prescribed service interval is based on
normal operation of the vehicle. Service work
will need to be performed more often if the
vehicle is operated under arduous conditions
or increased loads, for example:
R regular city driving with frequent intermedi-
ate stops
R if the vehicle is primarily used to travel
short distances
R for frequent operation in mountainous ter-
rain or on poor road surfaces
R if the engine is often left idling for long peri-
ods
In these or similar operating conditions, have,
for example, the air filter, engine oil and oil
filter changed more frequently. The tyres
must be checked more frequently if the vehi-
cle is operated under increased loads. Fur-
ther information can be obtained at a quali-
fied specialist workshop, e.g. a Mercedes-
Benz Service Centre.
Driving abroad An extensive Mercedes-Benz Service network
is also available in other countries. You can
obtain further information from any
Mercedes-Benz Service Centre. Care
General notes
H
Environmental note
Dispose of empty packaging and cleaning
cloths in an environmentally responsible man-
ner.
! For cleaning your vehicle, do not use any
of the following:
R dry, rough or hard cloths
R abrasive cleaning agents 340
CareMaintenance and care
Page 349 of 421
carried out by a qualified specialist work-
shop. Interior care
Cleaning the display !
For cleaning, do not use any of the fol-
lowing:
R alcohol-based thinner or petrol
R abrasive cleaning agents
R commercially-available household clean-
ing agents
These may damage the display surface. Do not put pressure on the display surface
when cleaning. This could lead to irrepara-
ble damage to the display.
X Before cleaning the display, make sure that
it is switched off and has cooled down.
X Clean the display surface using a commer-
cially available microfibre cloth and
TFT/LCD display cleaner.
X Dry the display surface using a dry micro-
fibre cloth.
Cleaning the plastic trim G
WARNING
Care products and cleaning agents containing solvents can cause surfaces in the cockpit to
become porous. This could result in plastic
parts breaking away when the airbags are
deployed. There is a danger of injury.
Do not use care products and cleaning agents containing solvents to clean the cockpit.
! Do not affix the following to plastic surfa-
ces:
R stickers
R films
R scented oil bottles or similar items
You could otherwise damage the plastic.
! Do not allow cosmetics, insect repellent
or sunscreen to come in contact with the plastic trim. This maintains the high-quality
look of the surfaces.
X Wipe the plastic trim with a damp, lint-free
cloth, e.g. a microfibre cloth.
X Heavy soiling: use car care and cleaning
products recommended and approved by
Mercedes-Benz.
The surface may change colour tempora-
rily. Wait until the surface is dry again.
Cleaning the steering wheel and gear or selector lever X
Thoroughly wipe with a damp cloth or use
leather care agents that have been recom-
mended and approved by Mercedes-Benz.
Cleaning wooden trim and trim ele-
ments !
Do not use solvent-based cleaning agents
such as tar remover, wheel cleaners, pol-
ishes or waxes. There is otherwise a risk of damaging the surface.
X Wipe the wooden trim and trim elements
with a damp, lint-free cloth, e.g. a microfi-
bre cloth.
X Heavy soiling: use car care and cleaning
products recommended and approved by
Mercedes-Benz.
Cleaning the seat covers General notes
! Do not use a microfibre cloth to clean
covers made out of real leather, artificial
leather or DINAMICA. If used frequently,
this can damage the cover.
Note that regular care is essential to make
sure that the appearance and comfort of the
covers are retained over time. 346
CareMaintenance and care
Page 354 of 421
Fire extinguisher
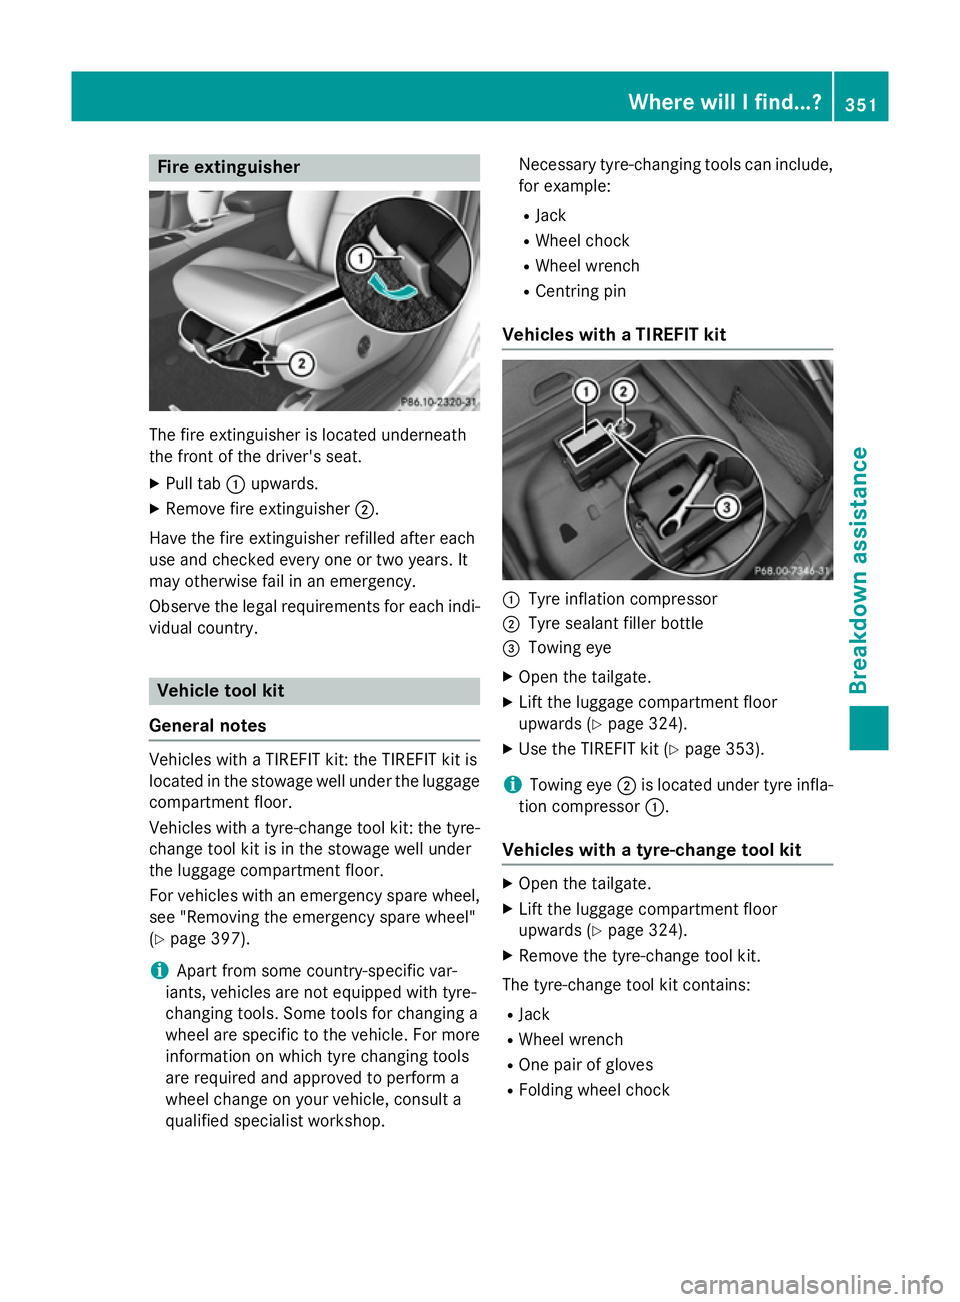
The fire extinguisher is located underneath
the front of the driver's seat.
X Pull tab :upwards.
X Remove fire extinguisher ;.
Have the fire extinguisher refilled after each
use and checked every one or two years. It
may otherwise fail in an emergency.
Observe the legal requirements for each indi- vidual country. Vehicle tool kit
General notes Vehicles with a TIREFIT kit: the TIREFIT kit is
located in the stowage well under the luggage
compartment floor.
Vehicles with a tyre-change tool kit: the tyre-change tool kit is in the stowage well under
the luggage compartment floor.
For vehicles with an emergency spare wheel, see "Removing the emergency spare wheel"
(Y page 397).
i Apart from some country-specific var-
iants, vehicles are not equipped with tyre-
changing tools. Some tools for changing a
wheel are specific to the vehicle. For more information on which tyre changing tools
are required and approved to perform a
wheel change on your vehicle, consult a
qualified specialist workshop. Necessary tyre-changing tools can include,
for example:
R Jack
R Wheel chock
R Wheel wrench
R Centring pin
Vehicles with a TIREFIT kit :
Tyre inflation compressor
; Tyre sealant filler bottle
= Towing eye
X Open the tailgate.
X Lift the luggage compartment floor
upwards (Y page 324).
X Use the TIREFIT kit (Y page 353).
i Towing eye
;is located under tyre infla-
tion compressor :.
Vehicles with a tyre-change tool kit X
Open the tailgate.
X Lift the luggage compartment floor
upwards (Y page 324).
X Remove the tyre-change tool kit.
The tyre-change tool kit contains:
R Jack
R Wheel wrench
R One pair of gloves
R Folding wheel chock Where will I find...?
351Breakdown assistance
Page 355 of 421
Flat tyre
Preparing the vehicle
Your vehicle may be equipped with: R MOExtended tyres (tyres with run-flat char-
acteristics) (Y page 352)
Vehicle preparation is not necessary on
vehicles with MOExtended tyres.
R a TIREFIT kit (Y page 351)
R an emergency spare wheel (certain coun-
tries only) (Y page 396)
Vehicles with MOExtended tyres are not
equipped with a TIREFIT kit at the factory. It is therefore recommended that you additionallyequip your vehicle with a TIREFIT kit if you fit tyres that do not feature run-flat characteris-
tics, e.g. winter tyres. A TIREFIT kit can be
obtained from a qualified specialist work-
shop.
Information on changing and fitting a wheel
(Y page 379).
X Stop the vehicle as far away as possible
from traffic on solid, non-slippery and level
ground.
X Switch on the hazard warning lamps.
X Secure the vehicle against rolling away
(Y page 192).
X If possible, bring the front wheels into the
straight-ahead position.
X Switch off the engine.
X Vehicles without KEYLESS-GO: remove
the key from the ignition lock.
X Vehicles with KEYLESS-GO start-func-
tion or KEYLESS-GO: open the driver's
door.
The on-board electronics now have status
0 . This is the same as the key having been
removed.
X Vehicles with KEYLESS-GO start-func-
tion or KEYLESS-GO: remove the Start/
Stop button from the ignition lock
(Y page 165).
X Make sure that the passengers are not
endangered as they do so. Make sure that no one is near the danger area while a
wheel is being changed. Anyone who is not
directly assisting in the wheel change
should, for example, stand behind the bar-
rier.
X Get out of the vehicle. Pay attention to traf-
fic conditions when doing so.
X Close the driver's door.
X Place the warning triangle at a suitable dis-
tance (Y page 350). Observe legal require-
ments. MOExtended tyres (tyres with run-flat
characteristics)
General notes With MOExtended tyres (tyres with run-flat
characteristics), you can continue to drive
your vehicle even if there is a total loss of
pressure in one or more tyres. The affected
tyre must not show any clearly visible dam-
age.
You can recognise MOExtended tyres by the
MOExtended marking which appears on the
tyre wall. You will find this marking next to the
tyre size designation, the load-bearing capa-
city and the speed index.
MOExtended tyres may only be used in con-
junction with an activated tyre pressure loss
warning system or tyre pressure monitor.
If a pressure loss warning message
appears in the multifunction display:
R observe the instructions in the display mes-
sages (Y page 292)
R check the tyre for damage
R if driving on, observe the following notes
The driving distance possible in run-flat mode is approximately 80 km when the vehicle is
partially laden and approximately 30 km
when the vehicle is fully laden. 352
Flat tyreBreakdown assistance
Page 357 of 421
If you come into contact with the tyre sealant,
observe the following:
R Rinse off the tyre sealant from your skin
immediately with water.
R If the tyre sealant comes into contact with
your eyes, immediately rinse them thor-
oughly with clean water.
R If tyre sealant is swallowed, immediately
rinse your mouth out thoroughly and drink
plenty of water. Do not induce vomiting,
and seek medical attention immediately.
R Immediately change out of clothing which
has come into contact with tyre sealant.
R If an allergic reaction occurs, seek medical
attention immediately.
! Do not operate the tyre inflation com-
pressor for longer than ten minutes at a
time without a break. It may otherwise
overheat.
The tyre inflation compressor can be oper-
ated again once it has cooled down.
Comply with the manufacturer’s safety
instructions on the sticker on the tyre infla-
tion compressor.
Using the TIREFIT kit X
Do not remove any foreign objects which
have penetrated the tyre, e.g. screws or
nails.
X Remove the tyre sealant bottle, the accom-
panying TIREFIT sticker and the tyre infla-
tion compressor from the stowage well underneath the luggage compartment floor
(Y page 351).
X Affix part :of the TIREFIT sticker to the
instrument cluster within the driver's field
of vision.
X Affix part ;of the TIREFIT sticker near the
valve on the wheel with the defective tyre. X
Remove filler hose Band connector =
from the bottom section of tyre inflation
compressor housing ;.
X Slide the yellow filler hose connector into
the mounting on yellow cap Aof tyre seal-
ant bottle :until the connector engages.
X With the sealing rings in front, slide yellow
cap Aof tyre sealant bottle :into the
holder of tyre inflation compressor ;.
Yellow cap Aand both hooks must
engage. X
Remove the cap from valve Con the faulty
tyre.
X Screw filler hose Donto valve C.
X Insert plug =into a 12 V socket in your
vehicle. 354
Flat tyreBreakdown assistance