2015 MERCEDES-BENZ CLA SHOOTING BRAKE trailer
[x] Cancel search: trailerPage 82 of 421
otherwise not be able to stabilise the vehi-
cle if the vehicle starts to skid or a wheel
starts to spin.
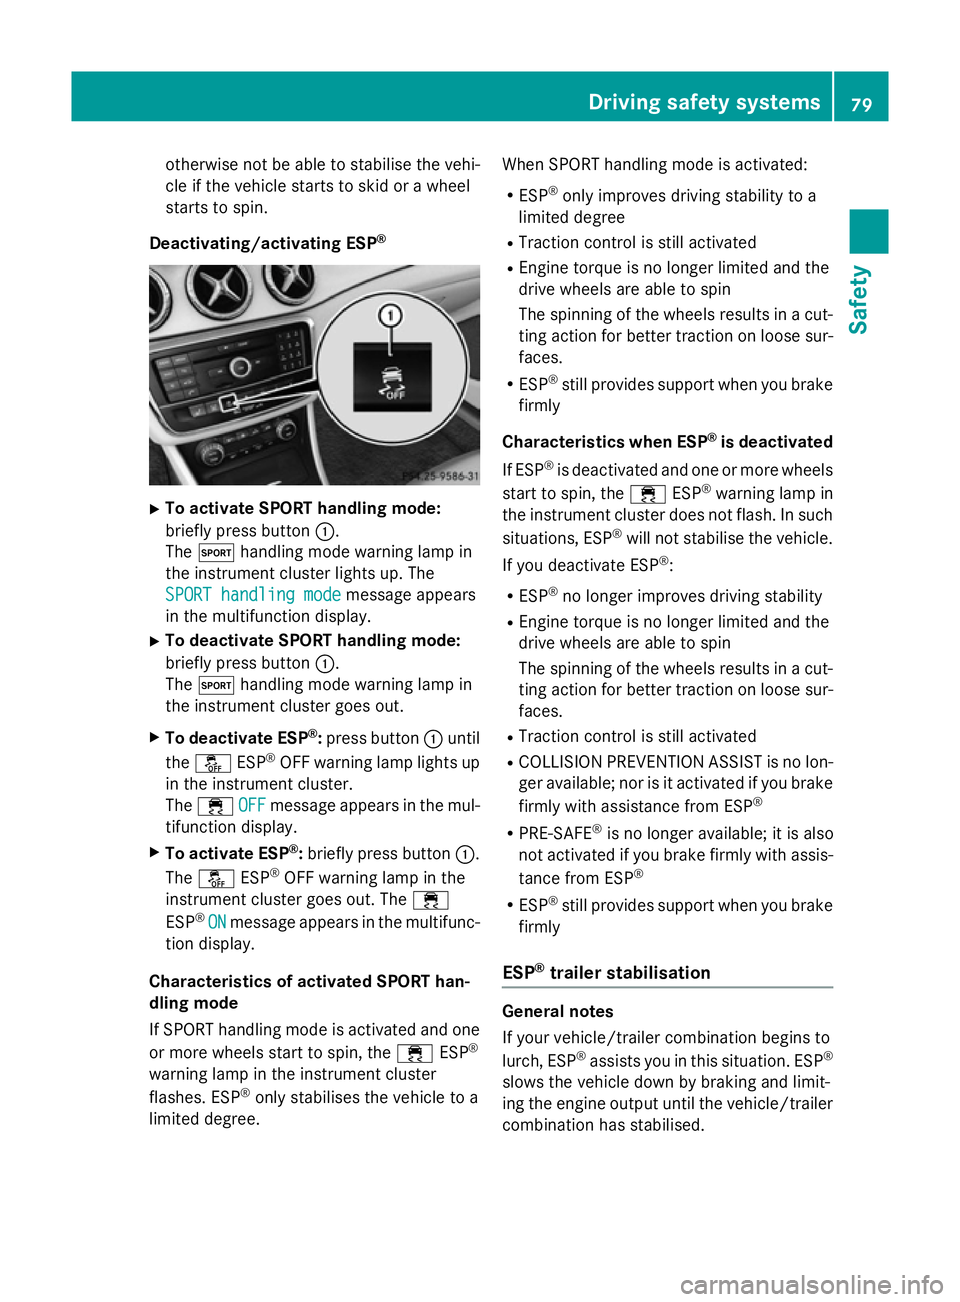
Deactivating/activating ESP ®X
To activate SPORT handling mode:
briefly press button :.
The M handling mode warning lamp in
the instrument cluster lights up. The
SPORT handling mode SPORT handling mode message appears
in the multifunction display.
X To deactivate SPORT handling mode:
briefly press button :.
The M handling mode warning lamp in
the instrument cluster goes out.
X To deactivate ESP ®
:press button :until
the å ESP®
OFF warning lamp lights up
in the instrument cluster.
The ÷ OFF
OFF message appears in the mul-
tifunction display.
X To activate ESP ®
:briefly press button :.
The å ESP®
OFF warning lamp in the
instrument cluster goes out. The ÷
ESP ®
ON
ON message appears in the multifunc-
tion display.
Characteristics of activated SPORT han-
dling mode
If SPORT handling mode is activated and one or more wheels start to spin, the ÷ESP®
warning lamp in the instrument cluster
flashes. ESP ®
only stabilises the vehicle to a
limited degree. When SPORT handling mode is activated:
R ESP ®
only improves driving stability to a
limited degree
R Traction control is still activated
R Engine torque is no longer limited and the
drive wheels are able to spin
The spinning of the wheels results in a cut-
ting action for better traction on loose sur-faces.
R ESP ®
still provides support when you brake
firmly
Characteristics when ESP ®
is deactivated
If ESP ®
is deactivated and one or more wheels
start to spin, the ÷ESP®
warning lamp in
the instrument cluster does not flash. In such
situations, ESP ®
will not stabilise the vehicle.
If you deactivate ESP ®
:
R ESP ®
no longer improves driving stability
R Engine torque is no longer limited and the
drive wheels are able to spin
The spinning of the wheels results in a cut-
ting action for better traction on loose sur- faces.
R Traction control is still activated
R COLLISION PREVENTION ASSIST is no lon-
ger available; nor is it activated if you brake
firmly with assistance from ESP ®
R PRE-SAFE ®
is no longer available; it is also
not activated if you brake firmly with assis-
tance from ESP ®
R ESP ®
still provides support when you brake
firmly
ESP ®
trailer stabilisation General notes
If your vehicle/trailer combination begins to
lurch, ESP
®
assists you in this situation. ESP ®
slows the vehicle down by braking and limit-
ing the engine output until the vehicle/trailer combination has stabilised. Driving safety systems
79Safety Z
Page 83 of 421
Important safety notes
G
WARNING
If road and weather conditions are poor,
trailer stabilisation will not be able to prevent the vehicle/trailer combination from swerv-
ing. Trailers with a high centre of gravity can
tip over before ESP ®
can detect this. There is
a risk of an accident.
Always adapt your driving style to the prevail-
ing road and weather conditions.
If your vehicle/trailer combination begins to
lurch, you can only stabilise the vehicle/
trailer combination by depressing the brake
firmly.
ESP ®
trailer stabilisation is active above
speeds of approximately 65 km/h.
ESP ®
trailer stabilisation does not work if
ESP ®
is deactivated or disabled because of a
malfunction. EBD (electronic brake force distribu-
tion)
General notes EBD monitors and controls the brake pres-
sure on the rear wheels to improve driving
stability while braking.
Important safety notes i
Observe the "Important safety notes" sec-
tion (Y page 72). G
WARNING
If EBD is malfunctioning, the rear wheels can
lock, e.g. under full braking. This increases the risk of skidding and an accident.
You should therefore adapt your driving style
to the different handling characteristics. Have the brake system checked at a qualified spe-
cialist workshop.
Observe information regarding indicator and
warning lamps (Y page 304) as well as dis-
play messages (Y page 268). ADAPTIVE BRAKE
ADAPTIVE BRAKE enhances braking safety
and offers increased braking comfort. In addi-
tion to the braking function, ADAPTIVE BRAKE
also has the HOLD function (Y page 211) and
hill start assist (Y page 169). STEER CONTROL
General notes STEER CONTROL helps you by transmitting a
noticeable steering force to the steering
wheel in the direction required for vehicle
stabilisation.
This steering support is provided in particular if:
R both right wheels or both left wheels are on
a wet or slippery road surface when you
brake
R the vehicle starts to skid
Important safety notes i
Observe the "Important safety notes" sec-
tion (Y page 72).
No steering support is provided from STEER
CONTROL, if: R ESP ®
is malfunctioning
R the steering is faulty
If ESP ®
is malfunctioning, you will be assisted
further by the electrical power steering. Protection against theft
Immobiliser
The immobiliser prevents your vehicle from
being started without the correct key. 80
Protection against theftSafety
Page 131 of 421
operate the foglamps on vehicles with the
Intelligent Light System (Y page 131).
Rear foglamp
The rear foglamp improves the visibility of
your vehicle in heavy fog for the following
traffic. Please observe the country-specific
laws on the use of rear foglamps.
X To switch on the rear foglamp: turn the
key to position 2in the ignition lock or start
the engine.
X Turn the light switch to LorÃ.
X Press the Rbutton.
The yellow Rindicator lamp in the
instrument cluster lights up.
X To switch off the rear foglamp: press the
R button.
The yellow Rindicator lamp in the
instrument cluster goes out.
i When the rear foglamp is switched on, the
centre brake lamp in the tail lamp switches off due to a legal requirement.
Side lamps ! If the battery has been excessively dis-
charged, the side lamps or parking lamps
are automatically switched off to enable
the next engine start. Always park your
vehicle safely and sufficiently lit according
to legal standards. Avoid the continuous
use of the Tside lamps for several
hours. If possible, switch on the Xright
or the Wleft parking lamp.
X To switch on: turn the light switch to T.
The green Tindicator lamp in the instru-
ment cluster lights up.
Parking lamps
Switching on the parking lamps ensures that
the corresponding side of the vehicle is illu-
minated. X
To switch on the parking lamps: the key
should not be in the ignition lock or it
should be in position 0.
X Turn the light switch to W(left-hand side
of the vehicle) or X(right-hand side of
the vehicle).
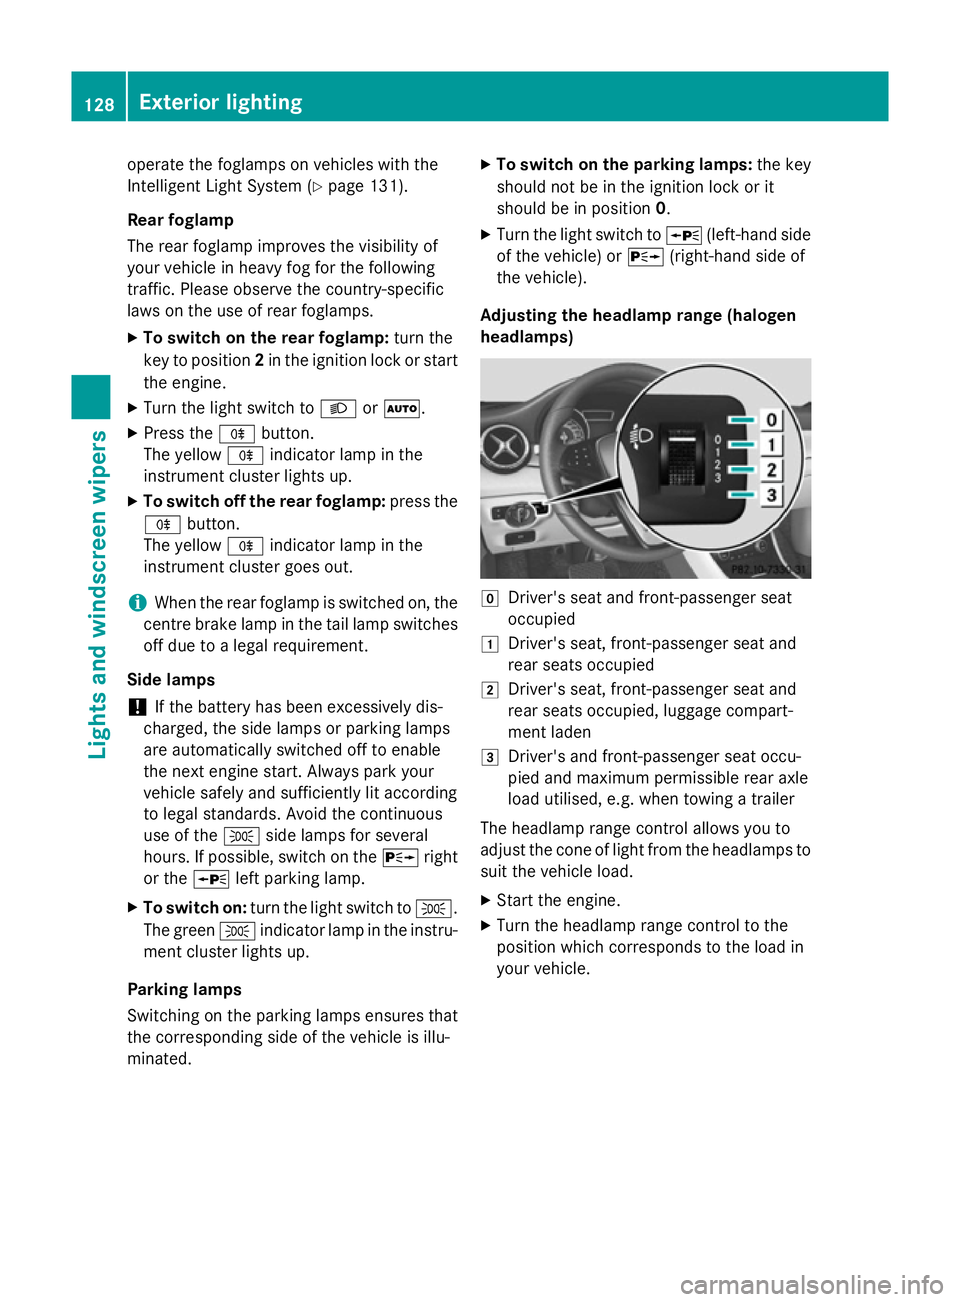
Adjusting the headlamp range (halogen
headlamps) g
Driver's seat and front-passenger seat
occupied
1 Driver's seat, front-passenger seat and
rear seats occupied
2 Driver's seat, front-passenger seat and
rear seats occupied, luggage compart-
ment laden
3 Driver's and front-passenger seat occu-
pied and maximum permissible rear axle
load utilised, e.g. when towing a trailer
The headlamp range control allows you to
adjust the cone of light from the headlamps to suit the vehicle load.
X Start the engine.
X Turn the headlamp range control to the
position which corresponds to the load in
your vehicle. 128
Exterior lightingLights and windscreen wipers
Page 166 of 421
Useful information
............................164
Running-in notes ............................... 164
Driving ............................................... 164
DYNAMIC SELECT button (all vehi-
cles except Mercedes-AMG vehi-
cles) .................................................... 174
DYNAMIC SELECT controller
(Mercedes-AMG vehicles) .................175
Manual transmission ........................176
Automatic transmission ...................177
Refuelling ........................................... 188
Parking ............................................... 192
Driving tips ........................................ 195
Driving systems ................................ 199
Towing a trailer ................................. 237 163Driving and parking
Page 172 of 421
depress the brake pedal. Only then can the
parking lock be deactivated.
All vehicles (except Mercedes-AMG vehi-
cles): if you do not depress the brake pedal,
the DIRECT SELECT lever can still be moved
but the parking lock remains engaged.
Mercedes-AMG vehicles: if you do not
depress the brake pedal, the selector lever
can still be moved but the parking lock
remains engaged.
Vehicles with automatic transmission: at
transmission fluid temperatures below
Ò20 †, you can only shift out of position Pinto
another transmission position when the
engine is running.
i Vehicles with automatic transmis-
sion: upshifts take place at higher engine
speeds after a cold start. This helps the
catalytic converter to reach its operating
temperature more quickly.
Vehicles with automatic transmission:
information on automatically releasing the
electric parking brake (Y page 193).
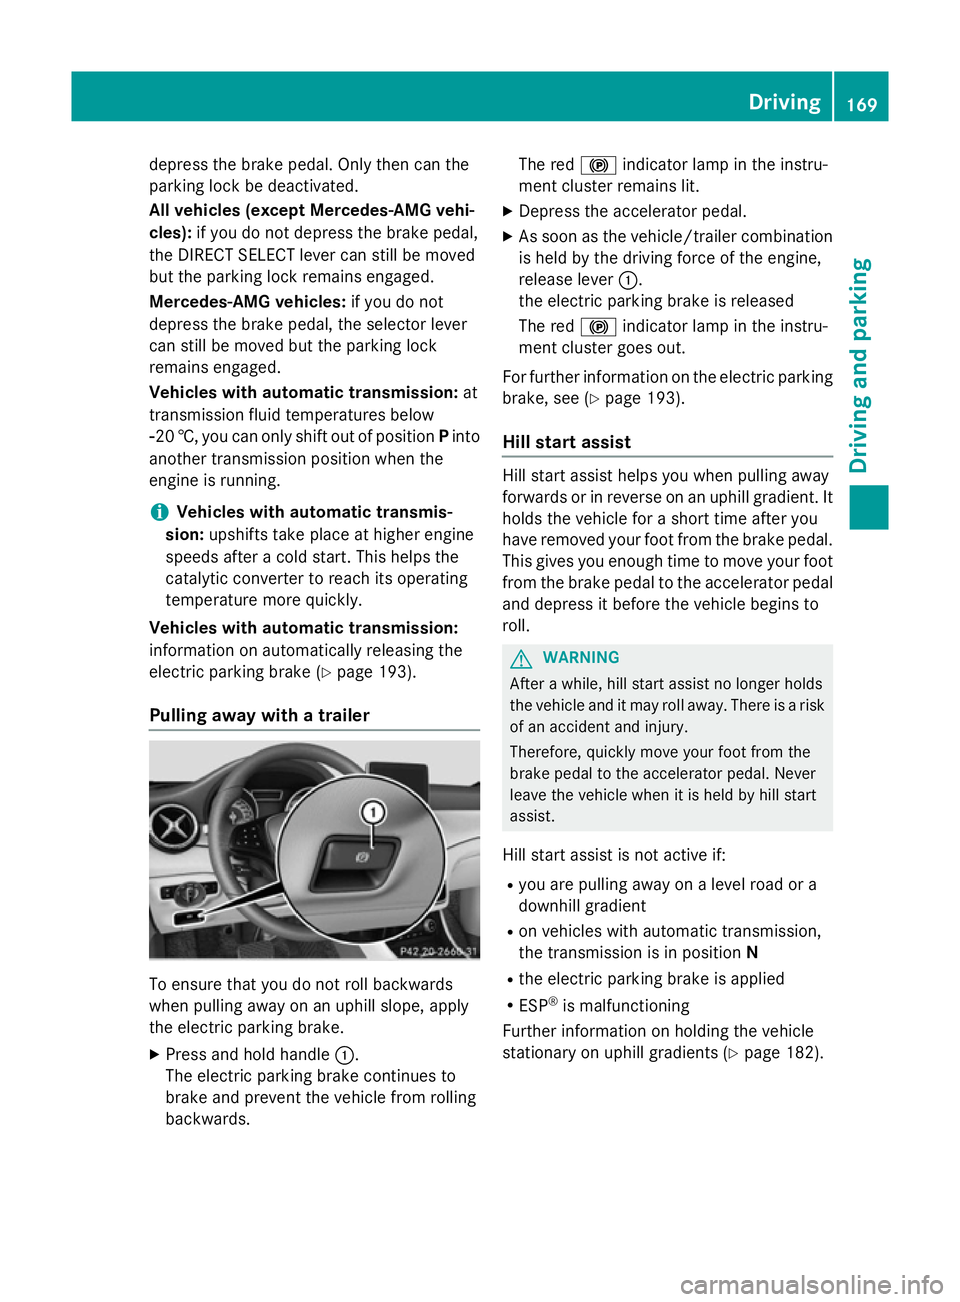
Pulling away with a trailer To ensure that you do not roll backwards
when pulling away on an uphill slope, apply
the electric parking brake.
X Press and hold handle :.
The electric parking brake continues to
brake and prevent the vehicle from rolling
backwards. The red
!indicator lamp in the instru-
ment cluster remains lit.
X Depress the accelerator pedal.
X As soon as the vehicle/trailer combination
is held by the driving force of the engine,
release lever :.
the electric parking brake is released
The red !indicator lamp in the instru-
ment cluster goes out.
For further information on the electric parking
brake, see (Y page 193).
Hill start assist Hill start assist helps you when pulling away
forwards or in reverse on an uphill gradient. It
holds the vehicle for a short time after you
have removed your foot from the brake pedal.
This gives you enough time to move your foot from the brake pedal to the accelerator pedal and depress it before the vehicle begins to
roll. G
WARNING
After a while, hill start assist no longer holds
the vehicle and it may roll away. There is a risk of an accident and injury.
Therefore, quickly move your foot from the
brake pedal to the accelerator pedal. Never
leave the vehicle when it is held by hill start
assist.
Hill start assist is not active if:
R you are pulling away on a level road or a
downhill gradient
R on vehicles with automatic transmission,
the transmission is in position N
R the electric parking brake is applied
R ESP ®
is malfunctioning
Further information on holding the vehicle
stationary on uphill gradients (Y page 182). Driving
169Driving and parking Z
Page 179 of 421

You can also change gear yourself using the
steering wheel gearshift paddles. Further
information on the manual drive program
(Y page 185). Manual transmission
Gear lever
! Only engage gear when the clutch pedal is
depressed.
! When shifting to
5thand 6thgear, you
must press the shift lever to the right. Oth-
erwise, you could shift unintentionally into
3rd or4th gear and damage the engine or
transmission.
If you shift down at too high a speed (trans-
mission braking), this can cause the engine to overrev, leading to engine damage.
Do not use the clutch bite point to keep the
vehicle stationary on uphill gradients.
There is otherwise a risk of damaging the
clutch.
! On long and steep downhill gradients,
especially if the vehicle is laden or towing a
trailer, you must shift into gear 1, 2or3in
good time. This uses the engine's braking
effect. This relieves the load on the brake
system and prevents the brakes from over- heating and wearing too quickly. k
Reverse gear
1 -6
Forward gears Shifting to neutral N
X
Depress the clutch pedal fully.
X Shift the gear lever to position N:. Engaging reverse gear
! Only shift into reverse gear
Rwhen the
vehicle is stationary. Otherwise, you could
damage the transmission.
X Pull the gear lever up, push it to the left and
then pull it back.
The ECO start/stop function is not available
when reverse gear is engaged. Further infor-
mation on the ECO start/stop function
(Y page 170). Gearshift recommendation
The gearshift recommendations assist you in
adopting an economical driving style. The rec- ommended gear is shown in the multifunction
display.
X Shift gear according to gearshift recom-
mendation :when shown in the multi-
function display of the instrument cluster. 176
Manual transmissionDriving and parking
Page 186 of 421

Mercedes-AMG vehicles:
it is only possible
to use kickdown in the automatic drive pro-
grams and in temporary manual drive pro-
gram M. When manual drive program Mis
selected permanently, kickdown is not pos-
sible.
For further information on kickdown in man-
ual drive program M(Y page 187).
Towing a trailer Towing a trailer is not possible with all mod-
els. For further information, see
(Y page 239).
X Drive in the middle of the engine speed
range on uphill gradients.
X Depending on the uphill or downhill gradi-
ent, select a lower gear (Y page 197), even
if cruise control, DISTRONIC PLUS, or
SPEEDTRONIC are activated. Drive programs
All vehicles (except Mercedes-AMG
vehicles) Drive program C (Comfort)
Drive program
Cis characterised by the fol-
lowing:
R the vehicle delivers comfortable, economi-
cal driving characteristics.
R the vehicle pulling away more gently in
forward and reverse gears unless the accel-
erator pedal is depressed fully.
R the vehicle having improved driving stabil-
ity, for example on slippery road surfaces.
R optimal fuel consumption resulting from
the automatic transmission shifting up
sooner. The vehicle is driven in the low
engine speed range and the wheels are less
likely to spin. Drive program S (Sport)
Drive program
Sis characterised by the fol-
lowing:
R sporty engine settings.
R the automatic transmission shifting up
later. as a result of the later automatic
transmission shift points, the fuel con-
sumption possibly being higher.
Drive program I (Individual)
In drive program Ithe following properties of
the drive program can be selected:
R the drive (engine and transmission man-
agement)
R the suspension (vehicles with damping sys-
tem or AMG RIDE CONTROL)
R the steering
R the availability of the ECO start/stop func-
tion
R the climate control
Information about configuring drive program I
with COMAND Online or Audio 20 can be
found in the Digital Owner's Manual.
i To permanently select the gears in drive
program Iusing the steering wheel pad-
dles, select the M(manual) setting for the
drive.
Drive program E (Economy)
Drive program Eis characterised by the fol-
lowing:
R comfort-oriented engine settings.
R optimal fuel consumption resulting from
the automatic transmission shifting up
sooner.
R the vehicle pulling away more gently in
forward and reverse gears unless the accel-
erator pedal is depressed fully.
R the vehicle having improved driving stabil-
ity, for example on slippery road surfaces.
R the automatic transmission shifting up
sooner. This results in the vehicle being Automatic transmission
183Driving and parking Z
Page 200 of 421
completion. Therefore, there are dynamic
changes in the bars at the start of a journey.
During a prolonged driving time, these
changes are smaller. For more dynamic
changes, perform a manual reset.
Further information on the ECO display
(Y page 250). Brakes
Important safety notes G
WARNING
If you shift down on a slippery road surface in an attempt to increase the engine's braking
effect, the drive wheels could lose their grip.
This increases the risk of skidding and having
an accident.
Do not shift down for additional engine brak-
ing on a slippery road surface.
Downhill gradients Change into a lower gear in good time on long
and steep downhill gradients. Take particular note of this when driving a laden vehicle and
when towing a trailer. For vehicles with auto-
matic transmission, you need to activate
manual gearshifting (Y page 185).
This also applies if you have activated cruise
control, SPEEDTRONIC or DISTRONIC PLUS.
This will use the braking effect of the engine,
so less braking will be required to maintain
vehicle speed. This relieves the load on the
brake system and prevents the brakes from
overheating and wearing too quickly.
Briefly depressing the accelerator pedal on
downhill gradients while the manual drive
program Mis temporarily activated (vehicles
with automatic transmission): the automatic
transmission may switch back to the last
active automatic drive program Eor S. The
automatic transmission may shift to a higher
gear. This can reduce the engine's braking
effect. Heavy and light loads G
WARNING
The braking system can overheat if you leave your foot on the brake pedal while driving.
This increases the braking distance and could
even cause the braking system to fail. There is
a risk of an accident.
Never use the brake pedal as a footrest. Do
not simultaneously depress both the brake
pedal and the accelerator pedal while driving.
! Depressing the brake pedal constantly
results in excessive and premature wear to
the brake pads.
If heavy demands are made on the brakes, do not park the vehicle immediately. Drive on for
a short while. This allows the airflow to cool
the brakes more quickly.
If the brakes have been used only moderately,
you should occasionally test their effective-
ness. To do this, brake more firmly from a
higher speed, paying attention to traffic con-
ditions. This improves the grip of the brakes.
Wet road surfaces If you have driven for a long time in heavy rain
without braking, there may be a delayed reac-
tion from the brakes when braking for the first time. This may also occur after a car wash orafter driving through deep water.
You will have to depress the brake pedal more
firmly. Maintain a greater distance to the vehi-
cle in front.
After driving on a wet road or having the vehi-
cle washed, brake firmly while paying atten-
tion to the traffic conditions. This will warm up
the brake discs, thereby drying them more
quickly and protecting them against corro-
sion.
Limited braking performance on salt-
treated roads If you drive on salt-treated roads, a layer of
salt may form on the brake discs and pads. Driving tips
197Driving and parking Z