2015 MERCEDES-BENZ B-CLASS SPORTS wheel torque
[x] Cancel search: wheel torquePage 20 of 346
Trim pieces (cleaning instruc-
tions).................................................. 281
Trip computer (on-board com-
puter) .................................................. 196
Trip odometer
Calling up ....................................... 196
Resetting (on-board computer) ...... 197
Trunk load (maximum) ...................... 341
Turn signals
Changing bulbs (front) ................... 112
Display message ............................ 219
Switching on/off ........................... 106
Type identification plate
see Vehicle identification plate
U
UnlockingEmergency unlocking ....................... 78
From inside the vehicle (central
unlocking button) ............................. 78
V
Vanity mirror (in the sun visor) ........ 261
Vehicle
Correct use ...................................... 24
Data acquisition ............................... 25
Display message ............................ 230
Equipment ....................................... 21
Individual settings .......................... 204
Limited Warranty ............................. 25
Loading .......................................... 310
Locking (in an emergency) ............... 79
Locking (SmartKey) .......................... 70
Lowering ........................................ 325
Maintenance .................................... 21
Parking for a long period ................ 155
Pulling away ................................... 138
Raising ........................................... 323
Reporting problems ......................... 24
Securing from rolling away ............ 323
Transporting .................................. 298
Unlocking (in an emergency) ........... 78
Unlocking (SmartKey) ...................... 70
Vehicle data ................................... 341
Vehicle data
Roof load (maximum) ..................... 341 Trunk load (maximum) ................... 341
Vehicle dimensions ........................... 341
Vehicle emergency locking ................ 79
Vehicle identification number
see VIN
Vehicle identification plate .............. 334
Vehicle tool kit .................................. 284
Ventilation
Setting the vents ........................... 131
Video
Operating the DVD ........................ .200
VIN ...................................................... 334
W
Warning and indicator lamps
ABS ................................................ 238
Brakes .......................................... .237
Check Engine ................................. 244
Coolant .......................................... 244
Distance warning ........................... 246 ESP ®
.............................................. 240
ESP ®
OFF ....................................... 241
LIM (DISTRONIC PLUS) .................. 164
Overview .......................................... 30
PASSENGER AIR BAG ..................... .39
Reserve fuel .................................. .244
Restraint system ............................ 243
Seat belt ........................................ 235
Warranty .............................................. 21
Washer fluid
Display message ............................ 233
Wheel and tire combination
see Tires
Wheel bolt tightening torque ........... 325
Wheel chock ...................................... 323
Wheels
Changing a wheel .......................... 322
Checking ........................................ 303
Cleaning ......................................... 278
Emergency spare wheel ................. 329
General notes ................................ 326
Important safety notes .................. 302
Information on driving .................... 302
Interchanging/changing ................ 322
Mounting a new wheel ................... 325
Removing a wheel .......................... 325
Storing .......................................... .322
18Index
Page 21 of 346
Tightening torque ........................... 325
Wheel size/tire size ....................... 326
Window curtain air bag
Display message ........................... .216
Operation ......................................... 46
Windows
see Side windows
Windshield
Defrosting ...................................... 128
Windshield washer system
Adding washer fluid ....................... 273
Notes ............................................. 339
Windshield wipers
Display message ............................ 233
Problem (malfunction) ................... 117
Rear window wiper ........................ 114
Replacing the wiper blades ............ 115
Switching on/off ........................... 114
Winter driving
Slippery road surfaces ................... 160
Snow chains .................................. 305
Winter operation
General notes ................................ 304
Winter tires
M+S tires ....................................... 304
Wiper blades
Cleaning ......................................... 278
Important safety notes .................. 115
Replacing (rear window) ................ 116
Replacing (windshield )................... 115
Wooden trim (cleaning instruc-
tions) .................................................. 281
Z
ZONE function
Switching on/of f........................... 127
Index19
Page 66 of 346
Rto crossing traffic
R when cornering
As a result, the Adaptive Brake Assist may not intervene in all critical conditions. There is a
risk of an accident.
Always pay careful attention to the traffic sit- uation and be ready to brake.
Due to the nature of the system, particularly
complicated but non-critical driving condi-
tions may also cause Brake Assist to inter-
vene.
If adaptive Brake Assist is not available due to a malfunction in the radar sensor system, thebrake system remains available with full
brake boosting effect and BAS.
With the help of adaptive Brake Assist, the
distance warning signal can detect obstacles
that are in the path of your vehicle for an
extended period of time.
If adaptive Brake Assist detects a risk of col-
lision with the vehicle in front, it calculates
the braking force necessary to avoid a colli-
sion. If you apply the brakes forcefully, adap-
tive Brake Assist will automatically increase
the braking force to a level suitable for the
traffic conditions.
X Keep the brake pedal depressed until the
emergency braking situation is over.
ABS prevents the wheels from locking.
The brakes will work normally again if:
R you release the brake pedal.
R there is no longer any danger of a collision.
R no obstacle is detected in front of your
vehicle.
Adaptive Brake Assist is then deactivated.
If adaptive Brake Assist demands particularly
high braking force, preventative passenger
protection measures (PRE-SAFE ®
) are activa-
ted simultaneously.
Up to a speed of approximately 155 mph
(250 km/h), adaptive Brake Assist is capable
of reacting to moving objects that have
already been detected as such at least once
over the period of observation. Up to a speed of approximately 44 mph
(70 km/h), adaptive Brake Assist reacts to
stationary obstacles.
ESP®(Electronic Stability Program)
General notes
iObserve the "Important safety notes" sec-
tion ( Ypage 60).
ESP ®
monitors driving stability and traction,
i.e. power transmission between the tires and
the road surface.
If ESP ®
detects that the vehicle is deviating
from the direction desired by the driver, one
or more wheels are braked to stabilize the
vehicle. The engine output is also modified to keep the vehicle on the desired course within
physical limits. ESP ®
assists the driver when
pulling away on wet or slippery roads. ESP ®
can also stabilize the vehicle during braking.
ETS/4ETS (Electronic Traction System)
iObserve the "Important safety notes" sec-
tion ( Ypage 60).
ETS traction control is part of ESP ®
. On vehi-
cles with 4MATIC, 4ETS is part of ESP ®
.
Traction control brakes the drive wheels indi-
vidually if they spin. This enables you to pull
away and accelerate on slippery surfaces, for
example if the road surface is slippery on one
side. In addition, more drive torque is trans-
ferred to the wheel or wheels with traction.
Traction control remains active, even if you
deactivate ESP ®
.
Important safety notes
iObserve the "Important safety notes" sec-
tion ( Ypage 60).
GWARNING
If ESP ®
is malfunctioning, ESP ®
is unable to
stabilize the vehicle. Additionally, further driv-
64Driving safety systems
Safety
Page 68 of 346
If you deactivate ESP®
:
R ESP ®
no longer improves driving stability.
R engine torque is no longer limited and the
drive wheels are able to spin.
The spinning of the wheels results in a cut-
ting action for better traction on loose sur-faces.
R traction control is still activated.
R ESP ®
still provides support when you
brake.
ESP®trailer stabilization
General information
If your vehicle/trailer combination begins to
swerve, ESP ®
assists you in this situation.
ESP ®
slows the vehicle down by braking and
limiting the engine output until the vehicle/
trailer combination has stabilized.
Important safety notes
GWARNING
If road and weather conditions are poor,
trailer stabilization will not be able to prevent the vehicle/trailer combination from swerv-
ing. Trailers with a high center of gravity can
tip over before ESP ®
can detect this. There is
a risk of an accident.
Always adapt your driving style to the prevail- ing road and weather conditions.
If your vehicle with trailer (vehicle/trailer
combination) begins to lurch, you can only
stabilize the vehicle/trailer combination by
depressing the brake firmly. ESP ®
trailer stabilization is active above
speeds of about 65 km/h.ESP ®
trailer stabilization does not work if
ESP ®
is deactivated or disabled because of a
malfunction.
EBD (electronic brake force distribu- tion)
General information
EBD monitors and controls the brake pres-
sure on the rear wheels to improve driving
stability while braking.
Important safety notes
iObserve the "Important safety notes" sec-
tion ( Ypage 60).
GWARNING
If EBD is malfunctioning, the rear wheels can
lock, e.g. under full braking. This increases the
risk of skidding and an accident.
You should therefore adapt your driving style
to the different handling characteristics. Havethe brake system checked at a qualified spe-
cialist workshop.
Observe information regarding indicator and
warning lamps ( Ypage 238) as well as dis-
play messages ( Ypage 210).
ADAPTIVE BRAKE
ADAPTIVE BRAKE enhances braking safety
and offers increased braking comfort. In addi-
tion to the braking function, ADAPTIVE BRAKE
also has the HOLD function ( Ypage 170) and
hill start assist ( Ypage 138).
STEER CONTROL
General information
STEER CONTROL helps you by transmitting a
noticeable steering force to the steering
wheel in the direction required for vehicle
stabilization.
66Driving safety systems
Safety
Page 327 of 346
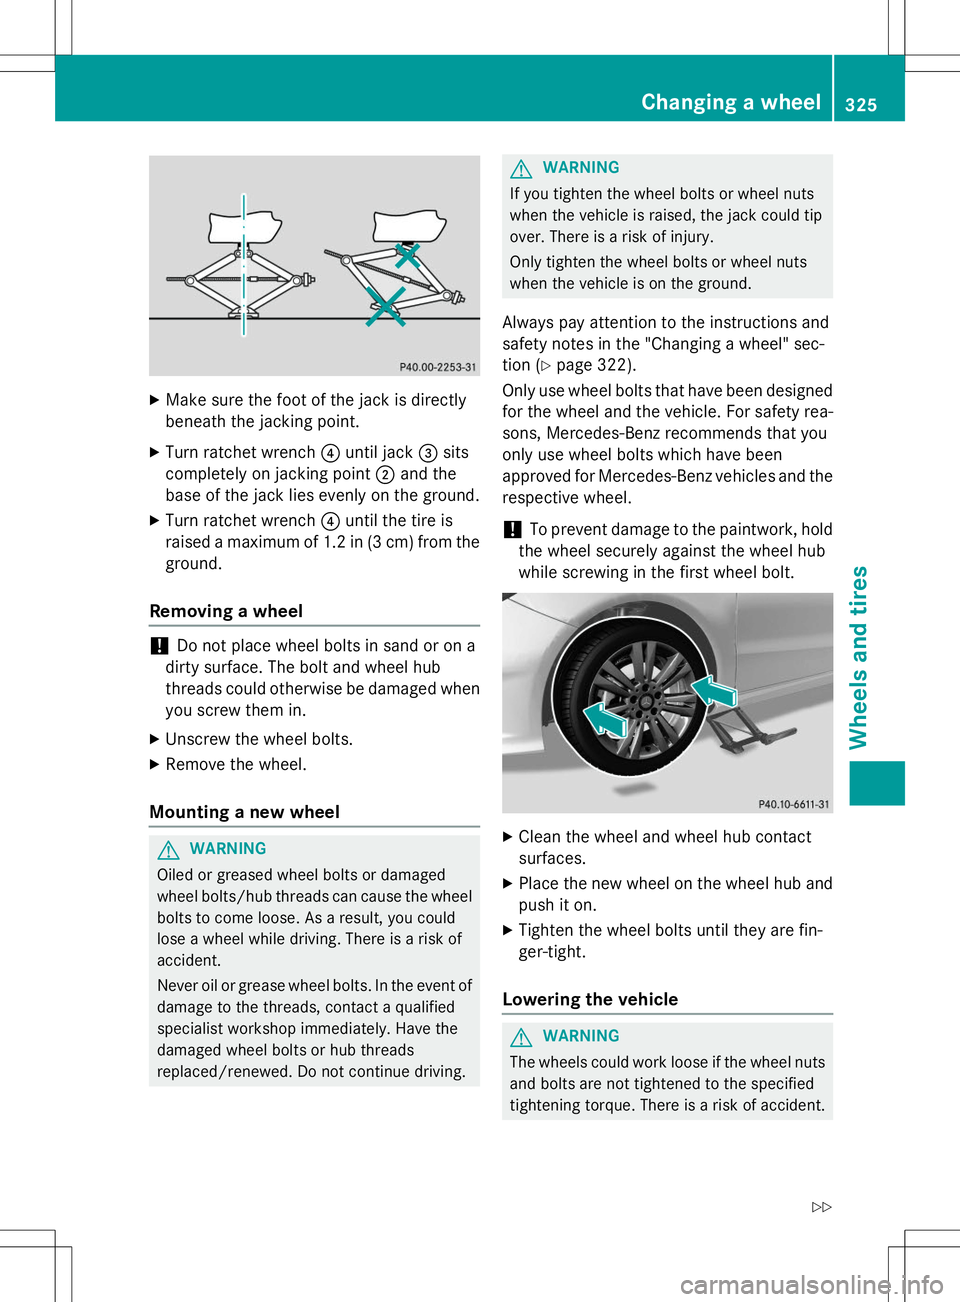
XMake sure the foot of the jack is directly
beneath the jacking point.
X Turn ratchet wrench ?until jack =sits
completely on jacking point ;and the
base of the jack lies evenly on the ground.
X Turn ratchet wrench ?until the tire is
raised a maximum of 1.2 in (3 cm) from the ground.
Removing a wheel
!Do not place wheel bolts in sand or on a
dirty surface. The bolt and wheel hub
threads could otherwise be damaged when you screw them in.
X Unscrew the wheel bolts.
X Remove the wheel.
Mounting a new wheel
GWARNING
Oiled or greased wheel bolts or damaged
wheel bolts/hub threads can cause the wheel
bolts to come loose. As a result, you could
lose a wheel while driving. There is a risk ofaccident.
Never oil or grease wheel bolts. In the event ofdamage to the threads, contact a qualified
specialist workshop immediately. Have the
damaged wheel bolts or hub threads
replaced/renewed. Do not continue driving.
GWARNING
If you tighten the wheel bolts or wheel nuts
when the vehicle is raised, the jack could tip
over. There is a risk of injury.
Only tighten the wheel bolts or wheel nuts
when the vehicle is on the ground.
Always pay attention to the instructions and
safety notes in the "Changing a wheel" sec-
tion ( Ypage 322).
Only use wheel bolts that have been designed for the wheel and the vehicle. For safety rea-
sons, Mercedes-Benz recommends that you
only use wheel bolts which have been
approved for Mercedes-Benz vehicles and the
respective wheel.
!To prevent damage to the paintwork, hold
the wheel securely against the wheel hub
while screwing in the first wheel bolt.
X Clean the wheel and wheel hub contact surfaces.
X Place the new wheel on the wheel hub and
push it on.
X Tighten the wheel bolts until they are fin-
ger-tight.
Lowering the vehicle
GWARNING
The wheels could work loose if the wheel nuts
and bolts are not tightened to the specified
tightening torque. There is a risk of accident.
Changing a wheel325
Wheels and tires
Z
Page 328 of 346
Have the tightening torque immediately
checked at a qualified specialist workshop
after a wheel is changed.
X Place the ratchet wrench onto the hexagon
nut of the jack so that the letters ABare
visible.
X Turn the ratchet wrench until the vehicle is
once again standing firmly on the ground.
X Place the jack to one side.
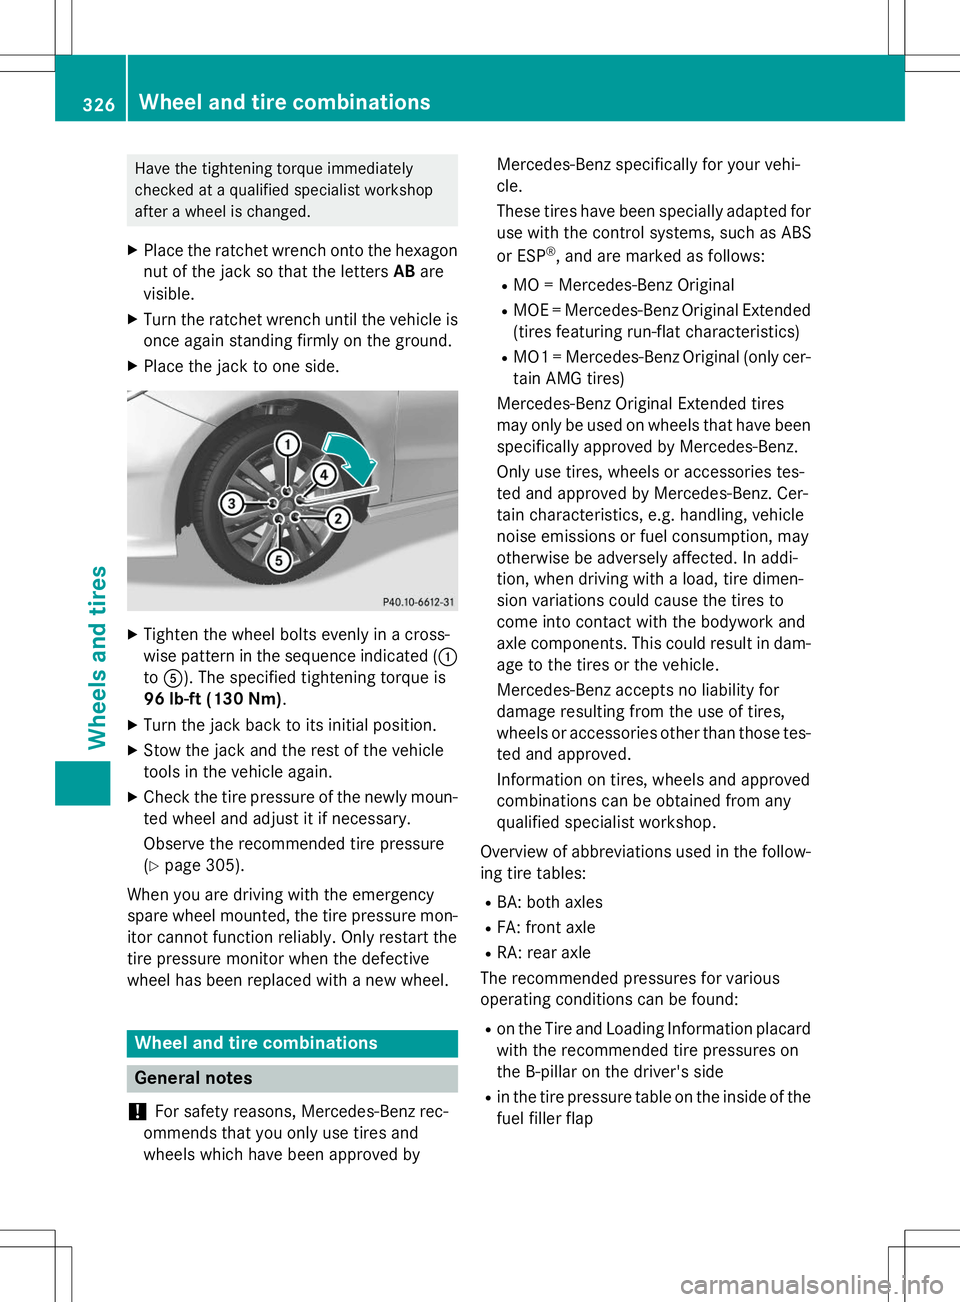
XTighten the wheel bolts evenly in a cross-
wise pattern in the sequence indicated ( :
to A ). The specified tightening torque is
96 lb-f t(130 Nm) .
X Turn the jack back to its initial position.
X Stow the jack and the rest of the vehicle
tools in the vehicle again.
X Check the tire pressure of the newly moun-
ted wheel and adjust it if necessary.
Observe the recommended tire pressure ( Y page 305).
When you are driving with the emergency
spare wheel mounted, the tire pressure mon-
itor cannot function reliably. Only restart the
tire pressure monitor when the defective
wheel has been replaced with a new wheel.
Wheel and tire combinations
General notes
!
For safety reasons, Mercedes-Benz rec-
ommends that you only use tires and
wheels which have been approved by Mercedes-Benz specifically for your vehi-cle.
These tires have been specially adapted for
use with the control systems, such as ABS
or ESP ®
, and are marked as follows:
R MO = Mercedes-Benz Original
R MOE = Mercedes-Benz Original Extended
(tires featuring run-flat characteristics)
R MO1 = Mercedes-Benz Original (only cer-
tain AMG tires)
Mercedes-Benz Original Extended tires
may only be used on wheels that have been
specifically approved by Mercedes-Benz.
Only use tires, wheels or accessories tes-
ted and approved by Mercedes-Benz. Cer-
tain characteristics, e.g. handling, vehicle
noise emissions or fuel consumption, may
otherwise be adversely affected. In addi-
tion, when driving with a load, tire dimen-
sion variations could cause the tires to
come into contact with the bodywork and
axle components. This could result in dam- age to the tires or the vehicle.
Mercedes-Benz accepts no liability for
damage resulting from the use of tires,
wheels or accessories other than those tes-
ted and approved.
Information on tires, wheels and approved
combinations can be obtained from any
qualified specialist workshop.
Overview of abbreviations used in the follow- ing tire tables: R BA: both axles
R FA: front axle
R RA: rear axle
The recommended pressures for various
operating conditions can be found:
R on the Tire and Loading Information placard
with the recommended tire pressures on
the B-pillar on the driver's side
R in the tire pressure table on the inside of the
fuel filler flap
326Wheel and tire combinations
Wheels and tires