2015 MERCEDES-BENZ B-CLASS SPORTS checking oil
[x] Cancel search: checking oilPage 11 of 346
Important safety notes .................. 139
Introduction ................................... 139
Emergency
Automatic measures after an acci-
dent ................................................ .54
Emergency release
Driver's door .................................... 78
Vehicle ............................................ .78
Emergency spare wheel
General notes ................................ 329
Important safety notes .................. 329
Removing ...................................... .330
Technical data ............................... 331
Emergency Tensioning Devices
Activation ......................................... 52
Emergency unlocking
Tailgate ............................................ 80
Emissions control
Service and warranty information .... 21
Engine
Check Engine warning lamp ........... 244
Display message ............................ 222
ECO start/stop function ................ 139
Engine number ............................... 335
Irregular running ............................ 141
Jump-starting ................................. 293
Starting problems .......................... 141
Starting the engine with the
SmartKey ....................................... 137
Starting with the Start/Stop but-
ton ................................................. 138
Switching off .................................. 153
Tow-starting (vehicle) ..................... 298
Engine electronics
Problem (malfunction) ................... 141
Engine oil
Adding .......................................... .272
Additives ........................................ 338
Checking the oil level ..................... 271
Checking the oil level using the
dipstick .......................................... 272
Display message ............................ 224
Filling capacity ............................... 338
Notes about oil grades ................... 337
Notes on oil level/consumption .... 271
Viscosity ........................................ 338 ESP
®
(Electronic Stability Pro-
gram)
Activating/deactivating (on-
board computer) ............................ 202
Characteristics ................................. 65
Deactivating/activating (notes) ....... 65
Display message ............................ 208
ETS/4ETS ........................................ 64
Function/notes ................................ 64
General notes .................................. 64
Important safety information ........... 64
Trailer stabilization ........................... 66
Warning lamp ................................. 240
ETS/4ETS (Electronic Traction Sys-
tem) ...................................................... 64
Exhaust
see Exhaust pipe
Exhaust check ................................... 156
Exhaust pipe
Cleaning ......................................... 280
Exterior lighting
Cleaning ......................................... 279
see Lights
Exterior mirrors
Adjusting ......................................... 98
Dipping (automatic) ......................... 99
Folding in when locking (on-boardcomputer) ...................................... 206
Folding in/out (automatically )......... 99
Folding in/out (electrically) ............. 98
Out of position (troubleshooting) ..... 99
Setting ............................................. 99
Storing settings (memory func-
tion) ............................................... 101
Storing the parking position .......... 100
Eyeglasses compartment ................. 249
F
Filler cap
see Fuel filler flap
Flat tire
MOExtended tire s.......................... 285
Preparing the vehicle ..................... 284
TIREFIT kit ...................................... 286
see Emergency spare wheel
Floormats ........................................... 268
Index9
Page 17 of 346
SeatsAdjusting (electrically) ..................... 94
Adjusting (manually) ........................ 94
Adjusting the 4-way lumbar sup-
port .................................................. 95
Adjusting the head restraint ............ 94
Cleaning the cover ........................ .281
Correct driver's seat position ........... 92
Folding the backrest (rear com-
partment) forwards/back (vehi-
cles with the EASY-VARIO-PLUS
system) .......................................... 253
Folding the backrest (rear com-
partment) forwards/back (vehi-
cles without the EASY-VARIO-
PLUS system) ................................ 252
Important safety notes .................... 93
Seat heating problem ..................... .97
Storing settings (memory func-
tion) ............................................... 101
Switching seat heating on/of f......... 96
Securing cargo .................................. 255
Selector lever
Cleaning ......................................... 280
Sensors (cleaning instructions) ....... 279
Service menu (on-board com- puter) .................................................. 204
Service message
see ASSYST PLUS
Service products
Brake fluid ..................................... 338
Coolant (engine) ............................ 339
Engine oil ....................................... 337
Fuel ................................................ 335
Important safety notes .................. 335
Refrigerant (air-conditioning sys-
tem) ............................................... 340
Washer fluid ................................... 339
Setting the air distribution ............... 127
Setting the airflow ............................ 127
Settings
Factory (on-board computer) ......... 206
On-board computer ....................... 204
Side impact air bag ............................. 46
Side marker lamp (display mes-
sage) ................................................... 221 Side windows
Cleaning ......................................... 278
Convenience closing feature ............ 83
Convenience opening feature .......... 82
Important safety information ........... 81
Opening/closing .............................. 82
Problem (malfunction) ..................... 85
Resetting ......................................... 84
Reversing feature ............................. 81
Sliding sunroof
see Panorama roof with power
tilt/sliding panel
SmartKey
Changing the battery ....................... 74
Changing the programming ............. 72
Checking the battery ....................... 73
Convenience closing feature ............ 83
Convenience opening feature .......... 82
Display message ............................ 234
Door central locking/unlocking ....... 70
Important safety notes .................... 70
KEYLESS-GO start function .............. 72
Loss ................................................. 75
Mechanical key ................................ 72
Positions (ignition lock) ................. 135
Problem (malfunction) ..................... 75
Starting the engine ........................ 137
SmartKey positions (ignition lock) .. 135
Snow chains ...................................... 305
Sockets
Center console .............................. 263
General notes ................................ 262
Luggage compartment ................... 263
Rear compartment ......................... 263
Special seat belt retractor .................. 55
Specialist workshop ............................ 24
Speed, controlling
see Cruise control
Speedometer
Activating/deactivating the addi-
tional speedometer ........................ 204
Digital ............................................ 197
In the Instrument cluster ................. 29
Segments ...................................... 193
Selecting the unit of measure-
ment .............................................. 204
Standing lamps
Display message ............................ 221
Index15
Page 273 of 346
!Make sure that the windshield wipers are
not folded away from the windshield. You
could otherwise damage the windshield
wipers or the hood.
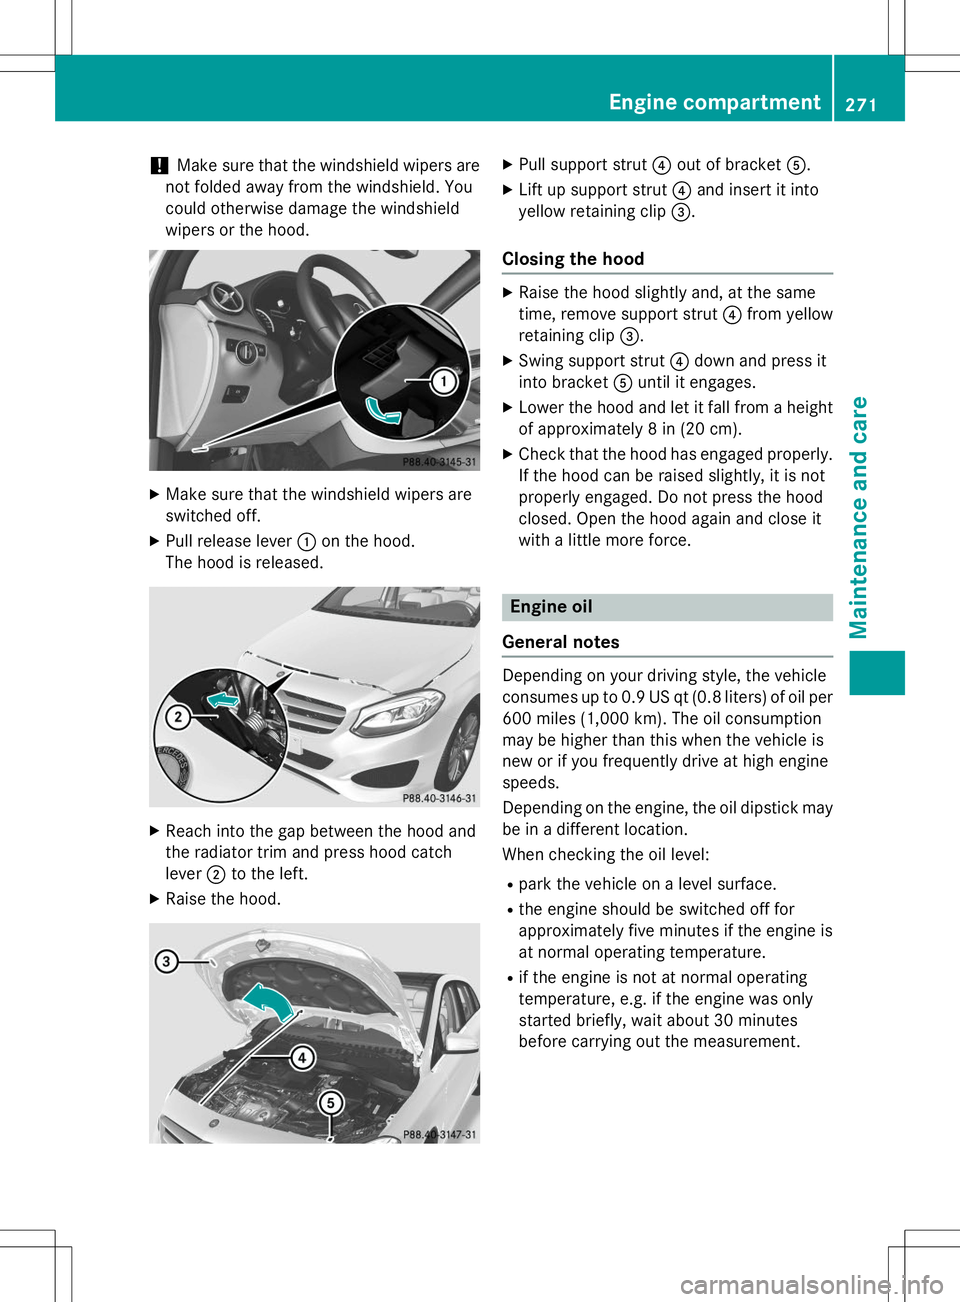
X Make sure that the windshield wipers are
switched off.
X Pull release lever :on the hood.
The hood is released.
X Reach into the gap between the hood and
the radiator trim and press hood catchlever ;to the left.
X Raise the hood.
XPull support strut ?out of bracket A.
X Lift up support strut ?and insert it into
yellow retaining clip =.
Closing the hood
X
Raise the hood slightly and, at the same
time, remove support strut ?from yellow
retaining clip =.
X Swing support strut ?down and press it
into bracket Auntil it engages.
X Lower the hood and let it fall from a height
of approximately 8 in (20 cm).
X Check that the hood has engaged properly.
If the hood can be raised slightly, it is not
properly engaged. Do not press the hood
closed. Open the hood again and close it
with a little more force.
Engine oil
General notes
Depending on your driving style, the vehicle
consumes up to 0.9 US qt (0.8 liters) of oil per 600 miles (1,000 km). The oil consumption
may be higher than this when the vehicle is
new or if you frequently drive at high enginespeeds.
Depending on the engine, the oil dipstick maybe in a different location.
When checking the oil level:
R park the vehicle on a level surface.
R the engine should be switched off for
approximately five minutes if the engine is
at normal operating temperature.
R if the engine is not at normal operating
temperature, e.g. if the engine was only
started briefly, wait about 30 minutes
before carrying out the measurement.
Engine compartment271
Maintenance and care
Z
Page 274 of 346
Checking the oil level using the oil dip-
stick
GWARNING
Certain components in the engine compart-
ment, such as the engine, radiator and parts
of the exhaust system, can become very hot.
Working in the engine compartment poses a
risk of injury.
Where possible, let the engine cool down andtouch only the components described in the
following.
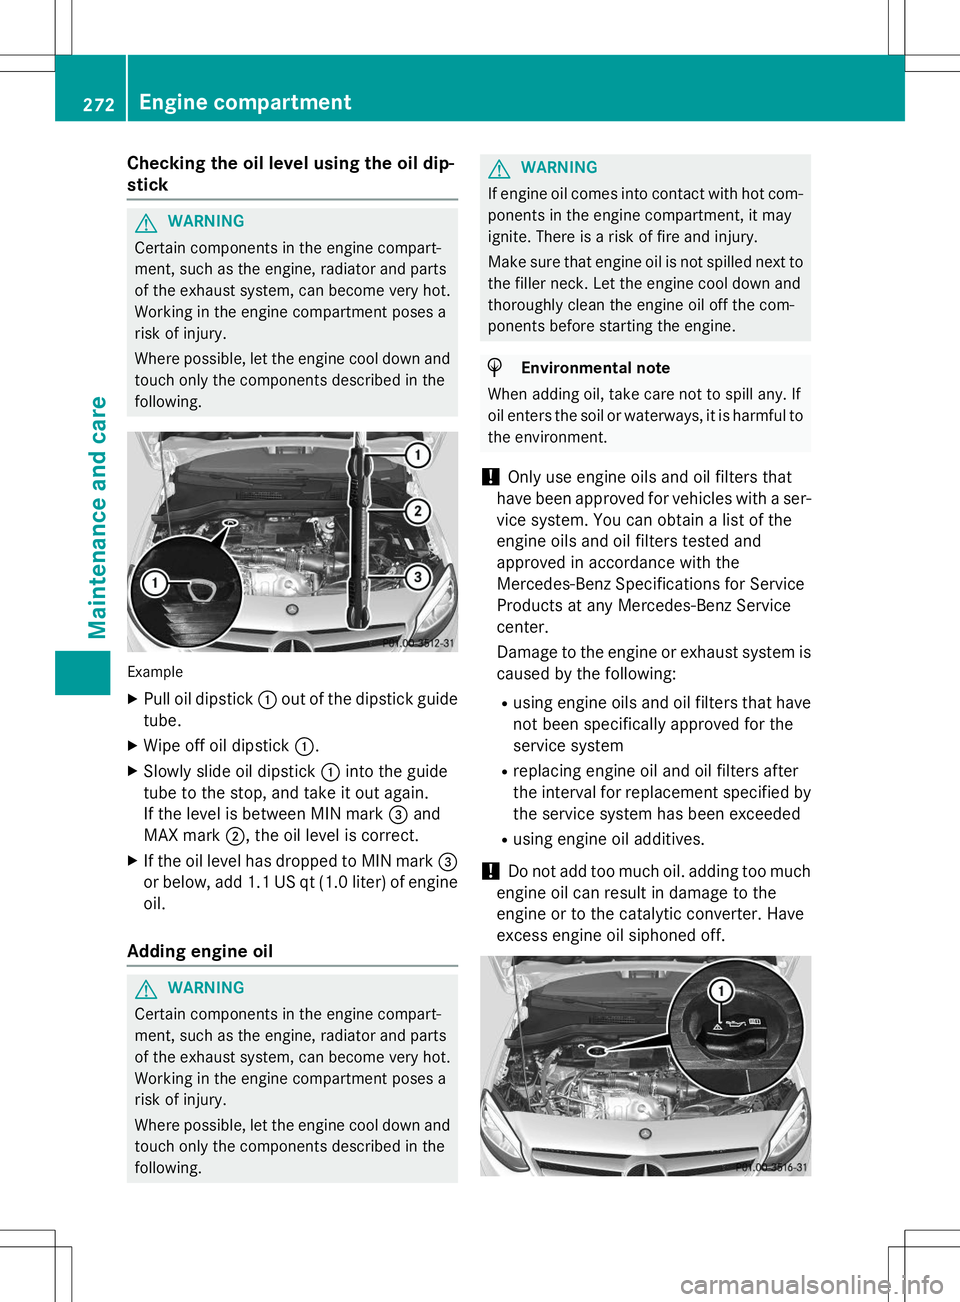
Example
X Pull oil dipstick :out of the dipstick guide
tube.
X Wipe off oil dipstick :.
X Slowly slide oil dipstick :into the guide
tube to the stop, and take it out again.
If the level is between MIN mark =and
MAX mark ;, the oil level is correct.
X If the oil level has dropped to MIN mark =
or below, add 1.1 US qt (1.0 liter) of engine oil.
Adding engine oil
GWARNING
Certain components in the engine compart-
ment, such as the engine, radiator and parts
of the exhaust system, can become very hot.
Working in the engine compartment poses a
risk of injury.
Where possible, let the engine cool down and touch only the components described in the
following.
GWARNING
If engine oil comes into contact with hot com- ponents in the engine compartment, it may
ignite. There is a risk of fire and injury.
Make sure that engine oil is not spilled next to
the filler neck. Let the engine cool down and
thoroughly clean the engine oil off the com-
ponents before starting the engine.
HEnvironmental note
When adding oil, take care not to spill any. If
oil enters the soil or waterways, it is harmful to the environment.
!Only use engine oils and oil filters that
have been approved for vehicles with a ser-
vice system. You can obtain a list of the
engine oils and oil filters tested and
approved in accordance with the
Mercedes-Benz Specifications for Service
Products at any Mercedes-Benz Service
center.
Damage to the engine or exhaust system is caused by the following:
R using engine oils and oil filters that have
not been specifically approved for the
service system
R replacing engine oil and oil filters after
the interval for replacement specified by
the service system has been exceeded
R using engine oil additives.
!Do not add too much oil. adding too much
engine oil can result in damage to the
engine or to the catalytic converter. Have
excess engine oil siphoned off.
272Engine compartment
Maintenance and care
Page 275 of 346
Example: engine oil cap
X Turn cap :counter-clockwise and remove
it.
X Add engine oil.
If the oil level is at or below the MIN mark on
the oil dipstick, add 1.1 US qt (1.0 l)of
engine oil.
X Replace cap :on the filler neck and turn
clockwise.
Ensure that the cap locks into placesecurely.
X Check the oil level again with the oil dip-
stick ( Ypage 272).
Further information on engine oil( Y page 337).
Checking and adding other service
products
Checking coolant level
GWARNING
The engine cooling system is pressurized, par- ticularly when the engine is warm. When
opening the cap, you could be scalded by hotcoolant spraying out. There is a risk of injury.
Let the engine cool down before opening the
cap. Wear eye and hand protection when
opening the cap. Open the cap slowly half a
turn to allow pressure to escape.
!The coolant may only be checked and cor-
rected when the engine is cool (coolant
temperature below 104 ‡ (40 †). Check-
ing the coolant when the coolant tempera-
ture is above 104 ‡ (40 †) may result in
damage to the engine or to the engine cool- ing system.
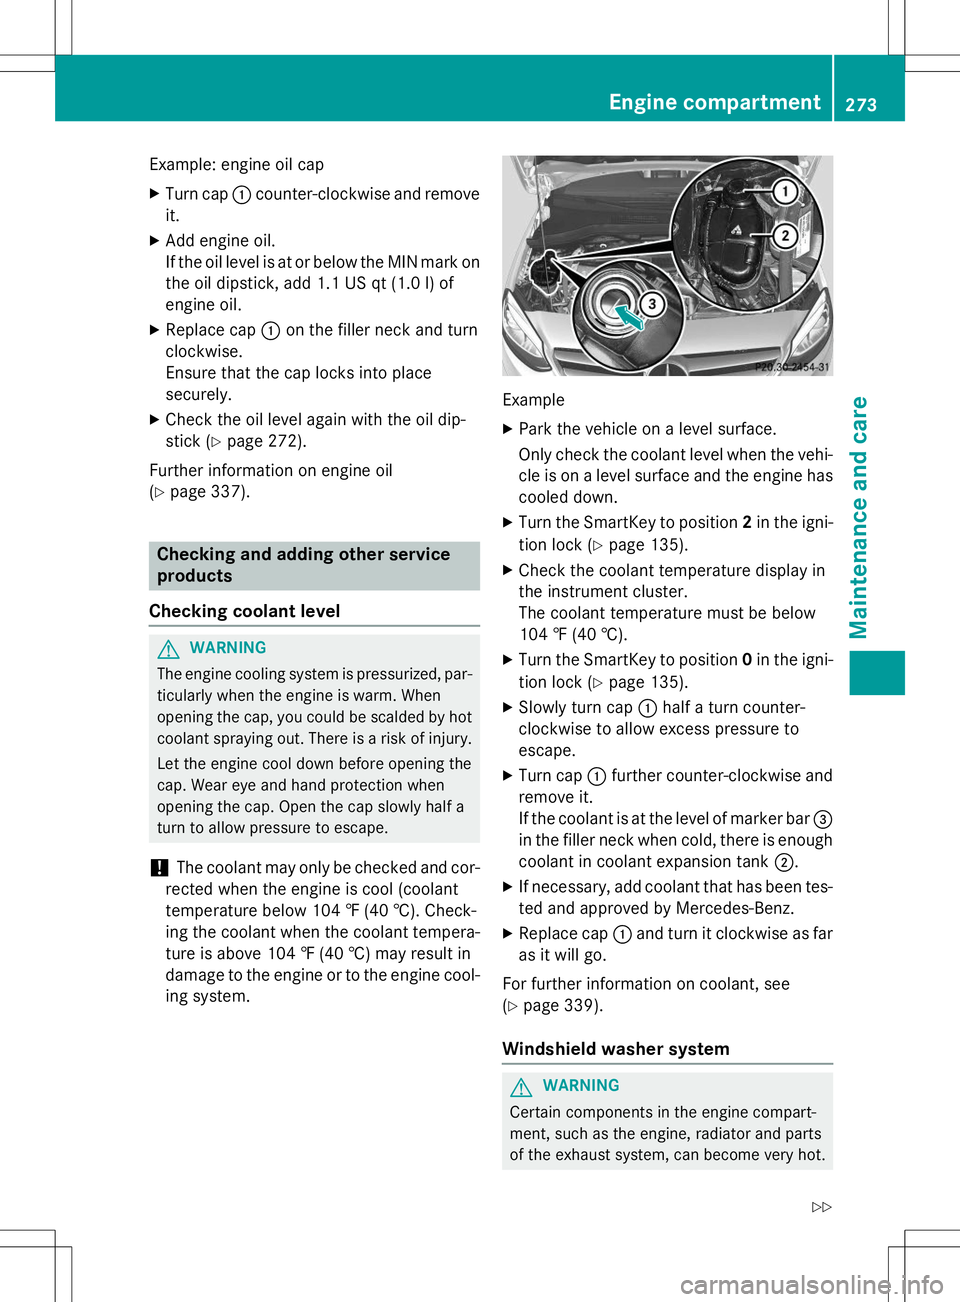
Example
X Park the vehicle on a level surface.
Only check the coolant level when the vehi-
cle is on a level surface and the engine has cooled down.
X Turn the SmartKey to position 2in the igni-
tion lock ( Ypage 135).
X Check the coolant temperature display in
the instrument cluster.
The coolant temperature must be below
104 ‡ (40 †).
X Turn the SmartKey to position 0in the igni-
tion lock ( Ypage 135).
X Slowly turn cap :half a turn counter-
clockwise to allow excess pressure toescape.
X Turn cap :further counter-clockwise and
remove it.
If the coolant is at the level of marker bar =
in the filler neck when cold, there is enough
coolant in coolant expansion tank ;.
X If necessary, add coolant that has been tes-
ted and approved by Mercedes-Benz.
X Replace cap :and turn it clockwise as far
as it will go.
For further information on coolant, see( Y page 339).
Windshield washer system
GWARNING
Certain components in the engine compart-
ment, such as the engine, radiator and parts
of the exhaust system, can become very hot.
Engine compartment273
Maintenance and care
Z