2015 MERCEDES-BENZ B-CLASS SPORTS ignition
[x] Cancel search: ignitionPage 160 of 346
Heavy and light loads
GWARNING
If you rest your foot on the brake pedal while
driving, the braking system can overheat. Thisincreases the stopping distance and can even
cause the braking system to fail. There is a
risk of an accident.
Never use the brake pedal as a footrest. Never
depress the brake pedal and the accelerator
pedal at the same time.
!Depressing the brake pedal constantly
results in excessive and premature wear to
the brake pads.
If the brakes have been subjected to a heavy load, do not stop the vehicle immediately.
Drive on for a short while. This allows the air-
flow to cool the brakes more quickly.
Wet roads
If you have driven for a long time in heavy rain
without braking, there may be a delayed reac- tion from the brakes when braking for the firsttime. This may also occur after the vehicle has
been washed or driven through deep water.
You have to depress the brake pedal more
firmly. Maintain a greater distance from the
vehicle in front.
After driving on a wet road or having the vehi-
cle washed, brake firmly while paying atten-
tion to the traffic conditions. This will warm up
the brake discs, thereby drying them more
quickly and protecting them against corro-sion.
Limited braking performance on salt-
treated roads
If you drive on salted roads, a layer of salt
residue may form on the brake discs and
brake pads. This can result in a significantly
longer braking distance. R
In order to prevent any salt build-up, apply
the brakes occasionally while paying atten-
tion to the traffic conditions.
R Carefully depress the brake pedal and the
beginning and end of a journey.
R Maintain a greater distance to the vehicle
ahead.
Servicing the brakes
!If the red brake warning lamp lights up in
the instrument cluster and you hear a warn- ing tone while the engine is running, the
brake fluid level may be too low. Observe
additional warning messages in the multi-
function display.
The brake fluid level may be too low due tobrake pad wear or leaking brake lines.
Have the brake system checked immedi-
ately. This work should be carried out at a
qualified specialist workshop.
!A function or performance test should
only be carried out on a 2-axle dynamom-
eter. If you are planning to have the vehicle tested on such a dynamometer, contact an
authorized Mercedes-Benz Center to
obtain further information first. Otherwise,
you could damage the drive train or the
brake system.
!As the ESP ®
system operates automati-
cally, the engine and the ignition must be
switched off (the SmartKey must be in posi-
tion 0or 1in the ignition lock) if:
R the electric parking brake is tested on a
brake dynamometer (for a maximum of
ten seconds)
R the vehicle is towed with the front axle
raised.
Braking triggered automatically by ESP ®
may seriously damage the brake system.
All checks and maintenance work on the
brake system must be carried out at a quali-
fied specialist workshop. Consult a qualified
specialist workshop to arrange this.
158Driving tips
Driving and parking
Page 174 of 346
When the HOLD function is activated, the
transmission is shifted automatically to posi-tion Pif:
R the driver's seat belt is not fastened and the
driver's door is open.
R the engine is switched off, unless it is auto-
matically switched off by the ECO start/
stop function.
The electric parking brake secures the vehicle automatically if the HOLD function is activa-
ted when the vehicle is stationary and:
R a system malfunction occurs.
R the power supply is not sufficient.
4MATIC
!
Never tow the vehicle with one axle
raised. This may damage the differential.
Damage of this sort is not covered by the
Mercedes-Benz Limited Warranty. All
wheels must remain either on the ground or be fully raised. Observe the instructions for
towing the vehicle with all wheels in full
contact with the ground.
4MATIC, together with ESP ®
, improves the
traction of your vehicle whenever a drive
wheel spins due to insufficient grip.
If you fail to adapt your driving style, 4MATIC can neither reduce the risk of accident nor
override the laws of physics. 4MATIC cannot
take account of road, weather and traffic con-
ditions. 4MATIC is only an aid. You are
responsible for the distance to the vehicle in
front, for vehicle speed, for braking in good
time and for staying in your lane.
If a drive wheel spins due to insufficient grip: R Only depress the accelerator pedal as far as
necessary when pulling away.
R Accelerate less when driving.
iIn wintry driving conditions, the maximum
effect of 4MATIC can only be achieved if
you use winter tires (M+S tires), with snow
chains if necessary.
PARKTRONIC
Important safety notes
PARKTRONIC is an electronic parking aid with
ultrasonic sensors. It monitors the area
around your vehicle using six sensors in the
front bumper and six sensors in the rear
bumper. PARKTRONIC indicates visually and
audibly the distance between your vehicle
and an object.
PARKTRONIC is only an aid. It is not a replace-
ment for your attention to your immediate
surroundings. You are always responsible for
safe maneuvering, parking and exiting a park- ing space. When maneuvering, parking or
pulling out of a parking space, make sure thatthere are no persons, animals or objects in
the area in which you are maneuvering.
!When parking, pay particular attention to
objects above or below the sensors, such
as flower pots or trailer drawbars.
PARKTRONIC does not detect such objects
when they are in the immediate vicinity of
the vehicle. You could damage the vehicle
or the objects.
The sensors may not detect snow and other
objects that absorb ultrasonic waves.
Ultrasonic sources such as an automatic
car wash, the compressed-air brakes on a
truck or a pneumatic drill could cause
PARKTRONIC to malfunction.
PARKTRONIC may not function correctly on
uneven terrain.
PARKTRONIC is activated automatically when you:
R switch on the ignition
R shift the transmission to position D,R or N
R release the electric parking brake
172Driving systems
Driving and parking
Page 176 of 346
on the dashboard above the center air vents.
The warning display for the rear area is loca-
ted on the headliner in the rear compartment.
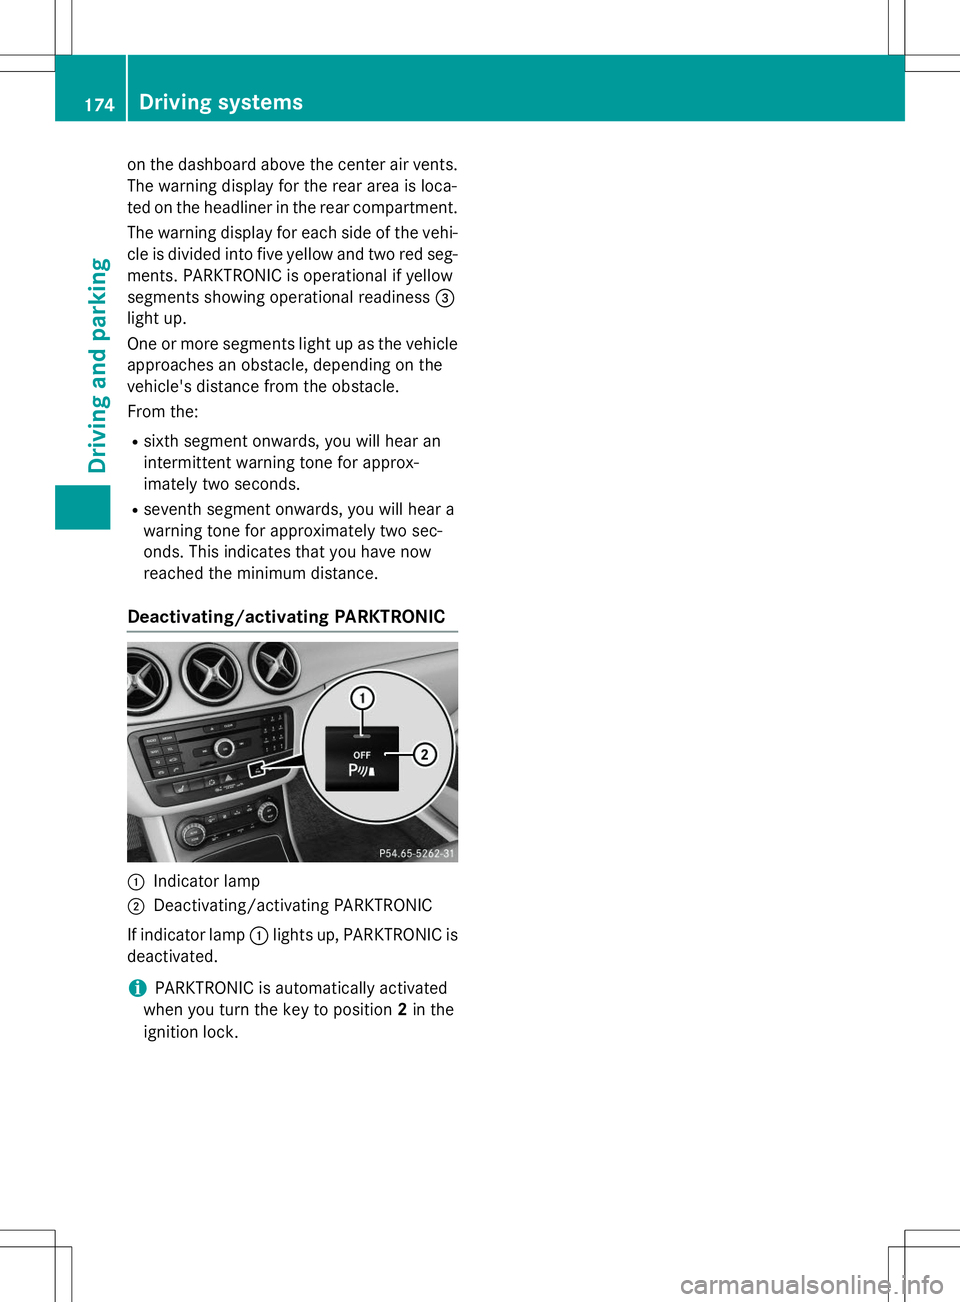
The warning display for each side of the vehi-
cle is divided into five yellow and two red seg- ments. PARKTRONIC is operational if yellow
segments showing operational readiness =
light up.
One or more segments light up as the vehicle
approaches an obstacle, depending on the
vehicle's distance from the obstacle.
From the:
R sixth segment onwards, you will hear an
intermittent warning tone for approx-
imately two seconds.
R seventh segment onwards, you will hear a
warning tone for approximately two sec-
onds. This indicates that you have now
reached the minimum distance.
Deactivating/activating PARKTRONIC
:Indicator lamp
;Deactivating/activating PARKTRONIC
If indicator lamp :lights up, PARKTRONIC is
deactivated.
iPARKTRONIC is automatically activated
when you turn the key to position 2in the
ignition lock.
174Driving systems
Driving and parking
Page 177 of 346
Problems with PARKTRONIC
ProblemPossible causes/consequences andMSolutions
Only the red segments
in the PARKTRONIC
warning displays are lit.
You also hear a warning
tone for approximately
two seconds.
PARKTRONIC is then
deactivated and the
indicator lamp on the
PARKTRONIC button
lights up.PARKTRONIC has malfunctioned and has switched off.
X If problems persist, have PARKTRONIC checked at a qualified
specialist workshop.
Only the red segments
in the PARKTRONIC
warning displays are lit.
PARKTRONIC is thendeactivated.The PARKTRONIC sensors are dirty or there is interference. X Clean the PARKTRONIC sensors ( Ypage 279).
X Switch the ignition back on.
The problem may be caused by an external source of radio or
ultrasound waves. XSee if PARKTRONIC functions in a different location.
Active Parking Assist
General notes
Active Parking Assist is an electronic parking
aid with ultrasound. It measures the road on
both sides of the vehicle. A parking symbol
indicates a suitable parking space. Active
steering intervention and brake application
can assist you during parking and when exit-
ing a parking space. You may also use
PARKTRONIC ( Ypage 172).
Important safety notes
Active Parking Assist is merely an aid. It is not
a replacement for your attention to your
immediate surroundings. You are always
responsible for safe maneuvering, parking
and exiting a parking space. Make sure that
no persons, animals or objects are in the
maneuvering range.
When PARKTRONIC is switched off, Active
Parking Assist is also unavailable.
GWARNING
While parking or pulling out of a parking
space, the vehicle swings out and can drive
onto areas of the oncoming lane. This could
result in a collision with another road user.
There is a risk of an accident.
Pay attention to other road users. Stop the
vehicle if necessary or cancel the Active Park-
ing Assist parking procedure.
!If unavoidable, you should drive over
obstacles such as curbs slowly and not at a sharp angle. Otherwise, you may damage
the wheels or tires.
Active Parking Assist may possibly indicate
parking spaces which are not suitable for
parking, for example:
R where parking or stopping is prohibited
R in front of driveways or entrances and exits
R on unsuitable surfaces
Driving systems175
Driving and parking
Z
Page 182 of 346
Rear view camera
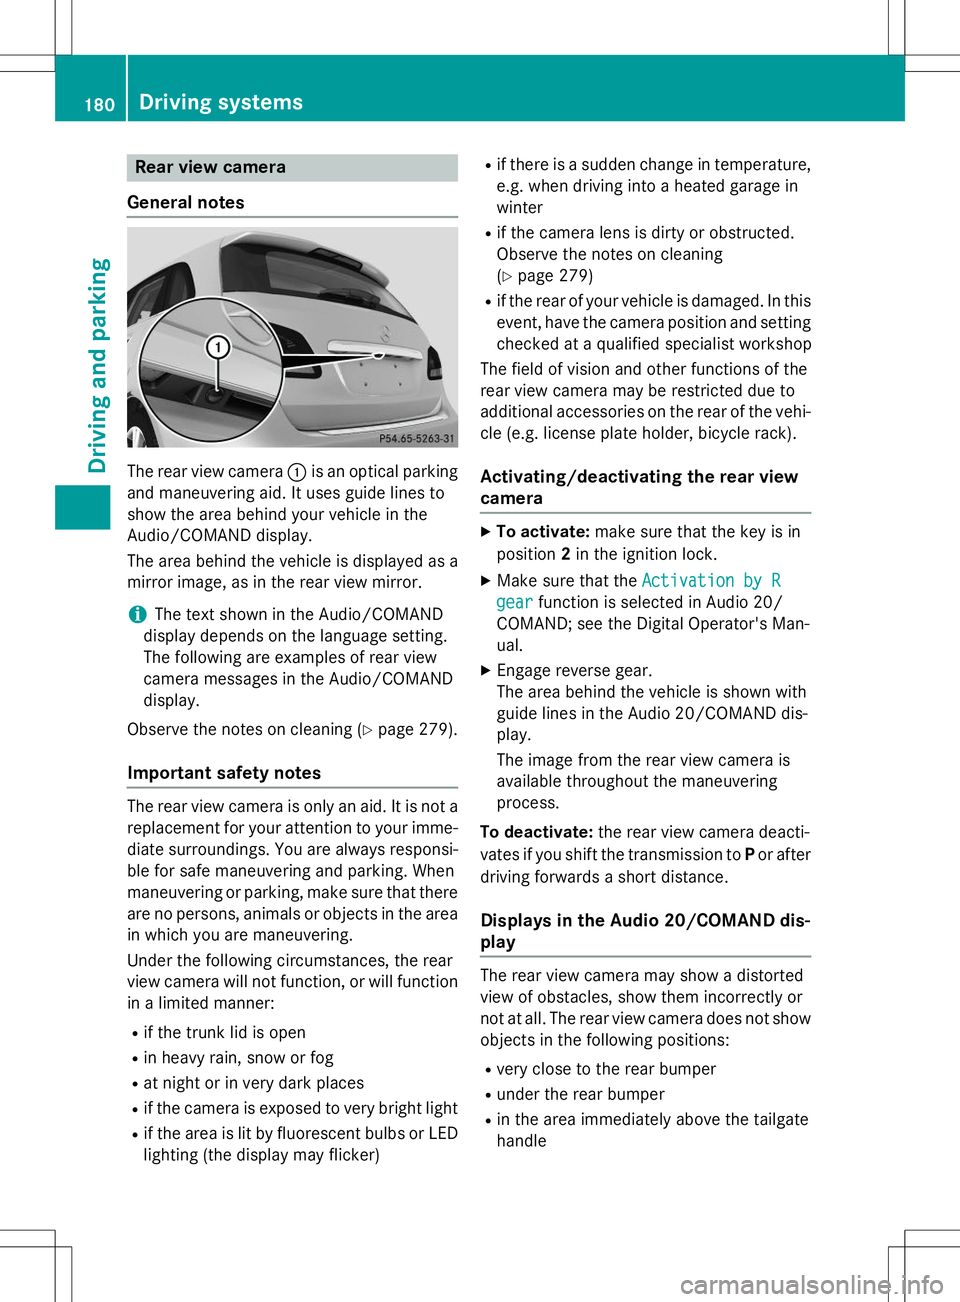
General notes
The rear view camera :is an optical parking
and maneuvering aid. It uses guide lines to
show the area behind your vehicle in the
Audio/COMAND display.
The area behind the vehicle is displayed as a
mirror image, as in the rear view mirror.
iThe text shown in the Audio/COMAND
display depends on the language setting.
The following are examples of rear view
camera messages in the Audio/COMAND
display.
Observe the notes on cleaning ( Ypage 279).
Important safety notes
The rear view camera is only an aid. It is not a
replacement for your attention to your imme-
diate surroundings. You are always responsi- ble for safe maneuvering and parking. When
maneuvering or parking, make sure that there
are no persons, animals or objects in the area in which you are maneuvering.
Under the following circumstances, the rear
view camera will not function, or will function
in a limited manner:
R if the trunk lid is open
R in heavy rain, snow or fog
R at night or in very dark places
R if the camera is exposed to very bright light
R if the area is lit by fluorescent bulbs or LED
lighting (the display may flicker) R
if there is a sudden change in temperature,
e.g. when driving into a heated garage in
winter
R if the camera lens is dirty or obstructed.
Observe the notes on cleaning(Y page 279)
R if the rear of your vehicle is damaged. In this
event, have the camera position and setting
checked at a qualified specialist workshop
The field of vision and other functions of the
rear view camera may be restricted due to
additional accessories on the rear of the vehi-
cle (e.g. license plate holder, bicycle rack).
Activating/deactivating the rear view
camera
X To activate: make sure that the key is in
position 2in the ignition lock.
X Make sure that the
Activation by R
gearfunction is selected in Audio 20/
COMAND; see the Digital Operator's Man-
ual.
X Engage reverse gear.
The area behind the vehicle is shown with
guide lines in the Audio 20/COMAND dis-
play.
The image from the rear view camera is
available throughout the maneuvering
process.
To deactivate: the rear view camera deacti-
vates if you shift the transmission to Por after
driving forwards a short distance.
Displays in the Audio 20/COMAND dis-play
The rear view camera may show a distorted
view of obstacles, show them incorrectly or
not at all. The rear view camera does not show
objects in the following positions:
R very close to the rear bumper
R under the rear bumper
R in the area immediately above the tailgate
handle
180Driving systems
Driving and parking
Page 195 of 346
If the coolant temperature is over 248 ‡
(120 †), do not continue driving. The
engine will otherwise be damaged.
The coolant temperature gage is in the instru- ment cluster on the right-hand side( Y page 29).
Under normal operating conditions and with
the specified coolant level, the coolant tem-
perature may rise to 248 ‡ (120 †).
Tachometer
!
Do not drive in the overrevving range, as
this could damage the engine.
The red band in the tachometer indicates the engine's overrevving range.
The engine is limited within a range to protect
the engine when the red band is reached.
Outside temperature display
You should pay special attention to road con- ditions when temperatures are around freez-
ing point.
Bear in mind that the outside temperature
display indicates the temperature measured
and does not record the road temperature.
The outside temperature display is in the mul-
tifunction display ( Ypage 195).
Changes in the outside temperature are dis-
played after a short delay.
Speedometer with segments
The speedometer is divided into segments
only on vehicles with DISTRONIC PLUS.
The segments in the speedometer indicate
which speed range is available.
R DISTRONIC PLUS activated ( Ypage 163):
One or two segments in the set speed
range light up.
R DISTRONIC PLUS detects a vehicle in front
that is driving at a slower speed than the
stored speed: The segments between the speed of the
vehicle in front and the stored speed lightup.
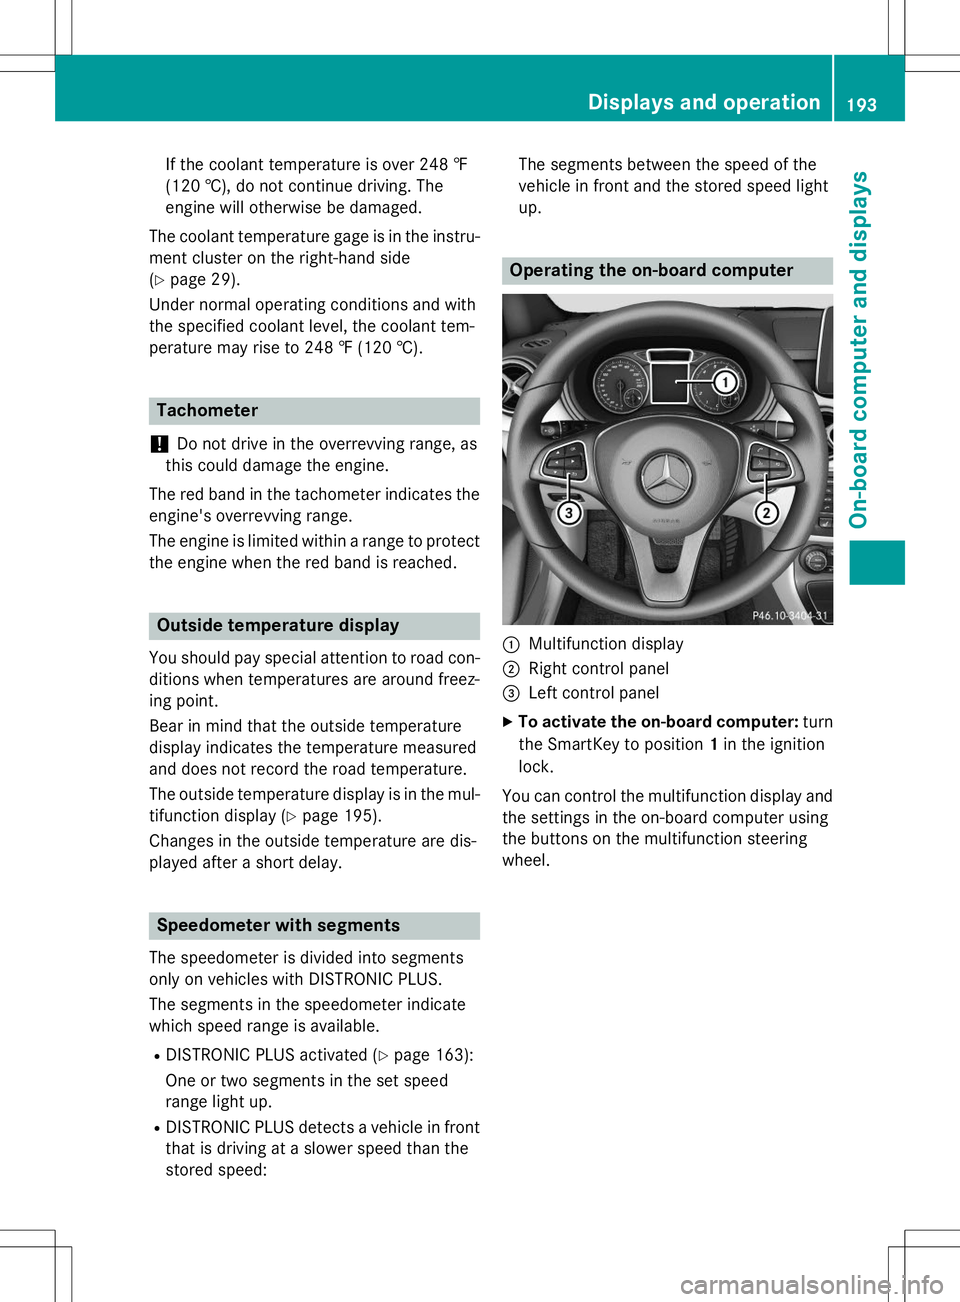
Operating the on-board computer
:Multifunction display
;Right control panel
=Left control panel
X To activate the on-board computer: turn
the SmartKey to position 1in the ignition
lock.
You can control the multifunction display and
the settings in the on-board computer using
the buttons on the multifunction steering
wheel.
Displays and operation193
On-board computer and displays
Z
Page 198 of 346
RDriveAssistDriveAssistmenu (assistance)
( Y page 201)
R
Serv.Serv.menu ( Ypage 204)
R
Sett.Sett.menu (settings) ( Ypage 204)
The
AudioAudio,NaviNaviandTelTelmenus differ slightly
in vehicles with Audio 20 and in vehicles with COMAND. The examples given in this Opera-
tor's Manual apply to vehicles equipped withCOMAND.
Trip menu
Standard display
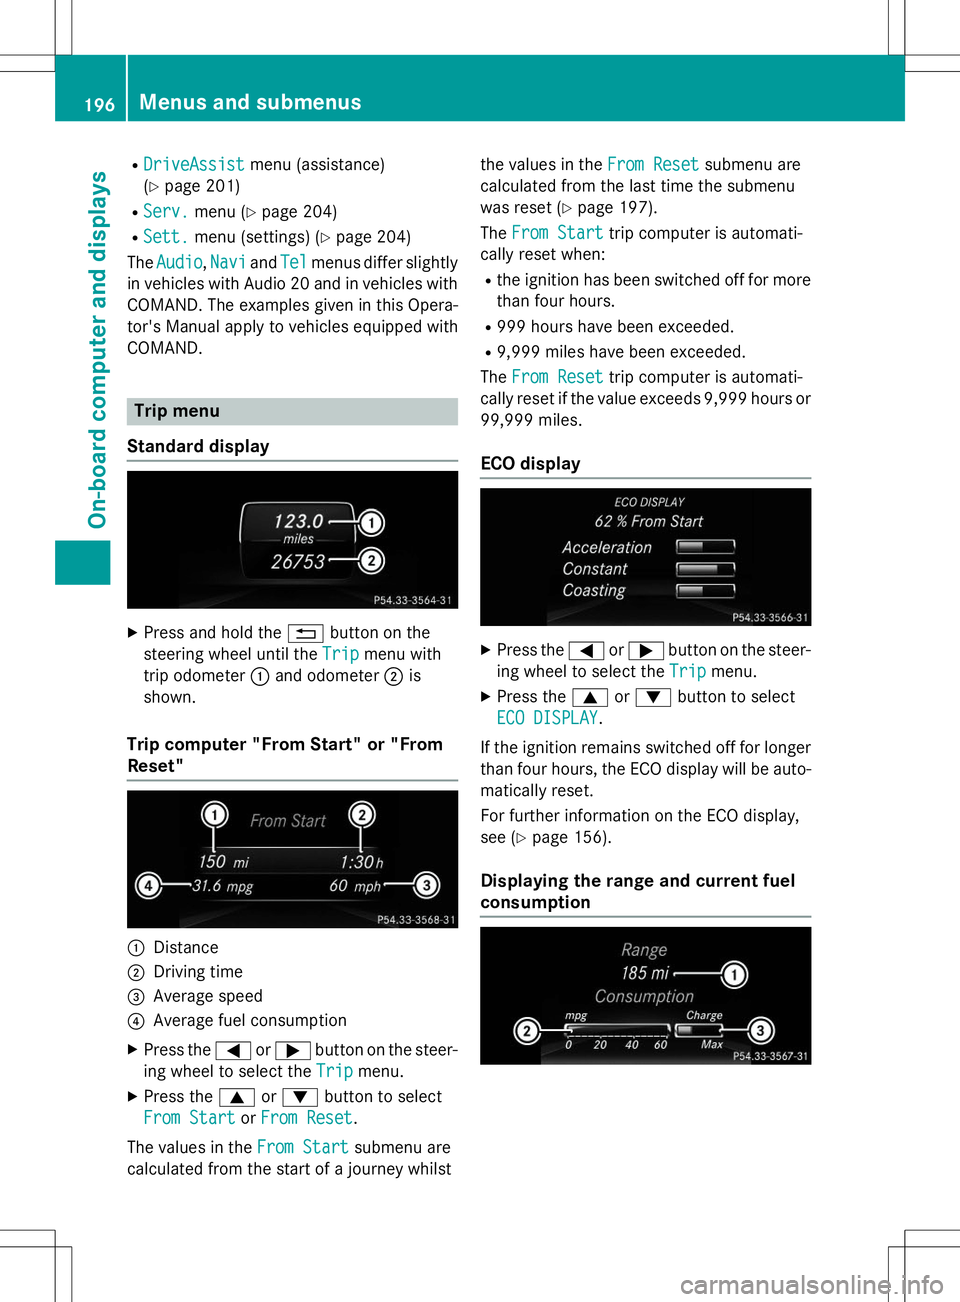
X Press and hold the %button on the
steering wheel until the
TripTripmenu with
trip odometer :and odometer ;is
shown.
Trip computer "From Start" or "From Reset"
:Distance
;Driving time
=Average speed
?Average fuel consumption
X Press the =or; button on the steer-
ing wheel to select the
TripTripmenu.
X Press the 9or: button to select
From StartFrom StartorFrom ResetFrom Reset.
The values in the
From StartFrom Startsubmenu are
calculated from the start of a journey whilst the values in the
From ResetFrom Resetsubmenu are
calculated from the last time the submenu
was reset ( Ypage 197).
The
From StartFrom Starttrip computer is automati-
cally reset when:
R the ignition has been switched off for more
than four hours.
R 999 hours have been exceeded.
R 9,999 miles have been exceeded.
The
From ResetFrom Resettrip computer is automati-
cally reset if the value exceeds 9,999 hours or 99,999 miles.
ECO display
X Press the =or; button on the steer-
ing wheel to select the
TripTripmenu.
X Press the 9or: button to select
ECO DISPLAYECO DISPLAY.
If the ignition remains switched off for longer than four hours, the ECO display will be auto-
matically reset.
For further information on the ECO display,
see ( Ypage 156).
Displaying the range and current fuel
consumption
196Menus and submenus
On-board computer and displays
Page 209 of 346
Display messages
Introduction
General notes
Display messages appear in the multifunction display.
Display messages with graphic displays may be shown in simplified form in the Operator's
Manual and may therefore differ from the multifunction display.
Please respond in accordance with the display messages and follow the additional notes in this Operator's Manual.
Certain display messages are accompanied by an audible warning tone or a continuous tone.
When the ignition is switched off, all display messages are deleted, apart from some high-
priority display messages. Once the causes of the high-priority display messages have been
rectified, the corresponding display messages are also deleted.
When you stop and park the vehicle, please observe the notes on:
R HOLD function ( Ypage 170)
R Parking ( Ypage 152)
Hiding display messages
X
Press the aor% button on the steering wheel to hide the display message.
The display message is cleared.
The multifunction display shows high-priority display messages in red. Some high-priority dis- play messages cannot be hidden.
The multifunction display shows these messages continuously until the causes for the mes-
sages have been remedied.
Message memory
The on-board computer saves certain display messages in the message memory. You can call
up the display messages:
X Press the =or; button on the steering wheel to select the
Serv.menu.
If there are display messages, the multifunction display shows
2 Messages, for example.
X Press the 9or: button to select the entry, e.g.
2 Messages.
X Press ato confirm.
X Press the 9or: button to scroll through the display messages.
Display messages207
On-board computer and displays
Z