2015 MERCEDES-BENZ B-CLASS SPORTS ignition
[x] Cancel search: ignitionPage 89 of 346
iThe sliding sunroof cannot be opened if a
roof carrier is installed. In order to allow
ventilation of the vehicle interior, you can
raise the sliding sunroof.
If contact is made with a roof carrier
approved by Mercedes-Benz, the sliding
sunroof lowers slightly but remains raised
at the rear.
Rain-closing feature
The rain-closing feature is only available for
vehicles with a rain sensor.
When the SmartKey is in position 0in the
ignition lock or is removed, the sliding sunroof
closes automatically:
R if it starts to rain
R at extreme outside temperatures
R after six hours
R if there is a malfunction in the power supply
The sliding sunroof remains raised at the rear
in order to allow ventilation of the vehicle
interior.
iIf the sliding sunroof is obstructed while
being closed by the rain-closing feature, it
opens again slightly. The rain-closing fea-
ture is then deactivated.
The sliding sunroof does not close if: R it is raised at the rear.
R it is blocked.
R no rain is falling on the area of the wind-
shield being monitored by the rain sensor,
e.g. because the vehicle is under a bridge.
Operating the roller sunblind for the
sliding sunroof
Important safety notes
GWARNING
When opening or closing the roller sunblind,
parts of the body could be trapped between
the roller sunblind and the frame or sliding
sunroof. There is a risk of injury.
When opening or closing make sure that no
parts of the body are in the sweep of the roller sunblind.
If somebody becomes trapped:
R release the switch immediately, or
R during automatic operation, push the
switch briefly in any direction
The opening or closing procedure will be stop-
ped.
The roller sunblind shields the vehicle interior from sunlight. The roller sunblind can only be
opened and closed when the sliding sunroof
is closed.
Roller sunblind reversing feature
The roller sunblind is equipped with an auto-
matic reversing feature. If a solid object
blocks or restricts the roller sunblind during
the closing process, the roller sunblind opens
again automatically. The automatic reversing
feature is only an aid and is not a substitute
for your attentiveness to the roller sunblind
while it is closing.
GWARNING
The reversing feature does not react:
R to soft, light and thin objects, e.g. small fin-
gers
R when closing the roller sunblind again man-
ually immediately after automatic reversing
This means that the reversing feature cannot
prevent someone being trapped in these sit-
uations. There is a risk of injury.
When closing make sure that no parts of the
body are in the sweep of the roller sunblind.
If somebody becomes trapped:
R release the switch immediately, or
R during automatic operation, push the
switch briefly in any direction
The closing process is stopped.
Panorama roof with power tilt/sliding panel87
Opening and closing
Z
Page 90 of 346
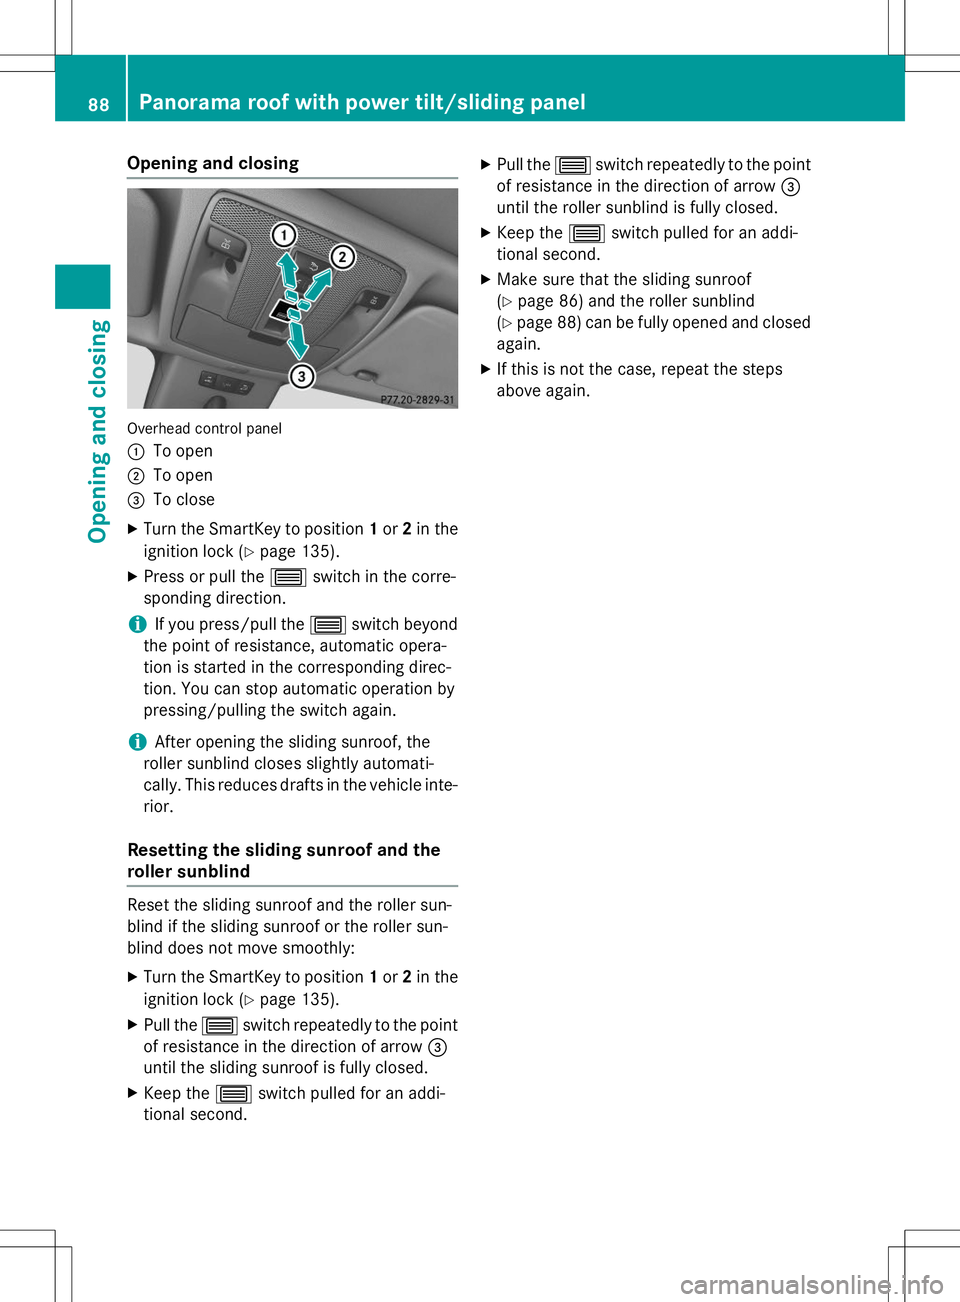
Opening and closing
Overhead control panel :
To open
;To open
=To close
X Turn the SmartKey to position 1or 2in the
ignition lock ( Ypage 135).
X Press or pull the 3switch in the corre-
sponding direction.
iIf you press/pull the 3switch beyond
the point of resistance, automatic opera-
tion is started in the corresponding direc-
tion. You can stop automatic operation by
pressing/pulling the switch again.
iAfter opening the sliding sunroof, the
roller sunblind closes slightly automati-
cally. This reduces drafts in the vehicle inte- rior.
Resetting the sliding sunroof and the
roller sunblind
Reset the sliding sunroof and the roller sun-
blind if the sliding sunroof or the roller sun-
blind does not move smoothly:
X Turn the SmartKey to position 1or 2in the
ignition lock ( Ypage 135).
X Pull the 3switch repeatedly to the point
of resistance in the direction of arrow =
until the sliding sunroof is fully closed.
X Keep the 3switch pulled for an addi-
tional second. X
Pull the 3switch repeatedly to the point
of resistance in the direction of arrow =
until the roller sunblind is fully closed.
X Keep the 3switch pulled for an addi-
tional second.
X Make sure that the sliding sunroof(Y page 86) and the roller sunblind
( Y page 88) can be fully opened and closed
again.
X If this is not the case, repeat the steps
above again.
88Panorama roof with power tilt/sliding panel
Opening and closing
Page 95 of 346
The seat belt should:
R fit snugly across your body
R be routed across the middle of your shoulder
R be routed in your pelvic area across the
hip joints
X Before starting off, adjust the rear-view mir-
ror and the exterior mirrors ( Ypage 98) in
such a way that you have a good view of
road and traffic conditions.
X Vehicles with a memory function: save
the seat and exterior mirror settings( Y page 101).
Seats
Important safety notes
GWARNING
Children could become trapped if they adjust
the seats, particularly when unattended.
There is a risk of injury.
When leaving the vehicle, always take the
SmartKey with you and lock the vehicle. Never leave children unsupervised in the vehicle.
The seats can still be adjusted when there is
no SmartKey in the ignition lock.
GWARNING
When you adjust a seat, you or other vehicle
occupants could become trapped, e.g. on the seat guide rail. There is a risk of injury.
Make sure when adjusting a seat that no one
has any body parts in the sweep of the seat.
Observe the safety notes on "Air bags" ( Y page 44) and "Children in the vehicle"
( Y page 54).
GWARNING
If the driver's seat is not engaged, it could
move unexpectedly while the vehicle is in
motion. This could cause you to lose control of
the vehicle. There is a risk of an accident.
Always make sure that the driver's seat is
engaged before starting the vehicle.
GWARNING
You could lose control of your vehicle if you dothe following while driving:
R adjust the driver's seat, head restraint,
steering wheel or mirrors
R fasten the seat belt
There is a risk of an accident.
Adjust the driver's seat, head restraint, steer-
ing wheel and mirror and fasten your seat belt before starting the engine.
GWARNING
If you adjust the seat height carelessly, you orother vehicle occupants could be trapped andthereby injured. Children in particular could
accidentally press the electrical seat adjust-
ment buttons and become trapped. There is a
risk of injury.
While moving the seats, make sure that your
hands or other body parts do not get under the
lever assembly of the seat adjustment sys-tem.
!To avoid damage to the seats and the seat
heating, observe the following information:
R keep liquids from spilling on the seats. If
liquid is spilled on the seats, dry them as
soon as possible.
R if the seat covers are damp or wet, do not
switch on the seat heating. The seat
heating should also not be used to dry
the seats.
R clean the seat covers as recommended;
see the "Interior care" section.
R do not transport heavy loads on the
seats. Do not place sharp objects on the
seat cushions, e.g. knives, nails or tools.
The seats should only be occupied by
passengers, if possible.
R when the seat heating is in operation, do
not cover the seats with insulating mate-
Seats93
Seats, steering wheel and mirrors
Z
Page 98 of 346
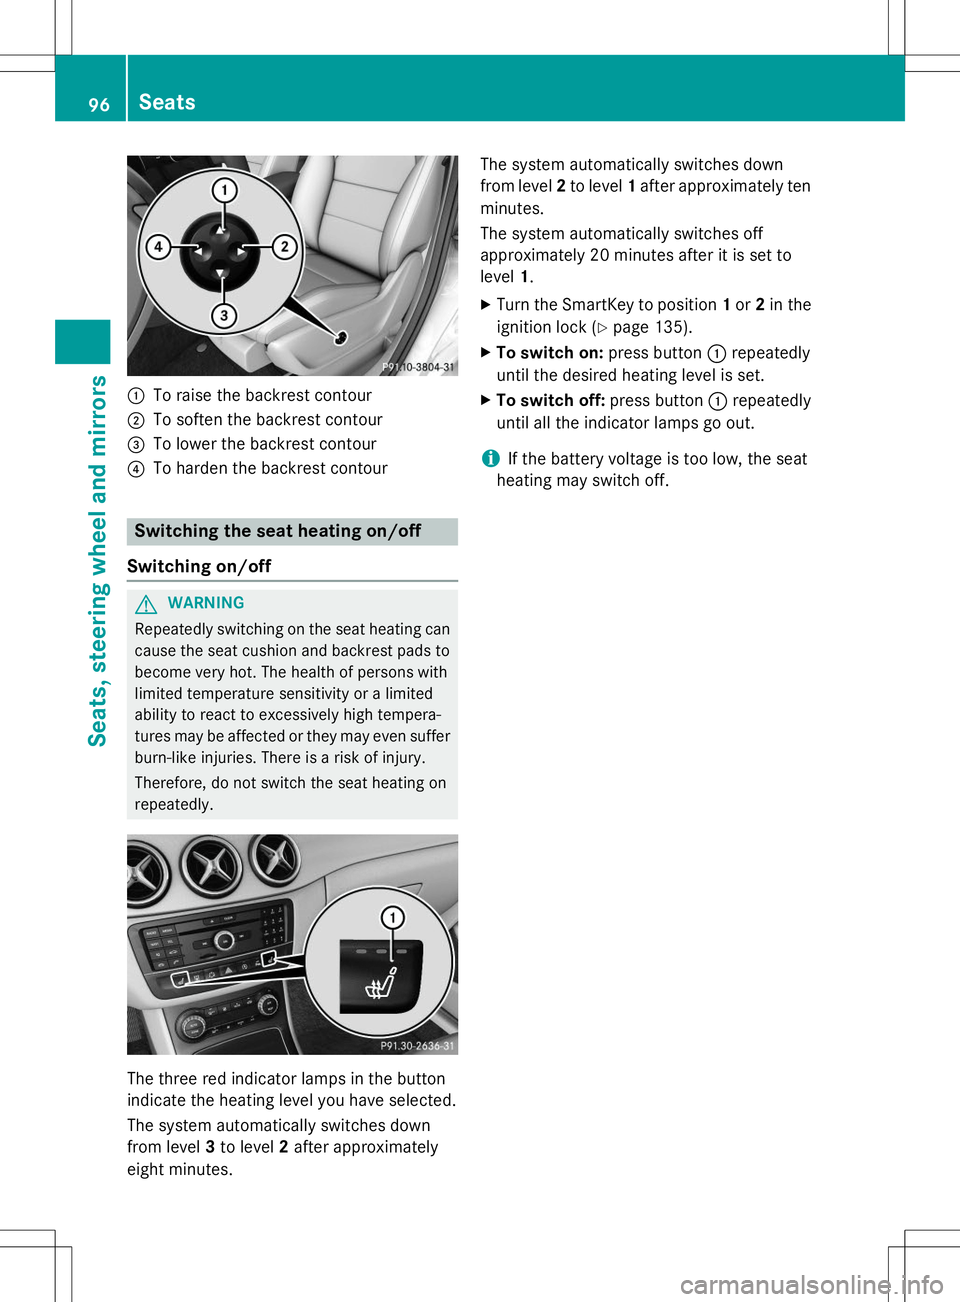
:To raise the backrest contour
;To soften the backrest contour
=To lower the backrest contour
?To harden the backrest contour
Switching the seat heating on/off
Switching on/off
GWARNING
Repeatedly switching on the seat heating can
cause the seat cushion and backrest pads to
become very hot. The health of persons with
limited temperature sensitivity or a limited
ability to react to excessively high tempera-
tures may be affected or they may even suffer burn-like injuries. There is a risk of injury.
Therefore, do not switch the seat heating on repeatedly.
The three red indicator lamps in the button
indicate the heating level you have selected.
The system automatically switches down
from level 3to level 2after approximately
eight minutes. The system automatically switches down
from level
2to level 1after approximately ten
minutes.
The system automatically switches off
approximately 20 minutes after it is set tolevel 1.
X Turn the SmartKey to position 1or 2in the
ignition lock ( Ypage 135).
X To switch on: press button:repeatedly
until the desired heating level is set.
X To switch off: press button:repeatedly
until all the indicator lamps go out.
iIf the battery voltage is too low, the seat
heating may switch off.
96Seats
Seats, steering wheel and mirrors
Page 100 of 346
Mirrors
Rear-view mirror
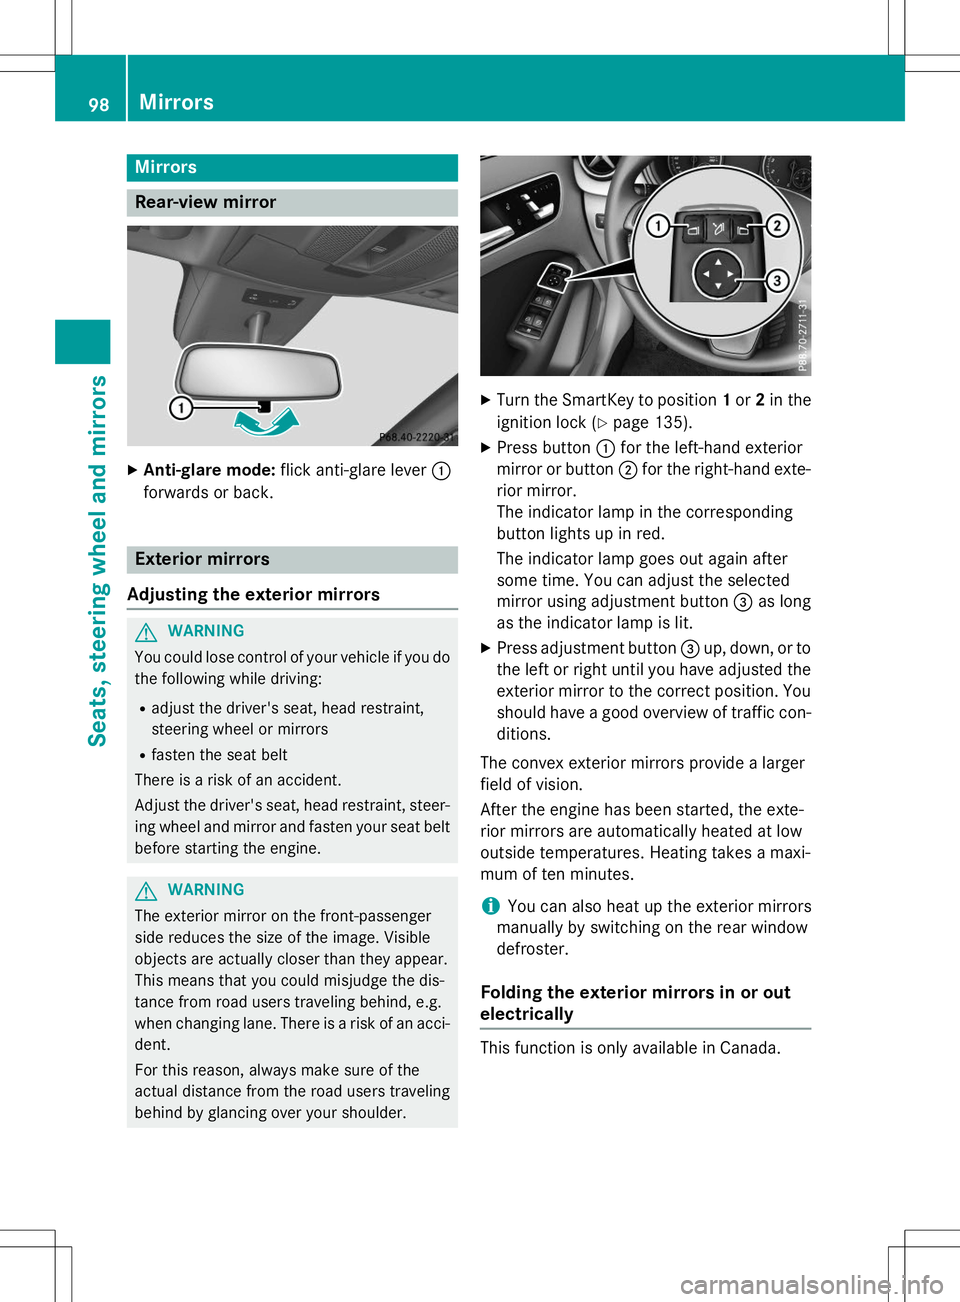
XAnti-glare mode: flick anti-glare lever :
forwards or back.
Exterior mirrors
Adjusting the exterior mirrors
GWARNING
You could lose control of your vehicle if you do the following while driving:
R adjust the driver's seat, head restraint,
steering wheel or mirrors
R fasten the seat belt
There is a risk of an accident.
Adjust the driver's seat, head restraint, steer-
ing wheel and mirror and fasten your seat belt before starting the engine.
GWARNING
The exterior mirror on the front-passenger
side reduces the size of the image. Visible
objects are actually closer than they appear.
This means that you could misjudge the dis-
tance from road users traveling behind, e.g.
when changing lane. There is a risk of an acci-dent.
For this reason, always make sure of the
actual distance from the road users traveling
behind by glancing over your shoulder.
X Turn the SmartKey to position 1or 2in the
ignition lock ( Ypage 135).
X Press button :for the left-hand exterior
mirror or button ;for the right-hand exte-
rior mirror.
The indicator lamp in the corresponding
button lights up in red.
The indicator lamp goes out again after
some time. You can adjust the selected
mirror using adjustment button =as long
as the indicator lamp is lit.
X Press adjustment button =up, down, or to
the left or right until you have adjusted the
exterior mirror to the correct position. You
should have a good overview of traffic con- ditions.
The convex exterior mirrors provide a larger
field of vision.
After the engine has been started, the exte-
rior mirrors are automatically heated at low
outside temperatures. Heating takes a maxi-
mum of ten minutes.
iYou can also heat up the exterior mirrors
manually by switching on the rear window
defroster.
Folding the exterior mirrors in or out
electrically
This function is only available in Canada.
98Mirrors
Seats, steering wheel and mirrors
Page 101 of 346
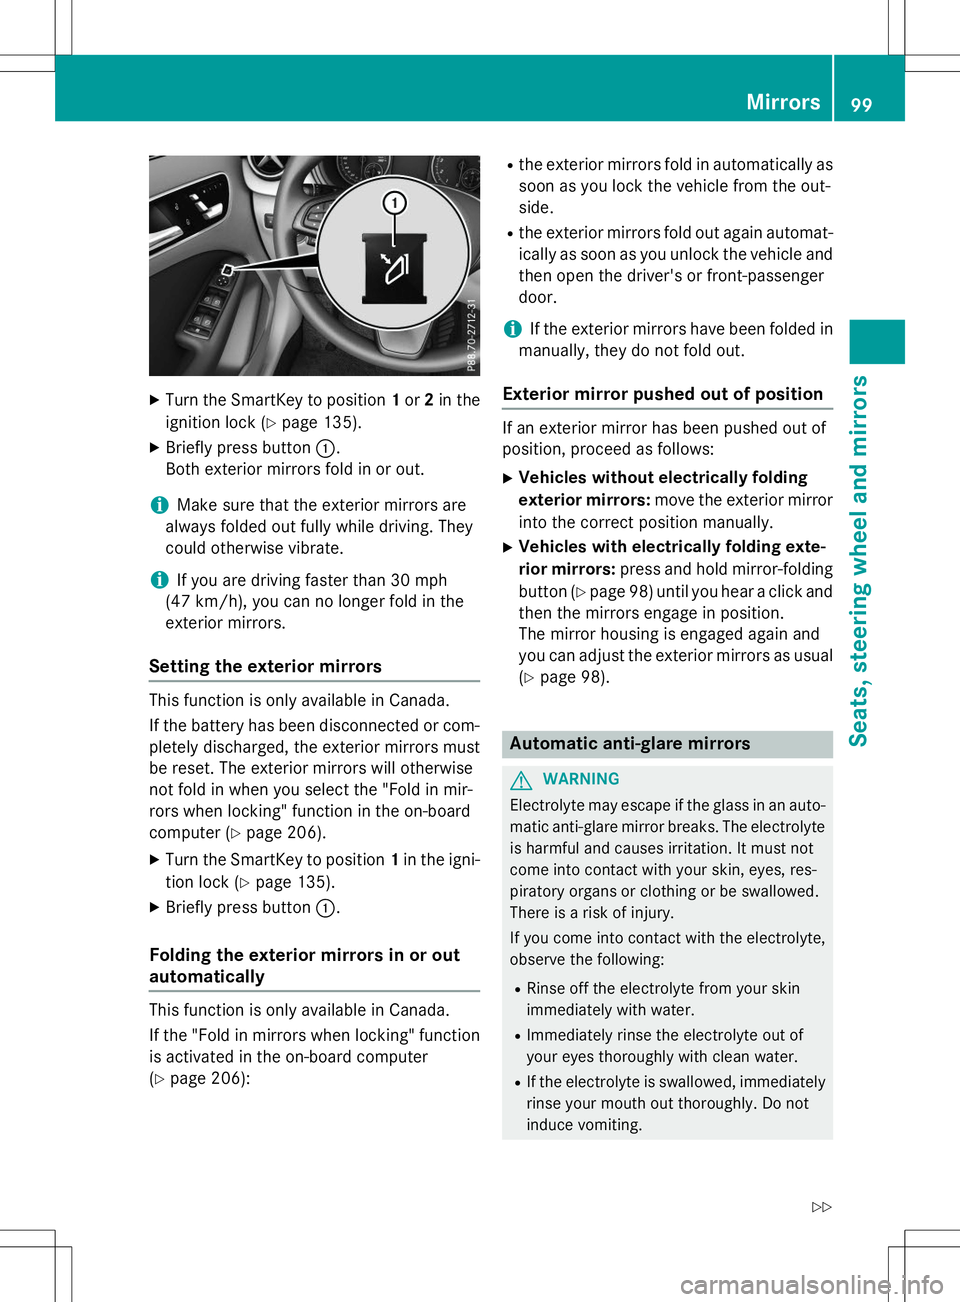
XTurn the SmartKey to position 1or 2in the
ignition lock ( Ypage 135).
X Briefly press button :.
Both exterior mirrors fold in or out.
iMake sure that the exterior mirrors are
always folded out fully while driving. They
could otherwise vibrate.
iIf you are driving faster than 30 mph
(47 km/ h), you can no longer fold in the
exterior mirrors.
Setting the exterior mirrors
This function is only available in Canada.
If the battery has been disconnected or com- pletely discharged, the exterior mirrors must
be reset. The exterior mirrors will otherwise
not fold in when you select the "Fold in mir-
rors when locking" function in the on-board
computer ( Ypage 206).
X Turn the SmartKey to position 1in the igni-
tion lock ( Ypage 135).
X Briefly press button :.
Folding the exterior mirrors in or out
automatically
This function is only available in Canada.
If the "Fold in mirrors when locking" function
is activated in the on-board computer ( Y page 206): R
the exterior mirrors fold in automatically as
soon as you lock the vehicle from the out-side.
R the exterior mirrors fold out again automat-
ically as soon as you unlock the vehicle and
then open the driver's or front-passengerdoor.
iIf the exterior mirrors have been folded in
manually, they do not fold out.
Exterior mirror pushed out of position
If an exterior mirror has been pushed out of
position, proceed as follows:
X Vehicles without electrically folding
exterior mirrors: move the exterior mirror
into the correct position manually.
X Vehicles with electrically folding exte-
rior mirrors: press and hold mirror-folding
button ( Ypage 98) until you hear a click and
then the mirrors engage in position.
The mirror housing is engaged again and
you can adjust the exterior mirrors as usual
( Y page 98).
Automatic anti-glare mirrors
GWARNING
Electrolyte may escape if the glass in an auto-
matic anti-glare mirror breaks. The electrolyte
is harmful and causes irritation. It must not
come into contact with your skin, eyes, res-
piratory organs or clothing or be swallowed.
There is a risk of injury.
If you come into contact with the electrolyte,
observe the following:
R Rinse off the electrolyte from your skin
immediately with water.
R Immediately rinse the electrolyte out of
your eyes thoroughly with clean water.
R If the electrolyte is swallowed, immediately
rinse your mouth out thoroughly. Do not
induce vomiting.
Mirrors99
Seats, steering wheel and mirrors
Z
Page 102 of 346
RIf electrolyte comes into contact with your
skin or hair or is swallowed, seek medical
attention immediately.
R Immediately change out of clothing which
has come into contact with electrolyte.
R If an allergic reaction occurs, seek medical
attention immediately.
The "Automatic anti-glare mirrors" function is
only available if the vehicle is equipped with
the "Mirrors package".
The rear-view mirror and the exterior mirror
on the driver's side automatically go into anti- glare mode if:
R the ignition is switched on and
R incident light from headlamps strikes the
sensor in the rear-view mirror
The mirrors do not go into anti-glare mode if
reverse gear is engaged or the interior lighting is switched on.
Parking position for the exterior mir-
ror on the front-passenger side
General notes
The "Parking position of the exterior mirror on
the front-passenger side" function is only
available if the vehicle is equipped with the
"Mirrors package".
Setting and storing the parking position
Using reverse gear
You can position the front-passenger side
exterior mirror in such a way that you can see the rear wheel on that side as soon as you
engage reverse gear. You can store this posi-
tion.
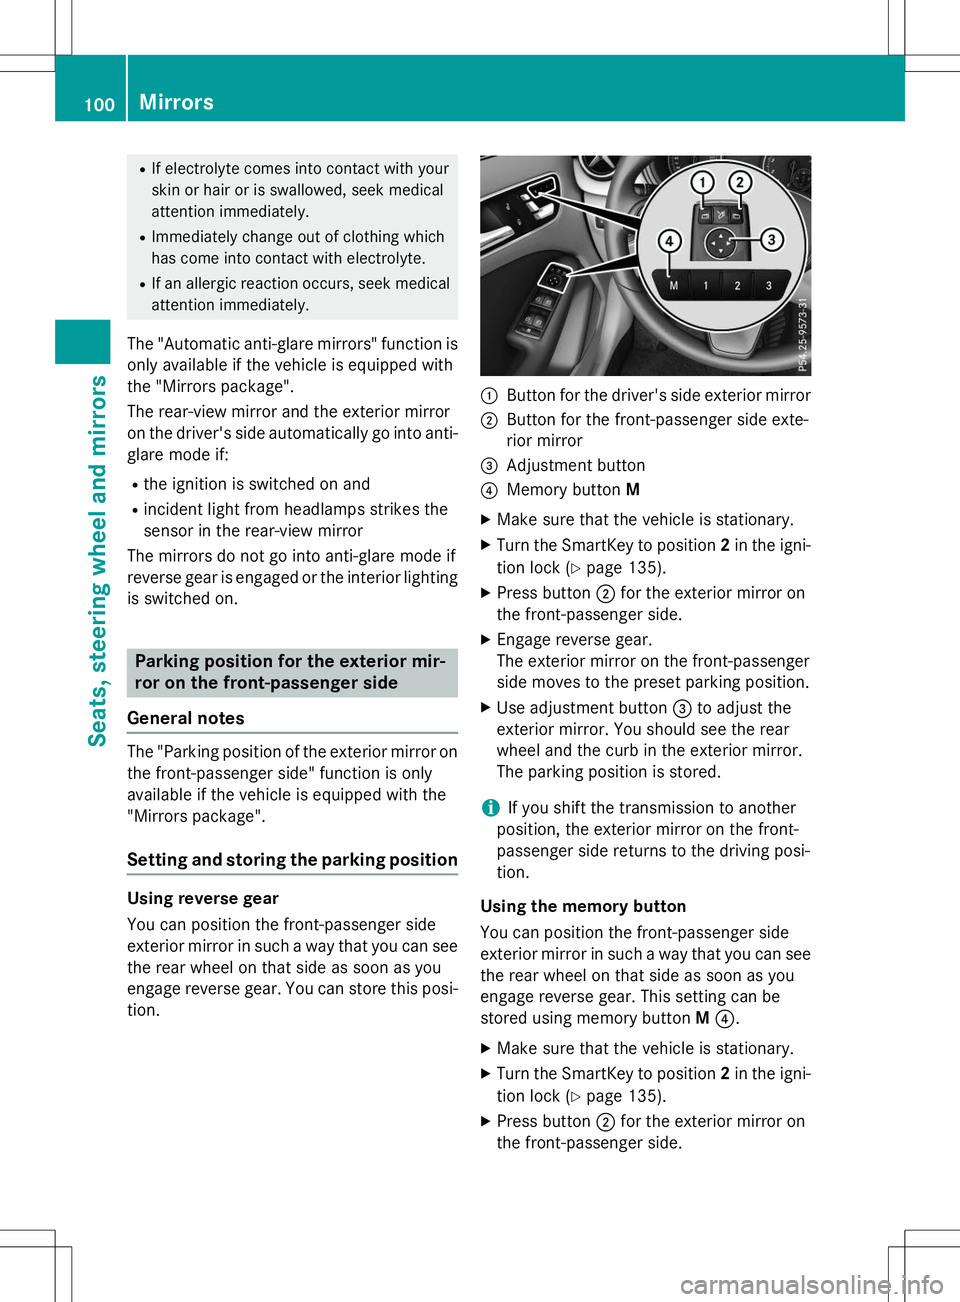
:Button for the driver's side exterior mirror
;Button for the front-passenger side exte-
rior mirror
=Adjustment button
?Memory button M
X Make sure that the vehicle is stationary.
X Turn the SmartKey to position 2in the igni-
tion lock ( Ypage 135).
X Press button ;for the exterior mirror on
the front-passenger side.
X Engage reverse gear.
The exterior mirror on the front-passenger
side moves to the preset parking position.
X Use adjustment button =to adjust the
exterior mirror. You should see the rear
wheel and the curb in the exterior mirror.
The parking position is stored.
iIf you shift the transmission to another
position, the exterior mirror on the front-
passenger side returns to the driving posi-tion.
Using the memory button
You can position the front-passenger side
exterior mirror in such a way that you can see
the rear wheel on that side as soon as you
engage reverse gear. This setting can be
stored using memory button M? .
X Make sure that the vehicle is stationary.
X Turn the SmartKey to position 2in the igni-
tion lock ( Ypage 135).
X Press button ;for the exterior mirror on
the front-passenger side.
100Mirrors
Seats, steering wheel and mirrors
Page 106 of 346
Useful information
iThis Operator's Manual describes all
models and all standard and optional equip- ment of your vehicle available at the time of
publication of the Operator's Manual.
Country-specific differences are possible.
Please note that your vehicle may not be
equipped with all features described. This
also applies to safety-related systems and
functions.
iRead the information on qualified special-
ist workshops ( Ypage 24).
Exterior lighting
General notes
For reasons of safety, Mercedes-Benz recom-
mends that you drive with the lights switchedon even during the daytime. In some coun-
tries, operation of the headlamps varies due
to legal requirements and self-imposed obli-
gations.
Setting the exterior lighting
Setting options
Exterior lighting can be set using: R the light switch
R the combination switch ( Ypage 106)
Light switch
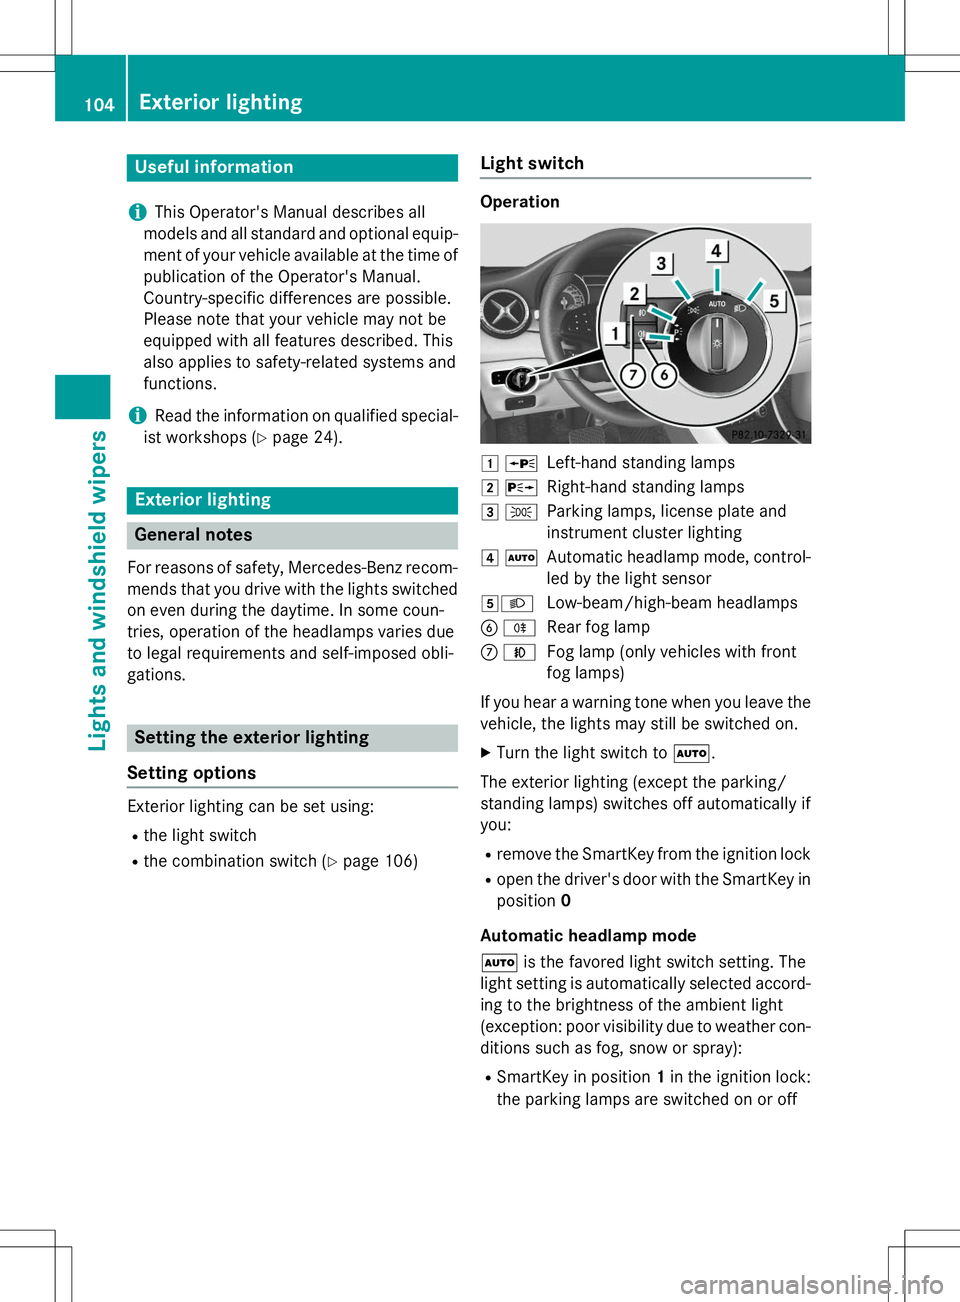
Operation
1 WLeft-hand standing lamps
2XRight-hand standing lamps
3 TParking lamps, license plate and
instrument cluster lighting
4ÃAutomatic headlamp mode, control-
led by the light sensor
5 LLow-beam/high-beam headlamps
B RRear fog lamp
CNFog lamp (only vehicles with front
fog lamps)
If you hear a warning tone when you leave the
vehicle, the lights may still be switched on. X Turn the light switch to Ã.
The exterior lighting (except the parking/
standing lamps) switches off automatically ifyou: R remove the SmartKey from the ignition lock
R open the driver's door with the SmartKey in
position 0
Automatic headlamp mode à is the favored light switch setting. The
light setting is automatically selected accord- ing to the brightness of the ambient light
(exception: poor visibility due to weather con-
ditions such as fog, snow or spray):
R SmartKey in position 1in the ignition lock:
the parking lamps are switched on or off
104Exterior lighting
Lights and windshield wipers