2015 MERCEDES-BENZ B-CLASS SPORTS spare wheel
[x] Cancel search: spare wheelPage 307 of 346
Only winter tires bearing theisnowflake
symbol in addition to the M+S marking pro-
vide the best possible grip in wintry road con- ditions. Only these tires will allow driving
safety systems such as ABS and ESP ®
to
function optimally in winter. These tires have
been developed specifically for driving in snow.
Use M+S tires of the same make and tread on
all wheels to maintain safe handling charac- teristics.
Always observe the maximum permissible
speed specified for the M+S tires you havemounted.
When you have mounted the M+S tires:
X Check the tire pressures ( Ypage 305).
X Restart the tire pressure loss warning sys-
tem (Canada). ( Ypage 309)
Information about driving with an emergency spare wheel ( Ypage 329).
Snow chains
GWARNING
If snow chains are mounted on the rear
wheels, the snow chains could cause abrasion
to the vehicle body or to chassis components.
This could cause damage to the vehicle or the
tires. There is a risk of an accident.
To avoid hazardous situations:
R never mount snow chains on the rear wheels
R only mount snow chains in pairs on the
front wheels.
!On some tire sizes there is not enough
space for snow chains. To avoid damage to the vehicle or tires, observe the "Wheel and
tire combinations" section under "Tires and wheels".
For safety reasons, Mercedes-Benz recom-
mends that you only use snow chains that
have been specially approved for your vehicle
by Mercedes-Benz, or are of a corresponding standard of quality. For more information,
please contact a qualified specialist work-shop.
If you intend to mount snow chains, please
bear the following points in mind:
R Snow chains may not be mounted on all
wheel/tire combinations. Permissible
wheel-tire combinations ( Ypage 326).
R Only use snow chains when driving on
roads completely covered by snow.
Remove the snow chains as soon as possi-
ble when you come to a road that is notsnow-covered.
R Local regulations may restrict the use of
snow chains. Observe the appropriate reg-
ulations if you wish to mount snow chains.
R Do not exceed the maximum permissible
speed of 30 mph (50 km/h).
R When snow chains are installed, never use
Active Parking Assist ( Ypage 175).
You may wish to deactivate ESP ®
when pull-
ing away with snow chains installed( Y page 64). You can thereby allow the wheels
to spin in a controlled manner, achieving an
increased driving force (cutting action).
Information about driving with an emergency spare wheel ( Ypage 329).
Tire pressure
Tire pressure specifications
Important safety notes
GWARNING
Underinflated or overinflated tires pose the
following risks: R the tires may burst, especially as the load
and vehicle speed increase.
R the tires may wear excessively and/or
unevenly, which may greatly impair tiretraction.
R the driving characteristics, as well as steer-
ing and braking, may be greatly impaired.
There is a risk of an accident.
Tire pressure305
Wheels and tires
Z
Page 308 of 346
Follow recommended tire inflation pressures
and check the pressure of all the tires includ-
ing the spare wheel:R monthly, at least
R if the load changes
R before beginning a long journey
R under different operating conditions, e.g.
off-road driving
If necessary, correct the tire pressure.
iThe specifications on the sample Tire and
Loading Information placard and tire pres-
sure tables are examples. Tire pressure
specifications are vehicle-specific and may
deviate from the data shown here. The tire pressure specifications that are valid for
your vehicle can be found on the Tire and
Loading Information placard and tire pres-
sure table on the vehicle.
General notes
The recommended tire pressures for the tires
mounted at the factory can be found on the
labels described here.
Operation with the emergency spare
wheel (Y page 329).
Further information on tire pressures can be
obtained at a qualified specialist workshop.
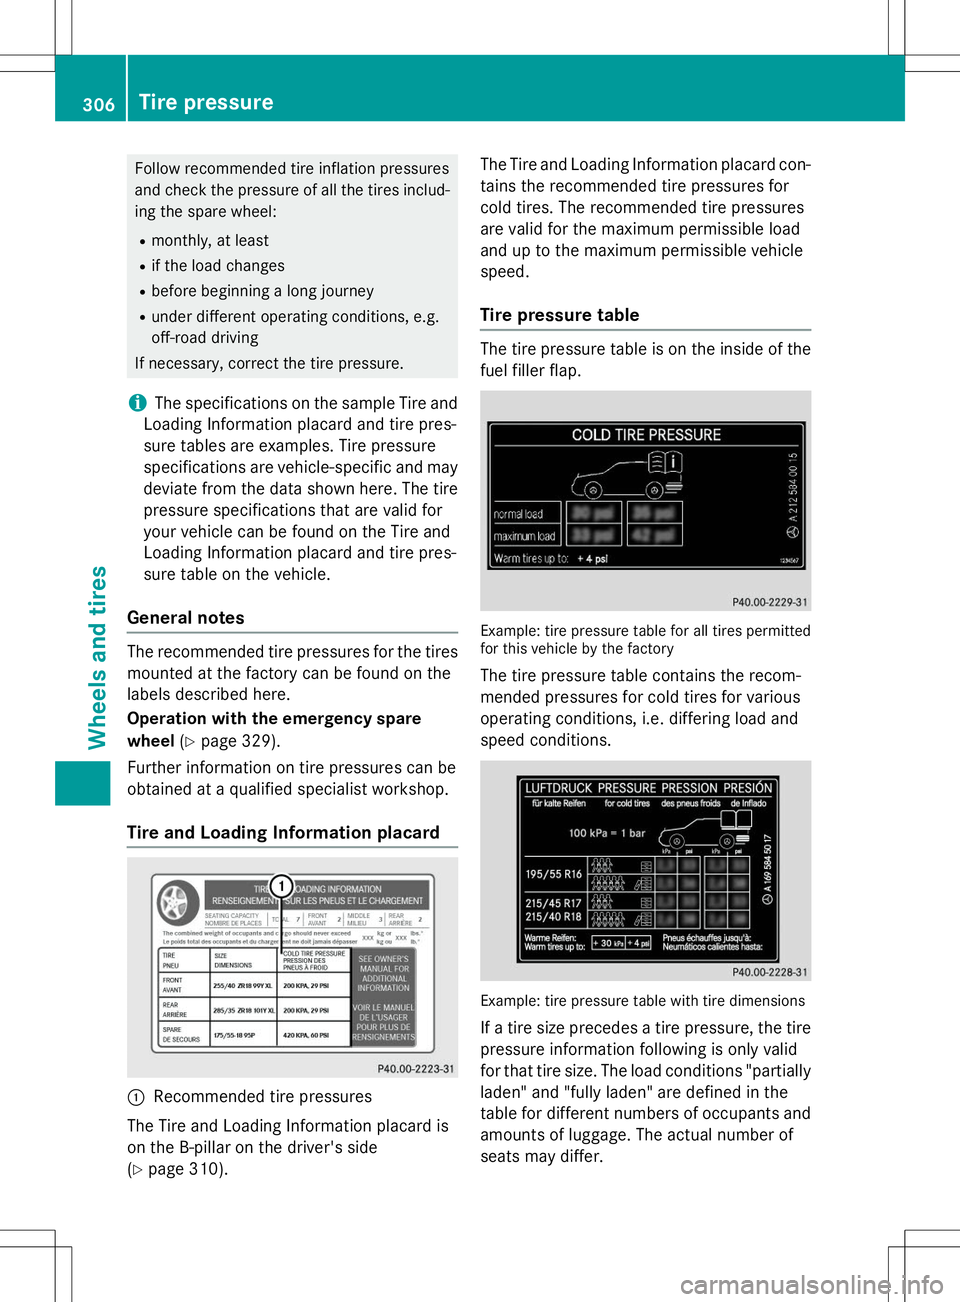
Tire and Loading Information placard
:Recommended tire pressures
The Tire and Loading Information placard is
on the B-pillar on the driver's side( Y page 310). The Tire and Loading Information placard con-
tains the recommended tire pressures for
cold tires. The recommended tire pressures
are valid for the maximum permissible load
and up to the maximum permissible vehicle
speed.
Tire pressure table
The tire pressure table is on the inside of the
fuel filler flap.
Example: tire pressure table for all tires permitted
for this vehicle by the factory
The tire pressure table contains the recom-
mended pressures for cold tires for various
operating conditions, i.e. differing load and
speed conditions.
Example: tire pressure table with tire dimensions
If a tire size precedes a tire pressure, the tire pressure information following is only valid
for that tire size. The load conditions "partially
laden" and "fully laden" are defined in the
table for different numbers of occupants and
amounts of luggage. The actual number of
seats may differ.
306Tire pressure
Wheels and tires
Page 310 of 346
pressure to the value specified for cold tires.The tire pressure would otherwise be too low.
Observe the recommended tire pressures for
cold tires:
R on the Tire and Loading Information placard
on the B-pillar on the driver's side
R in the tire pressure table on the inside of the
fuel filler flap ( Ypage 151)
Underinflated or overinflated tires
Underinflated tires
GWARNING
Tires with pressure that is too low can over-
heat and burst as a consequence. In addition, they also suffer from excessive and/or irreg-
ular wear, which can severely impair the brak-ing properties and the driving characteristics.There is a risk of an accident.
Avoid tire pressures that are too low in all the
tires, including the spare wheel.
Underinflated tires may:
R overheat, leading to tire defects
R adversely affect handling
R wear excessively and/or unevenly
R have an adverse effect on fuel consumption
Overinflated tires
GWARNING
Tires with excessively high pressure can burst
because they are damaged more easily by
road debris, potholes etc. In addition, they
also suffer from irregular wear, which can
severely impair the braking properties and the
driving characteristics. There is a risk of an
accident.
Avoid tire pressures that are too high in all the
tires, including the spare wheel.
Overinflated tires may: R increase the braking distance
R adversely affect handling R
wear excessively and/or unevenly
R have an adverse effect on ride comfort
R be more susceptible to damage
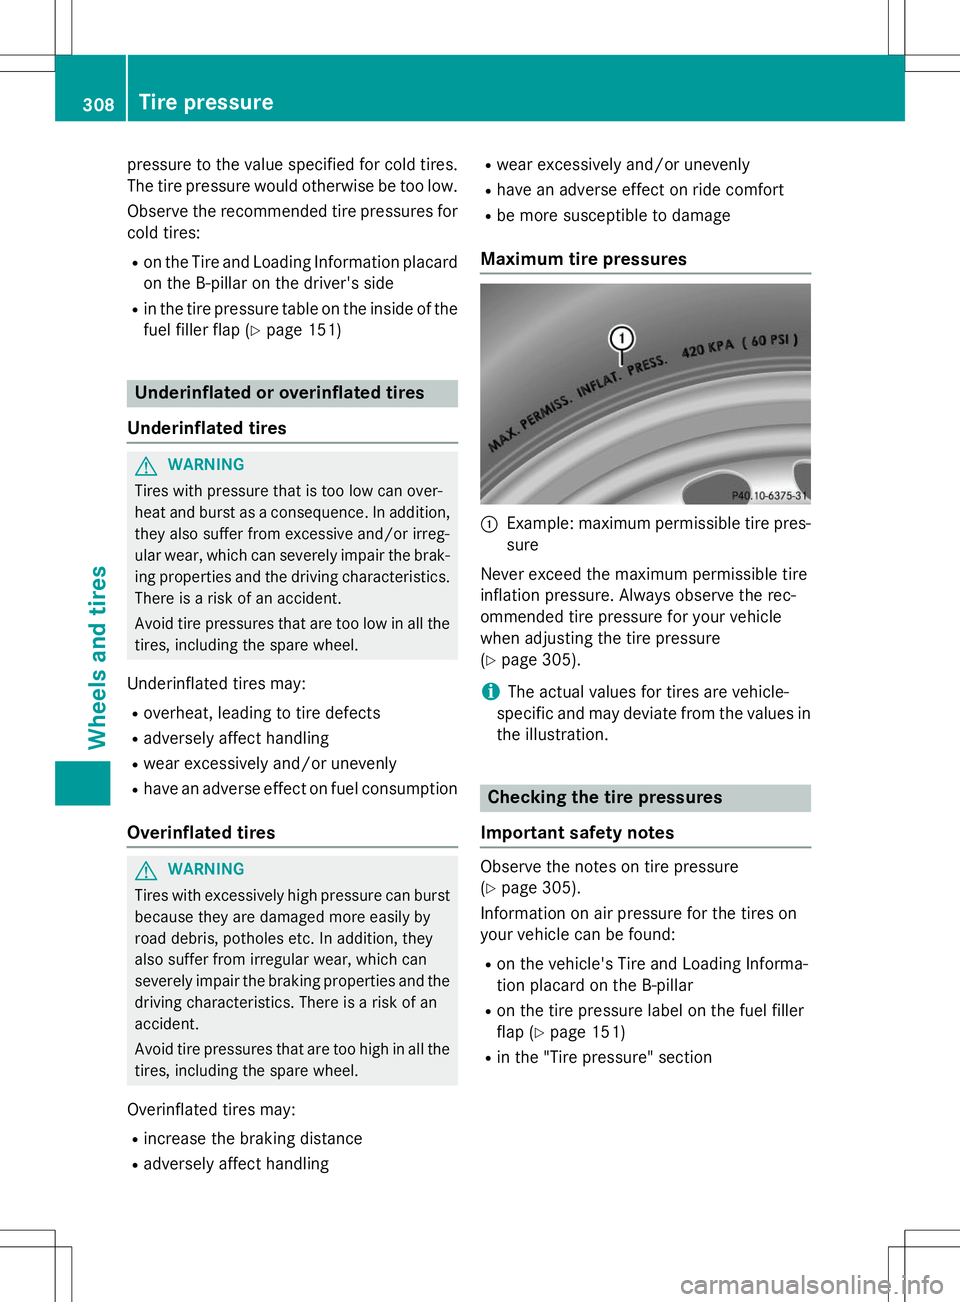
Maximum tire pressures
:Example: maximum permissible tire pres-
sure
Never exceed the maximum permissible tire
inflation pressure. Always observe the rec-
ommended tire pressure for your vehicle
when adjusting the tire pressure( Y page 305).
iThe actual values for tires are vehicle-
specific and may deviate from the values in
the illustration.
Checking the tire pressures
Important safety notes
Observe the notes on tire pressure ( Y page 305).
Information on air pressure for the tires on
your vehicle can be found:
R on the vehicle's Tire and Loading Informa-
tion placard on the B-pillar
R on the tire pressure label on the fuel filler
flap ( Ypage 151)
R in the "Tire pressure" section
308Tire pressure
Wheels and tires
Page 322 of 346
DOT (Department of Transportation)
DOT-marked tires fulfill the requirements of
the U S Department of Transportation.
Normal occupant weight
The number of occupants for which the vehi-
cle is designed multiplied by 68 kilograms
(150 lbs).
Uniform Tire Quality Grading Standards
A uniform standard to grade the quality of
tires with regards to tread quality, tire traction
and temperature characteristics. The quality
grading assessment is made by the manufac-
turer following specifications from the U.S.
government. The ratings are molded into the
sidewall of the tire.
Recommended tire pressures
The recommended tire pressure applies to
the tires mounted at the factory.
The Tire and Loading Information placard con- tains the recommended tire pressures for
cold tires on a fully loaded vehicle and for the
maximum permissible vehicle speed.
The tire pressure table contains the recom-
mended pressures for cold tires for various
operating conditions, i.e. differing load and
speed conditions.
Increased vehicle weight due to optional
equipment
The combined weight of all standard and
optional equipment available for the vehicle,
regardless of whether it is actually installed
on the vehicle or not.
Rim
This is the part of the wheel on which the tire
is mounted.
GAWR (Gross Axle Weight Rating)
The GAWR is the maximum gross axle weight rating. The actual load on an axle must never
exceed the gross axle weight rating. The
gross axle weight rating can be found on the
vehicle identification plate on the B-pillar on
the driver's side. Speed rating
The speed rating is part of the tire identifica-
tion. It specifies the speed range for which the
tire is approved.
GVW (Gross Vehicle Weight)
The gross vehicle weight includes the weight
of the vehicle including fuel, tools, the spare
wheel, accessories installed, occupants, lug-
gage and the drawbar noseweight, if applica-
ble. The gross vehicle weight must not exceed the gross vehicle weight rating GVWR as
specified on the vehicle identification plate on
the B-pillar on the driver's side.
GVWR (Gross Vehicle Weight Rating)
The GVWR is the maximum permissible gross weight of a fully loaded vehicle (the weight of the vehicle including all accessories, occu-
pants, fuel, luggage and the drawbar nose-
weight, if applicable). The gross vehicle
weight rating is specified on the vehicle iden-
tification plate on the B-pillar on the driver's
side.
Maximum loaded vehicle weight
The maximum weight is the sum of:
R the curb weight of the vehicle
R the weight of the accessories
R the load limit
R the weight of the factory installed optional
equipment
Kilopascal (kPa)
Metric unit for tire pressure. 6.9 kPa corre-
sponds to 1 psi. Another unit for tire pressure is bar. 100 kilopascals (kPa) are the equiva-
lent of 1 bar.
Load index
In addition to the load-bearing index, the load
index may also be imprinted on the sidewall of the tire. This specifies the load-bearing capa- city more precisely.
320All about wheels and ti res
Wheels and tires
Page 328 of 346
Have the tightening torque immediately
checked at a qualified specialist workshop
after a wheel is changed.
X Place the ratchet wrench onto the hexagon
nut of the jack so that the letters ABare
visible.
X Turn the ratchet wrench until the vehicle is
once again standing firmly on the ground.
X Place the jack to one side.
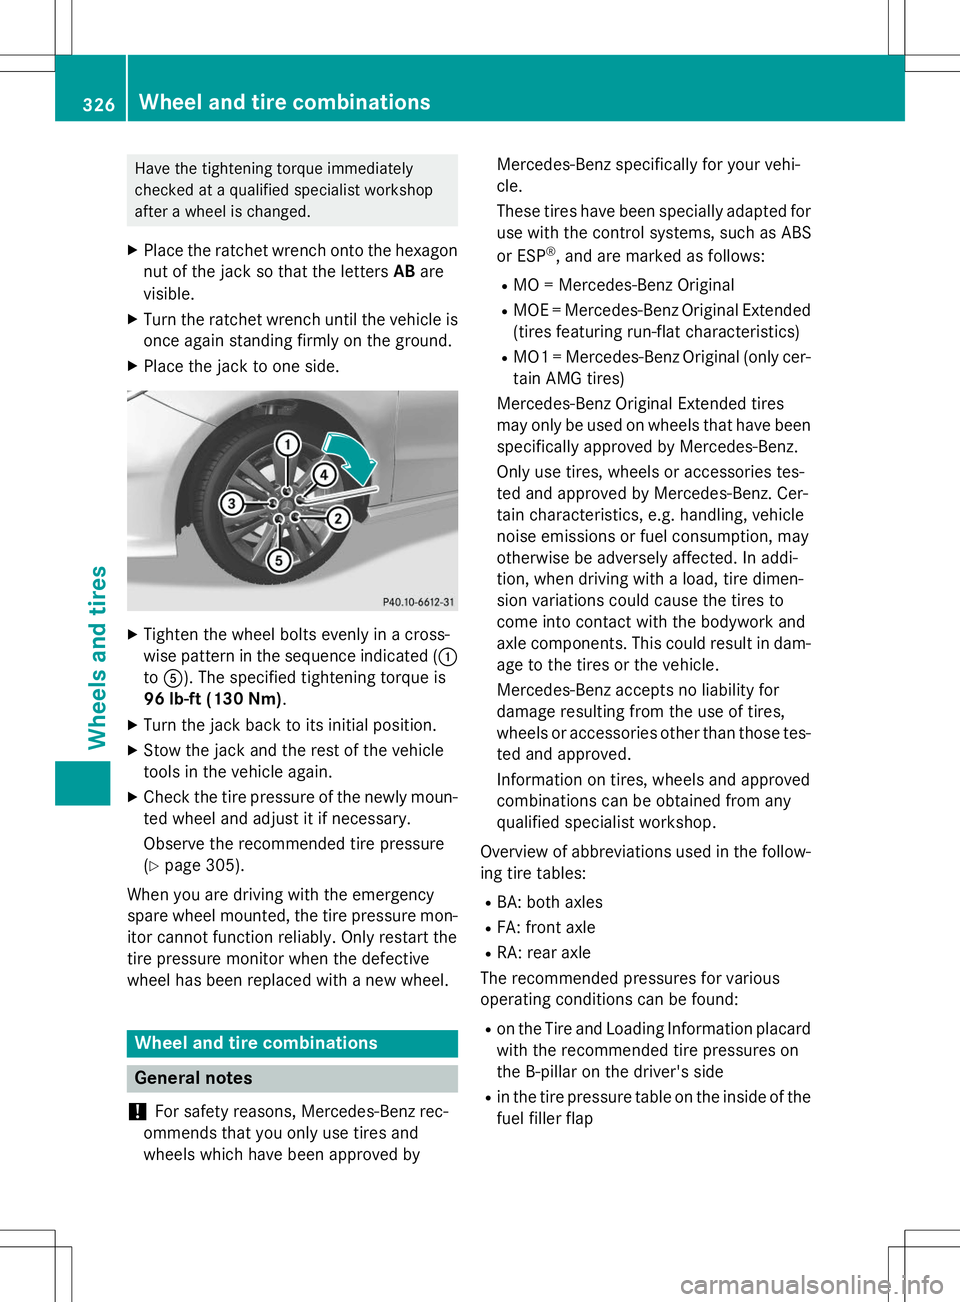
XTighten the wheel bolts evenly in a cross-
wise pattern in the sequence indicated ( :
to A ). The specified tightening torque is
96 lb-f t(130 Nm) .
X Turn the jack back to its initial position.
X Stow the jack and the rest of the vehicle
tools in the vehicle again.
X Check the tire pressure of the newly moun-
ted wheel and adjust it if necessary.
Observe the recommended tire pressure ( Y page 305).
When you are driving with the emergency
spare wheel mounted, the tire pressure mon-
itor cannot function reliably. Only restart the
tire pressure monitor when the defective
wheel has been replaced with a new wheel.
Wheel and tire combinations
General notes
!
For safety reasons, Mercedes-Benz rec-
ommends that you only use tires and
wheels which have been approved by Mercedes-Benz specifically for your vehi-cle.
These tires have been specially adapted for
use with the control systems, such as ABS
or ESP ®
, and are marked as follows:
R MO = Mercedes-Benz Original
R MOE = Mercedes-Benz Original Extended
(tires featuring run-flat characteristics)
R MO1 = Mercedes-Benz Original (only cer-
tain AMG tires)
Mercedes-Benz Original Extended tires
may only be used on wheels that have been
specifically approved by Mercedes-Benz.
Only use tires, wheels or accessories tes-
ted and approved by Mercedes-Benz. Cer-
tain characteristics, e.g. handling, vehicle
noise emissions or fuel consumption, may
otherwise be adversely affected. In addi-
tion, when driving with a load, tire dimen-
sion variations could cause the tires to
come into contact with the bodywork and
axle components. This could result in dam- age to the tires or the vehicle.
Mercedes-Benz accepts no liability for
damage resulting from the use of tires,
wheels or accessories other than those tes-
ted and approved.
Information on tires, wheels and approved
combinations can be obtained from any
qualified specialist workshop.
Overview of abbreviations used in the follow- ing tire tables: R BA: both axles
R FA: front axle
R RA: rear axle
The recommended pressures for various
operating conditions can be found:
R on the Tire and Loading Information placard
with the recommended tire pressures on
the B-pillar on the driver's side
R in the tire pressure table on the inside of the
fuel filler flap
326Wheel and tire combinations
Wheels and tires
Page 331 of 346
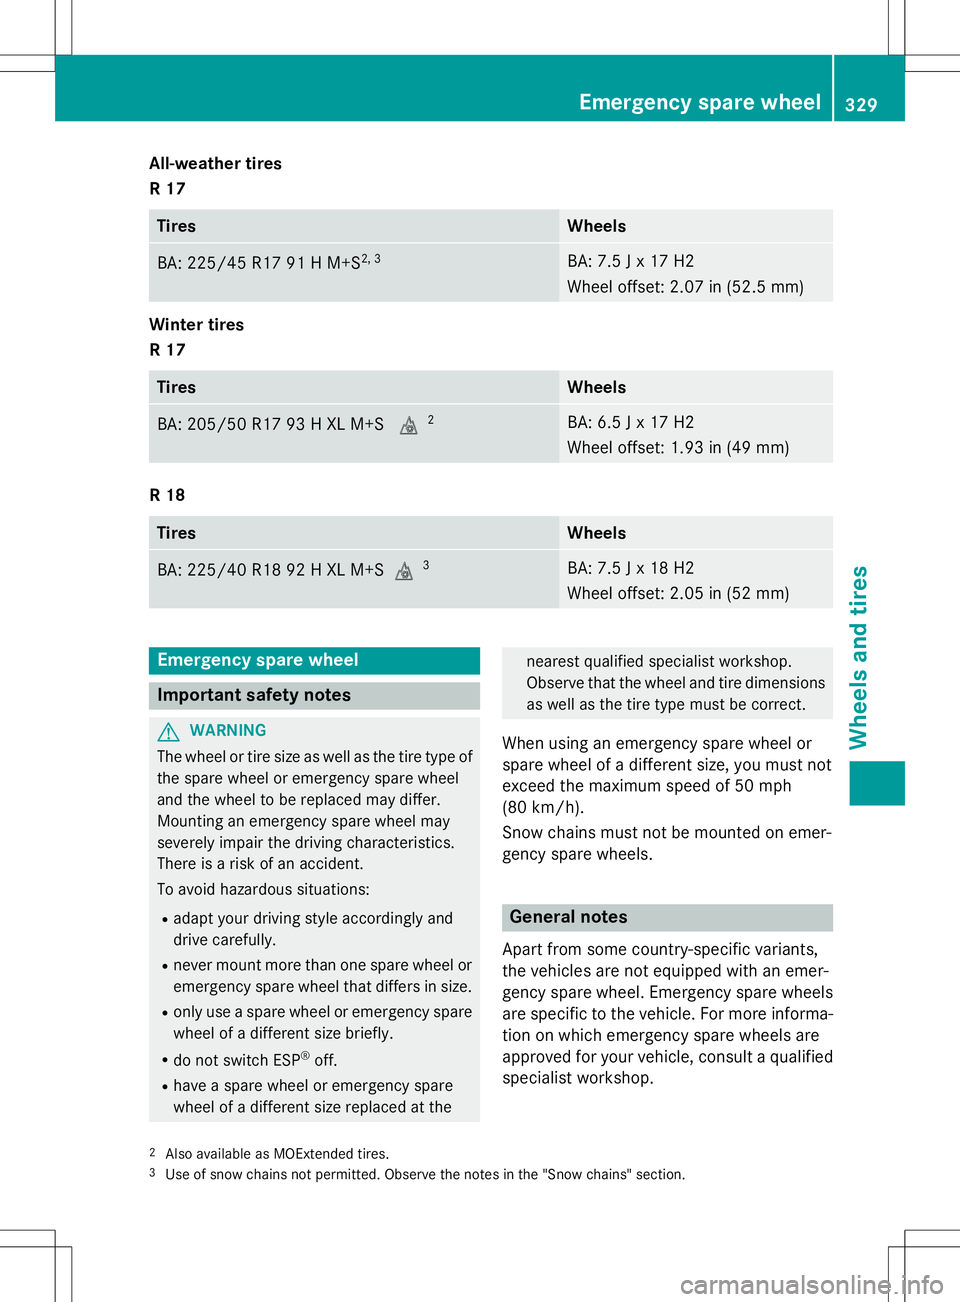
All-weather tires
R 17
TiresWheels
BA: 225/45 R17 91 H M+S2, 3BA: 7.5 J x 17 H2
Wheel offset: 2.07 in (52.5 mm)
Winter tires
R 17
TiresWheels
BA: 205/50 R17 93 H XL M+S
i2BA: 6.5 J x 17 H2
Wheel offset: 1.93 in (49 mm)
R 18
TiresWheels
BA: 225/40 R18 92 H XL M+S
i3BA: 7.5 J x 18 H2
Wheel offset: 2.05 in (52 mm)
Emergency spare wheel
Important safety notes
GWARNING
The wheel or tire size as well as the tire type of
the spare wheel or emergency spare wheel
and the wheel to be replaced may differ.
Mounting an emergency spare wheel may
severely impair the driving characteristics.
There is a risk of an accident.
To avoid hazardous situations:
R adapt your driving style accordingly and
drive carefully.
R never mount more than one spare wheel or
emergency spare wheel that differs in size.
R only use a spare wheel or emergency spare
wheel of a different size briefly.
R do not switch ESP ®
off.
R have a spare wheel or emergency spare
wheel of a different size replaced at the
nearest qualified specialist workshop.
Observe that the wheel and tire dimensions
as well as the tire type must be correct.
When using an emergency spare wheel or
spare wheel of a different size, you must not
exceed the maximum speed of 50 mph
(80 km/ h).
Snow chains must not be mounted on emer-
gency spare wheels.
General notes
Apart from some country-specific variants,
the vehicles are not equipped with an emer-
gency spare wheel. Emergency spare wheels
are specific to the vehicle. For more informa- tion on which emergency spare wheels are
approved for your vehicle, consult a qualified specialist workshop.
2 Also available as MOExtended tires.
3 Use of snow chains not permitted. Observe the notes in the "Snow chains" section.
Emergency spare wheel329
Wheels and tires
Z
Page 332 of 346
You should regularly check the pressure of
the emergency spare wheel, particularly prior
to long trips, and correct the pressure as nec- essary ( Ypage 305). The value on the wheel is
valid. In addition, the emergency spare wheel
tire pressure can be found under "Technical
data" ( Ypage 331).
An emergency spare wheel may also be
mounted against the direction of rotation.
Observe the time restriction on use as well as
the speed limitation specified on the emer-
gency spare wheel.
Replace the tires after six years at the latest, regardless of wear. This also applies to the
emergency spare wheel.
When you are driving with the emergency
spare wheel mounted, the tire pressure loss
warning system cannot function reliably. Only
restart the tire pressure loss warning system when the defective wheel has been replaced
with a new wheel.
Removing the emergency spare wheel
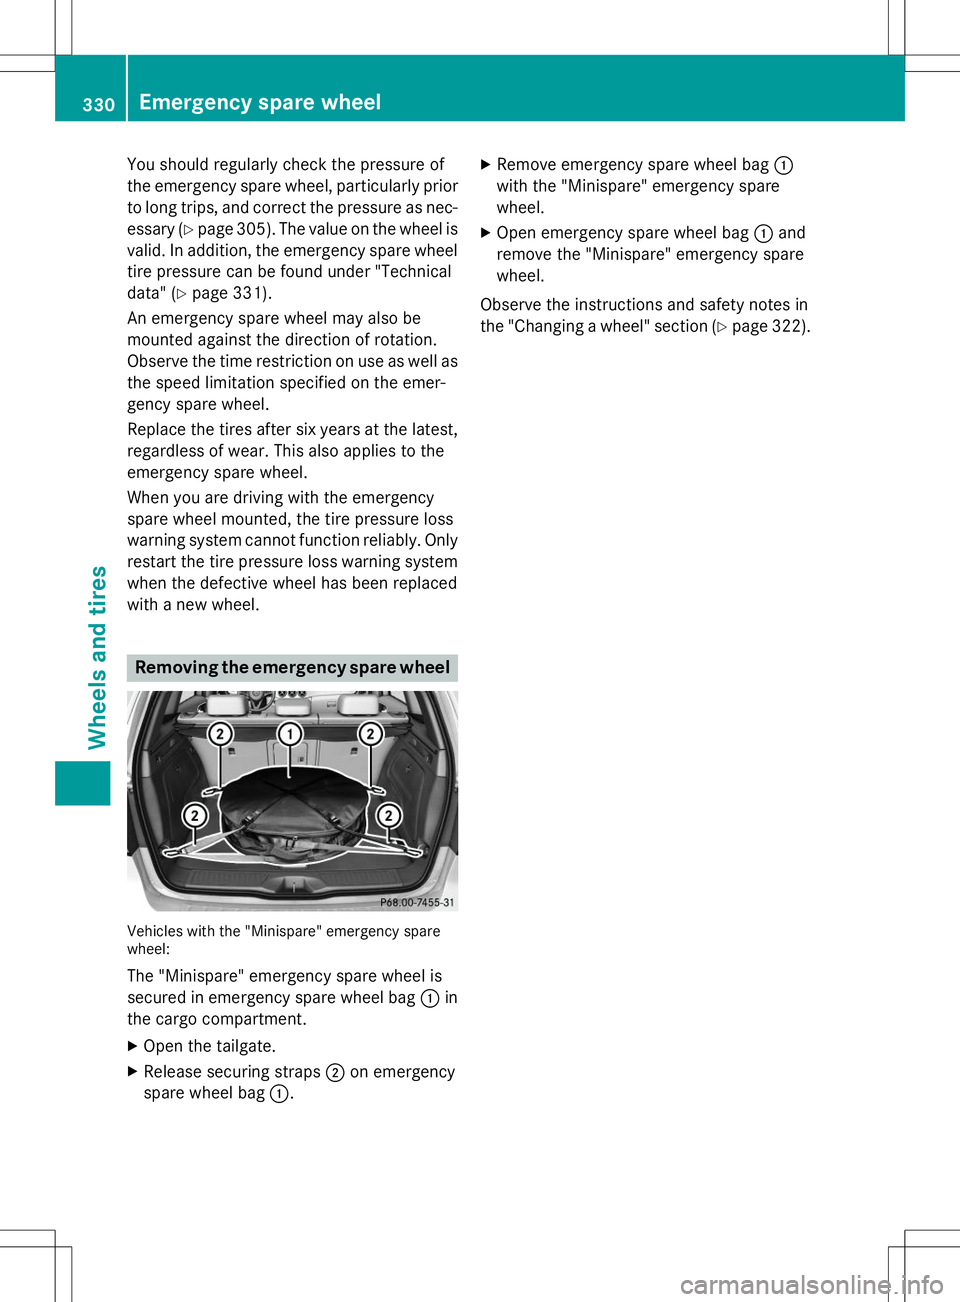
Vehicles with the "Minispare" emergency spare wheel:
The "Minispare" emergency spare wheel is
secured in emergency spare wheel bag :in
the cargo compartment.
X Open the tailgate.
X Release securing straps ;on emergency
spare wheel bag :. X
Remove emergency spare wheel bag :
with the "Minispare" emergency sparewheel.
X Open emergency spare wheel bag :and
remove the "Minispare" emergency sparewheel.
Observe the instructions and safety notes in
the "Changing a wheel" section ( Ypage 322).
330Emergency spare wheel
Wheels and tires
Page 333 of 346
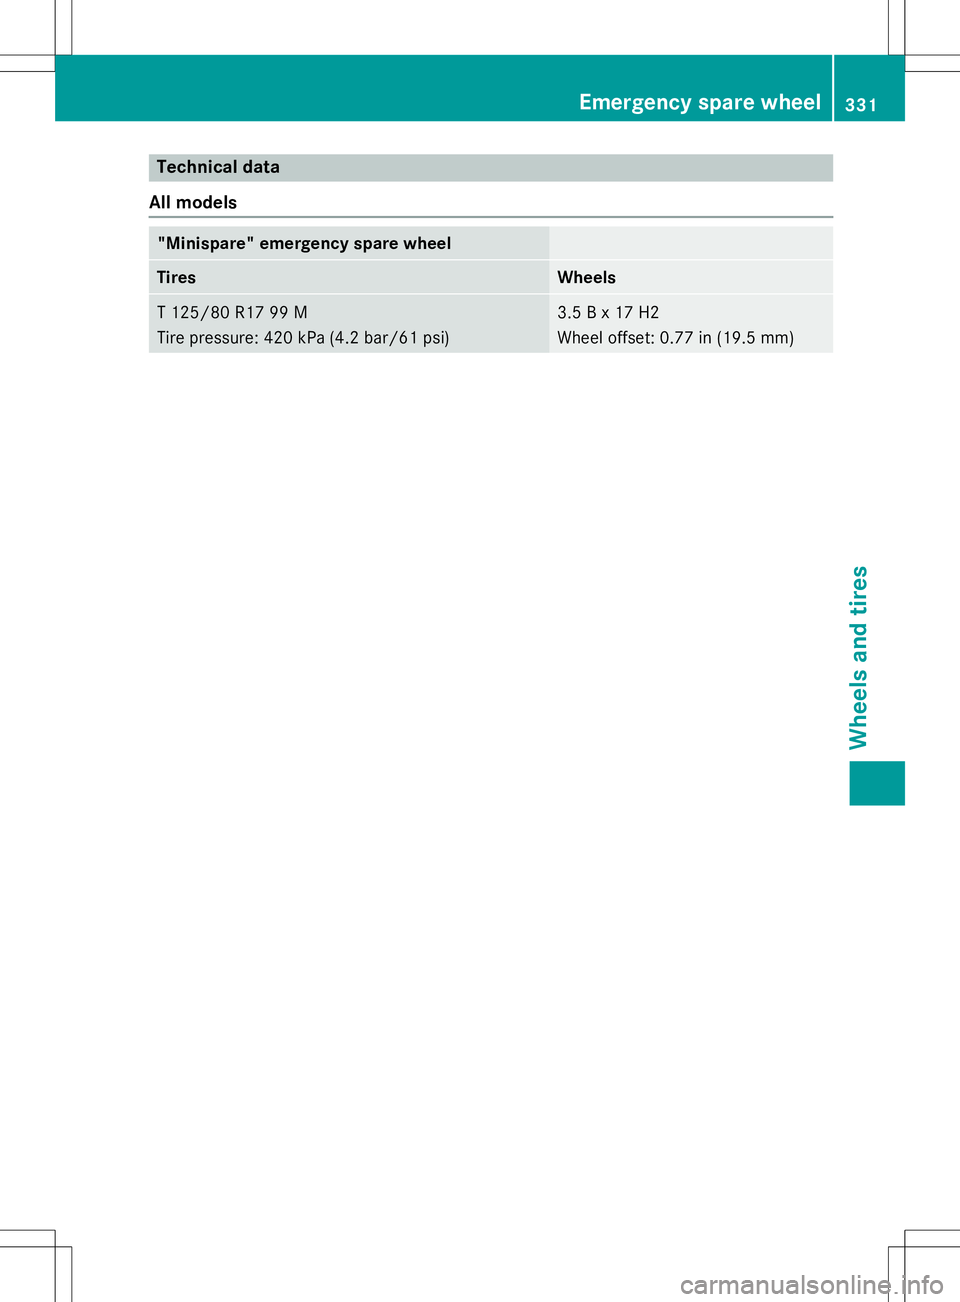
Technical data
All models
"Minispare" emergency spare wheel
TiresWheels
T 125/8 0 R17 99 M
Tire pressure : 420 kPa (4.2 bar/61 psi)3.5 B x 17 H2
Wheel offset: 0.77 in (19.5 mm)
Emergency spare wheel331
Wheels and tires
Z