2015 MERCEDES-BENZ B-CLASS SPORTS park assist
[x] Cancel search: park assistPage 140 of 346
Starting procedure with the Start/Stopbutton
The Start/Stop button can be used to start
the vehicle manually without inserting the
SmartKey into the ignition lock. The Start/
Stop button must be inserted in the ignition
lock and the SmartKey must be in the vehicle. This mode for starting the engine operates
independently of the ECO start/stop auto-
matic engine start function.
You can start the engine if a valid SmartKey isin the vehicle. Switch off the engine and
always take the SmartKey with you when
leaving the vehicle, even if you only leave it for
a short time. Pay attention to the important
safety notes.
X Depress the brake pedal and keep itdepressed.
X Press the Start/Stop button once(Y page 135).
The engine starts.
Pulling away
Automatic transmission
GWARNING
If the engine speed is above the idling speed
and you engage transmission position Dor R,
the vehicle could pull away suddenly. There is a risk of an accident.
When engaging transmission position Dor R,
always firmly depress the brake pedal and do not simultaneously accelerate.
Depress the accelerator carefully when pull-
ing away.
The vehicle locks centrally once you have
pulled away. The locking knobs in the doors
drop down.
You can open the doors from the inside at any
time.
You can also deactivate the automatic locking
feature ( Ypage 205). It is only possible to shift the transmission
from position
Pto the desired position if you
depress the brake pedal. Only then can the
parking lock be deactivated.
If you do not depress the brake pedal, the
DIRECT SELECT lever can still be moved but
the parking lock remains engaged.
At transmission fluid temperatures below Ò 4 ‡ ( Ò20 †), you can only shift out of park
position Pinto another transmission position
when the engine is running.
iUpshifts take place at higher engine
speeds after a cold start. This helps the
catalytic converter to reach its operating
temperature more quickly.
Information on the automatic release of the
electric parking brake ( Ypage 153).
Hill start assist
Hill start assist helps you when pulling away
forwards or in reverse on an uphill gradient. It
holds the vehicle for a short time after you
have removed your foot from the brake pedal. This gives you enough time to move your footfrom the brake pedal to the accelerator pedal
and to depress it before the vehicle begins to
roll.
GWARNING
After a short time, hill start assist will no lon-
ger brake your vehicle and it could roll away.
There is a risk of an accident and injury.
Therefore, quickly move your foot from the
brake pedal to the accelerator pedal. Never
leave the vehicle when it is held by hill startassist.
Hill start assist is not active if: R you are pulling away on a level road or on a
downhill gradient.
R the transmission is in position N.
R the electric parking brake is applied.
R ESP ®
is malfunctioning.
Further information on holding the vehicle
stationary on uphill gradients ( Ypage 146).
138Driving
Driving and parking
Page 151 of 346
Shift recommendation
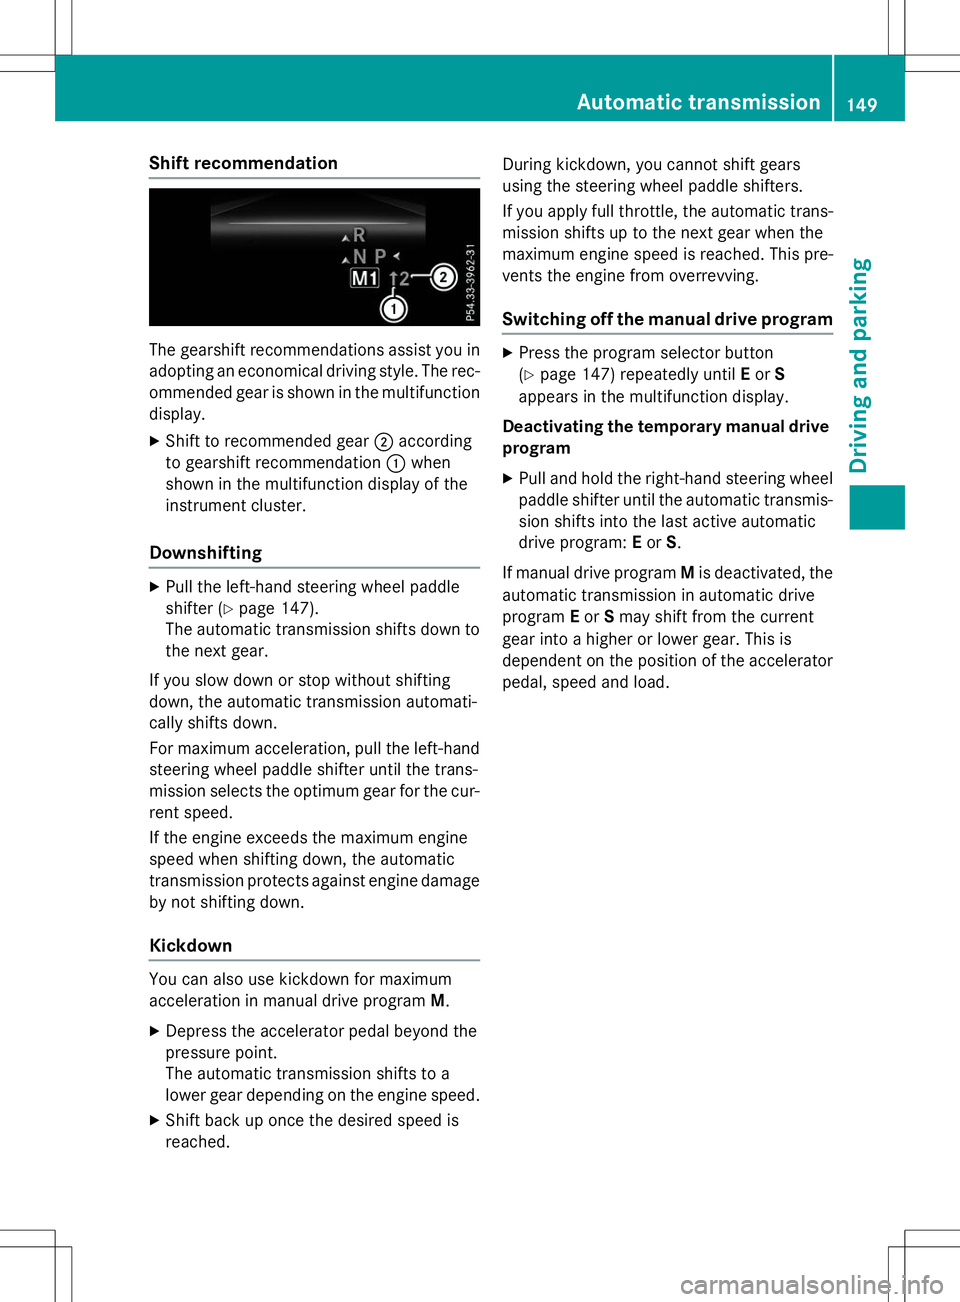
The gearshift recommendations assist you inadopting an economical driving style. The rec-
ommended gear is shown in the multifunction display.
X Shift to recommended gear ;according
to gearshift recommendation :when
shown in the multifunction display of the
instrument cluster.
Downshifting
X Pull the left-hand steering wheel paddle
shifter ( Ypage 147).
The automatic transmission shifts down to
the next gear.
If you slow down or stop without shifting
down, the automatic transmission automati-
cally shifts down.
For maximum acceleration, pull the left-hand
steering wheel paddle shifter until the trans-
mission selects the optimum gear for the cur- rent speed.
If the engine exceeds the maximum engine
speed when shifting down, the automatic
transmission protects against engine damage
by not shifting down.
Kickdown
You can also use kickdown for maximum
acceleration in manual drive program M.
X Depress the accelerator pedal beyond the
pressure point.
The automatic transmission shifts to a
lower gear depending on the engine speed.
X Shift back up once the desired speed isreached. During kickdown, you cannot shift gears
using the steering wheel paddle shifters.
If you apply full throttle, the automatic trans-
mission shifts up to the next gear when the
maximum engine speed is reached. This pre-
vents the engine from overrevving.
Switching off the manual drive program
X Press the program selector button (Y page 147) repeatedly until Eor S
appears in the multifunction display.
Deactivating the temporary manual drive program
X Pull and hold the right-hand steering wheel
paddle shifter until the automatic transmis- sion shifts into the last active automatic
drive program: Eor S.
If manual drive program Mis deactivated, the
automatic transmission in automatic driveprogram Eor Smay shift from the current
gear into a higher or lower gear. This is
dependent on the position of the accelerator
pedal, speed and load.
Automatic transmission149
Driving and parking
Z
Page 152 of 346
Problems with the transmission
ProblemPossible causes/consequences andMSolutions
The transmission has
problems shifting gear.The transmission is losing oil.
X Have the transmission checked at a qualified specialist work-
shop immediately.
The acceleration ability
is deteriorating.
The transmission no
longer shifts into all of
the gears.
Reverse gear can no
longer be engaged.The transmission is in emergency mode.
X Stop the vehicle.
X Shift the transmission to position P.
X Switch off the engine.
X Wait at least ten seconds before restarting the engine.
X Shift the transmission to position D.
X Have the transmission checked at a qualified specialist work-
shop immediately.
Refueling
Important safety notes
GWARNING
Fuel is highly flammable. If you handle fuel
incorrectly, there is a risk of fire and explo-sion.
You must avoid fire, open flames, creating
sparks and smoking. Switch off the engine
and, if applicable, the auxiliary heating before
refueling.
GWARNING
Fuel is poisonous and hazardous to health.
There is a risk of injury.
You must make sure that fuel does not comeinto contact with your skin, eyes or clothing
and that it is not swallowed. Do not inhale fuel
vapors. Keep fuel away from children.
If you or others come into contact with fuel,
observe the following:
R Wash away fuel from skin immediately
using soap and water.
R If fuel comes into contact with your eyes,
immediately rinse them thoroughly with
clean water. Seek medical assistance with-
out delay.
R If fuel is swallowed, seek medical assis-
tance without delay. Do not induce vomit-ing.
R Immediately change out of clothing which
has come into contact with fuel.
GWARNING
Electrostatic buildup can create sparks and
ignite fuel vapors. There is a risk of fire andexplosion.
Always touch the vehicle body before opening
the fuel filler flap or touching the fuel pump
nozzle. Any existing electrostatic buildup is
thereby discharged.
!Do not use diesel to refuel vehicles with a
gasoline engine. Do not switch on the igni- tion if you accidentally refuel with the
wrong fuel. Otherwise, the fuel will enter
the fuel system. Even small amounts of the
wrong fuel could result in damage to the
fuel system and the engine. Notify a quali-
fied specialist workshop and have the fuel
tank and fuel lines drained completely.
150Refueling
Driving and parking
Page 156 of 346
When leaving the vehicle, always take the
SmartKey with you and lock the vehicle. Neverleave children unsupervised in the vehicle.
The function of the electric parking brake is
dependent on the on-board voltage. If the on-
board voltage is low or there is a malfunction
in the system, it may not be possible to apply the released parking brake.
X If this is the case, only park the vehicle on
level ground and secure it to prevent it roll-
ing away.
X Shift the automatic transmission to posi-tion P.
It may not be possible to release an applied
parking brake if the on-board voltage is low or there is a malfunction in the system. Contact
a qualified specialist workshop.
The electric parking brake performs a func-
tion test at regular intervals while the engine is switched off. The sounds that can be heard
while this is occurring are normal.
Applying/releasing manually
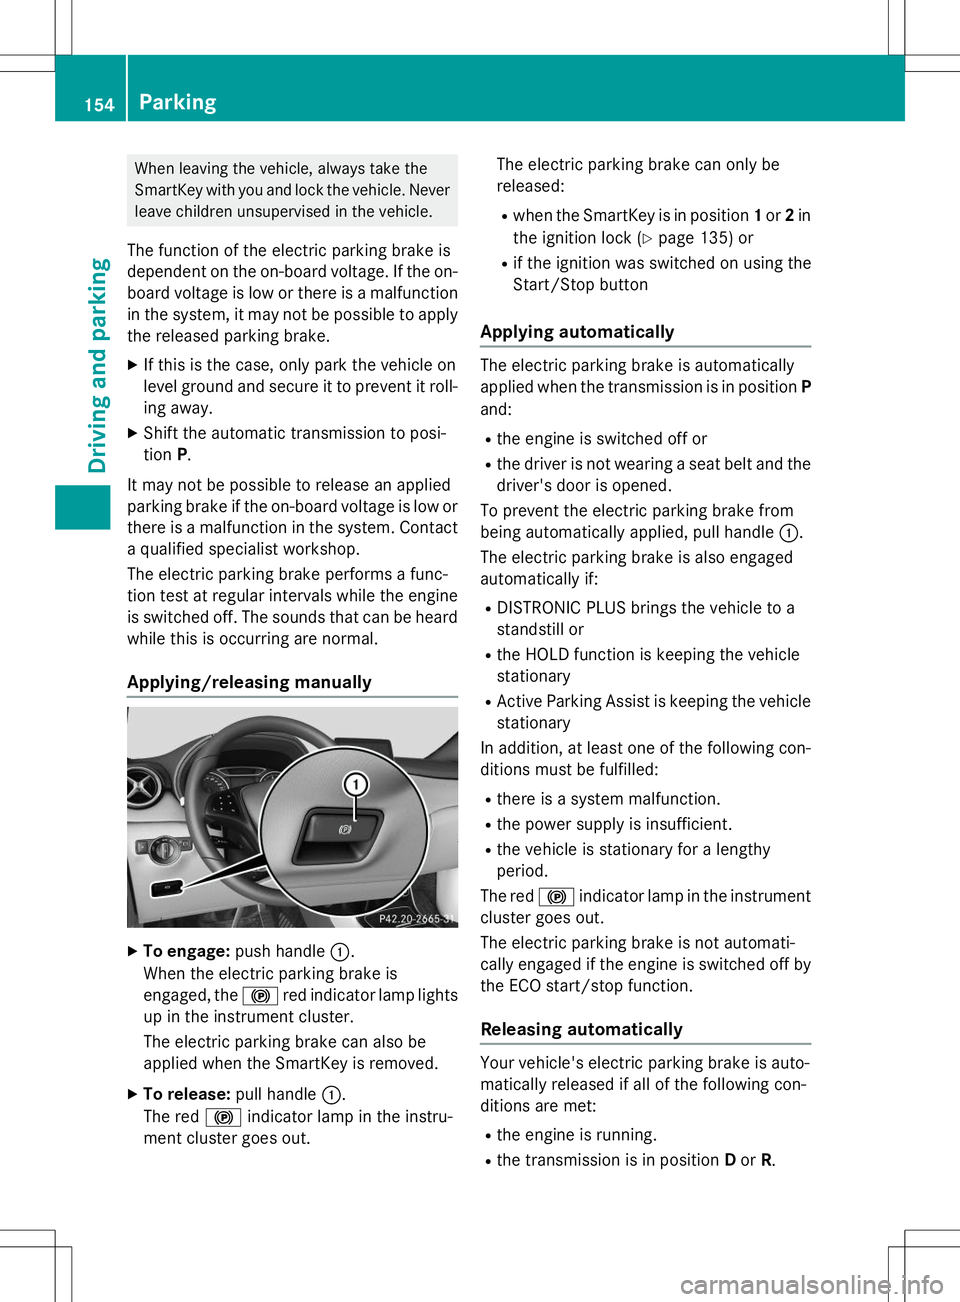
X To engage: push handle :.
When the electric parking brake is
engaged, the !red indicator lamp lights
up in the instrument cluster.
The electric parking brake can also be
applied when the SmartKey is removed.
X To release: pull handle:.
The red !indicator lamp in the instru-
ment cluster goes out. The electric parking brake can only bereleased:
R when the SmartKey is in position 1or 2in
the ignition lock ( Ypage 135) or
R if the ignition was switched on using the
Start/Stop button
Applying automatically
The electric parking brake is automatically
applied when the transmission is in position P
and:
R the engine is switched off or
R the driver is not wearing a seat belt and the
driver's door is opened.
To prevent the electric parking brake from
being automatically applied, pull handle :.
The electric parking brake is also engaged
automatically if:
R DISTRONIC PLUS brings the vehicle to a
standstill or
R the HOLD function is keeping the vehicle
stationary
R Active Parking Assist is keeping the vehicle
stationary
In addition, at least one of the following con-
ditions must be fulfilled:
R there is a system malfunction.
R the power supply is insufficient.
R the vehicle is stationary for a lengthyperiod.
The red !indicator lamp in the instrument
cluster goes out.
The electric parking brake is not automati-
cally engaged if the engine is switched off by the ECO start/stop function.
Releasing automatically
Your vehicle's electric parking brake is auto-
matically released if all of the following con-
ditions are met:
R the engine is running.
R the transmission is in position Dor R.
154Parking
Driving and parking
Page 161 of 346
Have brake pads installed and brake fluid
replaced at a qualified specialist workshop.
If the brake system has only been subject to
moderate loads, you should test the function-ality of your brakes at regular intervals.
You can find a description of Brake Assist
(BAS) on ( Ypage 61).
Mercedes-Benz recommends that you only
have brake pads/linings installed on your
vehicle which have been approved for
Mercedes-Benz vehicles or which correspond to an equivalent quality standard. Brake
pads/linings which have not been approved
for Mercedes-Benz vehicles or which are not
of an equivalent quality could affect your vehi-
cle's operating safety.
Mercedes-Benz recommends that you only
use brake fluid that has been specially
approved for your vehicle by Mercedes-Benz,
or which corresponds to an equivalent quality standard. Brake fluid which has not been
approved for Mercedes-Benz vehicles or
which is not of an equivalent quality could
affect your vehicle's operating safety.
Checking brake lining thickness
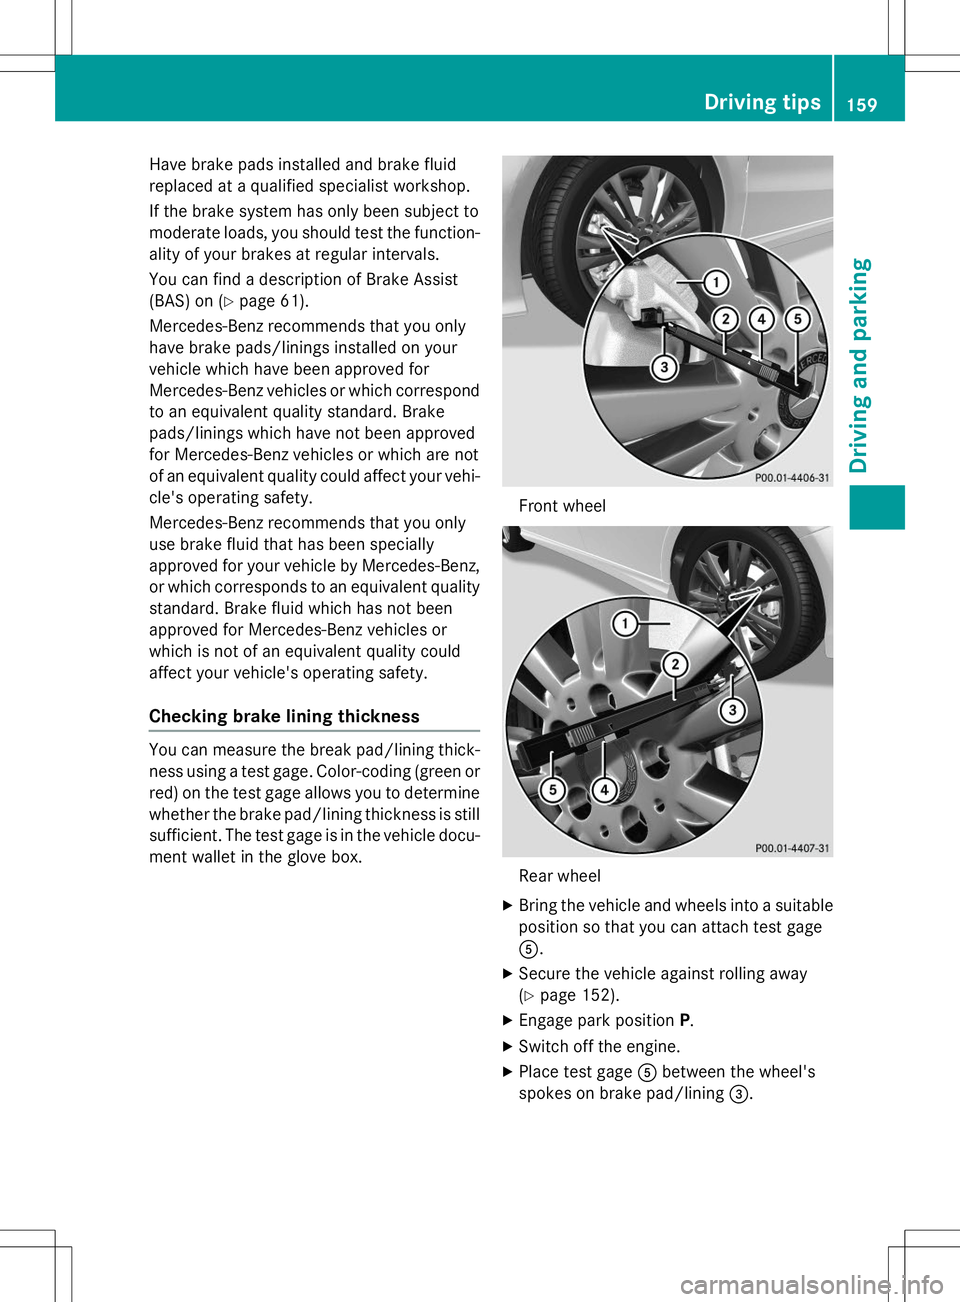
You can measure the break pad/lining thick- ness using a test gage. Color-coding (green or
red) on the test gage allows you to determine whether the brake pad/lining thickness is still
sufficient. The test gage is in the vehicle docu-
ment wallet in the glove box.
Front wheel
Rear wheel
X Bring the vehicle and wheels into a suitable
position so that you can attach test gageA .
X Secure the vehicle against rolling away(Y page 152).
X Engage park position P.
X Switch off the engine.
X Place test gage Abetween the wheel's
spokes on brake pad/lining =.
Driving tips159
Driving and parking
Z
Page 166 of 346
To prevent damage to the vehicle, deacti-
vate DISTRONIC PLUS and the HOLD func-tion in the following or other similar situa-tions:
R when towing the vehicle
R in the car wash
If you fail to adapt your driving style,
DISTRONIC PLUS can neither reduce the risk
of accident nor override the laws of physics.
DISTRONIC PLUS cannot take into account
the road, traffic and weather conditions.
DISTRONIC PLUS is only an aid. You are
responsible for the distance to the vehicle in
front, for vehicle speed, for braking in good
time and for staying in your lane.
Do not use DISTRONIC PLUS:
R in road and traffic conditions which do not
allow you to maintain a constant speed e.g.
in heavy traffic or on winding roads
R on slippery road surfaces. Braking or accel-
erating could cause the drive wheels to lose
traction and the vehicle could then skid
R when there is poor visibility, e.g. due to fog,
heavy rain or snow
DISTRONIC PLUS may not detect narrow
vehicles driving in front, e.g. motorcycles, or
vehicles driving on a different line.
In particular, the detection of obstacles can
be impaired if:
R there is dirt on the sensors or anything else
covering the sensors
R there is snow or heavy rain
R there is interference by other radar sources
R there are strong radar reflections, for
example, in parking garages
If DISTRONIC PLUS no longer detects a vehi- cle in front, DISTRONIC PLUS may unexpect-
edly accelerate the vehicle to the storedspeed. This speed may:
R be too high if you are driving in a filter lane
or an exit lane
R be so high when driving in the right-hand
lane that you overtake vehicles in the left-
hand lane
R be so high when driving in the left-hand lane
that you overtake vehicles in the right-hand
lane
If there is a change of drivers, advise the new
driver of the speed stored.
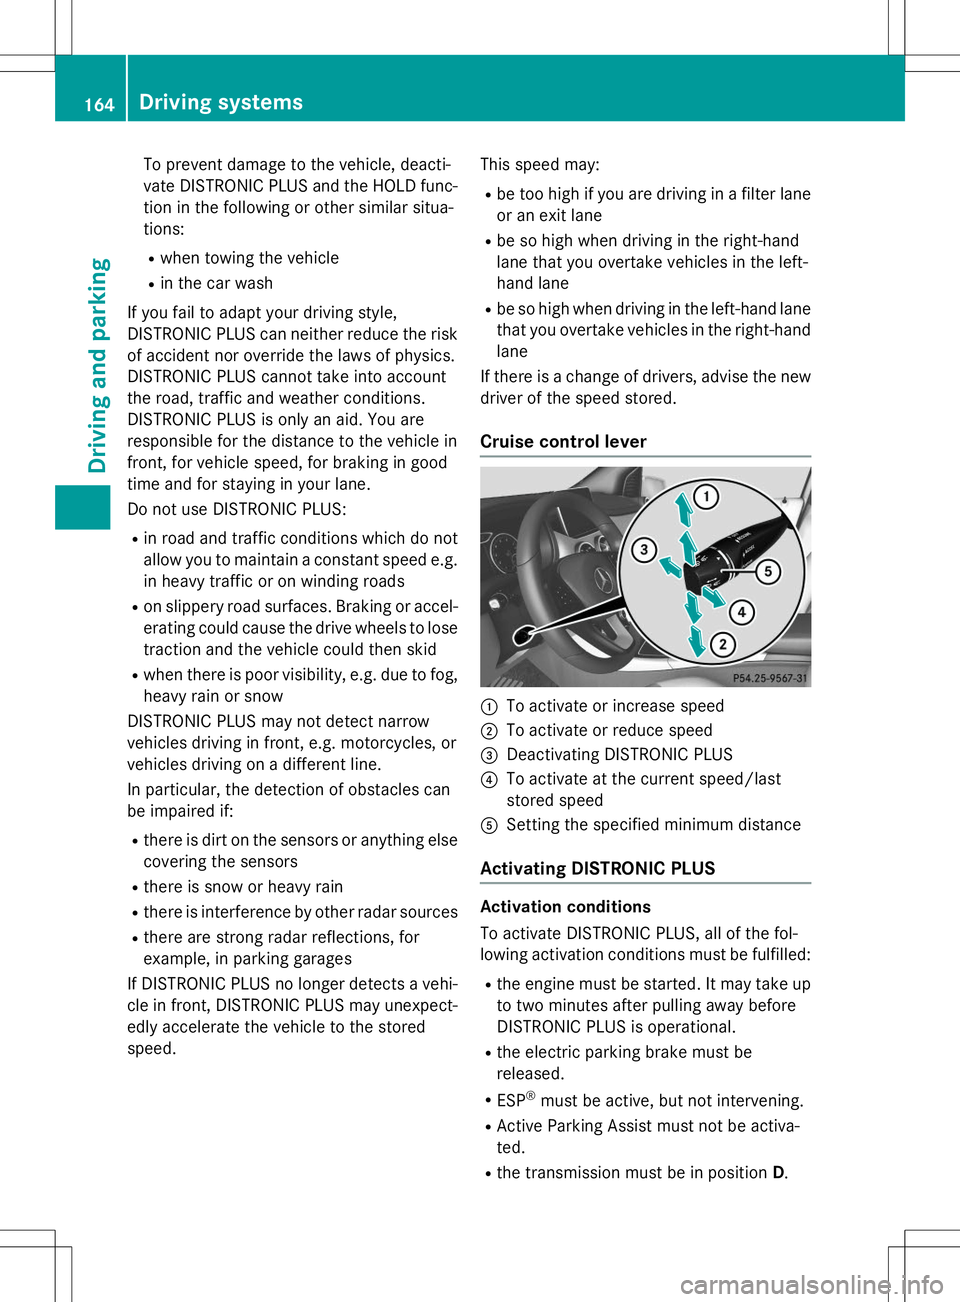
Cruise control lever
:To activate or increase speed
;To activate or reduce speed
=Deactivating DISTRONIC PLUS
?To activate at the current speed/last
stored speed
ASetting the specified minimum distance
Activating DISTRONIC PLUS
Activation conditions
To activate DISTRONIC PLUS, all of the fol-
lowing activation conditions must be fulfilled:
R the engine must be started. It may take up
to two minutes after pulling away before
DISTRONIC PLUS is operational.
R the electric parking brake must bereleased.
R ESP ®
must be active, but not intervening.
R Active Parking Assist must not be activa-ted.
R the transmission must be in position D.
164Driving systems
Driving and parking
Page 169 of 346
Setting the specified minimum distance
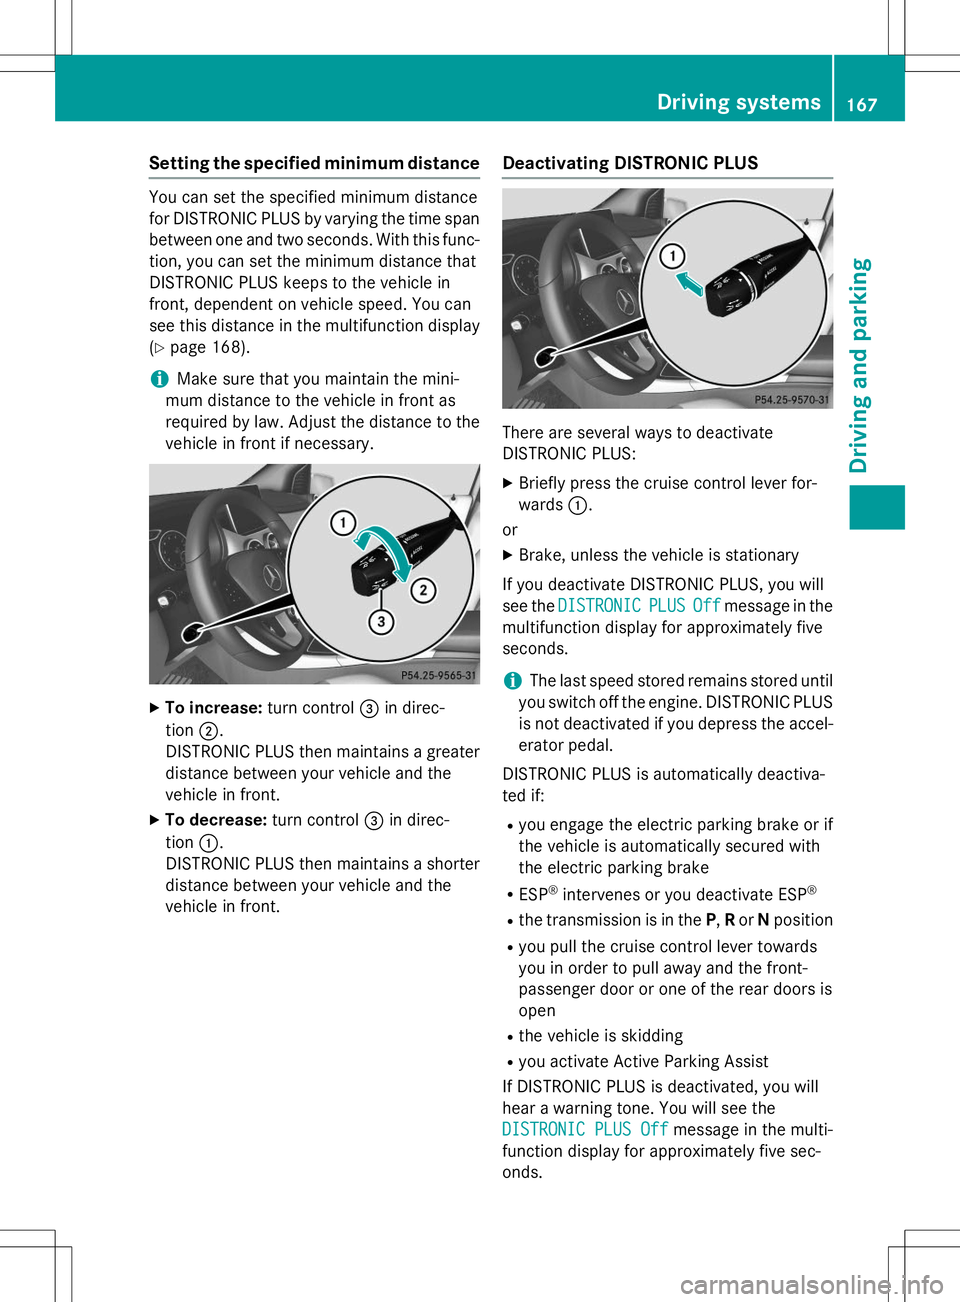
You can set the specified minimum distance
for DISTRONIC PLUS by varying the time span
between one and two seconds. With this func- tion, you can set the minimum distance that
DISTRONIC PLUS keeps to the vehicle in
front, dependent on vehicle speed. You can
see this distance in the multifunction display( Y page 168).
iMake sure that you maintain the mini-
mum distance to the vehicle in front as
required by law. Adjust the distance to the vehicle in front if necessary.
X To increase: turn control=in direc-
tion ;.
DISTRONIC PLUS then maintains a greater distance between your vehicle and the
vehicle in front.
X To decrease: turn control=in direc-
tion :.
DISTRONIC PLUS then maintains a shorter
distance between your vehicle and the
vehicle in front.
Deactivating DISTRONIC PLUS
There are several ways to deactivate
DISTRONIC PLUS:
X Briefly press the cruise control lever for-wards :.
or
X Brake, unless the vehicle is stationary
If you deactivate DISTRONIC PLUS, you will
see the
DISTRONICPLUSOffmessage in the
multifunction display for approximately five seconds.
iThe last speed stored remains stored until
you switch off the engine. DISTRONIC PLUS
is not deactivated if you depress the accel-
erator pedal.
DISTRONIC PLUS is automatically deactiva-
ted if: R you engage the electric parking brake or if
the vehicle is automatically secured with
the electric parking brake
R ESP ®
intervenes or you deactivate ESP ®
R the transmission is in the P,R or Nposition
R you pull the cruise control lever towards
you in order to pull away and the front-
passenger door or one of the rear doors isopen
R the vehicle is skidding
R you activate Active Parking Assist
If DISTRONIC PLUS is deactivated, you will
hear a warning tone. You will see the
DISTRONIC PLUS Offmessage in the multi-
function display for approximately five sec- onds.
Driving systems167
Driving and parking
Z
Page 170 of 346
DISTRONIC PLUS displays in the instru-
ment cluster
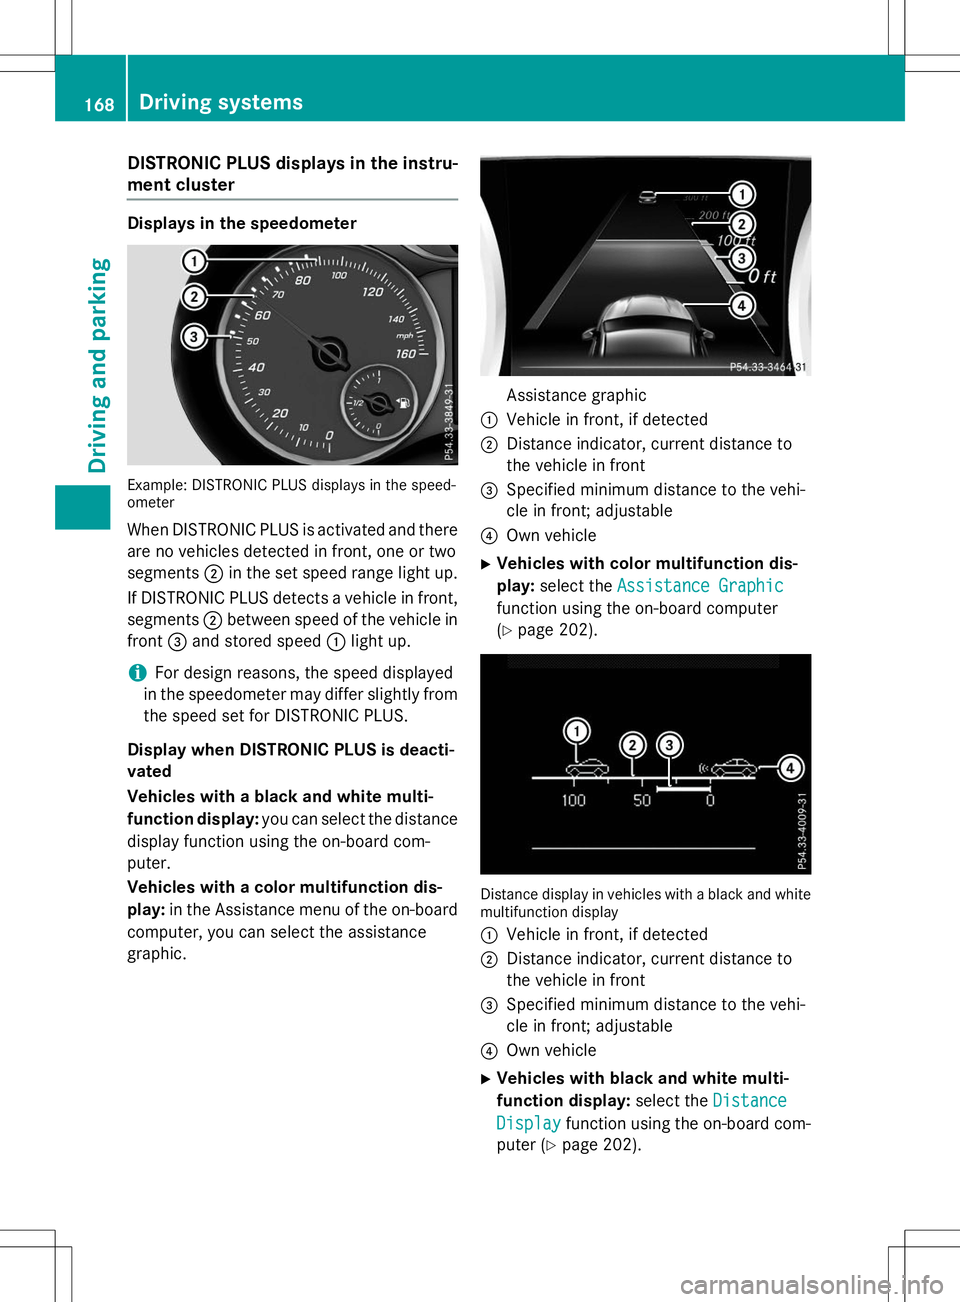
Displays in the speedometer
Example: DISTRONIC PLUS displays in the speed-
ometer
When DISTRONIC PLUS is activated and there
are no vehicles detected in front, one or two
segments ;in the set speed range light up.
If DISTRONIC PLUS detects a vehicle in front, segments ;between speed of the vehicle in
front =and stored speed :light up.
iFor design reasons, the speed displayed
in the speedometer may differ slightly from the speed set for DISTRONIC PLUS.
Display when DISTRONIC PLUS is deacti-
vated
Vehicles with a black and white multi-
function display: you can select the distance
display function using the on-board com-
puter.
Vehicles with a color multifunction dis-
play: in the Assistance menu of the on-board
computer, you can select the assistance
graphic.
Assistance graphic
:Vehicle in front, if detected
;Distance indicator, current distance to
the vehicle in front
=Specified minimum distance to the vehi-
cle in front; adjustable
?Own vehicle
X Vehicles with color multifunction dis-
play: select the
Assistance Graphic
function using the on-board computer (Y page 202).
Distance display in vehicles with a black and white
multifunction display :
Vehicle in front, if detected
;Distance indicator, current distance to
the vehicle in front
=Specified minimum distance to the vehi-
cle in front; adjustable
?Own vehicle
X Vehicles with black and white multi-
function display: select the
Distance
Displayfunction using the on-board com-
puter ( Ypage 202).
168Driving syste ms
Driving and parking