2015 MERCEDES-BENZ B-CLASS SPORTS manual transmission
[x] Cancel search: manual transmissionPage 151 of 346
Shift recommendation
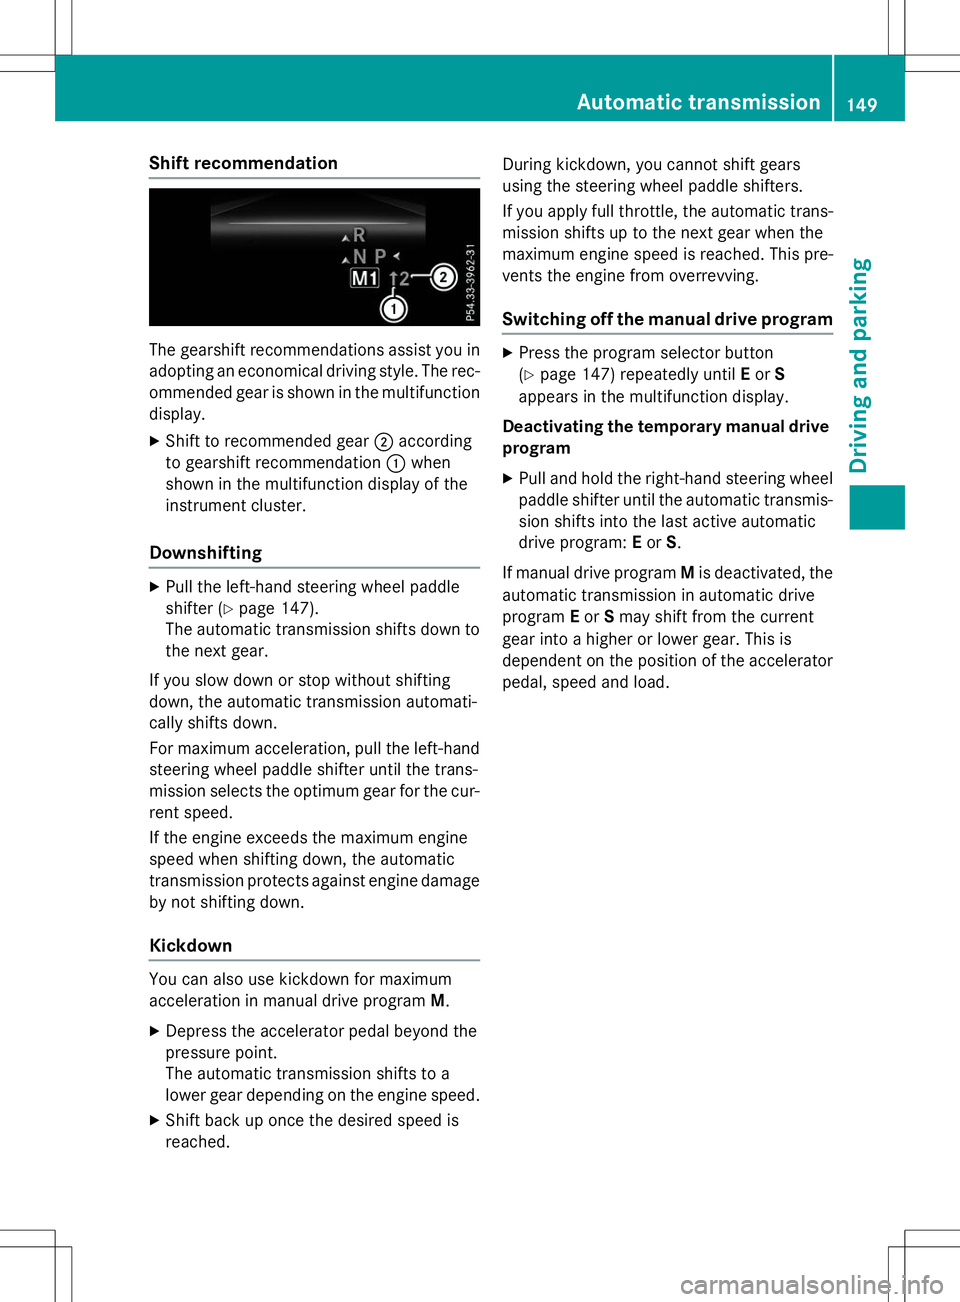
The gearshift recommendations assist you inadopting an economical driving style. The rec-
ommended gear is shown in the multifunction display.
X Shift to recommended gear ;according
to gearshift recommendation :when
shown in the multifunction display of the
instrument cluster.
Downshifting
X Pull the left-hand steering wheel paddle
shifter ( Ypage 147).
The automatic transmission shifts down to
the next gear.
If you slow down or stop without shifting
down, the automatic transmission automati-
cally shifts down.
For maximum acceleration, pull the left-hand
steering wheel paddle shifter until the trans-
mission selects the optimum gear for the cur- rent speed.
If the engine exceeds the maximum engine
speed when shifting down, the automatic
transmission protects against engine damage
by not shifting down.
Kickdown
You can also use kickdown for maximum
acceleration in manual drive program M.
X Depress the accelerator pedal beyond the
pressure point.
The automatic transmission shifts to a
lower gear depending on the engine speed.
X Shift back up once the desired speed isreached. During kickdown, you cannot shift gears
using the steering wheel paddle shifters.
If you apply full throttle, the automatic trans-
mission shifts up to the next gear when the
maximum engine speed is reached. This pre-
vents the engine from overrevving.
Switching off the manual drive program
X Press the program selector button (Y page 147) repeatedly until Eor S
appears in the multifunction display.
Deactivating the temporary manual drive program
X Pull and hold the right-hand steering wheel
paddle shifter until the automatic transmis- sion shifts into the last active automatic
drive program: Eor S.
If manual drive program Mis deactivated, the
automatic transmission in automatic driveprogram Eor Smay shift from the current
gear into a higher or lower gear. This is
dependent on the position of the accelerator
pedal, speed and load.
Automatic transmission149
Driving and parking
Z
Page 156 of 346
When leaving the vehicle, always take the
SmartKey with you and lock the vehicle. Neverleave children unsupervised in the vehicle.
The function of the electric parking brake is
dependent on the on-board voltage. If the on-
board voltage is low or there is a malfunction
in the system, it may not be possible to apply the released parking brake.
X If this is the case, only park the vehicle on
level ground and secure it to prevent it roll-
ing away.
X Shift the automatic transmission to posi-tion P.
It may not be possible to release an applied
parking brake if the on-board voltage is low or there is a malfunction in the system. Contact
a qualified specialist workshop.
The electric parking brake performs a func-
tion test at regular intervals while the engine is switched off. The sounds that can be heard
while this is occurring are normal.
Applying/releasing manually
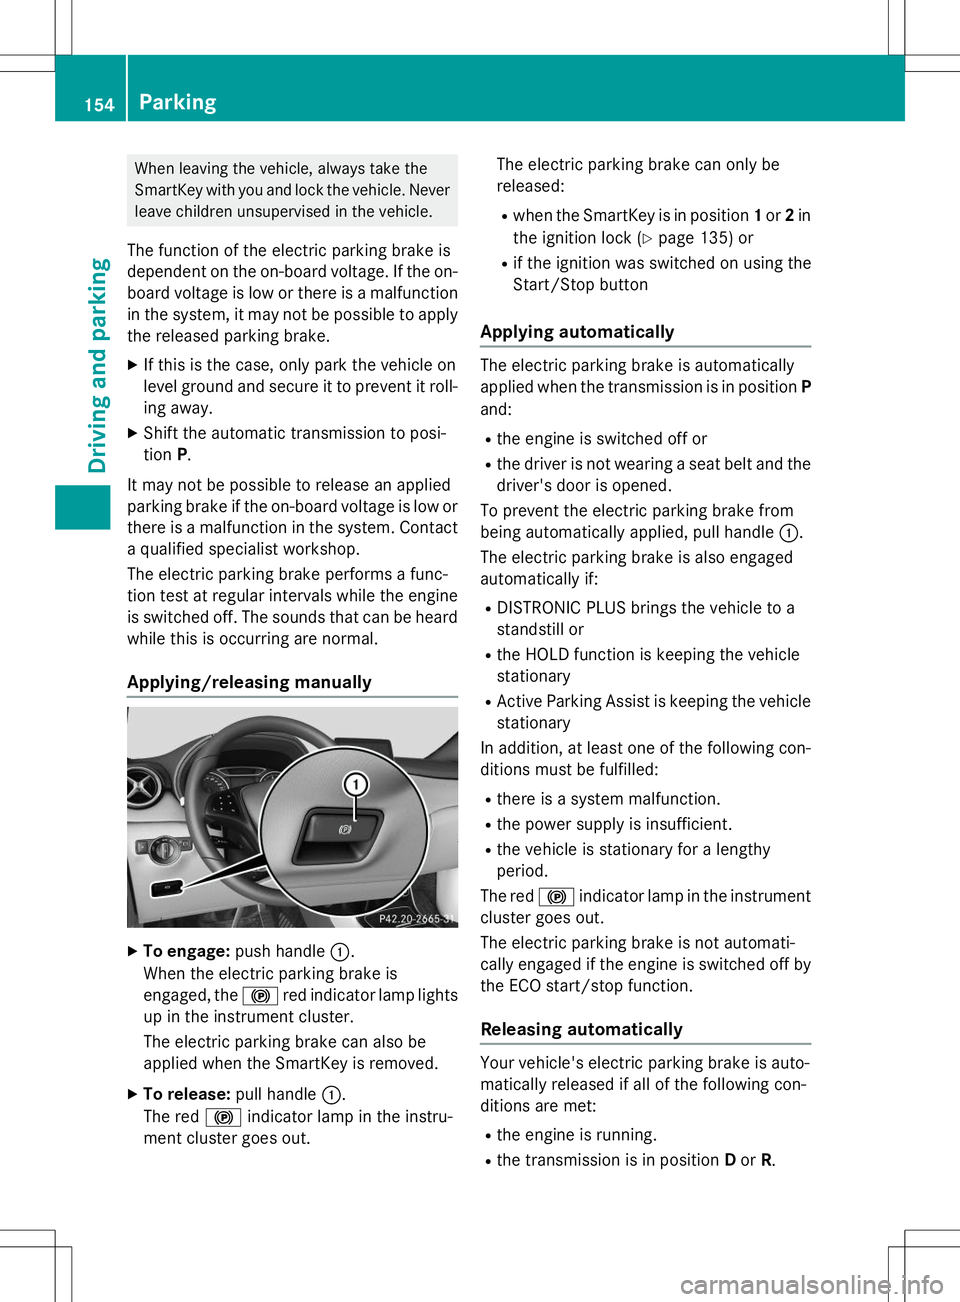
X To engage: push handle :.
When the electric parking brake is
engaged, the !red indicator lamp lights
up in the instrument cluster.
The electric parking brake can also be
applied when the SmartKey is removed.
X To release: pull handle:.
The red !indicator lamp in the instru-
ment cluster goes out. The electric parking brake can only bereleased:
R when the SmartKey is in position 1or 2in
the ignition lock ( Ypage 135) or
R if the ignition was switched on using the
Start/Stop button
Applying automatically
The electric parking brake is automatically
applied when the transmission is in position P
and:
R the engine is switched off or
R the driver is not wearing a seat belt and the
driver's door is opened.
To prevent the electric parking brake from
being automatically applied, pull handle :.
The electric parking brake is also engaged
automatically if:
R DISTRONIC PLUS brings the vehicle to a
standstill or
R the HOLD function is keeping the vehicle
stationary
R Active Parking Assist is keeping the vehicle
stationary
In addition, at least one of the following con-
ditions must be fulfilled:
R there is a system malfunction.
R the power supply is insufficient.
R the vehicle is stationary for a lengthyperiod.
The red !indicator lamp in the instrument
cluster goes out.
The electric parking brake is not automati-
cally engaged if the engine is switched off by the ECO start/stop function.
Releasing automatically
Your vehicle's electric parking brake is auto-
matically released if all of the following con-
ditions are met:
R the engine is running.
R the transmission is in position Dor R.
154Parking
Driving and parking
Page 159 of 346
Apart from driving style, consumption is
dependent on many factors such as, e.g.: Rload
R tire pressure
R cold start
R choice of route
R electrical consumers switched on
These factors are not included in the ECO dis-
play.
The evaluation of your driving style is carried
out using the following three categories:
R
Acceleration(evaluation of all accelera-
tion processes):
- The bar fills up: moderate acceleration,
especially at higher speeds
- The bar empties: sporty acceleration
R
Constant(assessment of driving behavior
at all times)
- The bar fills up: constant speed and
avoidance of unnecessary acceleration
and deceleration
- The bar empties: fluctuations in speed
R
Coasting(assessment of all deceleration
processes) - The bar fills up: anticipatory driving,
keeping your distance and early release
of the accelerator. The vehicle can coast
without use of the brakes.
- The bar empties: frequent braking
An economical driving style specially requires
driving at moderate engine speeds.
To achieve a higher value in the categories
AccelerationandConstant:
R observe the gearshift recommendations.
R drive in drive program E.
On long journeys at a constant speed, e.g. on
the highway, only the bar for
Constantwill
change.
The ECO display summarizes the driving char- acteristics from the start of the journey to its completion. For this reason, the bars change
dynamically at the beginning of the journey.
On longer journeys, there are fewer changes. For more dynamic changes, carry out a man-
ual reset.
For further information on the ECO display,
see ( Ypage 196).
Braking
Important safety notes
GWARNING
If you shift down on a slippery road surface in an attempt to increase the engine's braking
effect, the drive wheels could lose their grip.
There is an increased danger of skidding and
accidents.
Do not shift down for additional engine brak-
ing on a slippery road surface.
Downhill gradients
!On long and steep gradients, you must
reduce the load on the brakes by shifting to
a lower gear in good time. This allows you to
take advantage of the engine's braking
effect. For this, you need to have selected
manual drive program M. This helps you to
avoid overheating the brakes and wearing
them out excessively.
When you take advantage of the engine's
braking effect, a drive wheel may not turn
for some time, e.g. on a slippery road sur-
face. This could cause damage to the drive train. This type of damage is not covered bythe Mercedes-Benz warranty.
Briefly depressing the accelerator pedal on
downhill gradients while the manual drive
program Mis temporarily activated: the auto-
matic transmission may switch to the last
active automatic drive program Eor S. The
automatic transmission may shift to a higher
gear. This can reduce the engine's braking
effect.
Driving tips157
Driving an d parking
Z
Page 163 of 346
You should pay special attention to road con-
ditions when temperatures are around freez-
ing point.
For more information on driving with snow
chains, see ( Ypage 305).
For more information on driving with summer tires, see ( Ypage 304).
Observe the notes in the "Winter operation"
section ( Ypage 304).
Driving systems
Cruise control
General notes
Cruise control maintains a constant road
speed for you. It brakes automatically in order
to avoid exceeding the set speed. On long and
steep downhill gradients, especially if the
vehicle is laden, you must select a low gear in good time. For this, you will need to have
selected manual drive program M
( Y page 148). By doing so, you will make use
of the braking effect of the engine. This
relieves the load on the brake system and
prevents the brakes from overheating and
wearing too quickly.
Use cruise control only if road and traffic con- ditions make it appropriate to maintain a
steady speed for a prolonged period. You canstore any road speed above 20 mph
(30 km/h).
The speed indicated in the speedometer may differ slightly from the speed stored.
Important safety notes
If you fail to adapt your driving style, cruise
control can neither reduce the risk of an acci- dent nor override the laws of physics. Cruise
control cannot take into account the road,
traffic and weather conditions. Cruise control
is only an aid. You are responsible for the dis-
tance to the vehicle in front, for vehicle speed, for braking in good time and for staying in
your lane. Do not use cruise control: R
in road and traffic conditions which do not
allow you to maintain a constant speed e.g.
in heavy traffic or on winding roads
R on slippery road surfaces. Braking or accel-
erating could cause the drive wheels to lose
traction and the vehicle could then skid
R when there is poor visibility, e.g. due to fog,
heavy rain or snow
If there is a change of drivers, advise the new
driver of the speed stored.
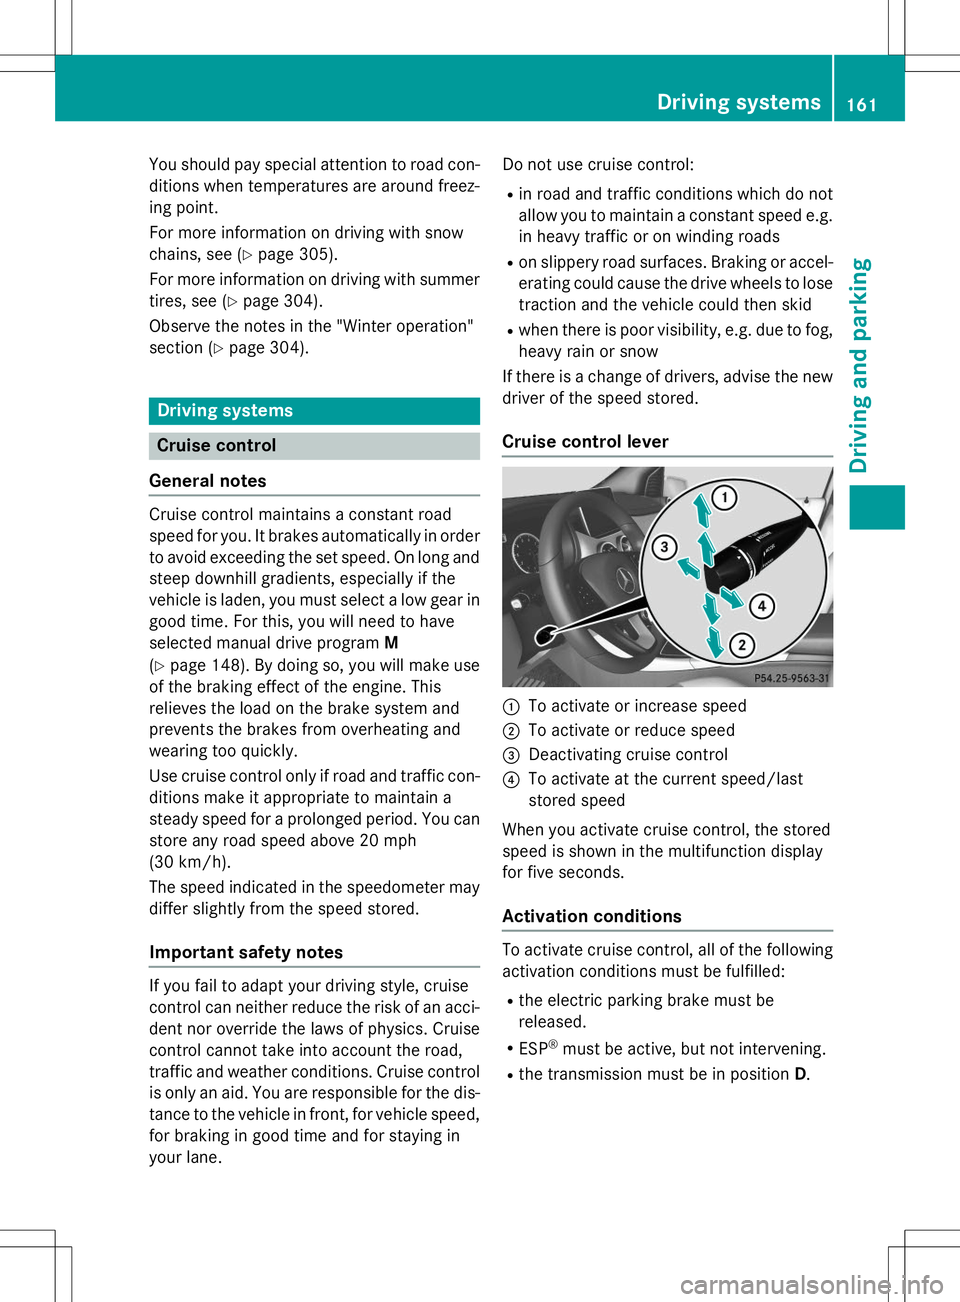
Cruise control lever
:To activate or increase speed
;To activate or reduce speed
=Deactivating cruise control
?To activate at the current speed/last
stored speed
When you activate cruise control, the stored
speed is shown in the multifunction display
for five seconds.
Activation conditions
To activate cruise control, all of the following activation conditions must be fulfilled:
R the electric parking brake must be released.
R ESP ®
must be active, but not intervening.
R the transmission must be in position D.
Driving systems161
Driving and parking
Z
Page 197 of 346
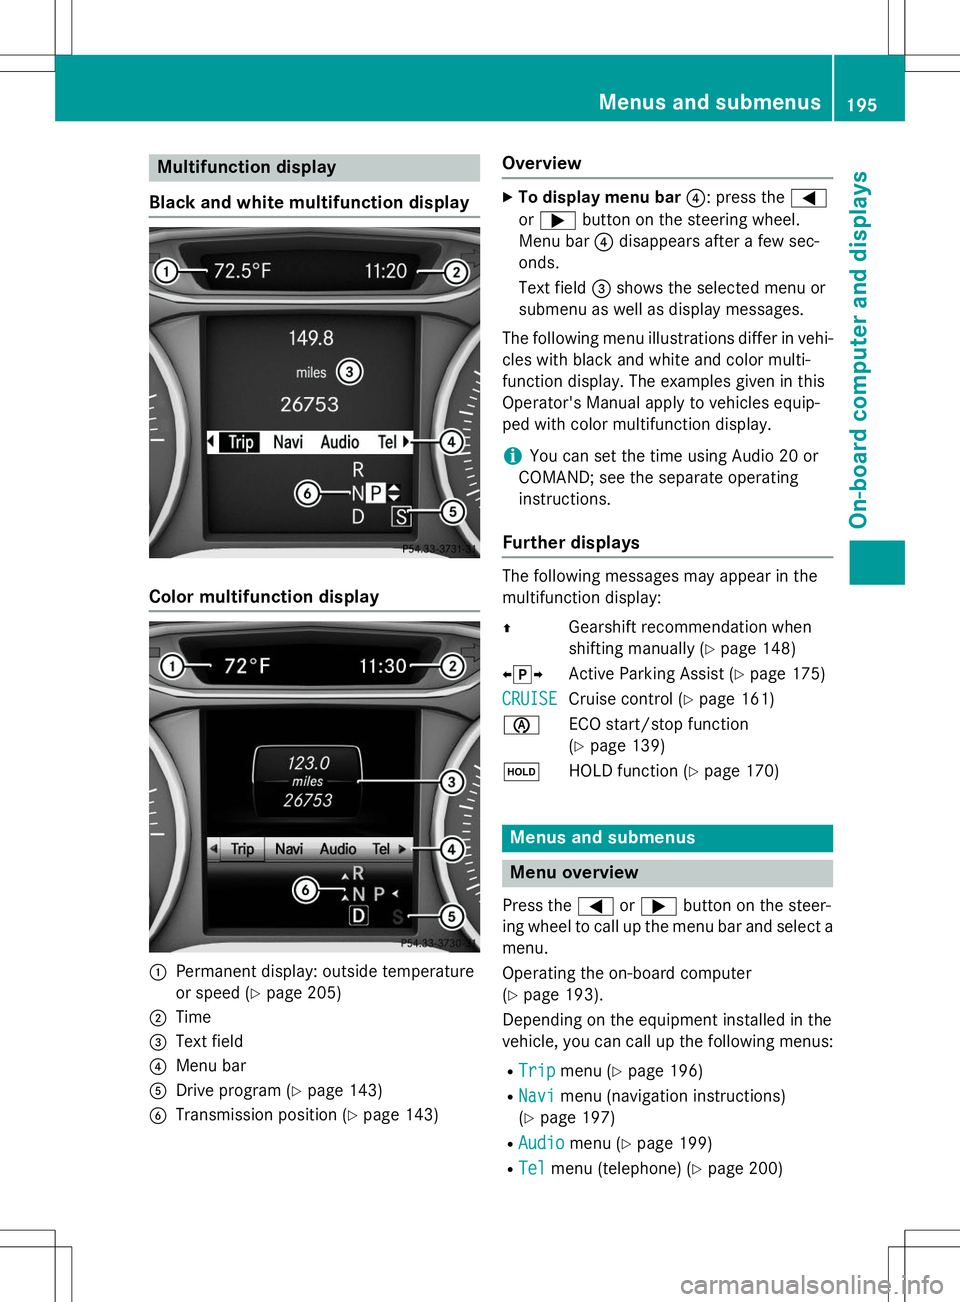
Multifunction display
Black and white multifunction display
Color multifunction display
:Permanent display: outside temperature
or speed ( Ypage 205)
;Time
=Text field
?Menu bar
ADrive program ( Ypage 143)
BTransmission position ( Ypage 143)
Overview
X
To display menu bar ?: press the =
or ; button on the steering wheel.
Menu bar ?disappears after a few sec-
onds.
Text field =shows the selected menu or
submenu as well as display messages.
The following menu illustrations differ in vehi- cles with black and white and color multi-
function display. The examples given in this
Operator's Manual apply to vehicles equip-
ped with color multifunction display.
iYou can set the time using Audio 20 or
COMAND; see the separate operating instructions.
Further displays
The following messages may appear in the
multifunction display: Z Gearshift recommendation when
shifting manually ( Ypage 148)
X j Y
Active Parking Assist ( Ypage 175)
CRUISECruise control ( Ypage 161)
è ECO start/stop function (Y page 139)
ë HOLD function ( Ypage 170)
Menus and submenus
Menu overview
Press the =or; button on the steer-
ing wheel to call up the menu bar and select a
menu.
Operating the on-board computer ( Y page 193).
Depending on the equipment installed in the
vehicle, you can call up the following menus:
R
Tripmenu ( Ypage 196)
R
Navimenu (navigation instructions)
( Y page 197)
R
Audiomenu ( Ypage 199)
R
Telmenu (telephone) ( Ypage 200)
Menus and submenus195
On-board computer and displays
Z
Page 293 of 346
Otherwise, the vehicle's electronic sys-
tem may be damaged.
R in vehicles with automatic transmission,
the transmission is locked in position P
after disconnecting the battery. The vehi-
cle is secured against rolling away. You
can then no longer move the vehicle.
The battery and the cover of the positive
terminal clamp must be installed securely
during operation.
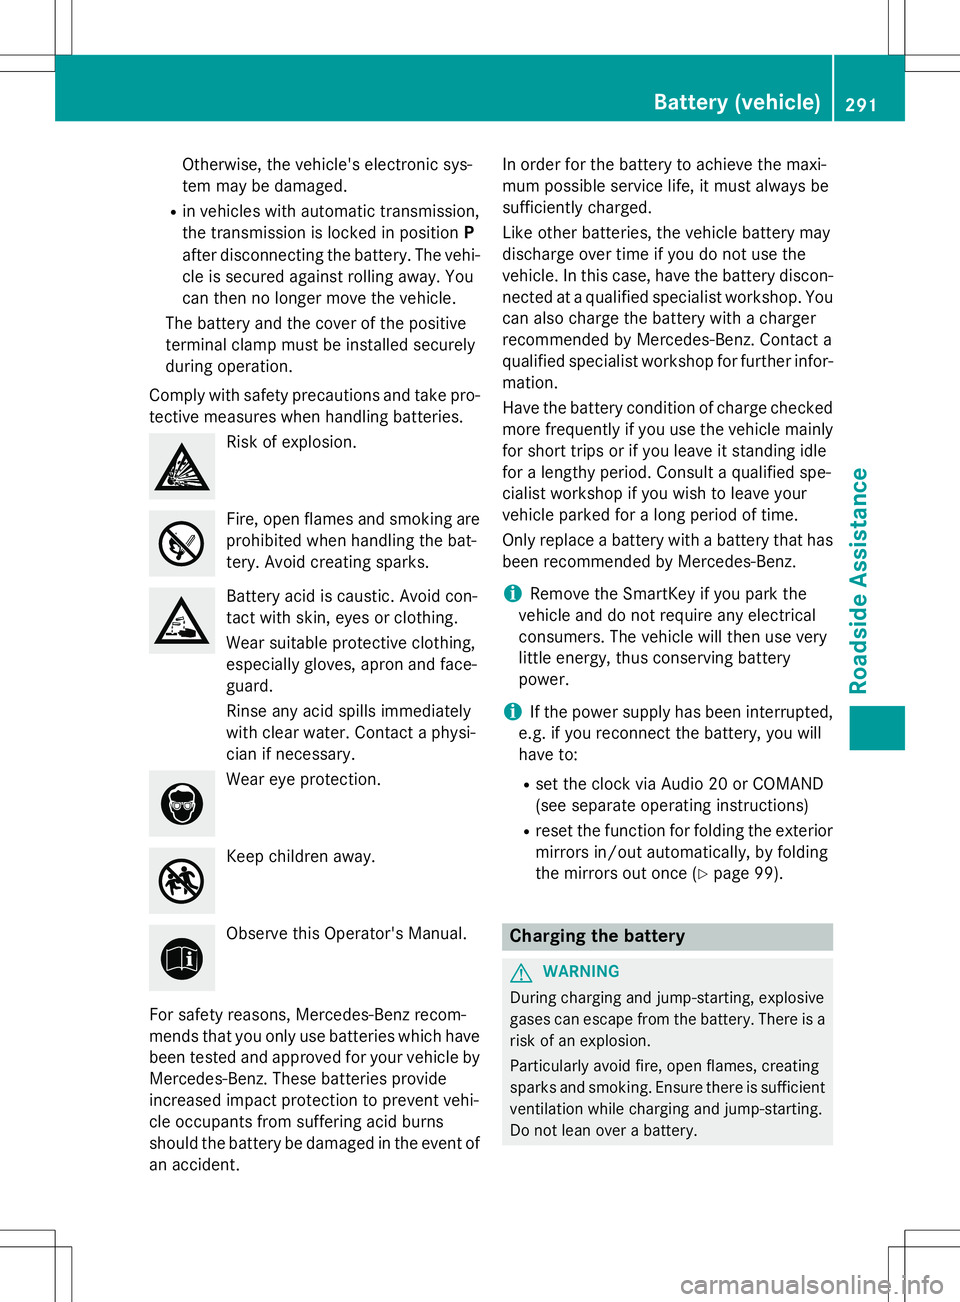
Comply with safety precautions and take pro-
tective measures when handling batteries.
Risk of explosion.
Fire, open flames and smoking are
prohibited when handling the bat-
tery. Avoid creating sparks.
Battery acid is caustic. Avoid con-
tact with skin, eyes or clothing.
Wear suitable protective clothing,
especially gloves, apron and face-guard.
Rinse any acid spills immediately
with clear water. Contact a physi-
cian if necessary.
Wear eye protection.
Keep children away.
Observe this Operator's Manual.
For safety reasons, Mercedes-Benz recom-
mends that you only use batteries which have been tested and approved for your vehicle by
Mercedes-Benz. These batteries provide
increased impact protection to prevent vehi-
cle occupants from suffering acid burns
should the battery be damaged in the event of
an accident. In order for the battery to achieve the maxi-
mum possible service life, it must always be
sufficiently charged.
Like other batteries, the vehicle battery may
discharge over time if you do not use the
vehicle. In this case, have the battery discon-
nected at a qualified specialist workshop. You
can also charge the battery with a charger
recommended by Mercedes-Benz. Contact a
qualified specialist workshop for further infor- mation.
Have the battery condition of charge checked
more frequently if you use the vehicle mainly
for short trips or if you leave it standing idle
for a lengthy period. Consult a qualified spe-
cialist workshop if you wish to leave your
vehicle parked for a long period of time.
Only replace a battery with a battery that has been recommended by Mercedes-Benz.
iRemove the SmartKey if you park the
vehicle and do not require any electrical
consumers. The vehicle will then use very
little energy, thus conserving batterypower.
iIf the power supply has been interrupted,
e.g. if you reconnect the battery, you will
have to: R set the clock via Audio 20 or COMAND
(see separate operating instructions)
R reset the function for folding the exterior
mirrors in/out automatically, by folding
the mirrors out once ( Ypage 99).
Charging the battery
GWARNING
During charging and jump-starting, explosive
gases can escape from the battery. There is a
risk of an explosion.
Particularly avoid fire, open flames, creating
sparks and smoking. Ensure there is sufficient
ventilation while charging and jump-starting.
Do not lean over a battery.
Battery (vehicle)291
Roadside Assistance
Z
Page 324 of 346
Occupant distribution
The distribution of occupants in a vehicle at
their designated seating positions.
Total load limit
Nominal load and luggage load plus 68 kg
(150 lbs) multiplied by the number of seats inthe vehicle.
Changing a wheel
Flat tire
The "Breakdown assistance" section ( Y page 284) contains information and notes
on how to deal with a flat tire. Information on driving with MOExtended tires in the event of
a flat tire can be found under "MOExtended
tires (tires with run-flat characteristics"( Y page 285).
Rotating the wheels
GWARNING
Interchanging the front and rear wheels may
severely impair the driving characteristics if
the wheels or tires have different dimensions.
The wheel brakes or suspension components
may also be damaged. There is a risk of acci-
dent.
Rotate front and rear wheels only if the wheels and tires are of the same dimensions.
Observe the instructions and safety notes in
the "Changing a wheel" section ( Ypage 322).
The wear patterns on the front and rear tires
differ, depending on the operating conditions. Rotate the wheels before a clear wear patternhas formed on the tires. Front tires typically
wear more on the shoulders and the rear tires
in the center.
If your vehicle's tire configuration allows, you can rotate the wheels according to the inter-
vals in the tire manufacturer's warranty book
in your vehicle documents. If no warranty
book is available, the tires should be rotated every 3,000 to 6,000 miles (5,000 to
10,000 km), or earlier if tire wear requires.
Ensure the direction of rotation is maintained.
Clean the contact surfaces of the wheel and
the brake disc thoroughly every time a wheel
is rotated. Check the tire pressure and, if nec-
essary, restart the tire pressure loss warning system.
Direction of rotation
Tires with a specified direction of rotation
have additional benefits, e.g. if there is a risk of hydroplaning. These advantages can only
be gained if the tires are installed correspond-
ing to the direction of rotation.
An arrow on the sidewall of the tire indicates its correct direction of rotation.
Storing wheels
Store wheels that are not being used in a cool,dry and preferably dark place. Protect the
tires from oil, grease, gasoline and diesel.
Mounting a wheel
Preparing the vehicle
X Stop the vehicle on solid, non-slippery and
level ground.
X Apply the electric parking brake manually.
X Bring the front wheels into the straight-
ahead position.
X Shift the transmission to position P.
X Switch off the engine.
X Vehicles without KEYLESS-GO: remove
the SmartKey from the ignition lock.
X Vehicles with KEYLESS-GO start-func-
tion or KEYLESS-GO: open the driver's
door.
The on-board electronics now have status0 . This is the same as the SmartKey having
been removed.
322Changing a wheel
Wheels and tires
Page 337 of 346
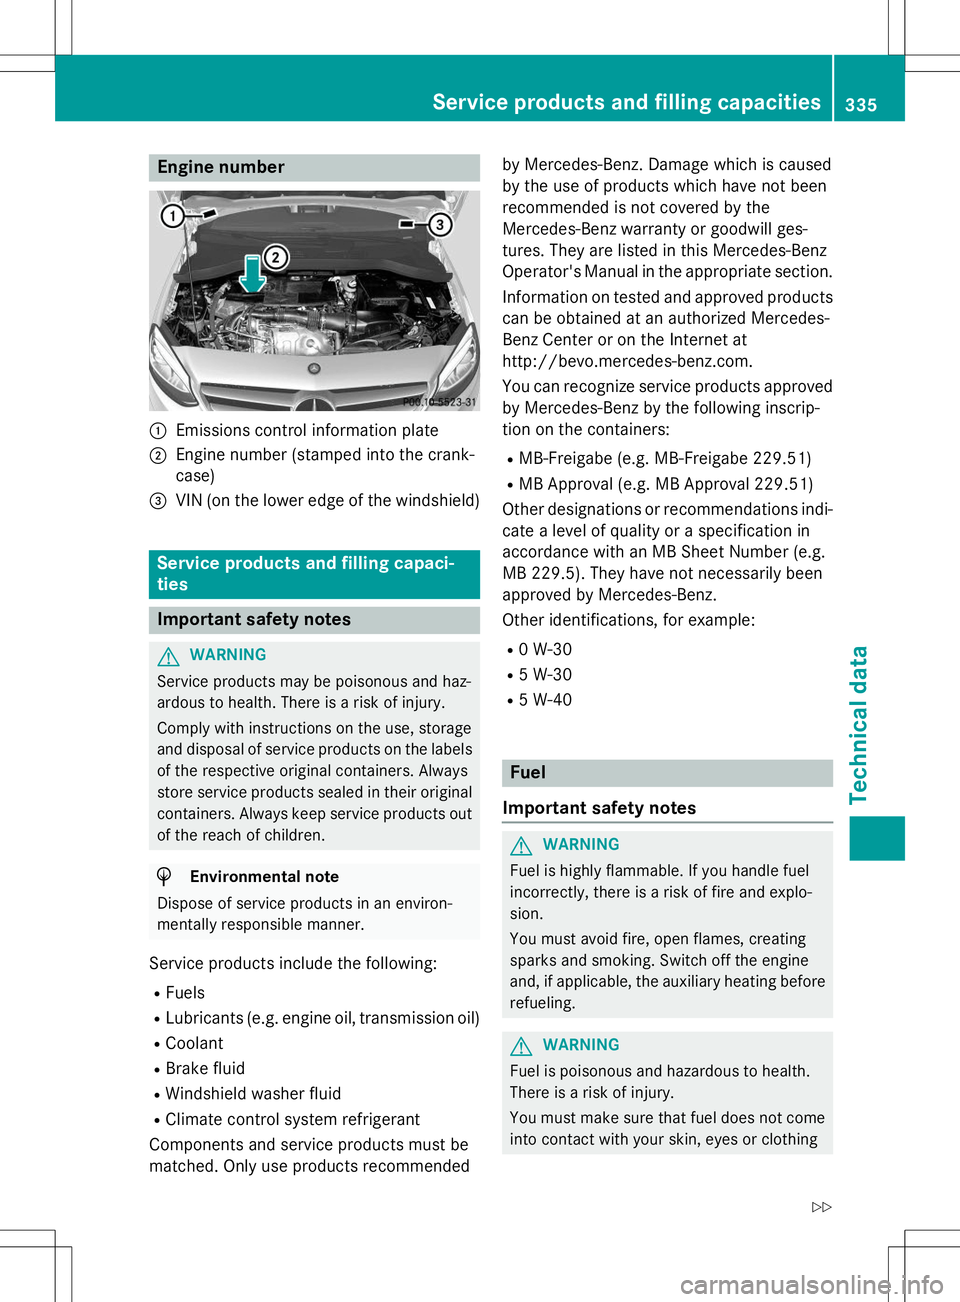
Engine number
:Emissions control information plate
;Engine number (stamped into the crank-
case)
=VIN (on the lower edge of the windshield)
Service products and filling capaci- ties
Important safety notes
GWARNING
Service products may be poisonous and haz-
ardous to health. There is a risk of injury.
Comply with instructions on the use, storage
and disposal of service products on the labelsof the respective original containers. Always
store service products sealed in their original containers. Always keep service products out
of the reach of children.
HEnvironmental note
Dispose of service products in an environ-
mentally responsible manner.
Service products include the following:
R Fuels
R Lubricants (e.g. engine oil, transmission oil)
R Coolant
R Brake fluid
R Windshield washer fluid
R Climate control system refrigerant
Components and service products must be
matched. Only use products recommended by Mercedes-Benz. Damage which is caused
by the use of products which have not been
recommended is not covered by the
Mercedes-Benz warranty or goodwill ges-
tures. They are listed in this Mercedes-Benz
Operator's Manual in the appropriate section.
Information on tested and approved products
can be obtained at an authorized Mercedes-
Benz Center or on the Internet at
http://bevo.mercedes-benz.com.
You can recognize service products approved
by Mercedes-Benz by the following inscrip-
tion on the containers:
R MB-Freigabe (e.g. MB-Freigabe 229.51)
R MB Approval (e.g. MB Approval 229.51)
Other designations or recommendations indi- cate a level of quality or a specification in
accordance with an MB Sheet Number (e.g.
MB 229.5). They have not necessarily been
approved by Mercedes-Benz.
Other identifications, for example:
R 0 W-30
R 5 W-30
R 5 W-40
Fuel
Important safety notes
GWARNING
Fuel is highly flammable. If you handle fuel
incorrectly, there is a risk of fire and explo-
sion.
You must avoid fire, open flames, creating
sparks and smoking. Switch off the engine
and, if applicable, the auxiliary heating before refueling.
GWARNING
Fuel is poisonous and hazardous to health.
There is a risk of injury.
You must make sure that fuel does not comeinto contact with your skin, eyes or clothing
Service products and filling capacities335
Technical data
Z