2015 MERCEDES-BENZ B-CLASS SPORTS bulb
[x] Cancel search: bulbPage 112 of 346
bulbs of the same type and the specified volt-
age.
Marks on the glass tube reduce the service
life of the bulbs. Do not touch the glass tube
with your bare hands. If necessary, clean the glass tube when cold with alcohol or spirit and
rub it off with a lint-free cloth.
Protect bulbs from moisture during opera-
tion. Do not allow bulbs to come into contact
with liquids.
Replace only the bulbs listed ( Ypage 110).
Have the bulbs that you cannot replace your-
self changed at a qualified specialist work- shop.
If you require assistance changing bulbs, con- sult a qualified specialist workshop.
If the new bulb still does not light up, consult
a qualified specialist workshop.
Bulbs and lamps are an important aspect of
vehicle safety. You must therefore make sure that these function correctly at all times.
Have the headlamp setting checked regularly.
Vehicles with LED headlamps: the light
clusters of your vehicle are equipped with
LED light bulbs. Do not replace the bulbs
yourself. Contact a qualified specialist work-
shop which has the necessary specialist
knowledge and tools to carry out the workrequired.
Overview: changing bulbs/bulb types
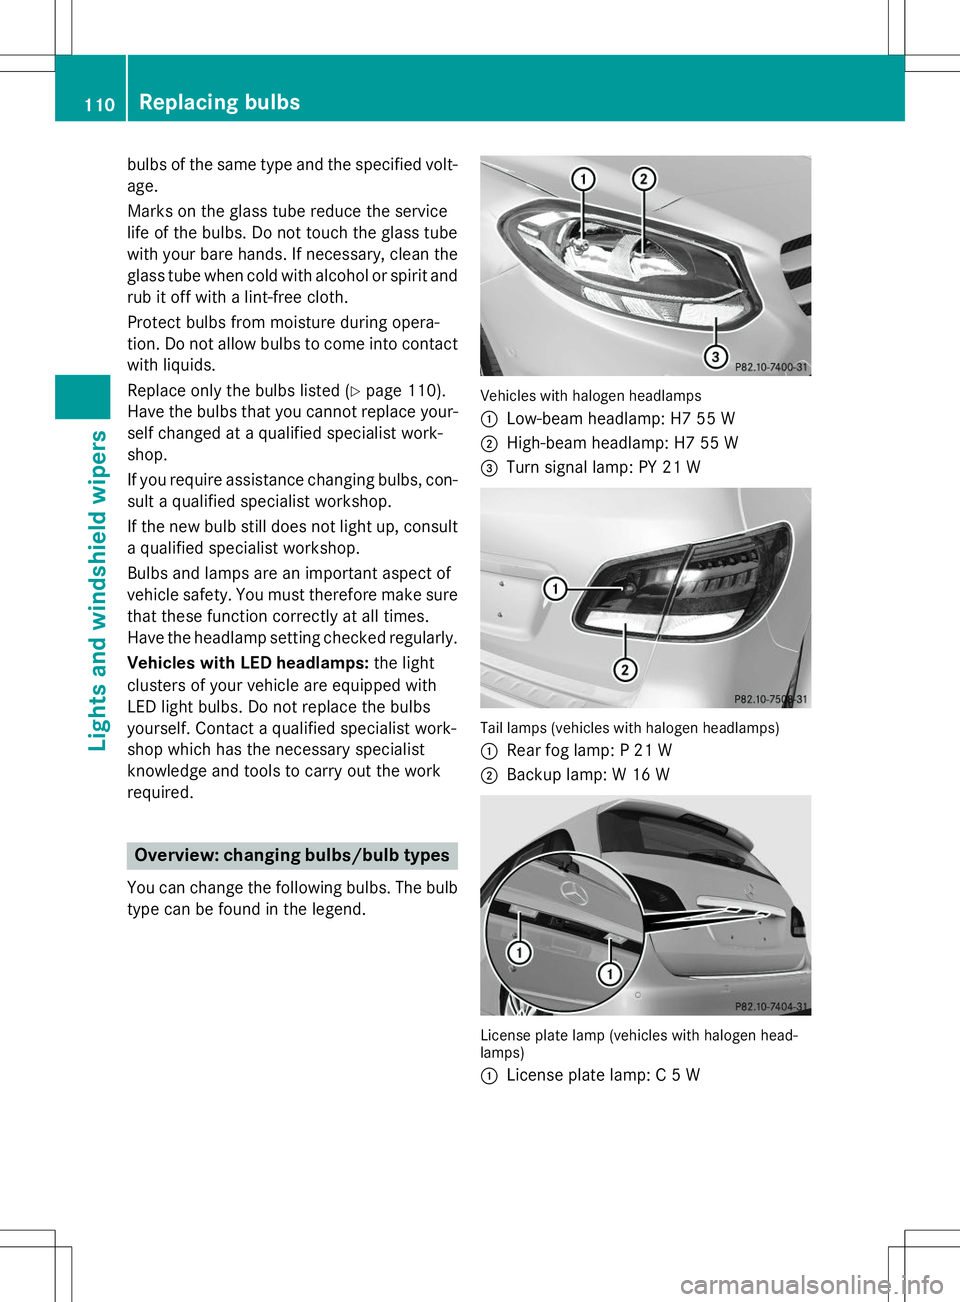
You can change the following bulbs. The bulb type can be found in the legend.
Vehicles with halogen headlamps :
Low-beam headlamp: H7 55 W
;High-beam headlamp: H7 55 W
=Turn signal lamp: PY 21 W
Tail lamps (vehicles with halogen headlamps) :
Rear fog lamp: P 21 W
;Backup lamp: W 16 W
License plate lamp (vehicles with halogen head- lamps) :
License plate lamp: C 5 W
110Replacing bulbs
Lights and windshield wipers
Page 113 of 346
Changing the front bulbs
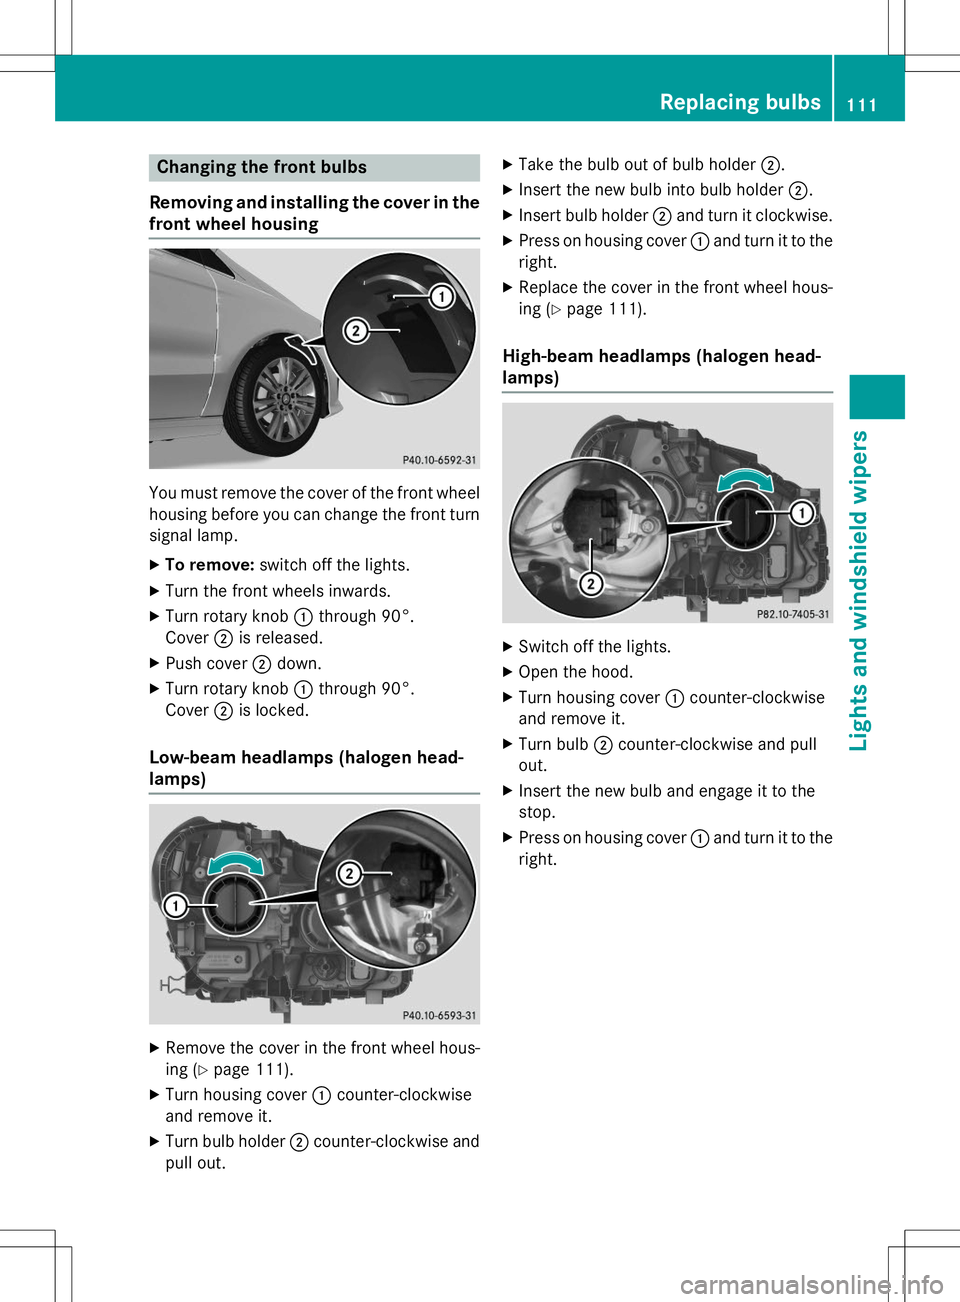
Removing and installing the cover in the
front wheel housing
You must remove the cover of the front wheel
housing before you can change the front turn signal lamp.
X To remove: switch off the lights.
X Turn the front wheels inwards.
X Turn rotary knob :through 90°.
Cover ;is released.
X Push cover ;down.
X Turn rotary knob :through 90°.
Cover ;is locked.
Low-beam headlamps (halogen head-
lamps)
X
Remove the cover in the front wheel hous-
ing ( Ypage 111).
X Turn housing cover :counter-clockwise
and remove it.
X Turn bulb holder ;counter-clockwise and
pull out. X
Take the bulb out of bulb holder ;.
X Insert the new bulb into bulb holder ;.
X Insert bulb holder ;and turn it clockwise.
X Press on housing cover :and turn it to the
right.
X Replace the cover in the front wheel hous-
ing ( Ypage 111).
High-beam headlamps (halogen head-
lamps)
X
Switch off the lights.
X Open the hood.
X Turn housing cover :counter-clockwise
and remove it.
X Turn bulb ;counter-clockwise and pull
out.
X Insert the new bulb and engage it to the
stop.
X Press on housing cover :and turn it to the
right.
Replacing bulbs111
Lights and windshield wipers
Z
Page 114 of 346
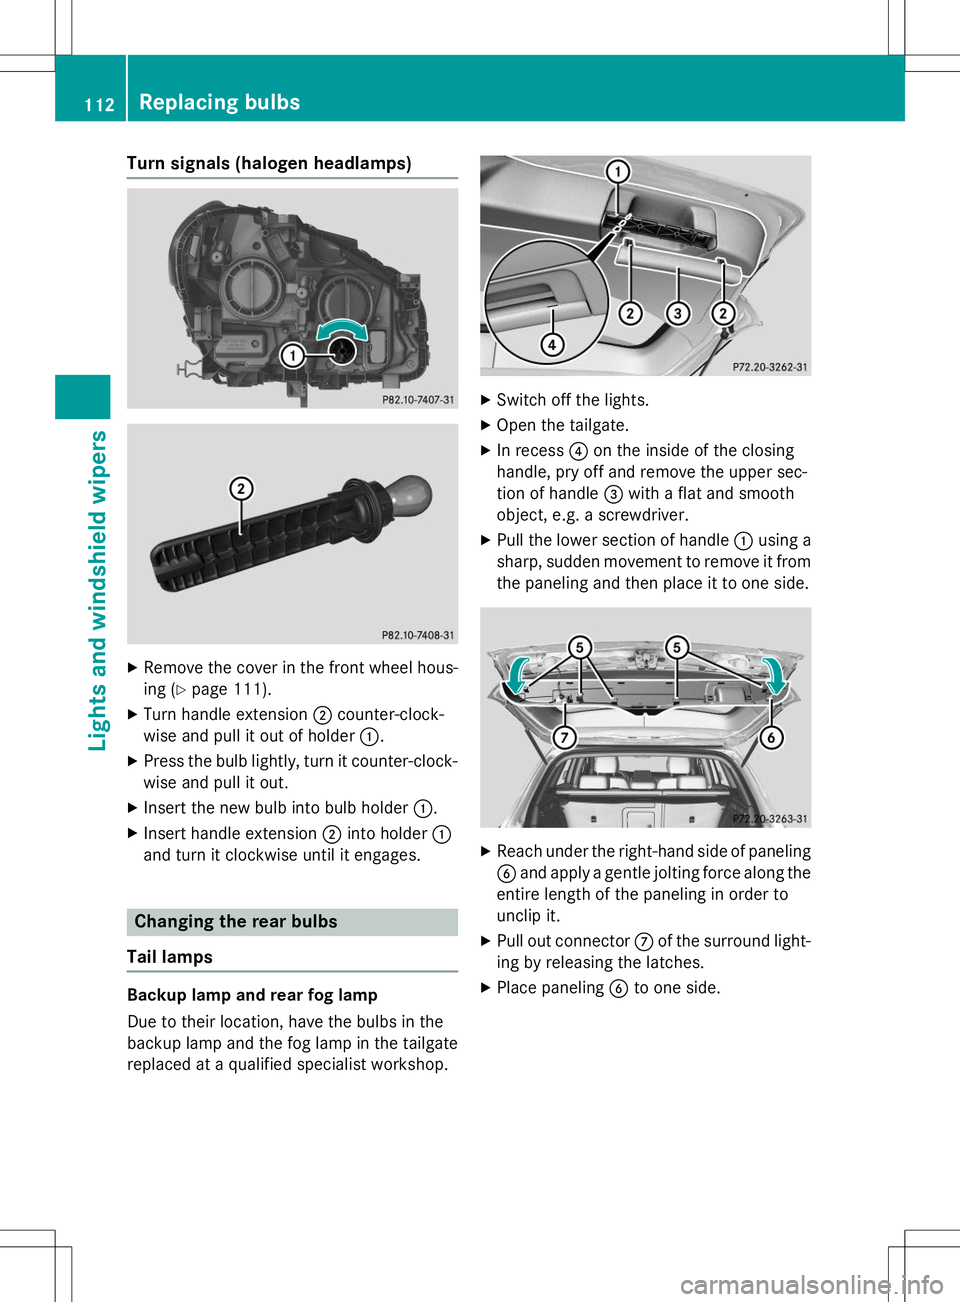
Turn signals (halogen headlamps)
XRemove the cover in the front wheel hous-
ing ( Ypage 111).
X Turn handle extension ;counter-clock-
wise and pull it out of holder :.
X Press the bulb lightly, turn it counter-clock-
wise and pull it out.
X Insert the new bulb into bulb holder :.
X Insert handle extension ;into holder :
and turn it clockwise until it engages.
Changing the rear bulbs
Tail lamps
Backup lamp and rear fog lamp
Due to their location, have the bulbs in the
backup lamp and the fog lamp in the tailgate replaced at a qualified specialist workshop.
X Switch off the lights.
X Open the tailgate.
X In recess ?on the inside of the closing
handle, pry off and remove the upper sec-
tion of handle =with a flat and smooth
object, e.g. a screwdriver.
X Pull the lower section of handle :using a
sharp, sudden movement to remove it from the paneling and then place it to one side.
X Reach under the right-hand side of paneling
B and apply a gentle jolting force along the
entire length of the paneling in order to
unclip it.
X Pull out connector Cof the surround light-
ing by releasing the latches.
X Place paneling Bto one side.
112Replacing bulbs
Lights and windshield wipers
Page 115 of 346
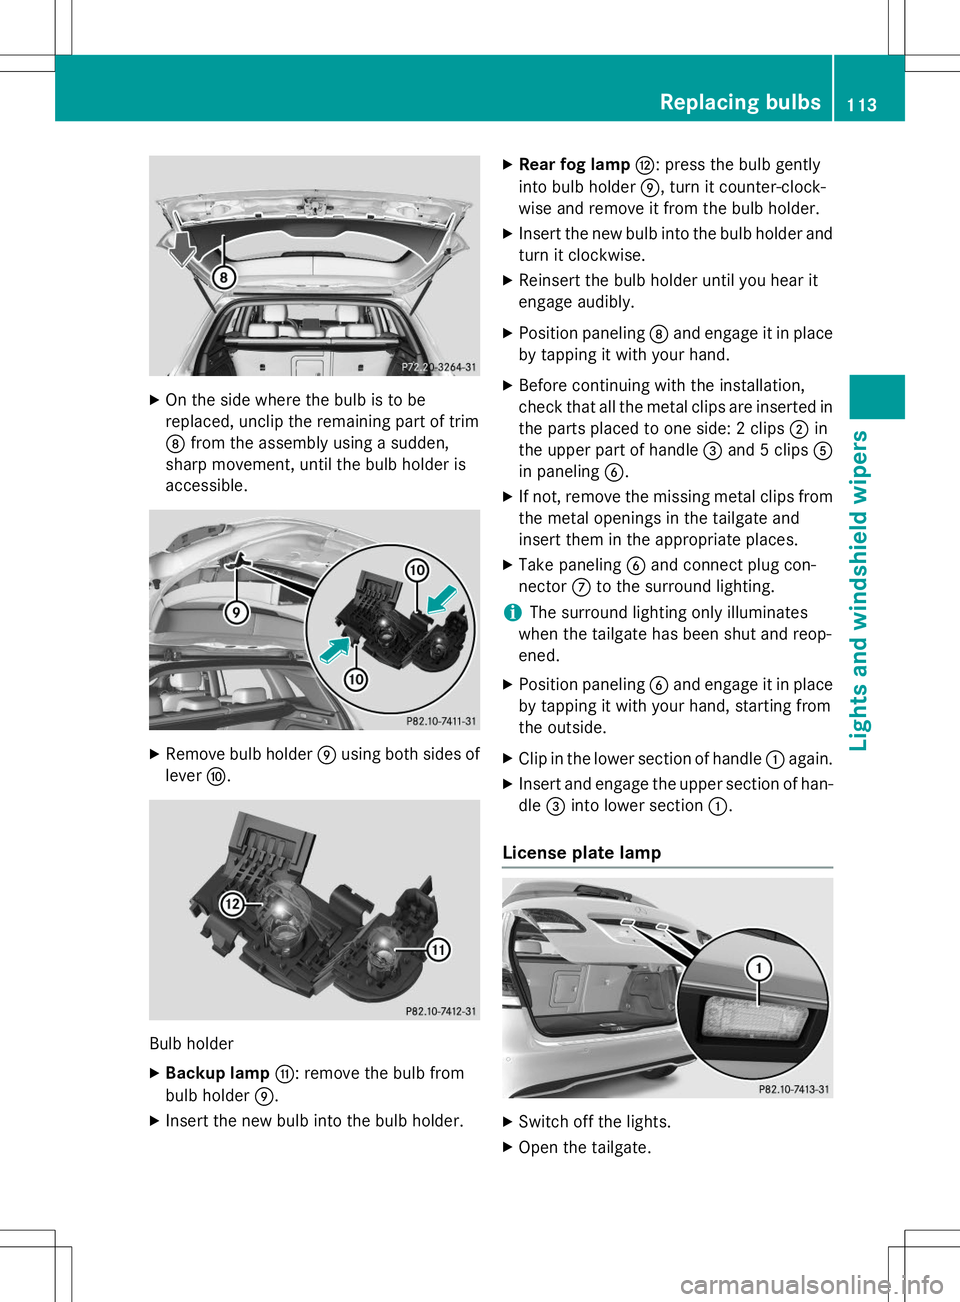
XOn the side where the bulb is to be
replaced, unclip the remaining part of trimD from the assembly using a sudden,
sharp movement, until the bulb holder isaccessible.
X Remove bulb holder Eusing both sides of
lever F.
Bulb holder
X Backup lamp G: remove the bulb from
bulb holder E.
X Insert the new bulb into the bulb holder. X
Rear fog lamp H: press the bulb gently
into bulb holder E, turn it counter-clock-
wise and remove it from the bulb holder.
X Insert the new bulb into the bulb holder and
turn it clockwise.
X Reinsert the bulb holder until you hear it
engage audibly.
X Position paneling Dand engage it in place
by tapping it with your hand.
X Before continuing with the installation,
check that all the metal clips are inserted in
the parts placed to one side: 2 clips ;in
the upper part of handle =and 5 clips A
in paneling B.
X If not, remove the missing metal clips from
the metal openings in the tailgate and
insert them in the appropriate places.
X Take paneling Band connect plug con-
nector Cto the surround lighting.
iThe surround lighting only illuminates
when the tailgate has been shut and reop- ened.
X Position paneling Band engage it in place
by tapping it with your hand, starting from
the outside.
X Clip in the lower section of handle :again.
X Insert and engage the upper section of han-dle =into lower section :.
License plate lamp
X
Switch off the lights.
X Open the tailgate.
Replacing bulbs113
Lights and windshield wipers
Z
Page 116 of 346
XApply a screwdriver to lamp lens :from
the outside.
X Lever out lamp lens :and remove it.
X Replace the bulb.
X Insert lamp lens :into the license plate
lamp and press it in until it engages.
Windshield wipers
Switching the windshield wipers
on/off
!
Do not operate the windshield wipers
when the windshield is dry, as this could
damage the wiper blades. Moreover, dust
that has collected on the windshield can
scratch the glass if wiping takes place when the windshield is dry.
If it is necessary to switch on the windshield wipers in dry weather conditions, always
use washer fluid when operating the wind-
shield wipers.
!If the windshield wipers leave smears on
the windshield after the vehicle has been
washed in an automatic car wash, wax or
other residues may be the reason for this.
Clean the windshield using washer fluid
after washing the vehicle in an automatic
car wash.
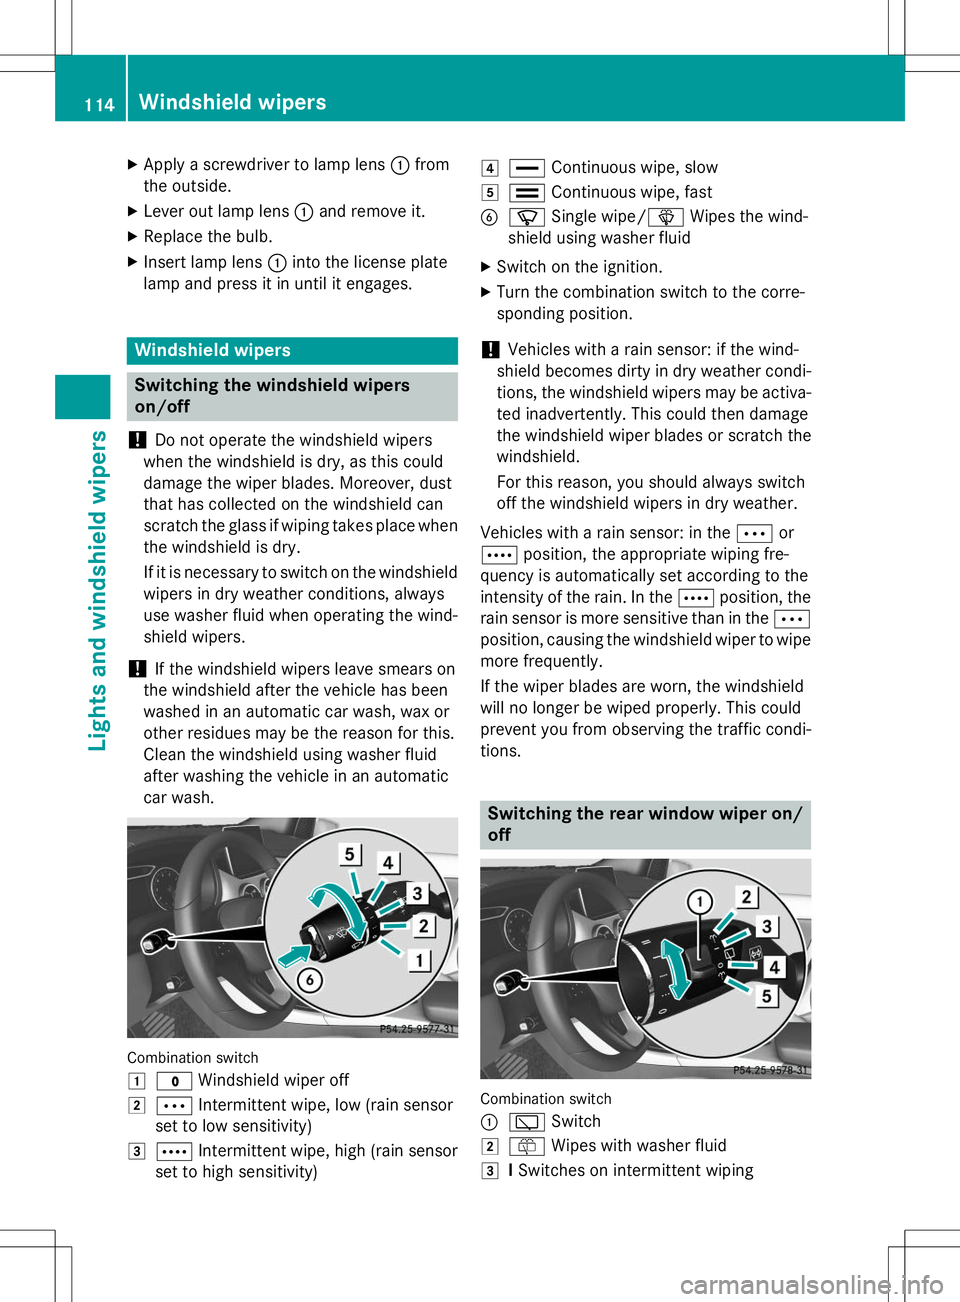
Combination switch 1
$ Windshield wiper off
2ÄIntermittent wipe, low (rain sensor
set to low sensitivity)
3Å Intermittent wipe, high (rain sensor
set to high sensitivity)
4° Continuous wipe, slow
5¯Continuous wipe, fast
BíSingle wipe/ îWipes the wind-
shield using washer fluid
X Switch on the ignition.
X Turn the combination switch to the corre-
sponding position.
!Vehicles with a rain sensor: if the wind-
shield becomes dirty in dry weather condi-
tions, the windshield wipers may be activa-
ted inadvertently. This could then damage
the windshield wiper blades or scratch the
windshield.
For this reason, you should always switch
off the windshield wipers in dry weather.
Vehicles with a rain sensor: in the Äor
Å position, the appropriate wiping fre-
quency is automatically set according to the
intensity of the rain. In the Åposition, the
rain sensor is more sensitive than in the Ä
position, causing the windshield wiper to wipe
more frequently.
If the wiper blades are worn, the windshield
will no longer be wiped properly. This could
prevent you from observing the traffic condi-
tions.
Switching the rear window wiper on/
off
Combination switch :
è Switch
2ôWipes with washer fluid
3ISwitches on intermittent wiping
114Windshield wipers
Lights and windshield wipers
Page 182 of 346
Rear view camera
General notes
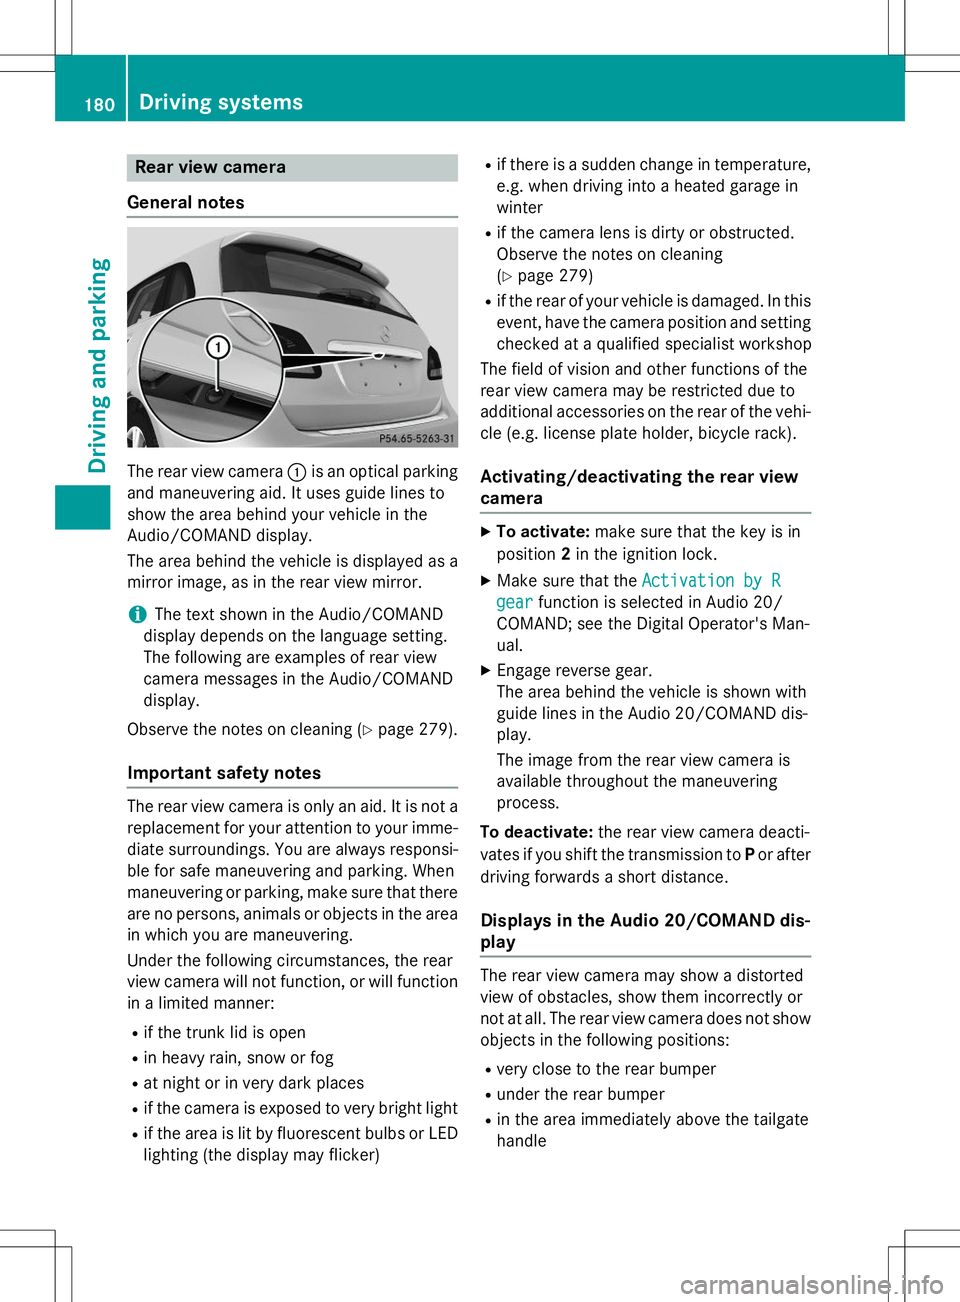
The rear view camera :is an optical parking
and maneuvering aid. It uses guide lines to
show the area behind your vehicle in the
Audio/COMAND display.
The area behind the vehicle is displayed as a
mirror image, as in the rear view mirror.
iThe text shown in the Audio/COMAND
display depends on the language setting.
The following are examples of rear view
camera messages in the Audio/COMAND
display.
Observe the notes on cleaning ( Ypage 279).
Important safety notes
The rear view camera is only an aid. It is not a
replacement for your attention to your imme-
diate surroundings. You are always responsi- ble for safe maneuvering and parking. When
maneuvering or parking, make sure that there
are no persons, animals or objects in the area in which you are maneuvering.
Under the following circumstances, the rear
view camera will not function, or will function
in a limited manner:
R if the trunk lid is open
R in heavy rain, snow or fog
R at night or in very dark places
R if the camera is exposed to very bright light
R if the area is lit by fluorescent bulbs or LED
lighting (the display may flicker) R
if there is a sudden change in temperature,
e.g. when driving into a heated garage in
winter
R if the camera lens is dirty or obstructed.
Observe the notes on cleaning(Y page 279)
R if the rear of your vehicle is damaged. In this
event, have the camera position and setting
checked at a qualified specialist workshop
The field of vision and other functions of the
rear view camera may be restricted due to
additional accessories on the rear of the vehi-
cle (e.g. license plate holder, bicycle rack).
Activating/deactivating the rear view
camera
X To activate: make sure that the key is in
position 2in the ignition lock.
X Make sure that the
Activation by R
gearfunction is selected in Audio 20/
COMAND; see the Digital Operator's Man-
ual.
X Engage reverse gear.
The area behind the vehicle is shown with
guide lines in the Audio 20/COMAND dis-
play.
The image from the rear view camera is
available throughout the maneuvering
process.
To deactivate: the rear view camera deacti-
vates if you shift the transmission to Por after
driving forwards a short distance.
Displays in the Audio 20/COMAND dis-play
The rear view camera may show a distorted
view of obstacles, show them incorrectly or
not at all. The rear view camera does not show
objects in the following positions:
R very close to the rear bumper
R under the rear bumper
R in the area immediately above the tailgate
handle
180Driving systems
Driving and parking
Page 221 of 346
Display messagesPossible causes/consequences andMSolutions
ator's Manualdisplay messages must not be shown in the
multifunction display.
X Wait for a period of at least 60 seconds until the necessary sys-
tem checks have been completed.
X Make sure that the display messages do not appear in the mul-
tifunction display.
If these conditions are fulfilled, the front-passenger seat can be
occupied again. Whether the PASSENGER AIR BAG OFF or ON
indicator lamp remains lit or goes out depends on how OCS clas-
sifies the occupant.
If the conditions are not fulfilled, the system is not operating cor- rectly.
X Visit a qualified specialist workshop immediately.
For further information about the Occupant Classification System, see ( Ypage 47).
Lights
iVehicles with LED bulbs in the light clusters:
The display message for the corresponding light will only appear if all the LEDs have failed.
Display messagesPossible causes/consequences and MSolutions
b
Check Left Low
BeamorCheck
Right Low Beam
The left or right-hand low-beam headlamp is defective.
X Halogen headlamp: replace the bulb (Ypage 109).
X LED headlamps: consult a qualified specialist workshop.
b
Check Rear Left
Turn Signalor
Check Rear Right
Turn Signal
The rear left-hand or rear right-hand turn signal is defective.
X Tail lamps (vehicles with halogen headlamps): replace the
bulb ( Ypage 109).
X Tail lamps (vehicles with LED headlamps): visit a qualified
specialist workshop.
b
Check Front Left
Turn Signalor
Check Front Right
Turn Signal
The front left-hand or front right-hand turn signal is defective.
X Halogen headlamp: replace the bulb (Ypage 109).
X LED headlamps: consult a qualified specialist workshop.
Displaymessages219
On-board computer and displays
Z
Page 222 of 346
Display messagesPossible causes/consequences andMSolutions
b
Check Left Mirror
Turn Signalor
CheckRightMirror
Turn Signal
The turn signal in the left-hand or right-hand exterior mirror is
defective.
X Visit a qualified specialist workshop.
b
CheckCenterBrake
Lamp
The high-mounted brake lamp is faulty. XVisit a qualified specialist workshop.
b
Check Left Brake
LamporCheck
Right Brake Lamp
The left or right-hand brake lamp is defective. XVisit a qualified specialist workshop.
b
Check Left Tail
and Brake Lampsor
Check Right Tail
and Brake Lamps
The left or right-hand tail lamp/brake lamp is defective.
X Visit a qualified specialist workshop.
b
Check Left High
BeamorCheck
Right High Beam
The left or right-hand high beam is defective.
X Halogen headlamp: replace the bulb (Ypage 109).
X LED headlamps: consult a qualified specialist workshop.
b
License Plate Lamp
The left or right-hand license plate lamp is faulty.
X Check whether you are permitted to replace the bulb yourself (Y page 109).
or
X Visit a qualified specialist workshop.
b
Check Left Fog
LamporCheck Right
Fog Lamp
The left or right-hand fog lamp is faulty.
X Visit a qualified specialist workshop.
b
Rear Fog Lamp
The rear fog lamp is faulty.
X Tail lamps (vehicles with halogen headlamps): replace the
bulb ( Ypage 109).
X Tail lamps (vehicles with LED headlamps): visit a qualified
specialist workshop.
220Display messages
On-board computer and displays