2015 MERCEDES-BENZ B-Class ELECTRIC tow
[x] Cancel search: towPage 266 of 338
R
When programming, hold remote control
A at varying distances and angles from the
button which you are programming. Try var- ious angles at a distance between 2and
12 inches (5to 30 cm) or at the same angle
but at varying distances.
R If another remote control is available for the
same garage door drive, repeat the same
programming steps with this remote con-
trol. Before performing these steps, make
sure that new batteries have been installed in garage door drive remote control A.
R Note that some remote controls only trans-
mit for a limited amount of time (the indi-
cator lamp on the remote control goes out). Press button Bon remote control Aagain
before transmission ends.
R Align the antenna cable of the garage door
opener unit. This can improve signal recep- tion/transmission.
Opening/closing the garage door After it has been programmed, the integrated
garage door opener performs the function of
the garage door system remote control.
Please also read the operating instructions
for the garage door system.
X Turn the SmartKey to position 2in the igni-
tion lock (Y page 131).
X Press button ;,=or? which you have
programmed to operate the garage door.
Garage door system with a fixed code: indi-
cator lamp :lights up green.
Garage door system with a rolling code:
indicator lamp :flashes green.
The transmitter will transmit a signal as
long as the button is pressed. The trans-
mission is halted after a maximum of ten
seconds and indicator lamp :lights up
yellow.
X Press button ;,=or? again if neces-
sary. Clearing the memory Make sure that you clear the memory of the
integrated garage door opener before selling
the vehicle.
X Turn the SmartKey to position 2in the igni-
tion lock (Y page 131).
X Press and hold buttons ;and ?.
The indicator lamp initially lights up yellow
and then green.
X Release buttons ;and ?.
The memory of the integrated garage door
opener in the rear-view mirror is cleared. Compass
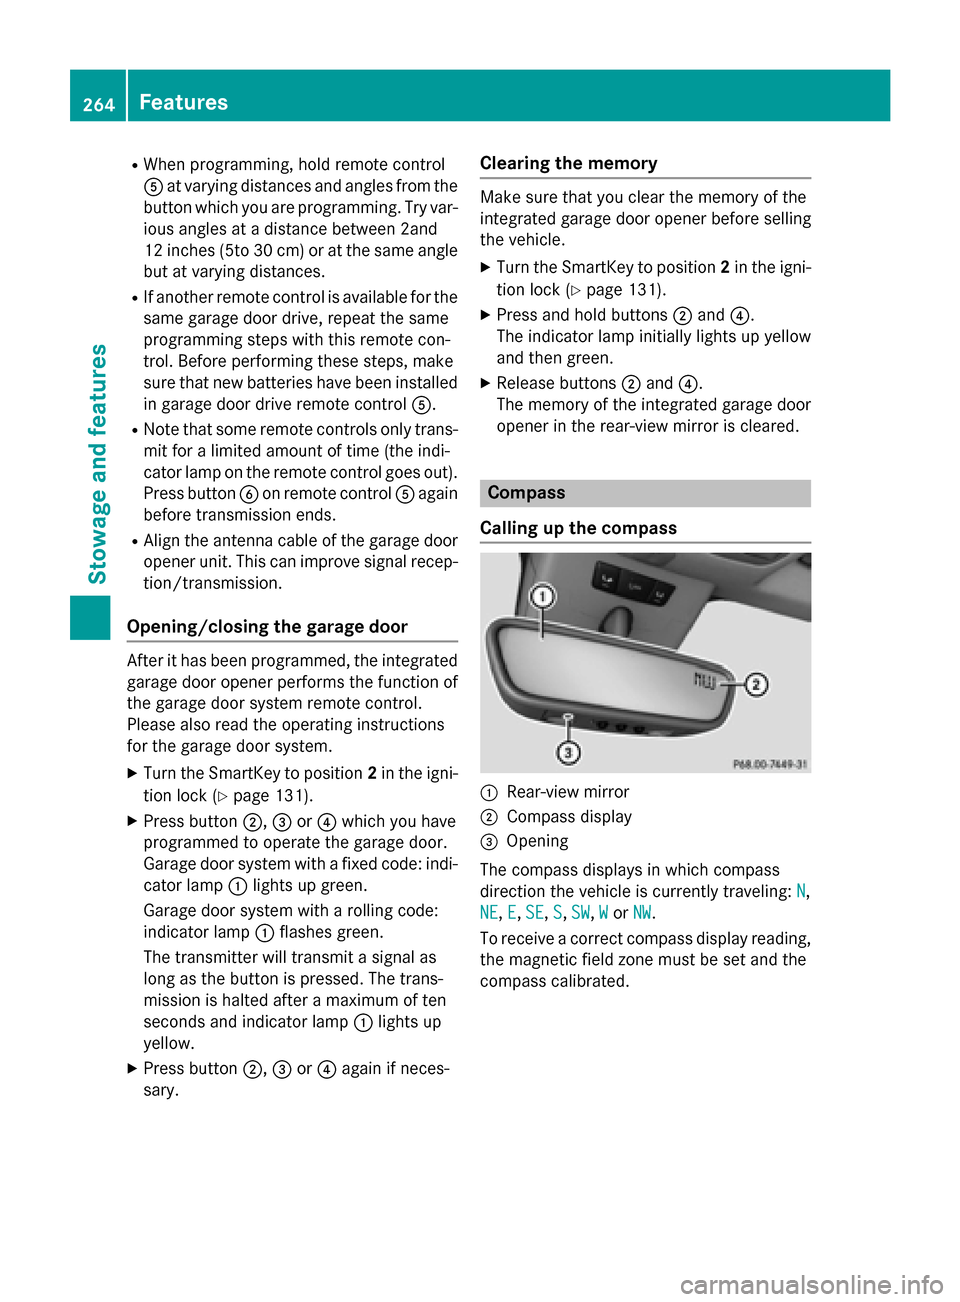
Calling up the compass :
Rear-view mirror
; Compass display
= Opening
The compass displays in which compass
direction the vehicle is currently traveling: N N,
NE
NE, E
E,SE
SE, S
S,SW
SW, W
Wor NW
NW.
To receive a correct compass display reading, the magnetic field zone must be set and the
compass calibrated. 264
FeaturesStowage and features
Page 267 of 338
Setting the compass
X
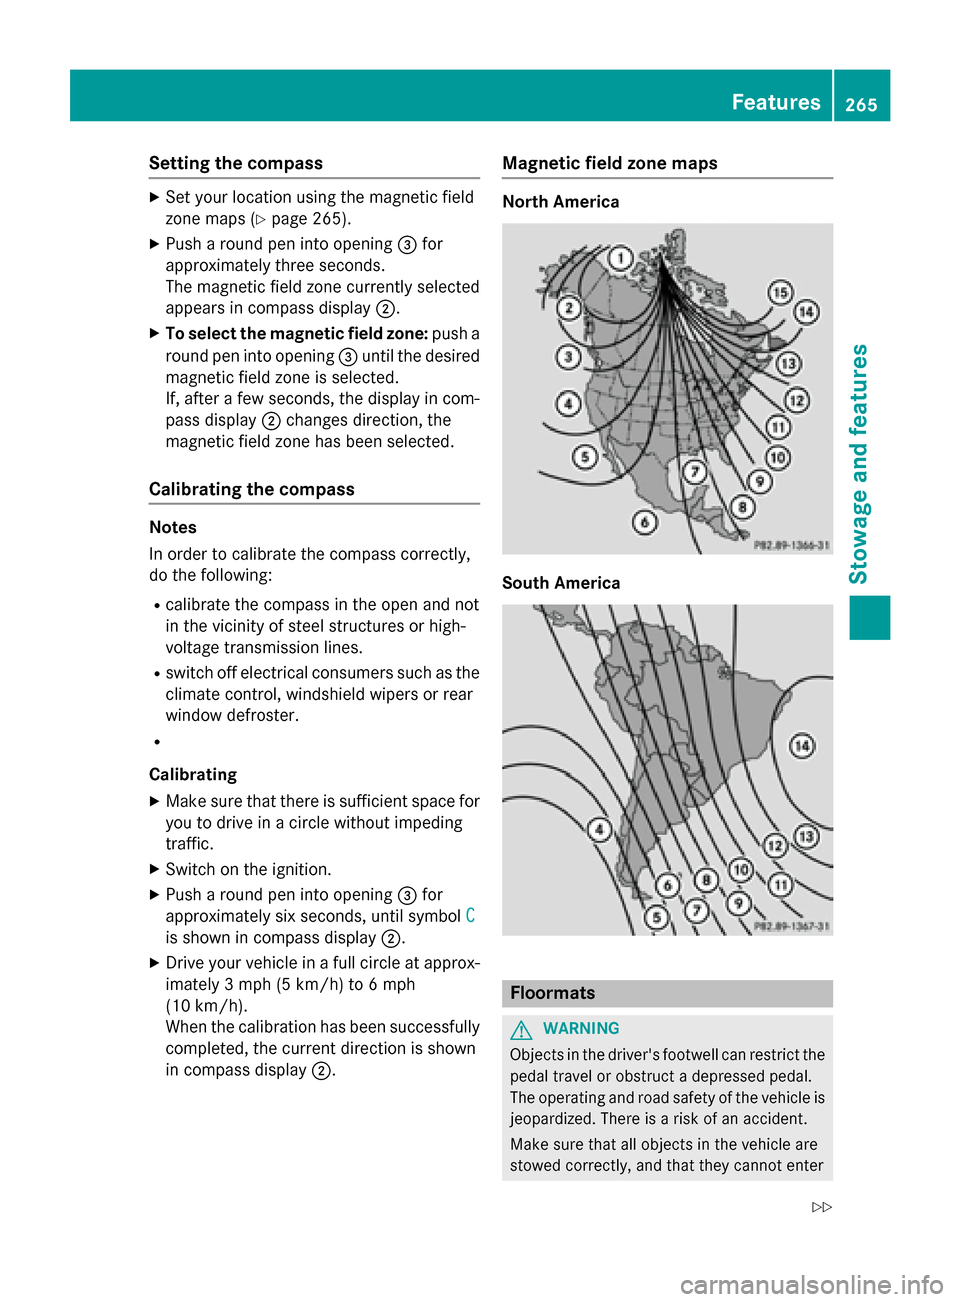
Set your location using the magnetic field
zone maps (Y page 265).
X Push a round pen into opening =for
approximately three seconds.
The magnetic field zone currently selected
appears in compass display ;.
X To select the magnetic field zone: push a
round pen into opening =until the desired
magnetic field zone is selected.
If, after a few seconds, the display in com-
pass display ;changes direction, the
magnetic field zone has been selected.
Calibrating the compass Notes
In order to calibrate the compass correctly,
do the following:
R calibrate the compass in the open and not
in the vicinity of steel structures or high-
voltage transmission lines.
R switch off electrical consumers such as the
climate control, windshield wipers or rear
window defroster.
R
Calibrating
X Make sure that there is sufficient space for
you to drive in a circle without impeding
traffic.
X Switch on the ignition.
X Push a round pen into opening =for
approximately six seconds, until symbol C
C
is shown in compass display ;.
X Drive your vehicle in a full circle at approx-
imately 3 mph (5 km/h) to 6 mph
(10 km/h).
When the calibration has been successfully completed, the current direction is shown
in compass display ;. Magnetic field zone maps North America
South America
Floormats
G
WARNING
Objects in the driver's footwell can restrict the pedal travel or obstruct a depressed pedal.
The operating and road safety of the vehicle is
jeopardized. There is a risk of an accident.
Make sure that all objects in the vehicle are
stowed correctly, and that they cannot enter Features
265Stowage and features
Z
Page 274 of 338
Driving abroad
An extensive Mercedes-Benz Service network
is also available in other countries. You can
obtain further information from any author-
ized Mercedes-Benz Center. Care
General notes
H
Environmental note
Dispose of empty packaging and cleaning
cloths in an environmentally responsible man- ner.
! For cleaning your vehicle, do not use any
of the following:
R dry, rough or hard cloths
R abrasive cleaning agents
R solvents
R cleaning agents containing solvents
Do not scrub.
Do not touch the surfaces or protective
films with hard objects, e.g. a ring or ice
scraper. You could otherwise scratch or
damage the surfaces and protective film.
! Do not park the vehicle for an extended
period straight after cleaning it, particularly after having cleaned the wheels with wheel
cleaner. Wheel cleaners could cause
increased corrosion of the brake discs and
brake pads/linings. For this reason, you
should drive for a few minutes after clean-
ing. Braking heats the brake discs and the
brake pads/linings, thus drying them. The
vehicle can then be parked.
Regular care of your vehicle is a condition for
retaining the quality in the long term.
Use care products and cleaning agents rec-
ommended and approved by Mercedes-Benz. Washing the vehicle and cleaning the
paintwork
Automatic car wash G
WARNING
Braking efficiency is reduced after washing
the vehicle. There is a risk of an accident.
After the vehicle has been washed, brake
carefully while paying attention to the traffic
conditions until full braking power is restored.
! If the HOLD function is activated, the vehi-
cle brakes automatically in certain situa-
tions.
To prevent damage to the vehicle, deacti-
vate the HOLD function in the following or
other similar situations:
R when towing the vehicle
R in the car wash
! Never clean your vehicle in a Touchless
Automatic Car Wash as these use special
cleaning agents. These cleaning agents can
damage the paintwork or plastic parts.
! When washing your vehicle in a tow-
through car wash, make sure that the selec- tor lever is in position N, otherwise the
vehicle could be damaged.
! Make sure that:
R the side windows are fully closed.
R the ventilation/heating is switched off
(the OFF button has been pressed/the
airflow control is set to position 0).
R the windshield wiper switch is at position
0.
The vehicle may otherwise be damaged.
You can wash the vehicle in an automatic car
wash from the very start.
If the vehicle is very dirty, pre-wash it before
cleaning it in an automatic car wash.
After using an automatic car wash, wipe off
wax from the windshield and the wiper
blades. This will prevent smears and reduce 272
CareMaintenance and care
Page 275 of 338
wiping noises caused by residue on the wind-
shield.
Washing by hand In some countries, washing by hand is only
allowed at specially equipped washing bays.
Observe the legal requirements in each coun-
try.
X Do not use hot water and do not wash the
vehicle in direct sunlight.
X Use a soft sponge to clean.
X Use a mild cleaning agent, such as a car
shampoo approved by Mercedes-Benz.
X Thoroughly hose down the vehicle with a
gentle jet of water.
X Do not point the water jet directly towards
the air inlet.
X Use plenty of water and rinse out the
sponge frequently.
X Rinse the vehicle with clean water and dry
thoroughly with a chamois.
X Do not let the cleaning agent dry on the
paintwork.
Carefully remove all deposits of road salt as
soon as possible when driving in winter.
Power washers G
WARNING
The water jet from a circular jet nozzle (dirt
blasters) can cause invisible exterior damage to the tires or chassis components. Compo-
nents damaged in this way may fail unexpect-edly. There is a risk of an accident.
Do not use power washers with circular jet
nozzles to clean the vehicle. Have damaged
tires or chassis components replaced imme-
diately.
! Always maintain a distance of at least
11.8 in (30 cm) between the vehicle and the
power washer nozzle. Information about
the correct distance is available from the
equipment manufacturer. Move the power washer nozzle around
when cleaning your vehicle.
Do not aim directly at any of the following:
R tires
R door gaps, roof gaps, joints, etc.
R electrical components
R battery
R connectors
R lights
R seals
R trim
R ventilation slots
Damaged seals or electrical components
can lead to leaks or failures.
Cleaning the paintwork !
Do not affix:
R stickers
R films
R magnetic plates or similar items
to painted surfaces. You could otherwise
damage the paintwork.
Scratches, corrosive deposits, areas affected by corrosion and damage caused by inade-
quate care cannot always be completely
repaired. In such cases, visit a qualified spe-
cialist workshop.
X Remove dirt immediately, where possible,
while avoiding rubbing too hard.
X Soak insect remains with insect remover
and rinse off the treated areas afterwards.
X Soak bird droppings with water and rinse
off the treated areas afterwards.
X Remove coolant, brake fluid, tree resin,
oils, fuels and greases by rubbing gently
with a cloth soaked in petroleum ether or
lighter fluid.
X Use tar remover to remove tar stains.
X Use silicone remover to remove wax.
If water no longer forms "beads" on the paint
surface, use the paint care products recom-
mended and approved by Mercedes-Benz. Care
273Maintenance and care Z
Page 281 of 338
Useful information
............................280
Where will I find...? ...........................280
Flat tire .............................................. 280
Batteries ............................................ 285
Jump-starting .................................... 290
Towing ............................................... 292
Fuses .................................................. 296 279Roadside Assistance
Page 282 of 338
Useful information
i This Operator's Manual describes all
models and all standard and optional equip- ment of your vehicle available at the time of
publication of the Operator's Manual.
Country-specific differences are possible.
Please note that your vehicle may not be
equipped with all features described. This
also applies to safety-related systems and
functions.
i Read the information on qualified special-
ist workshops (Y page 25). Where will I find...?
Vehicle tool kit
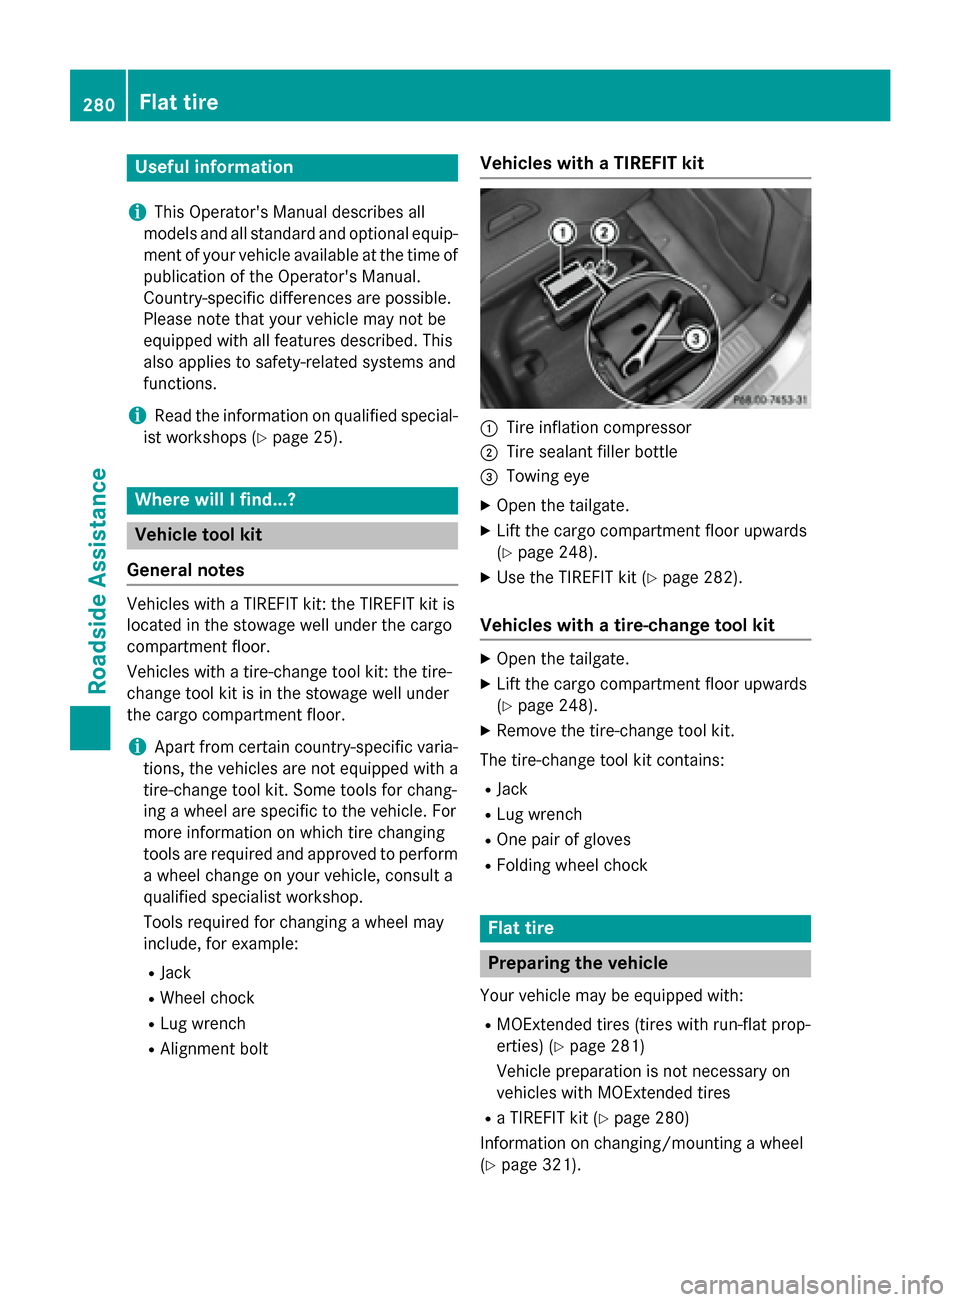
General notes Vehicles with a TIREFIT kit: the TIREFIT kit is
located in the stowage well under the cargo
compartment floor.
Vehicles with a tire-change tool kit: the tire-
change tool kit is in the stowage well under
the cargo compartment floor.
i Apart from certain country-specific varia-
tions, the vehicles are not equipped with a
tire-change tool kit. Some tools for chang-
ing a wheel are specific to the vehicle. For
more information on which tire changing
tools are required and approved to perform
a wheel change on your vehicle, consult a
qualified specialist workshop.
Tools required for changing a wheel may
include, for example:
R Jack
R Wheel chock
R Lug wrench
R Alignment bolt Vehicles with a TIREFIT kit
:
Tire inflation compressor
; Tire sealant filler bottle
= Towing eye
X Open the tailgate.
X Lift the cargo compartment floor upwards
(Y page 248).
X Use the TIREFIT kit (Y page 282).
Vehicles with a tire-change tool kit X
Open the tailgate.
X Lift the cargo compartment floor upwards
(Y page 248).
X Remove the tire-change tool kit.
The tire-change tool kit contains: R Jack
R Lug wrench
R One pair of gloves
R Folding wheel chock Flat tire
Preparing the vehicle
Your vehicle may be equipped with:
R MOExtended tires (tires with run-flat prop-
erties) (Y page 281)
Vehicle preparation is not necessary on
vehicles with MOExtended tires
R a TIREFIT kit (Y page 280)
Information on changing/mounting a wheel
(Y page 321). 280
Flat tireRoadside Assistance
Page 285 of 338
Comply with the manufacturer’s safety
instructions on the sticker on the tire inflation
compressor.
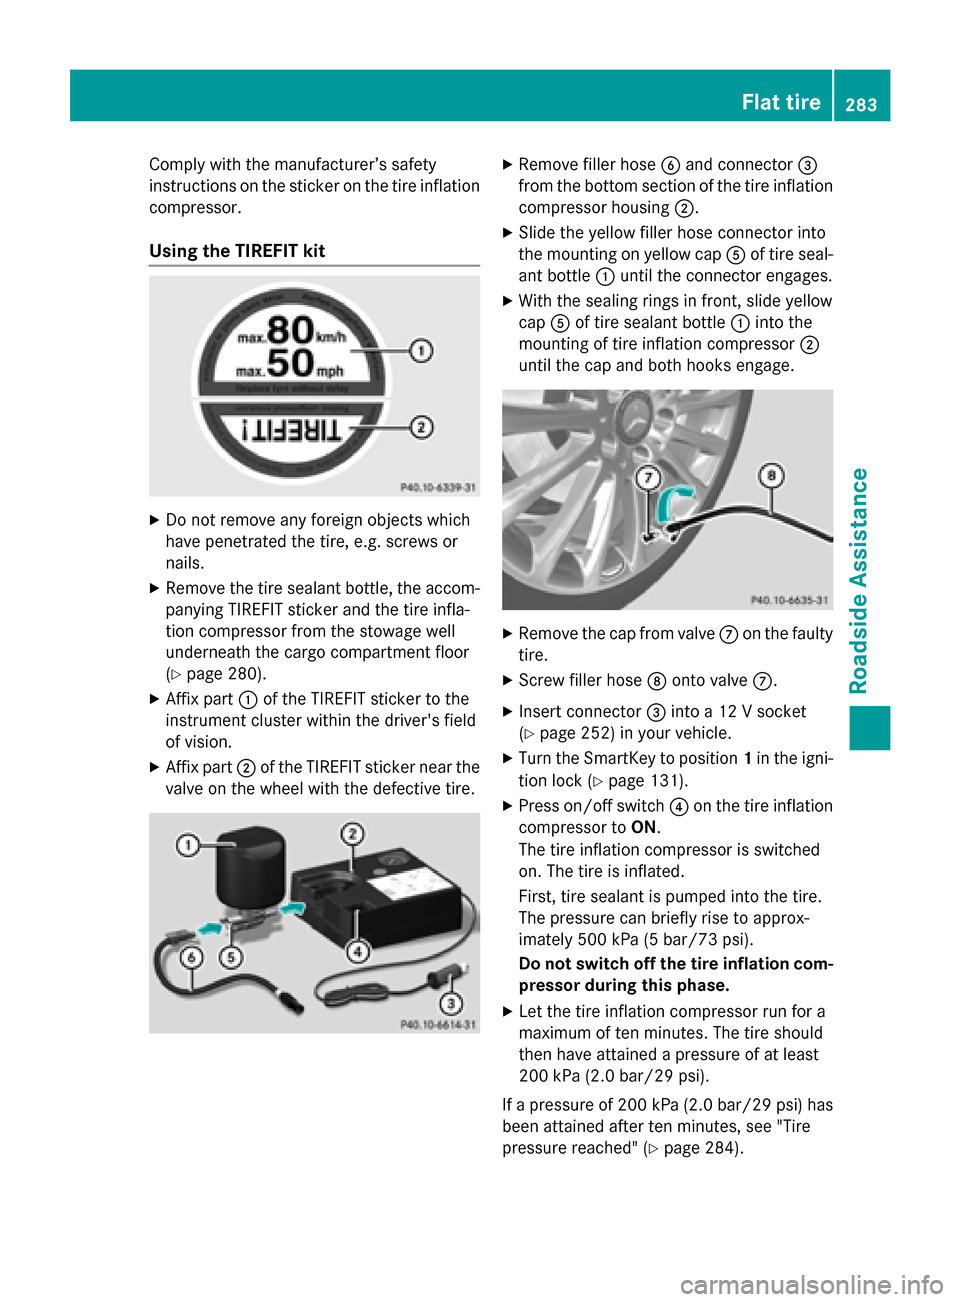
Using the TIREFIT kit X
Do not remove any foreign objects which
have penetrated the tire, e.g. screws or
nails.
X Remove the tire sealant bottle, the accom-
panying TIREFIT sticker and the tire infla-
tion compressor from the stowage well
underneath the cargo compartment floor
(Y page 280).
X Affix part :of the TIREFIT sticker to the
instrument cluster within the driver's field
of vision.
X Affix part ;of the TIREFIT sticker near the
valve on the wheel with the defective tire. X
Remove filler hose Band connector =
from the bottom section of the tire inflation compressor housing ;.
X Slide the yellow filler hose connector into
the mounting on yellow cap Aof tire seal-
ant bottle :until the connector engages.
X With the sealing rings in front, slide yellow
cap Aof tire sealant bottle :into the
mounting of tire inflation compressor ;
until the cap and both hooks engage. X
Remove the cap from valve Con the faulty
tire.
X Screw filler hose Donto valve C.
X Insert connector =into a 12 V socket
(Y page 252) in your vehicle.
X Turn the SmartKey to position 1in the igni-
tion lock (Y page 131).
X Press on/off switch ?on the tire inflation
compressor to ON.
The tire inflation compressor is switched
on. The tire is inflated.
First, tire sealant is pumped into the tire.
The pressure can briefly rise to approx-
imately 500 kPa (5 bar/73 psi).
Do not switch off the tire inflation com-
pressor during this phase.
X Let the tire inflation compressor run for a
maximum of ten minutes. The tire should
then have attained a pressure of at least
200 kPa (2.0 bar/29 psi).
If a pressure of 200 kPa (2.0 bar/29 psi) has
been attained after ten minutes, see "Tire
pressure reached" (Y page 284). Flat tire
283Roadside Assistance Z
Page 286 of 338
If a pressure of 200 kPa (2.0 bar/29 psi) has
not been attained after ten minutes, see "Tire
pressure not reached" (Y page 284).
If tire sealant leaks out, allow it to dry. It can
then be removed like a layer of film.
If your clothes are soiled with tire sealant,
have them cleaned with perchloroethylene at a dry cleaner as soon as possible.
Tire pressure not reached If a tire pressure of 200 kPa (2.0 bar/29 psi)
has not been achieved after ten minutes:
X Switch off the tire inflation compressor.
X Unscrew the filler hose from the valve of
the faulty tire.
X Very slowly drive forwards or reverse
approximately 30 ft (10 m).
X Pump up the tire again.
After a maximum of ten minutes, the tire
pressure must be at least 200 kPa (2.0 bar/
29 psi). G
WARNING
If the required tire pressure is not reached
after the specified time, the tire is too badly
damaged. The tire sealant cannot repair the
tire in this instance. Damaged tires and a tire pressure that is too low can significantly
impair the vehicle's braking and driving char-
acteristics. There is a risk of accident.
Do not continue driving. Contact a qualified
specialist workshop.
Tire pressure reached G
WARNING
A tire temporarily sealed with tire sealant
impairs the driving characteristics and is not
suitable for higher speeds. There is a risk of
accident.
You should therefore adapt your driving style
accordingly and drive carefully. Do not exceed the specified maximum speed with a tire that
has been repaired using tire sealant. The maximum speed for a tire sealed with tire
sealant is 50 mph (80 km/h). The upper part of the TIREFIT sticker must be affixed to the
instrument cluster in the driver's field of
vision.
! Residue from the tire sealant may come
out of the filler hose after use. This could
cause stains.
Therefore, place the filler hose in the plastic bag which contained the TIREFIT kit. H
Environmental note
Have the used tire sealant bottle disposed of
professionally, e.g. at a qualified specialist
workshop.
If a tire pressure of 200 kPa (2.0 bar/29 psi)
has been achieved after ten minutes:
X Switch off the tire inflation compressor.
X Unscrew the filler hose from the valve of
the faulty tire.
X Stow the tire sealant bottle and the tire
inflation compressor.
X Pull away immediately.
X Stop after driving for approximately ten
minutes and check the tire pressure with
the tire inflation compressor.
The tire pressure must now be at least
130 kPa (1.3 bar/19 psi). G
WARNING
If the required tire pressure is not reached
after driving for a short period, the tire is too
badly damaged. The tire sealant cannot repair the tire in this instance. Damaged tires and a
tire pressure that is too low can significantly
impair the vehicle's braking and driving char-
acteristics. There is a risk of accident.
Do not continue driving. Contact a qualified
specialist workshop.
i In cases such as the one mentioned
above, contact an authorized Mercedes-
Benz Center. Or call 1-800-FOR-MERCedes
(in the USA) or 1-800-387-0100 (in Can-
ada). 284
Flat tireRoadside Assistance