2015 MERCEDES-BENZ B-Class ELECTRIC warning lights
[x] Cancel search: warning lightsPage 219 of 338
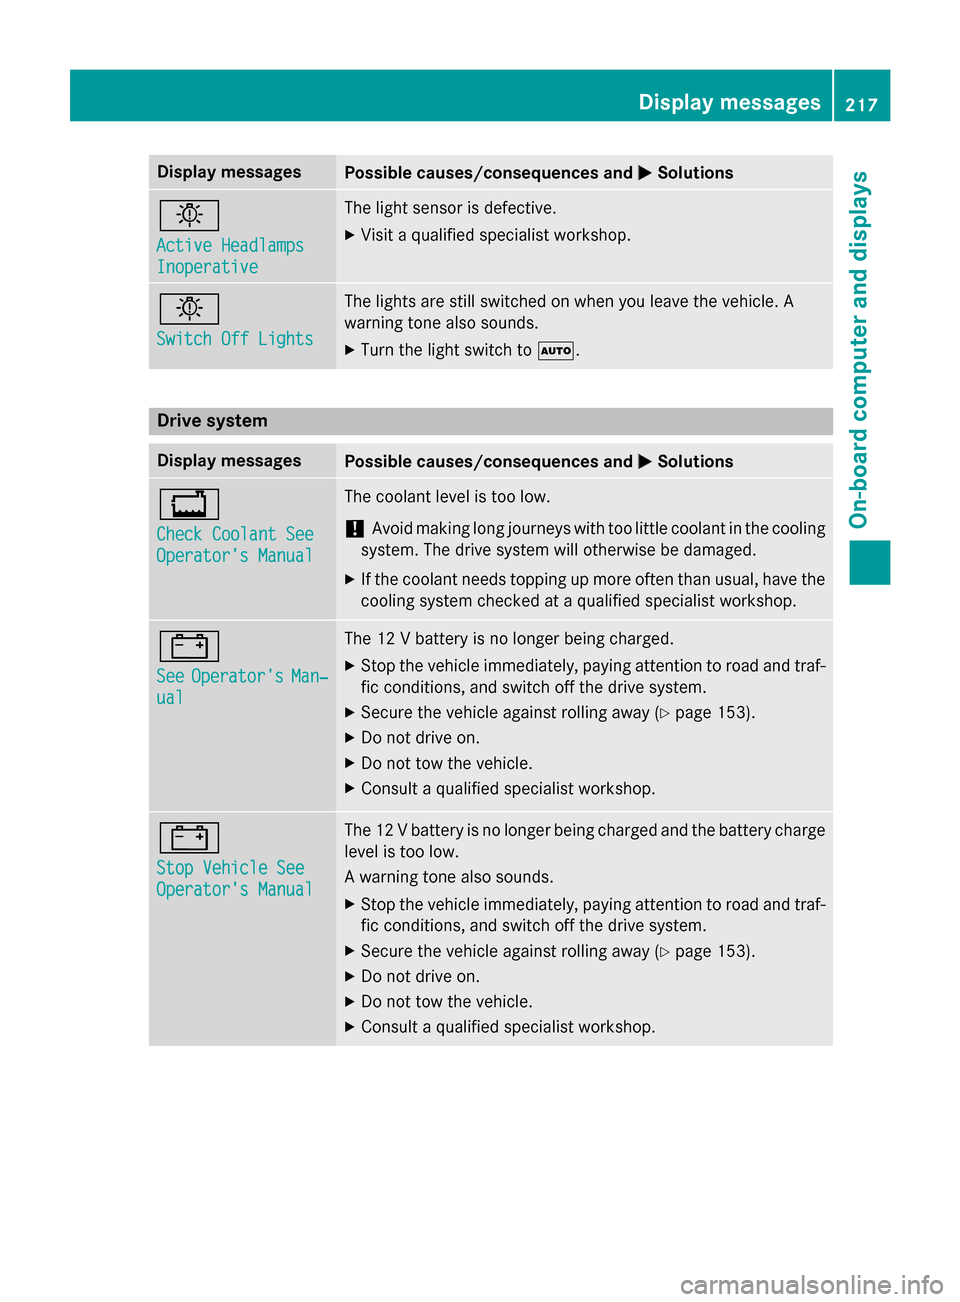
Display messages
Possible causes/consequences and
M
MSolutions b
Active Headlamps Active Headlamps
Inoperative Inoperative The light sensor is defective.
X Visit a qualified specialist workshop. b
Switch Off Lights Switch Off Lights The lights are still switched on when you leave the vehicle. A
warning tone also sounds.
X Turn the light switch to Ã.Drive system
Display messages
Possible causes/consequences and
M MSolutions +
Check Coolant See Check Coolant See
Operator's Manual Operator's Manual The coolant level is too low.
! Avoid making long journeys with too little coolant in the cooling
system. The drive system will otherwise be damaged.
X If the coolant needs topping up more often than usual, have the
cooling system checked at a qualified specialist workshop. #
See See
Operator's
Operator's Man‐
Man‐
ual
ual The 12 V battery is no longer being charged.
X Stop the vehicle immediately, paying attention to road and traf-
fic conditions, and switch off the drive system.
X Secure the vehicle against rolling away (Y page 153).
X Do not drive on.
X Do not tow the vehicle.
X Consult a qualified specialist workshop. #
Stop Vehicle See Stop Vehicle See
Operator's Manual Operator's Manual The 12 V battery is no longer being charged and the battery charge
level is too low.
A warning tone also sounds.
X Stop the vehicle immediately, paying attention to road and traf-
fic conditions, and switch off the drive system.
X Secure the vehicle against rolling away (Y page 153).
X Do not drive on.
X Do not tow the vehicle.
X Consult a qualified specialist workshop. Display
messages
217On-board computer and displays Z
Page 230 of 338
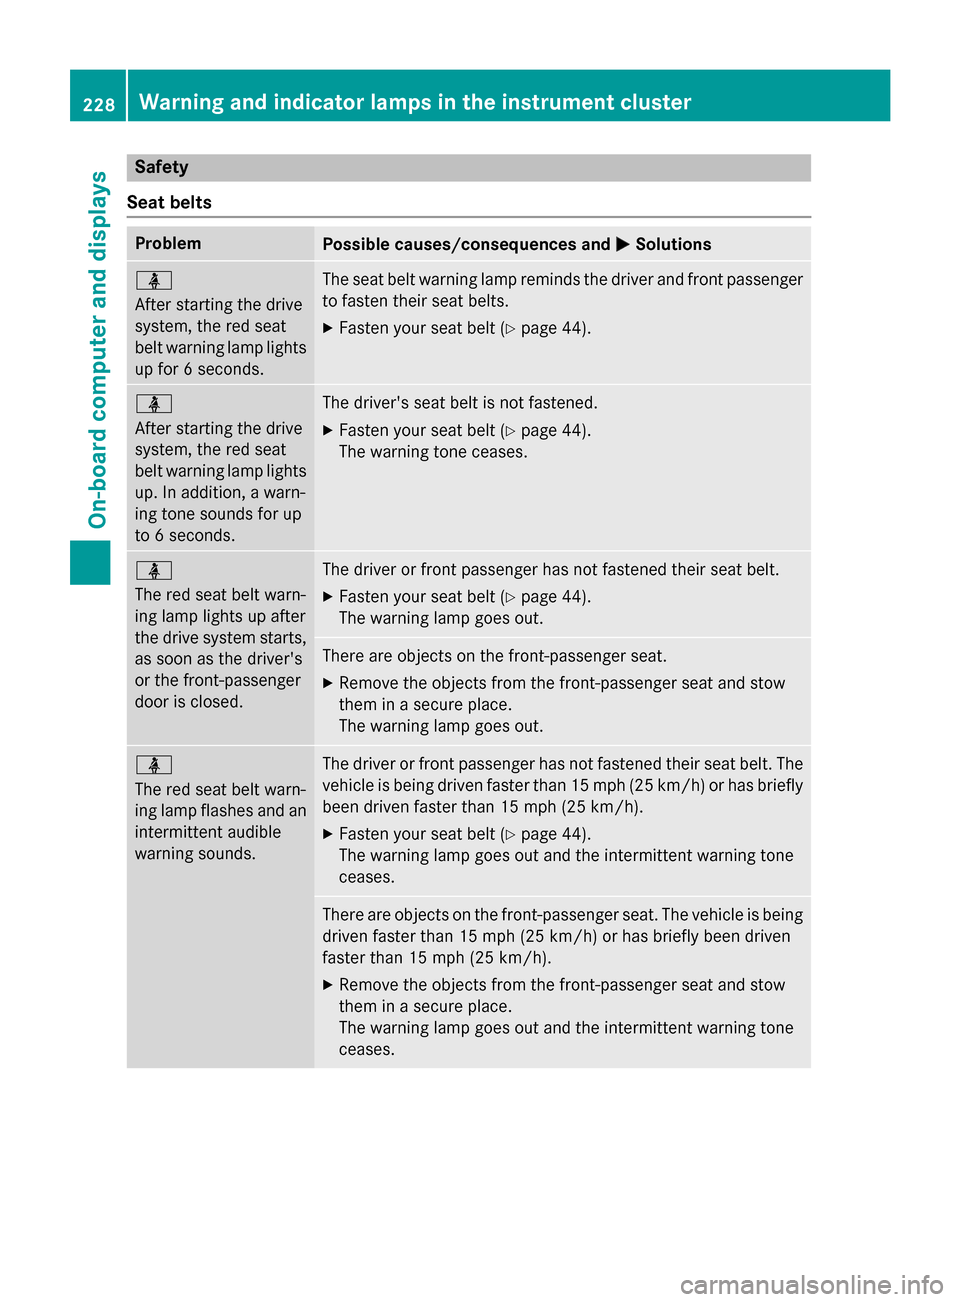
Safety
Seat belts Problem
Possible causes/consequences and
M
MSolutions ü
After starting the drive
system, the red seat
belt warning lamp lights
up for 6 seconds. The seat belt warning lamp reminds the driver and front passenger
to fasten their seat belts.
X Fasten your seat belt (Y page 44).ü
After starting the drive
system, the red seat
belt warning lamp lights
up. In addition, a warn-
ing tone sounds for up
to 6 seconds. The driver's seat belt is not fastened.
X Fasten your seat belt (Y page 44).
The warning tone ceases. ü
The red seat belt warn-
ing lamp lights up after
the drive system starts,
as soon as the driver's
or the front-passenger
door is closed. The driver or front passenger has not fastened their seat belt.
X Fasten your seat belt (Y page 44).
The warning lamp goes out. There are objects on the front-passenger seat.
X Remove the objects from the front-passenger seat and stow
them in a secure place.
The warning lamp goes out. ü
The red seat belt warn-
ing lamp flashes and an
intermittent audible
warning sounds. The driver or front passenger has not fastened their seat belt. The
vehicle is being driven faster than 15 mph (25 km/h) or has briefly been driven faster than 15 mph (25 km/h).
X Fasten your seat belt (Y page 44).
The warning lamp goes out and the intermittent warning tone
ceases. There are objects on the front-passenger seat. The vehicle is being
driven faster than 15 mph (25 km/h) or has briefly been driven
faster than 15 mph (25 km/h).
X Remove the objects from the front-passenger seat and stow
them in a secure place.
The warning lamp goes out and the intermittent warning tone
ceases. 228
Warning and indicator lamps in the instrument clusterOn-board computer and displays
Page 238 of 338
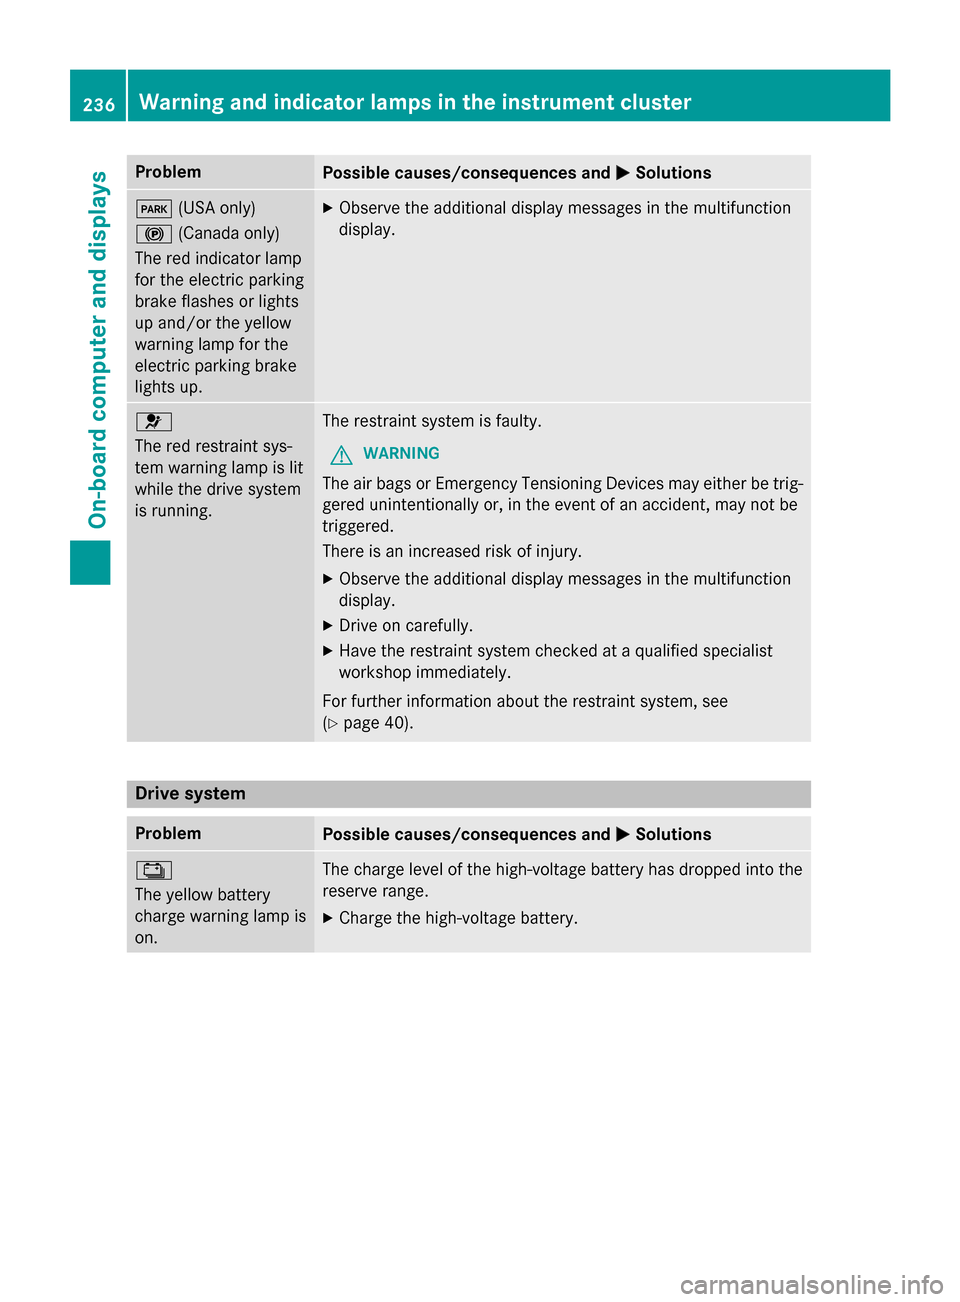
Problem
Possible causes/consequences and
M
MSolutions F
(USA only)
! (Canada only)
The red indicator lamp
for the electric parking
brake flashes or lights
up and/or the yellow
warning lamp for the
electric parking brake
lights up. X
Observe the additional display messages in the multifunction
display. 6
The red restraint sys-
tem warning lamp is lit
while the drive system
is running.
The restraint system is faulty.
G WARNING
The air bags or Emergency Tensioning Devices may either be trig- gered unintentionally or, in the event of an accident, may not be
triggered.
There is an increased risk of injury.
X Observe the additional display messages in the multifunction
display.
X Drive on carefully.
X Have the restraint system checked at a qualified specialist
workshop immediately.
For further information about the restraint system, see
(Y page 40). Drive system
Problem
Possible causes/consequences and
M MSolutions Ý
The yellow battery
charge warning lamp is
on. The charge level of the high-voltage battery has dropped into the
reserve range.
X Charge the high-voltage battery. 236
Warning and indicator lamps in the instrument clusterOn-board computer and displays
Page 239 of 338
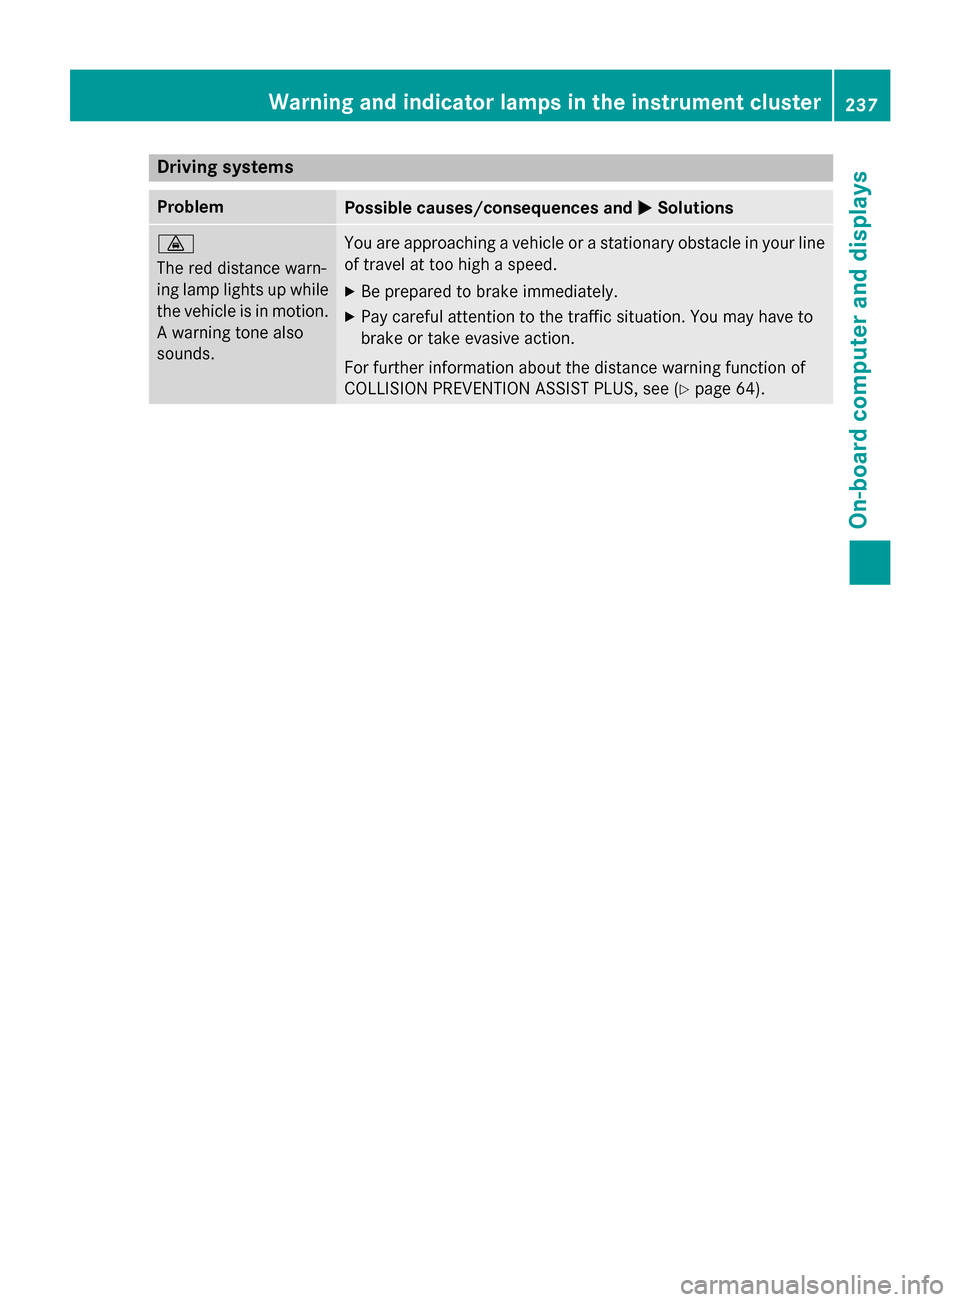
Driving systems
Problem
Possible causes/consequences and
M
MSolutions ·
The red distance warn-
ing lamp lights up while
the vehicle is in motion. A warning tone also
sounds. You are approaching a vehicle or a stationary obstacle in your line
of travel at too high a speed.
X Be prepared to brake immediately.
X Pay careful attention to the traffic situation. You may have to
brake or take evasive action.
For further information about the distance warning function of
COLLISION PREVENTION ASSIST PLUS, see (Y page 64).Wa
rning and indi cator lamps in the instrument cluster
237On-board computer and displays Z
Page 264 of 338
When using the integrated garage door
opener, always make sure that nobody is
within the range of movement of the garage
door.
G
WARNING
Combustion engines emit poisonous exhaust
gases such as carbon monoxide. Inhaling
these exhaust gases leads to poisoning. There is a risk of fatal injury. Therefore never leave
the engine running in enclosed spaces with-
out sufficient ventilation.
Programming Programming buttons
Pay attention to the "Important safety notes"
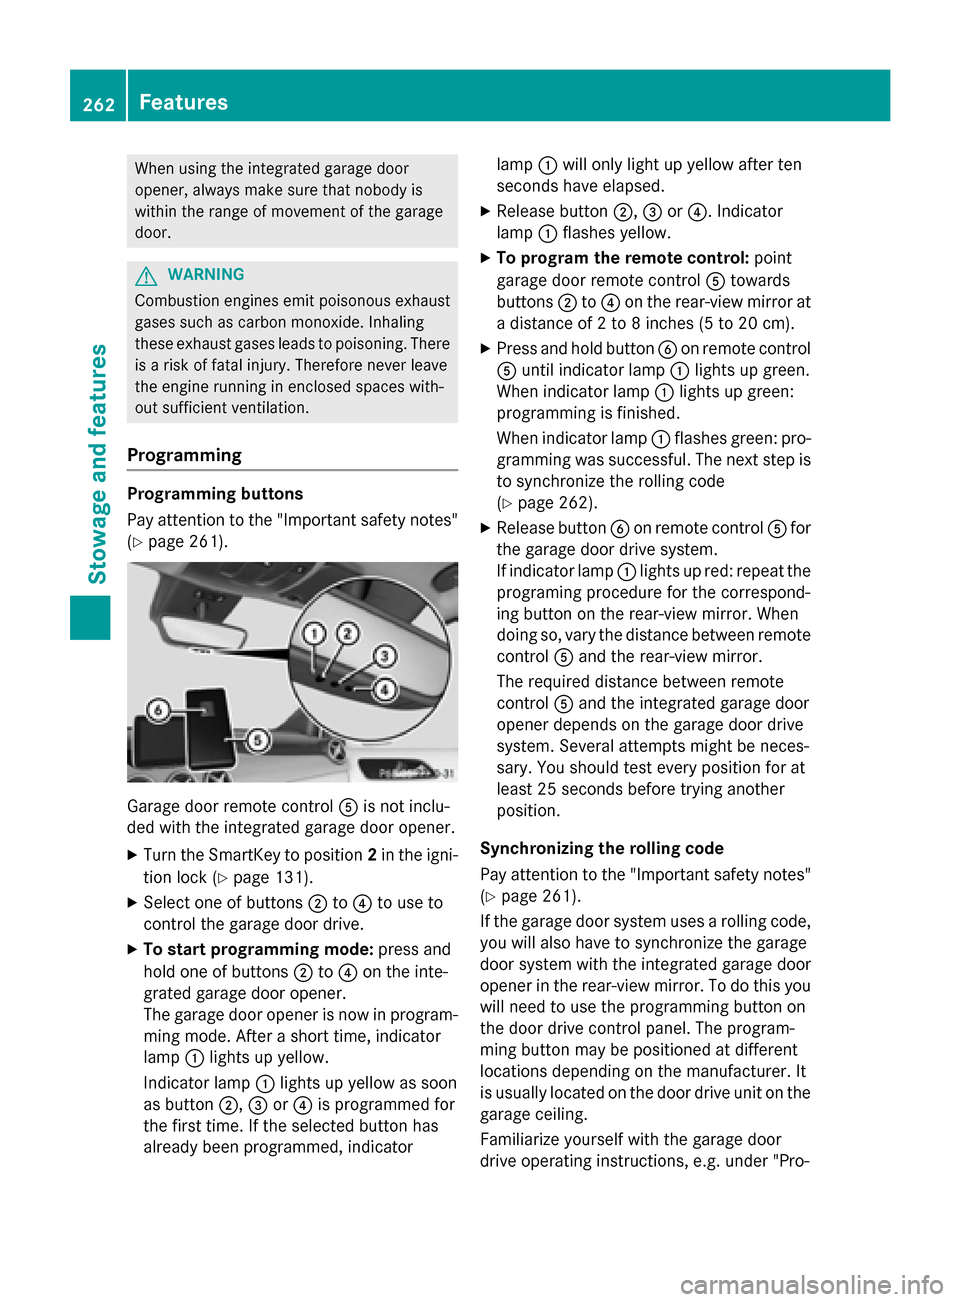
(Y page 261). Garage door remote control
Ais not inclu-
ded with the integrated garage door opener.
X Turn the SmartKey to position 2in the igni-
tion lock (Y page 131).
X Select one of buttons ;to? to use to
control the garage door drive.
X To start programming mode: press and
hold one of buttons ;to? on the inte-
grated garage door opener.
The garage door opener is now in program-
ming mode. After a short time, indicator
lamp :lights up yellow.
Indicator lamp :lights up yellow as soon
as button ;,=or? is programmed for
the first time. If the selected button has
already been programmed, indicator lamp
:will only light up yellow after ten
seconds have elapsed.
X Release button ;,=or?. Indicator
lamp :flashes yellow.
X To program the remote control: point
garage door remote control Atowards
buttons ;to? on the rear-view mirror at
a distance of 2 to 8 inches (5 to 20 cm).
X Press and hold button Bon remote control
A until indicator lamp :lights up green.
When indicator lamp :lights up green:
programming is finished.
When indicator lamp :flashes green: pro-
gramming was successful. The next step is to synchronize the rolling code
(Y page 262).
X Release button Bon remote control Afor
the garage door drive system.
If indicator lamp :lights up red: repeat the
programing procedure for the correspond-
ing button on the rear-view mirror. When
doing so, vary the distance between remote control Aand the rear-view mirror.
The required distance between remote
control Aand the integrated garage door
opener depends on the garage door drive
system. Several attempts might be neces-
sary. You should test every position for at
least 25 seconds before trying another
position.
Synchronizing the rolling code
Pay attention to the "Important safety notes"
(Y page 261).
If the garage door system uses a rolling code,
you will also have to synchronize the garage
door system with the integrated garage door
opener in the rear-view mirror. To do this you
will need to use the programming button on
the door drive control panel. The program-
ming button may be positioned at different
locations depending on the manufacturer. It
is usually located on the door drive unit on the garage ceiling.
Familiarize yourself with the garage door
drive operating instructions, e.g. under "Pro- 262
FeaturesStowage and features
Page 275 of 338
wiping noises caused by residue on the wind-
shield.
Washing by hand In some countries, washing by hand is only
allowed at specially equipped washing bays.
Observe the legal requirements in each coun-
try.
X Do not use hot water and do not wash the
vehicle in direct sunlight.
X Use a soft sponge to clean.
X Use a mild cleaning agent, such as a car
shampoo approved by Mercedes-Benz.
X Thoroughly hose down the vehicle with a
gentle jet of water.
X Do not point the water jet directly towards
the air inlet.
X Use plenty of water and rinse out the
sponge frequently.
X Rinse the vehicle with clean water and dry
thoroughly with a chamois.
X Do not let the cleaning agent dry on the
paintwork.
Carefully remove all deposits of road salt as
soon as possible when driving in winter.
Power washers G
WARNING
The water jet from a circular jet nozzle (dirt
blasters) can cause invisible exterior damage to the tires or chassis components. Compo-
nents damaged in this way may fail unexpect-edly. There is a risk of an accident.
Do not use power washers with circular jet
nozzles to clean the vehicle. Have damaged
tires or chassis components replaced imme-
diately.
! Always maintain a distance of at least
11.8 in (30 cm) between the vehicle and the
power washer nozzle. Information about
the correct distance is available from the
equipment manufacturer. Move the power washer nozzle around
when cleaning your vehicle.
Do not aim directly at any of the following:
R tires
R door gaps, roof gaps, joints, etc.
R electrical components
R battery
R connectors
R lights
R seals
R trim
R ventilation slots
Damaged seals or electrical components
can lead to leaks or failures.
Cleaning the paintwork !
Do not affix:
R stickers
R films
R magnetic plates or similar items
to painted surfaces. You could otherwise
damage the paintwork.
Scratches, corrosive deposits, areas affected by corrosion and damage caused by inade-
quate care cannot always be completely
repaired. In such cases, visit a qualified spe-
cialist workshop.
X Remove dirt immediately, where possible,
while avoiding rubbing too hard.
X Soak insect remains with insect remover
and rinse off the treated areas afterwards.
X Soak bird droppings with water and rinse
off the treated areas afterwards.
X Remove coolant, brake fluid, tree resin,
oils, fuels and greases by rubbing gently
with a cloth soaked in petroleum ether or
lighter fluid.
X Use tar remover to remove tar stains.
X Use silicone remover to remove wax.
If water no longer forms "beads" on the paint
surface, use the paint care products recom-
mended and approved by Mercedes-Benz. Care
273Maintenance and care Z
Page 277 of 338
!
Do not use dry cloths, abrasive products,
solvents or cleaning agents containing sol-
vents to clean the inside of the windows. Do not touch the insides of the windows with
hard objects, e.g. an ice scraper or ring.
There is otherwise a risk of damaging the
windows.
! Clean the water drainage channels of the
windshield and the rear window at regular
intervals. Deposits such as leaves, petals
and pollen may under certain circumstan-
ces prevent water from draining away. This
can lead to corrosion damage and damage to electronic components.
X Clean the inside and outside of the win-
dows with a damp cloth and a cleaning
product that is recommended and
approved by Mercedes-Benz.
Cleaning wiper blades G
WARNING
You could become trapped by the windshield wipers if they start moving while cleaning the
windshield or wiper blades. There is a risk of
injury.
Always switch off the windshield wipers and
the ignition before cleaning the windshield or
wiper blades.
! Only fold the windshield wipers away from
the windshield when vertical. Otherwise,
you will damage the hood.
! Do not pull the wiper blade. Otherwise,
the wiper blade could be damaged.
! Do not clean wiper blades too often and
do not rub them too hard. Otherwise, the
graphite coating could be damaged. This
could cause wiper noise.
! Hold the wiper arm securely when folding
back. The windshield could be damaged if
the wiper arm smacks against it suddenly. X
Fold the windshield wiper arms away from
the windshield.
X Carefully clean the wiper blades with a
damp cloth.
X Fold the windshield wiper arms back again
before switching on the ignition.
Cleaning the exterior lighting !
Only use cleaning agents or cleaning
cloths which are suitable for plastic light
lenses. Unsuitable cleaning agents or
cleaning cloths could scratch or damage
the plastic light lenses.
X Clean the plastic lenses of the exterior
lights with a wet sponge and a mild cleaning
agent, e.g. Mercedes-Benz car shampoo or cleaning cloths.
Cleaning the mirror turn signals !
Only use cleaning agents or cleaning
cloths that are suitable for plastic lenses.
Unsuitable cleaning agents or cleaning
cloths could scratch or damage the plastic lenses of the mirror turn signals.
X Clean the plastic lenses of the mirror turn
signals in the exterior mirror housing using
a wet sponge and mild cleaning agent, e.g.
Mercedes-Benz car shampoo or cleaning
cloths.
Cleaning the sensors !
If you clean the sensors with a power
washer, make sure that you keep a dis-
tance of at least 11.8 in (30 cm) between
the vehicle and the power washer nozzle.
Information about the correct distance is
available from the equipment manufac-
turer. Care
275Maintenance and care Z
Page 296 of 338
Installing/removing the towing eye
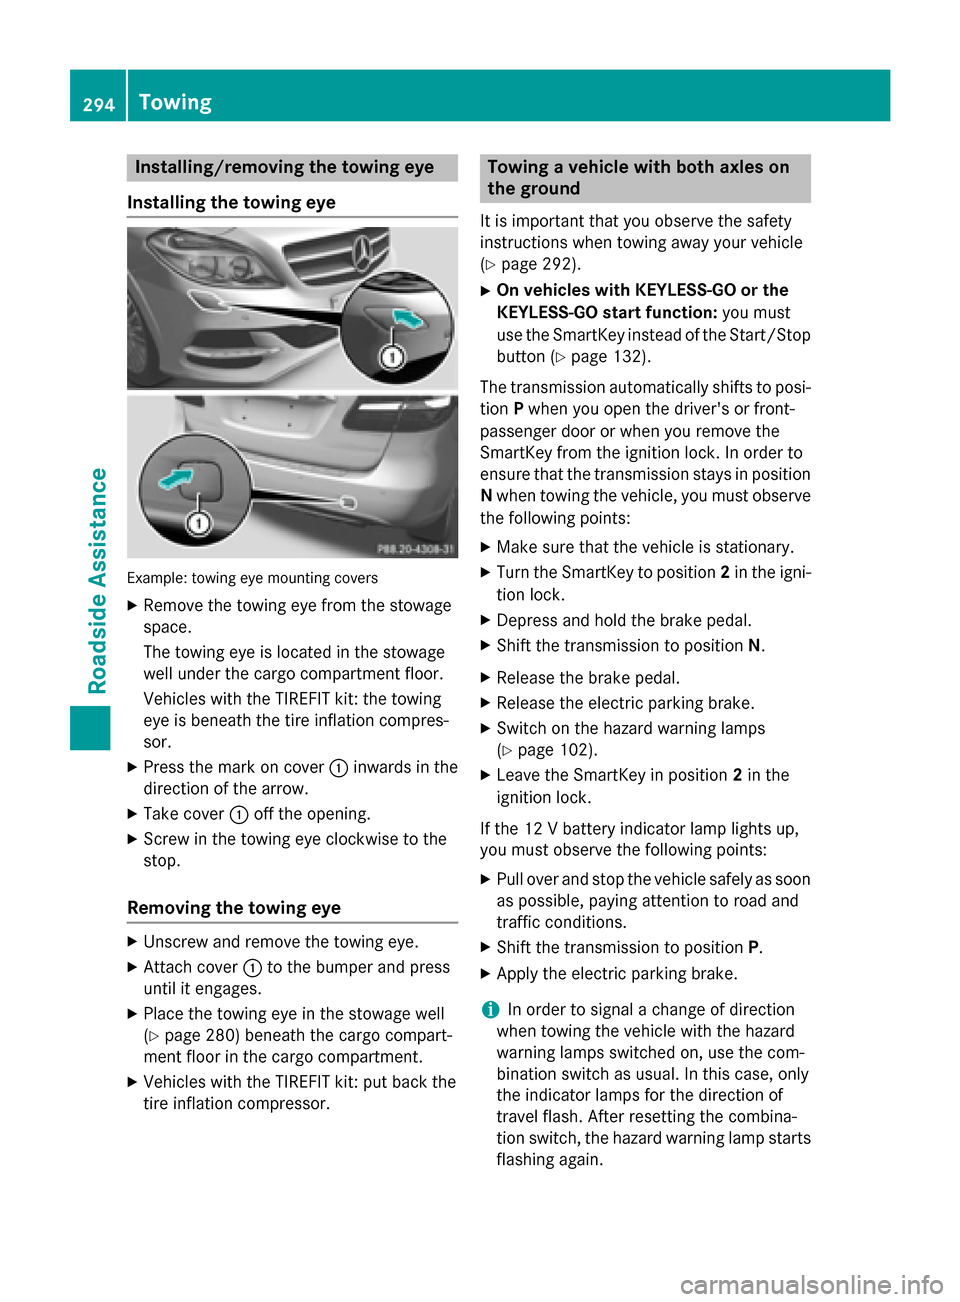
Installing the towing eye Example: towing eye mounting covers
X Remove the towing eye from the stowage
space.
The towing eye is located in the stowage
well under the cargo compartment floor.
Vehicles with the TIREFIT kit: the towing
eye is beneath the tire inflation compres-
sor.
X Press the mark on cover :inwards in the
direction of the arrow.
X Take cover :off the opening.
X Screw in the towing eye clockwise to the
stop.
Removing the towing eye X
Unscrew and remove the towing eye.
X Attach cover :to the bumper and press
until it engages.
X Place the towing eye in the stowage well
(Y page 280) beneath the cargo compart-
ment floor in the cargo compartment.
X Vehicles with the TIREFIT kit: put back the
tire inflation compressor. Towing a vehicle with both axles on
the ground
It is important that you observe the safety
instructions when towing away your vehicle
(Y page 292).
X On vehicles with KEYLESS-GO or the
KEYLESS-GO start function: you must
use the SmartKey instead of the Start/Stop
button (Y page 132).
The transmission automatically shifts to posi- tion Pwhen you open the driver's or front-
passenger door or when you remove the
SmartKey from the ignition lock. In order to
ensure that the transmission stays in position N when towing the vehicle, you must observe
the following points:
X Make sure that the vehicle is stationary.
X Turn the SmartKey to position 2in the igni-
tion lock.
X Depress and hold the brake pedal.
X Shift the transmission to position N.
X Release the brake pedal.
X Release the electric parking brake.
X Switch on the hazard warning lamps
(Y page 102).
X Leave the SmartKey in position 2in the
ignition lock.
If the 12 V battery indicator lamp lights up,
you must observe the following points:
X Pull over and stop the vehicle safely as soon
as possible, paying attention to road and
traffic conditions.
X Shift the transmission to position P.
X Apply the electric parking brake.
i In order to signal a change of direction
when towing the vehicle with the hazard
warning lamps switched on, use the com-
bination switch as usual. In this case, only
the indicator lamps for the direction of
travel flash. After resetting the combina-
tion switch, the hazard warning lamp starts
flashing again. 294
TowingRoadside Assistance