2015 MERCEDES-BENZ B-Class ELECTRIC display
[x] Cancel search: displayPage 69 of 338
Drive on carefully. Have ESP
®
checked at a
qualified specialist workshop.
When towing your vehicle with the front axle
raised, observe the notes on ESP ®
(Y page 295).
When towing the vehicle with the rear axle
raised, observe the notes on ESP ®
(Y page 295).
ESP ®
is only deactivated if the åwarning
lamp is lit continuously.
If the ÷ warning lamp and the åwarn-
ing lamp are lit continuously, ESP ®
is not
available due to a malfunction.
Observe the information on warning lamps
(Y page 233) and display messages which
may be shown in the instrument cluster
(Y page 201).
Only use wheels with the recommended tire
sizes. Only then will ESP ®
function properly.
Characteristics of ESP ®Characteristics of ESP
®
If the ÷ ESP warning lamp goes out before
beginning the journey, ESP ®
is automatically
active.
If ESP ®
intervenes, the ÷ESP®
warning
lamp flashes in the instrument cluster.
If ESP ®
intervenes:
X Do not deactivate ESP ®
under any circum-
stances.
X Only depress the accelerator pedal as far as
necessary when pulling away.
X Adapt your driving style to suit the prevail-
ing road and weather conditions. Deactivating/activating ESP
® Important safety notes
You can select between the following states
of ESP ®
:
R ESP ®
is activated.
R ESP ®
is deactivated. G
WARNING
If you deactivate ESP ®
, ESP ®
no longer sta-
bilizes the vehicle. There is an increased risk
of skidding and an accident.
Only deactivate ESP ®
in the situations descri-
bed in the following.
It may be best to deactivate ESP ®
in the fol-
lowing situations:
R when using snow chains
R in deep snow
R on sand or gravel
i Activate ESP ®
as soon as the situations
described above no longer apply. ESP ®
will
otherwise not be able to stabilize the vehi-
cle if the vehicle starts to skid or a wheel
starts to spin.
! Avoid spinning the driven wheels for an
extended period with ESP ®
deactivated.
You could otherwise damage the drivetrain.
Deactivating/activating ESP ®
You can deactivate or activate ESP ®
via the
on-board computer (Y page 194).
ESP ®
deactivated:
The å ESP®
OFF warning lamp in the
instrument cluster lights up.
ESP ®
activated:
The å ESP®
OFF warning lamp in the
instrument cluster goes out.
Characteristics when ESP ®
is deactivated
If ESP ®
is deactivated and one or more wheels
start to spin, the ÷ESP®
warning lamp in
the instrument cluster flashes. In such situa-
tions, ESP ®
will not stabilize the vehicle. Driving safety systems
67Safety Z
Page 71 of 338
Observe the "Important safety notes" section
for driving safety systems (Y page 62).
The Recuperative Brake System converts the kinetic energy when braking into electrical
energy. The electric motor is used as an alter-
nator during braking. This electrical energy is
then stored in the high-voltage battery.
You can find information about manually
adjustable recuperation under "Steering
wheel paddle shifters" (Y page 138).
If the warning light in the instrument cluster is lit up, there is a motor malfunction or a brake
malfunction.
Observe information regarding indicator and
warning lamps (Y page 229) as well as dis-
play messages (Y page 201). Protection against theft
Immobilizer
The immobilizer prevents your vehicle from
being started without the correct SmartKey.
X To activate with the SmartKey: remove
the SmartKey from the ignition lock.
X To activate with KEYLESS-GO start-
function or KEYLESS-GO: switch the igni-
tion off and open the driver's door.
X To deactivate: switch on the ignition.
When leaving the vehicle, always take the
SmartKey with you and lock the vehicle. Any-
one can start the drive system if a valid key
has been left inside the vehicle.
i The immobilizer is always deactivated
when you start the drive system.
In the event that the engine cannot be star- ted (yet the vehicle's battery is charged),
the system is not operational. The READY
display in the multifunction display does
not appear. Contact an authorized
Mercedes-Benz Center or call
1-800-FOR-MERCedes (in the USA) or
1-800-387-0100 (in Canada). ATA (anti-theft alarm system)
X
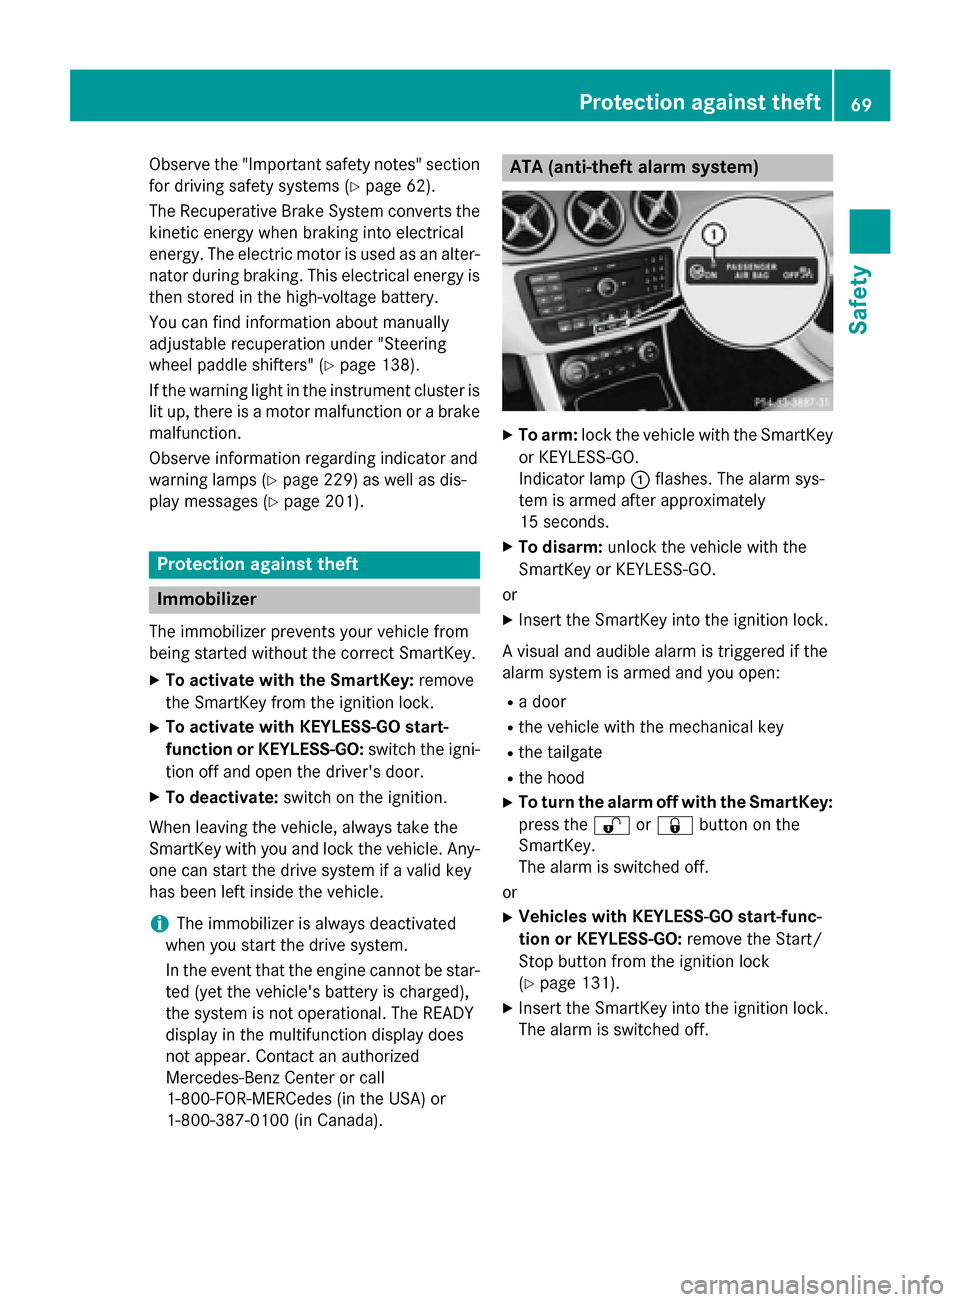
To arm: lock the vehicle with the SmartKey
or KEYLESS-GO.
Indicator lamp :flashes. The alarm sys-
tem is armed after approximately
15 seconds.
X To disarm: unlock the vehicle with the
SmartKey or KEYLESS-GO.
or X Insert the SmartKey into the ignition lock.
A visual and audible alarm is triggered if the
alarm system is armed and you open:
R a door
R the vehicle with the mechanical key
R the tailgate
R the hood
X To turn the alarm off with the SmartKey:
press the %or& button on the
SmartKey.
The alarm is switched off.
or
X Vehicles with KEYLESS-GO start-func-
tion or KEYLESS-GO: remove the Start/
Stop button from the ignition lock
(Y page 131).
X Insert the SmartKey into the ignition lock.
The alarm is switched off. Protection against theft
69Safety Z
Page 90 of 338
Useful information
i This Operator's Manual describes all
models and all standard and optional equip- ment of your vehicle available at the time of
publication of the Operator's Manual.
Country-specific differences are possible.
Please note that your vehicle may not be
equipped with all features described. This
also applies to safety-related systems and
functions.
i Read the information on qualified special-
ist workshops (Y page 25). Correct driver's seat position
G
WARNING
You could lose control of your vehicle if you do the following while driving:
R adjust the driver's seat, head restraint,
steering wheel or mirrors
R fasten the seat belt
There is a risk of an accident.
Adjust the driver's seat, head restraint, steer-
ing wheel and mirror and fasten your seat belt before starting the vehicle's drive system. X
Observe the safety guidelines on seat
adjustment (Y page 89).
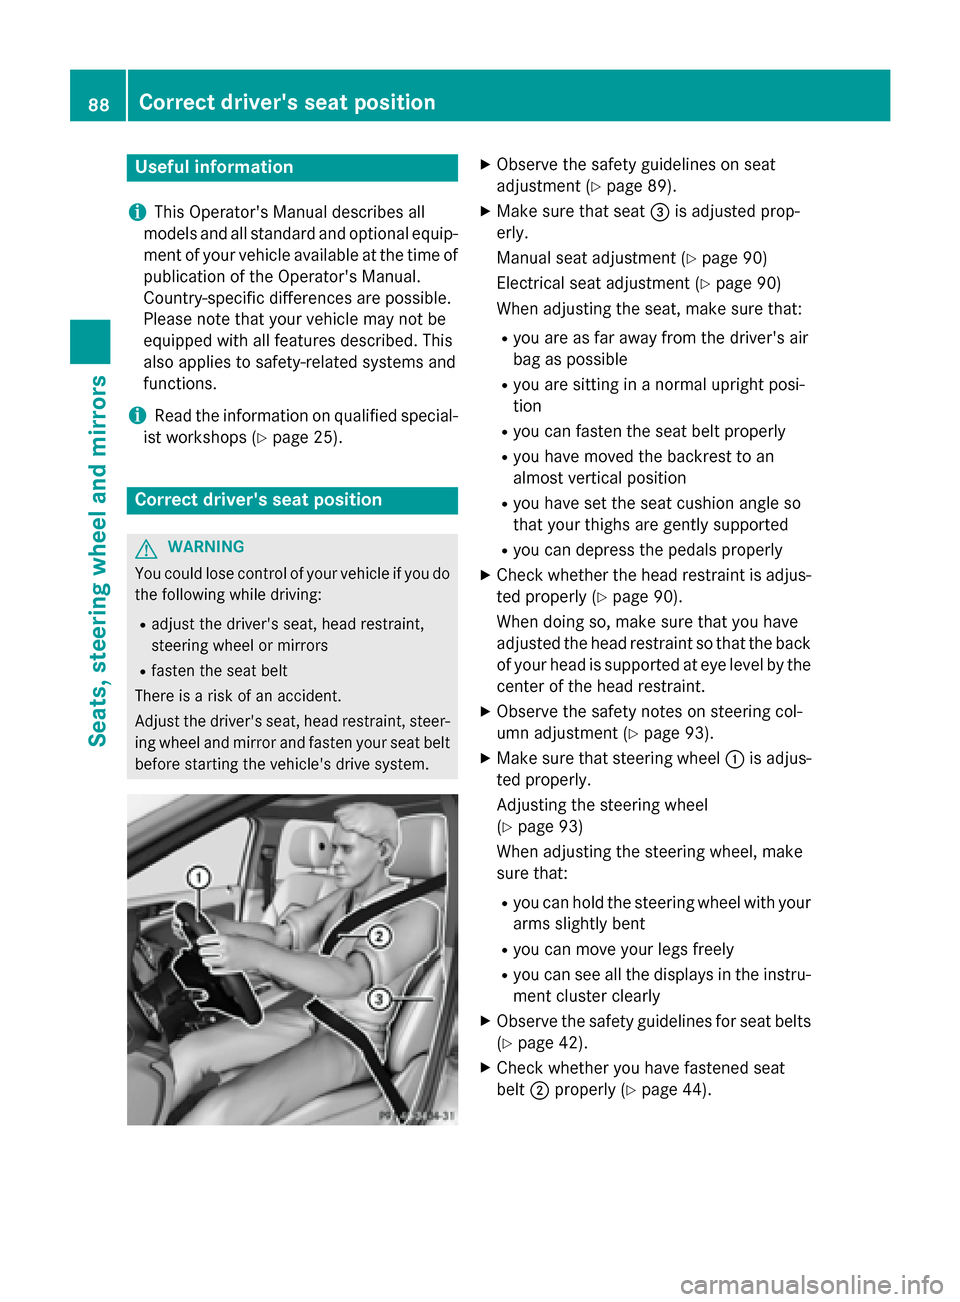
X Make sure that seat =is adjusted prop-
erly.
Manual seat adjustment (Y page 90)
Electrical seat adjustment (Y page 90)
When adjusting the seat, make sure that:
R you are as far away from the driver's air
bag as possible
R you are sitting in a normal upright posi-
tion
R you can fasten the seat belt properly
R you have moved the backrest to an
almost vertical position
R you have set the seat cushion angle so
that your thighs are gently supported
R you can depress the pedals properly
X Check whether the head restraint is adjus-
ted properly (Y page 90).
When doing so, make sure that you have
adjusted the head restraint so that the back of your head is supported at eye level by the
center of the head restraint.
X Observe the safety notes on steering col-
umn adjustment (Y page 93).
X Make sure that steering wheel :is adjus-
ted properly.
Adjusting the steering wheel
(Y page 93)
When adjusting the steering wheel, make
sure that:
R you can hold the steering wheel with your
arms slightly bent
R you can move your legs freely
R you can see all the displays in the instru-
ment cluster clearly
X Observe the safety guidelines for seat belts
(Y page 42).
X Check whether you have fastened seat
belt ;properly (Y page 44). 88
Correct driver's seat positionSeats, steering wheel and mirrors
Page 106 of 338
Important safety notes
G
WARNING
Adaptive Highbeam Assist does not recognize road users:
R who have no lights, e.g. pedestrians
R who have poor lighting, e.g. cyclists
R whose lighting is blocked, e.g. by a barrier
In very rare cases, Adaptive Highbeam Assist
may fail to recognize other road users that
have lights, or may recognize them too late. In this or similar situations, the automatic high-
beam headlamps will not be deactivated or
activated regardless. There is a risk of an acci-
dent.
Always carefully observe the traffic conditions and switch off the high-beam headlamps in
good time.
Adaptive Highbeam Assist cannot take into
account road, weather or traffic conditions.
Adaptive Highbeam Assist is only an aid. You are responsible for adjusting the vehicle's
lighting to the prevailing light, visibility and
traffic conditions.
In particular, the detection of obstacles can
be restricted if there is:
R poor visibility, e.g. due to fog, heavy rain or
snow
R dirt on the sensors or the sensors are
obscured
Switching Adaptive Highbeam Assist
on/off X
To switch on: turn the light switch to Ã.
X Press the combination switch beyond the
pressure point in the direction of arrow :.
The _ indicator lamp in the multifunc-
tion display lights up when it is dark and the
light sensor activates the low-beam head-
lamps.
If you are driving at speeds above approx-
imately 16 mph (25 km/h): The headlamp range is set automatically
depending on the distance between the
vehicle and other road users.
If you are driving at speeds above approx-
imately 19 mph (30 km/h) and no other
road users are recognized:
The high-beam headlamps are switched on
automatically. The Kindicator lamp in
the instrument cluster also lights up.
If you are driving at speeds below approx-
imately 16 mph (25 km/h)or other road
users have been detected or the roads are adequately lit:
The high-beam headlamps are switched off
automatically. The Kindicator lamp in
the instrument cluster goes out. The _
indicator lamp in the multifunction display
remains lit.
X To deactivate: move the combination
switch back to its normal position.
The _ indicator lamp in the multifunc-
tion display goes out. Headlamps fogged up on the inside
Certain climatic and physical conditions may
cause moisture to form in the headlamp. This moisture does not affect the functionality of
the headlamp. 104
Exterior lightingLights and windshield wipers
Page 119 of 338
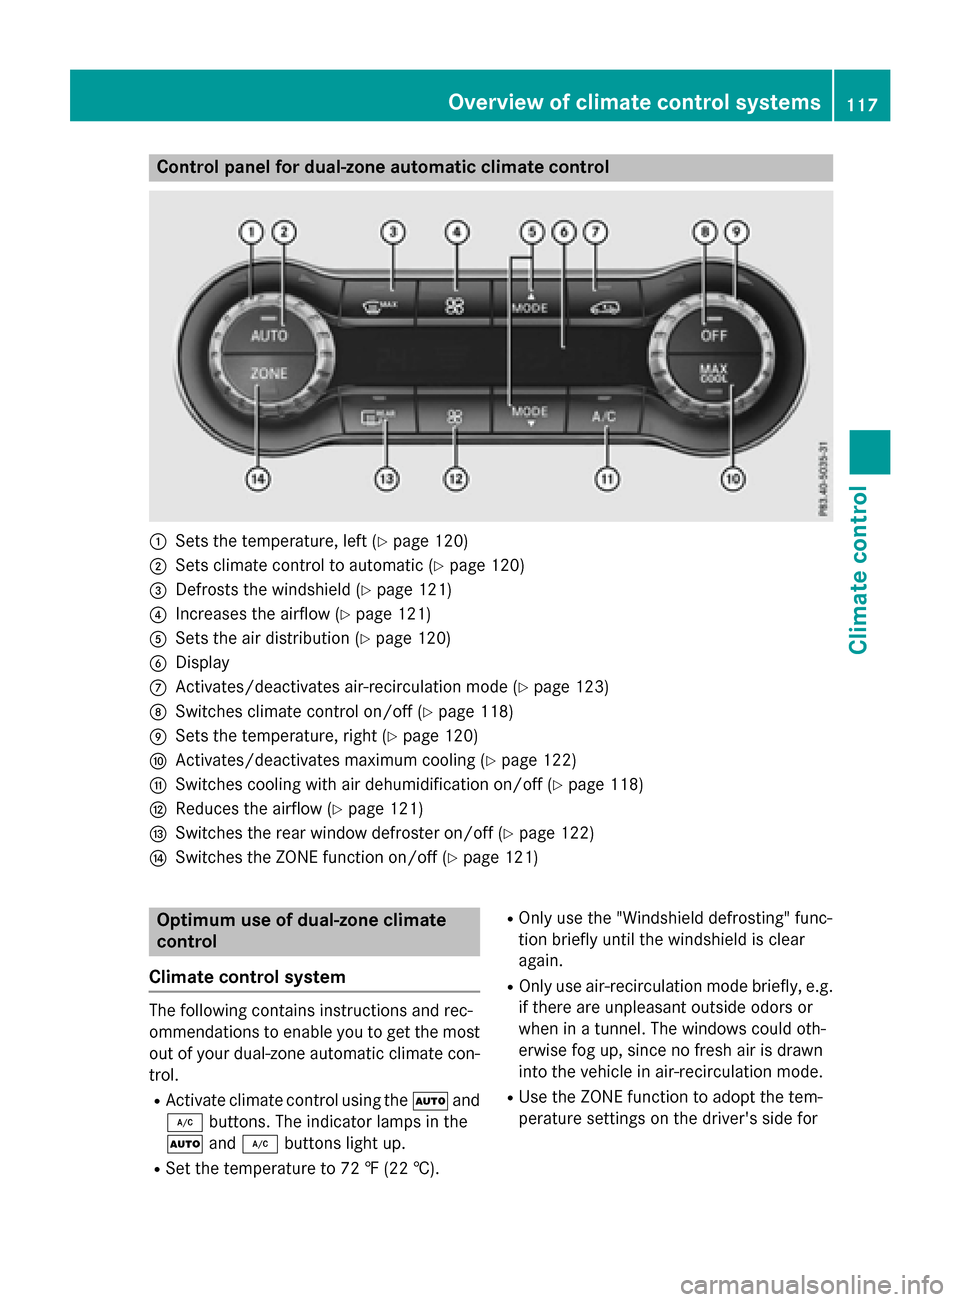
Control panel for dual-zone automatic climate control
:
Sets the temperature, left (Y page 120)
; Sets climate control to automatic (Y page 120)
= Defrosts the windshield (Y page 121)
? Increases the airflow (Y page 121)
A Sets the air distribution (Y page 120)
B Display
C Activates/deactivates air-recirculation mode (Y page 123)
D Switches climate control on/off (Y page 118)
E Sets the temperature, right (Y page 120)
F Activates/deactivates maximum cooling (Y page 122)
G Switches cooling with air dehumidification on/off (Y page 118)
H Reduces the airflow (Y page 121)
I Switches the rear window defroster on/off (Y page 122)
J Switches the ZONE function on/off (Y page 121)Optimum use of dual-zone climate
control
Climate control system The following contains instructions and rec-
ommendations to enable you to get the most
out of your dual-zone automatic climate con- trol.
R Activate climate control using the Ãand
¿ buttons. The indicator lamps in the
à and¿ buttons light up.
R Set the temperature to 72 ‡ (22 †). R
Only use the "Windshield defrosting" func-
tion briefly until the windshield is clear
again.
R Only use air-recirculation mode briefly, e.g.
if there are unpleasant outside odors or
when in a tunnel. The windows could oth-
erwise fog up, since no fresh air is drawn
into the vehicle in air-recirculation mode.
R Use the ZONE function to adopt the tem-
perature settings on the driver's side for Overview of climate control systems
117Climate control
Page 120 of 338
the front-passenger side as well. The indi-
cator lamp in the ábutton goes out.
R If you change the settings of the climate
control system, the climate status display
appears for approximately three seconds
at the bottom of the screen in the Audio/
COMAND display (see separate operating
instructions). You will see the current set-
tings of the various climate control func-
tions.
You can choose between various drive pro-
grams with the program selector button
(Y page 137). If you have selected drive pro-
gram E+, the climate control switches to Eco
mode and thermal comfort is impaired.
In Eco mode:
R the cooling output is reduced when cooling
R heat output is reduced when heating
R the time for which the rear window
defroster will run is reduced
If you have selected drive program Eor Sthe
climate control switches to Comfort mode.
The current climate control settings are main- tained in Comfort mode. Operating the climate control sys-
tems Switching climate control on/off
General notes When the climate control is switched off, the
air supply and air circulation are also
switched off. The windows could fog up.
Therefore, switch off climate control only
briefly Dual-zone automatic climate control X
Turn the SmartKey to position 2in the igni-
tion lock (Y page 131).
X To activate: press theÃbutton.
The indicator lamp in the Ãbutton lights
up. Airflow and air distribution are set to
automatic mode.
or
X Press the ^button.
The indicator lamp in the ^button goes
out. The previously selected settings are
restored.
X To deactivate: press the^button.
The indicator lamp in the ^button lights
up.
i Activate climate control primarily using
the à button. Activating/deactivating cooling with
air dehumidification
General notes If you deactivate the "Cooling with air-dehu-
midification" function, the air inside the vehi-
cle will not be cooled. The air inside the vehi-cle will also not be dehumidified. The win-
dows can fog up more quickly. Therefore, only
deactivate the "Cooling with air-dehumidifi-
cation" function briefly.
The "Cooling with air-dehumidification" func-
tion is operational when the vehicle is ready
to drive. The air inside the vehicle is cooled
and dehumidified according to the tempera-
ture selected.
Condensation may drip from the underside of the vehicle when it is in cooling mode. This is
normal and not a sign that there is a malfunc- tion. 118
Operating the climate control systemsClimate control
Page 135 of 338
Additionally, children could set the vehicle in
motion if, for example, they:
R release the parking brake.
R shift the transmission out of park position P
R start the vehicle's drive system.
There is a risk of an accident and injury.
When leaving the vehicle, always take the
SmartKey with you and lock the vehicle. Never leave children or animals unattended in the
vehicle. Always keep the SmartKey out of
reach of children.
Vehicles with an electric motor generate
much less driving noise than vehicles with
internal combustion engines. As a result, your vehicle may not be heard by other road users
in certain situations. This can happen, for
example, when you are parking and your vehi-
cle is not seen by other road users. This
requires you to adopt a particularly anticipa-
tory driving style, as it is necessary to allow
for the possibility that other road users may
behave erratically.
The vehicle is equipped with a sound gener-
ator. The sound generator is activated so that
other road users can hear your vehicle better. The sound generator is activated at speeds of under 20 mph (30 km/h) and switches off
automatically at higher speeds.
Starting procedure with the Start/Stop button The Start/Stop button can be used to start
the vehicle manually without inserting the
SmartKey into the ignition lock. The Start/
Stop button must be inserted in the ignition
lock and the SmartKey must be in the vehicle.
You can start the drive system if a valid key isin the vehicle. Switch off the drive system and
always take the key with you when leaving the vehicle, even if you only leave it for a short
time. Pay attention to the important safety
notes. X
Depress the brake pedal and keep it
depressed.
X Press the Start/Stop button once
(Y page 131).
The drive system is started. Once the vehi-
cle is ready to be driven, the Ready Readydisplay
(Y page 182) appears in the lower part of
the multifunction display.
Starting procedure with the SmartKey To start the drive system using the key
instead of the Start/Stop button, pull the
Start/Stop button out of the ignition lock.
X
Turn the SmartKey to position 3
(Y page 131 )in the ignition lock and release
it.
The drive system is started. Once the vehi-
cle is ready to be driven, the Ready Readydisplay
(Y page 182) appears in the lower part of
the multifunction display. Pulling away
The vehicle is equipped with a sound gener-
ator. At low speeds, an electric vehicle makes less noise than a vehicle with a combustion
engine. The sound generator is activated so
that other road users can hear your vehicle
better. The sound generator is activated at
speeds of under 20 mph (30 km/h) and
switches off automatically at higher speeds.
X Depress the brake pedal and keep it
depressed.
X Move the DIRECT SELECT lever to position
D or R.
X Release the brake pedal.
X Carefully depress the accelerator pedal.
The electric parking brake is automatically
released (Y page 155).
The red F(USA only) or !(Canada
only) indicator lamp in the instrument clus-
ter goes out.
The vehicle locks centrally once you have
pulled away. The locking knobs in the doors Driving
133Driving an d parking Z
Page 136 of 338
drop down. You can open the doors from the
inside at any time.
It is only possible to move the DIRECT SELECT
selector lever from position Pto the desired
selector lever position if you depress the
brake pedal. The parking lock is then deacti-
vated and the electrical parking brake is
released automatically. If the brake pedal is
not depressed, the DIRECT SELECT lever can still be moved but the parking lock remains
engaged.
Make sure that no charging cable is plugged
in. The parking lock cannot be released if a
charging cable is plugged in. Hill start assist
Hill start assist will aid you when pulling away
on a hill. It holds the vehicle for a short time
after you have removed your foot from the
brake pedal. This gives you enough time to
move your foot from the brake pedal to the
accelerator pedal and depress it before the
vehicle begins to roll. G
WARNING
After a short time, hill start assist will no lon-
ger brake your vehicle and it could roll away.
There is a risk of an accident and injury.
Therefore, quickly move your foot from the
brake pedal to the accelerator pedal. Never
leave the vehicle when it is held by hill start
assist.
Hill start assist is not active if: R you are pulling away on a level road or on a
downhill gradient.
R the DIRECT SELECT lever is in position N.
R the electric parking brake is applied.
R ESP ®
is malfunctioning.
Further information on holding the vehicle
stationary on uphill gradients (Y page 137). Transmission
Important safety notes
Shift the DIRECT SELECT lever to position P
when the drive system is switched off and the
vehicle is stationary. Park position Pis
engaged and the electric parking brake is
applied automatically:
If the DIRECT SELECT lever cannot be
engaged in park position P, the parking brake
is engaged automatically.
Observe the important safety notes on
switching ESP ®
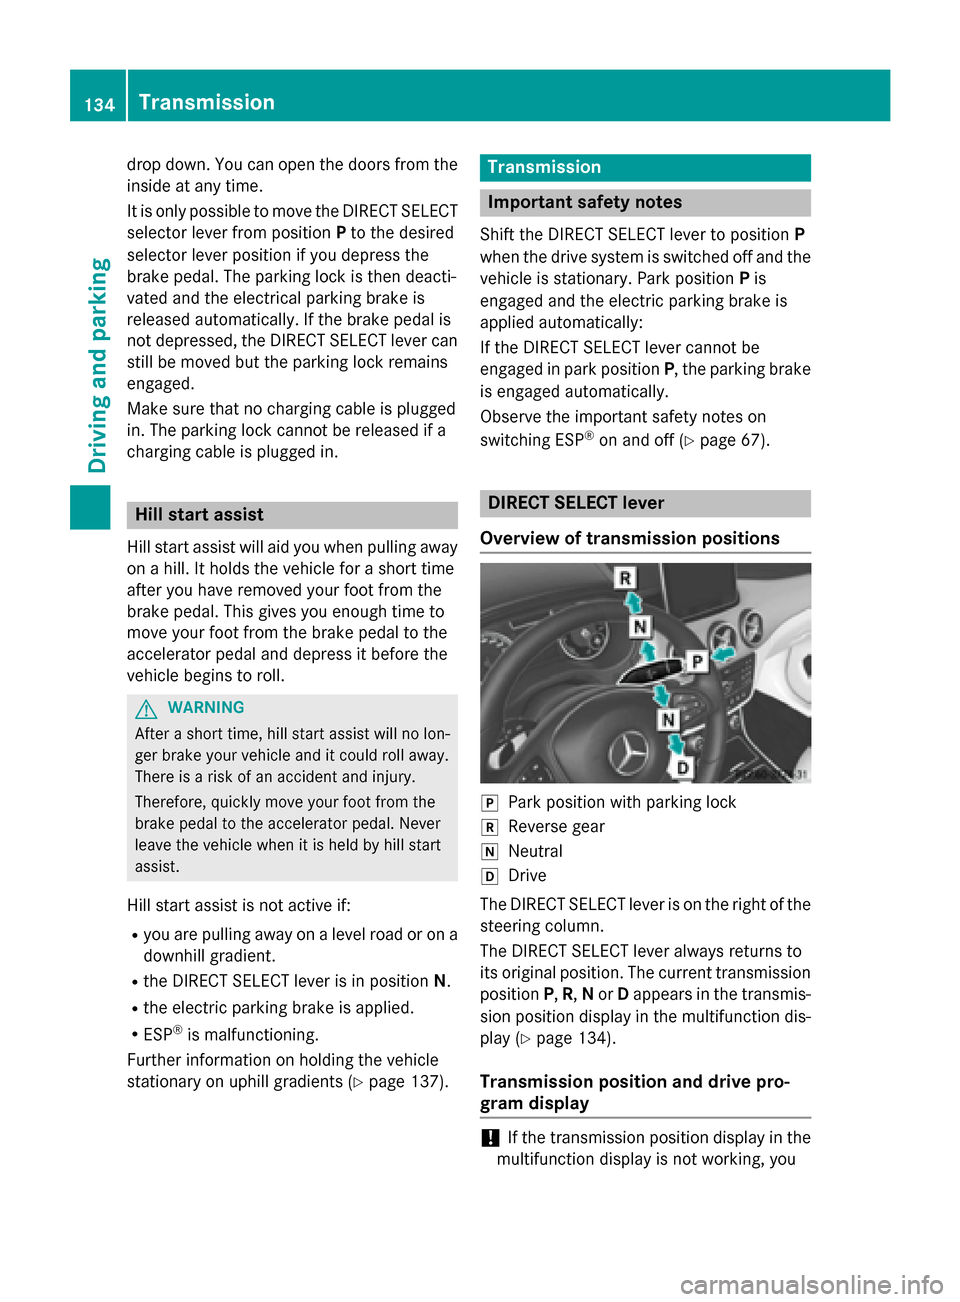
on and off (Y page 67). DIRECT SELECT lever
Overview of transmission positions j
Park position with parking lock
k Reverse gear
i Neutral
h Drive
The DIRECT SELECT lever is on the right of the
steering column.
The DIRECT SELECT lever always returns to
its original position. The current transmission position P,R, Nor Dappears in the transmis-
sion position display in the multifunction dis- play (Y page 134).
Transmission position and drive pro-
gram display !
If the transmission position display in the
multifunction display is not working, you 134
TransmissionDriving and parking