2015 MERCEDES-BENZ B-Class ELECTRIC key battery
[x] Cancel search: key batteryPage 78 of 338
X
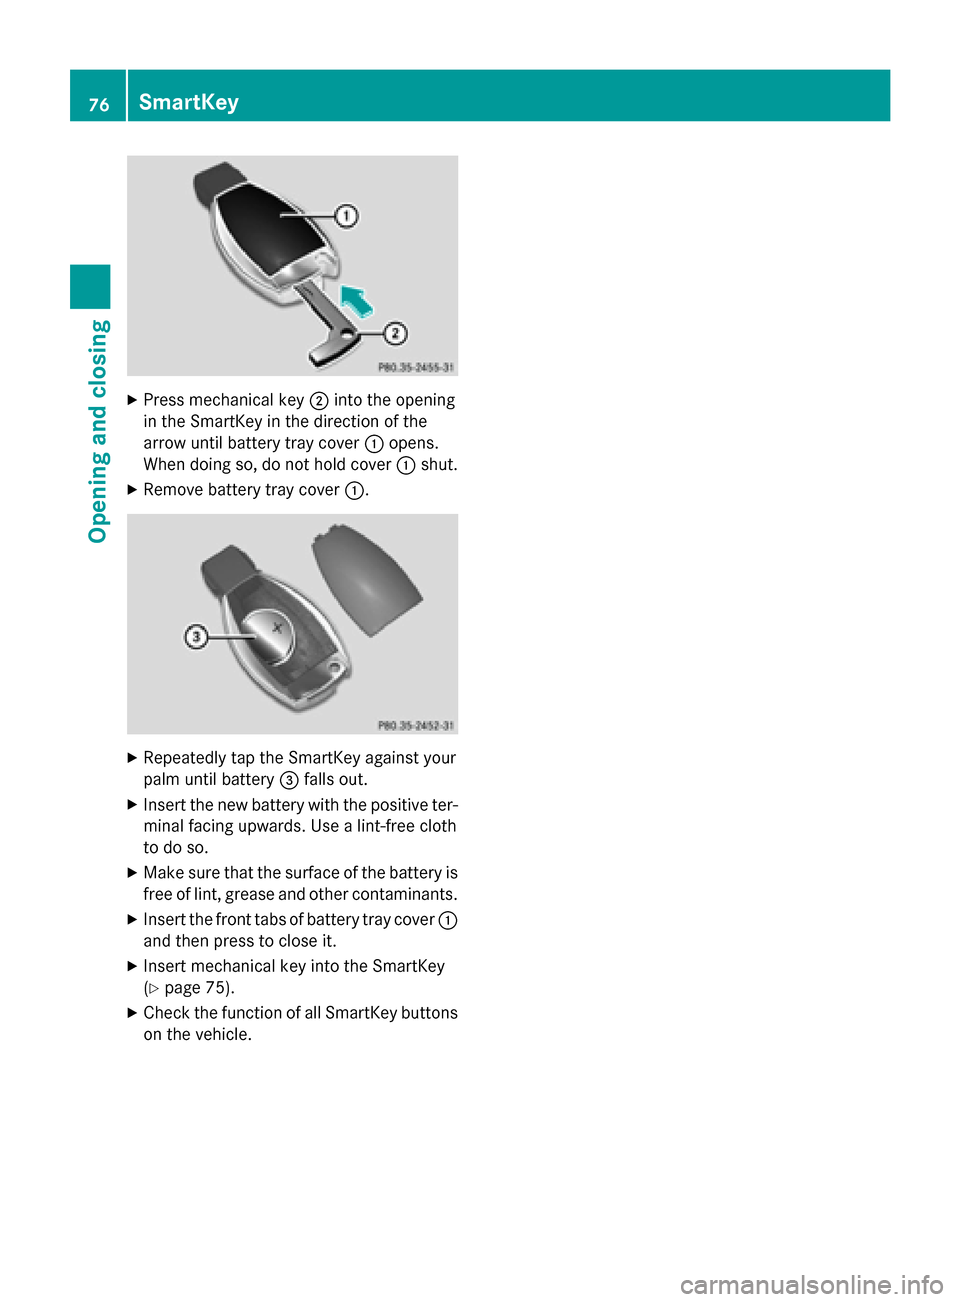
Press mechanical key ;into the opening
in the SmartKey in the direction of the
arrow until battery tray cover :opens.
When doing so, do not hold cover :shut.
X Remove battery tray cover :.X
Repeatedly tap the SmartKey against your
palm until battery =falls out.
X Insert the new battery with the positive ter-
minal facing upwards. Use a lint-free cloth
to do so.
X Make sure that the surface of the battery is
free of lint, grease and other contaminants.
X Insert the front tabs of battery tray cover :
and then press to close it.
X Insert mechanical key into the SmartKey
(Y page 75).
X Check the function of all SmartKey buttons
on the vehicle. 76
SmartKeyOpening and closing
Page 79 of 338
Problems with the SmartKey
Problem
Possible causes/consequences and
M
MSolutions You cannot lock or
unlock the vehicle
using the SmartKey. The SmartKey battery is discharged or nearly discharged.
X Vehicles without KEYLESS-GO or KEYLESS-GO start func-
tion: try again to lock/unlock the vehicle using the remote con-
trol function of the SmartKey. Point the tip of the SmartKey at
the driver's door handle from close range and press the %or
& button.
If this does not work: X Check the SmartKey battery (Y page 75) and replace it if nec-
essary (Y page 75).
X Unlock (Y page 80) or lock (Y page 81) the vehicle using the
mechanical key. There is interference from a powerful source of radio waves.
X Vehicles without KEYLESS-GO or KEYLESS-GO start func-
tion: try again to lock/unlock the vehicle using the remote con-
trol function of the SmartKey. Point the tip of the SmartKey at
the driver's door handle from close range and press the %/
& button.
If this does not work: X Unlock (Y page 80) or lock (Y page 81) the vehicle using the
mechanical key. The SmartKey is faulty.
X Unlock (Y page 80) or lock (Y page 81) the vehicle using the
mechanical key.
X Have the SmartKey checked at a qualified specialist workshop. You can no longer lock
or unlock the vehicle
using KEYLESS-GO. The SmartKey battery is discharged or nearly discharged.
X Check the SmartKey battery (Y page 75) and replace it if nec-
essary (Y page 75).
If this does not work:
X Unlock (Y page 80) or lock (Y page 81) the vehicle using the
mechanical key. There is interference from a powerful source of radio waves.
X Unlock (Y page 80) or lock (Y page 81) the vehicle using the
mechanical key. SmartKey
77Opening and closing Z
Page 80 of 338
Problem
Possible causes/consequences and
M
MSolutions KEYLESS-GO is malfunctioning.
X Lock/unlock the vehicle using the remote control function of
the SmartKey.
X Have the vehicle and SmartKey checked at a qualified specialist
workshop.
If the vehicle can also not be locked/unlocked using the remote
control function:
X Unlock (Y page 80) or lock (Y page 81) the vehicle using the
mechanical key.
X Have the vehicle and SmartKey checked at a qualified specialist
workshop. The drive system can-
not be started using the
SmartKey. The on-board voltage is too low.
X Switch off non-essential consumers, e.g. seat heating or interior
lighting, and try to start the drive system again.
If this does not work:
X Check the 12 V battery and charge it if necessary (Y page 287).
or
X Check the high-voltage battery and charge it if necessary
(Y page 141).
or
X Jump-start the vehicle (Y page 290).
or
X Consult a qualified specialist workshop. The drive system can-
not be started using the
Start/Stop button. The
SmartKey is in the vehi-
cle. The vehicle is locked.
X Unlock the vehicle and try to start the vehicle again. The SmartKey battery is discharged or nearly discharged.
X Check the SmartKey battery (Y page 75) and replace it if nec-
essary (Y page 75).
If this does not work:
X Start your vehicle with the SmartKey in the ignition lock. There is interference from a powerful source of radio waves.
X Start your vehicle with the SmartKey in the ignition lock. 78
SmartKeyOpening and closing
Page 94 of 338
:
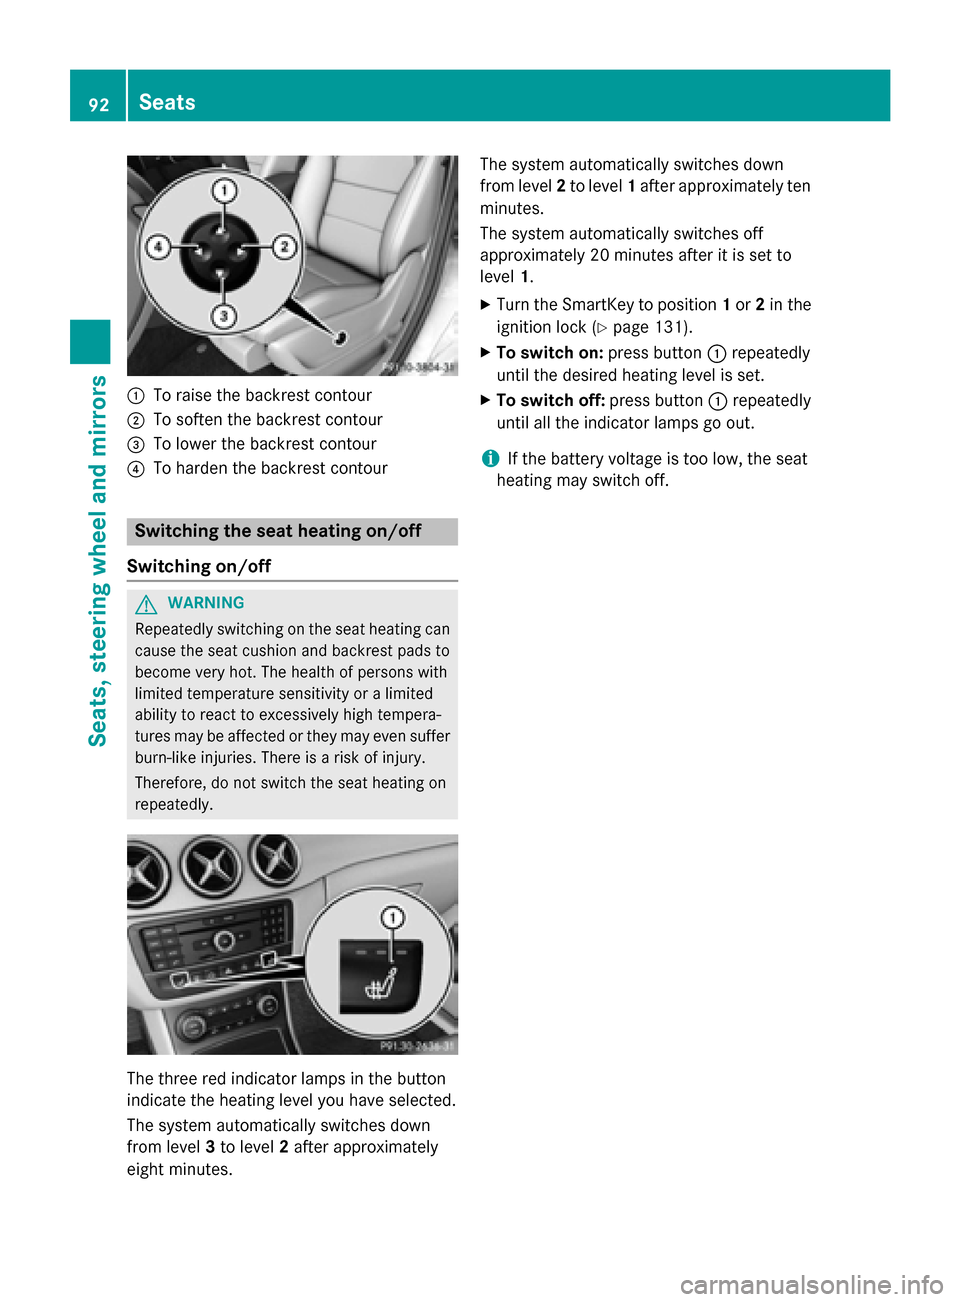
To raise the backrest contour
; To soften the backrest contour
= To lower the backrest contour
? To harden the backrest contour Switching the seat heating on/off
Switching on/off G
WARNING
Repeatedly switching on the seat heating can
cause the seat cushion and backrest pads to
become very hot. The health of persons with
limited temperature sensitivity or a limited
ability to react to excessively high tempera-
tures may be affected or they may even suffer burn-like injuries. There is a risk of injury.
Therefore, do not switch the seat heating on
repeatedly. The three red indicator lamps in the button
indicate the heating level you have selected.
The system automatically switches down
from level 3to level 2after approximately
eight minutes. The system automatically switches down
from level
2to level 1after approximately ten
minutes.
The system automatically switches off
approximately 20 minutes after it is set to
level 1.
X Turn the SmartKey to position 1or 2in the
ignition lock (Y page 131).
X To switch on: press button:repeatedly
until the desired heating level is set.
X To switch off: press button:repeatedly
until all the indicator lamps go out.
i If the battery voltage is too low, the seat
heating may switch off. 92
SeatsSeats, steering wheel and mirrors
Page 95 of 338
Problems with the seat heating
Problem
Possible causes/consequences and
M
MSolutions The seat heating has
switched off prema-
turely or cannot be
switched on. The on-board voltage is too low because too many electrical con-
sumers are switched on.
X Switch off electrical consumers that you do not need, such as
the rear window defroster or interior lighting.
Once the battery is sufficiently charged, the seat heating will
switch back on automatically. Steering wheel
Important safety notes
G
WARNING
You could lose control of your vehicle if you do the following while driving:
R adjust the driver's seat, head restraint,
steering wheel or mirrors
R fasten the seat belt
There is a risk of an accident.
Adjust the driver's seat, head restraint, steer-
ing wheel and mirror and fasten your seat belt before starting the vehicle's drive system. G
WARNING
Children could injure themselves if they
adjust the steering wheel. There is a risk of
injury.
When leaving the vehicle, always take the
SmartKey with you and lock the vehicle. Never leave children unsupervised in the vehicle. Adjusting the steering wheel
G
WARNING
If the steering wheel is unlocked while the
vehicle is in motion, it could change position
unexpectedly. This could cause you to lose
control of the vehicle. There is a risk of an
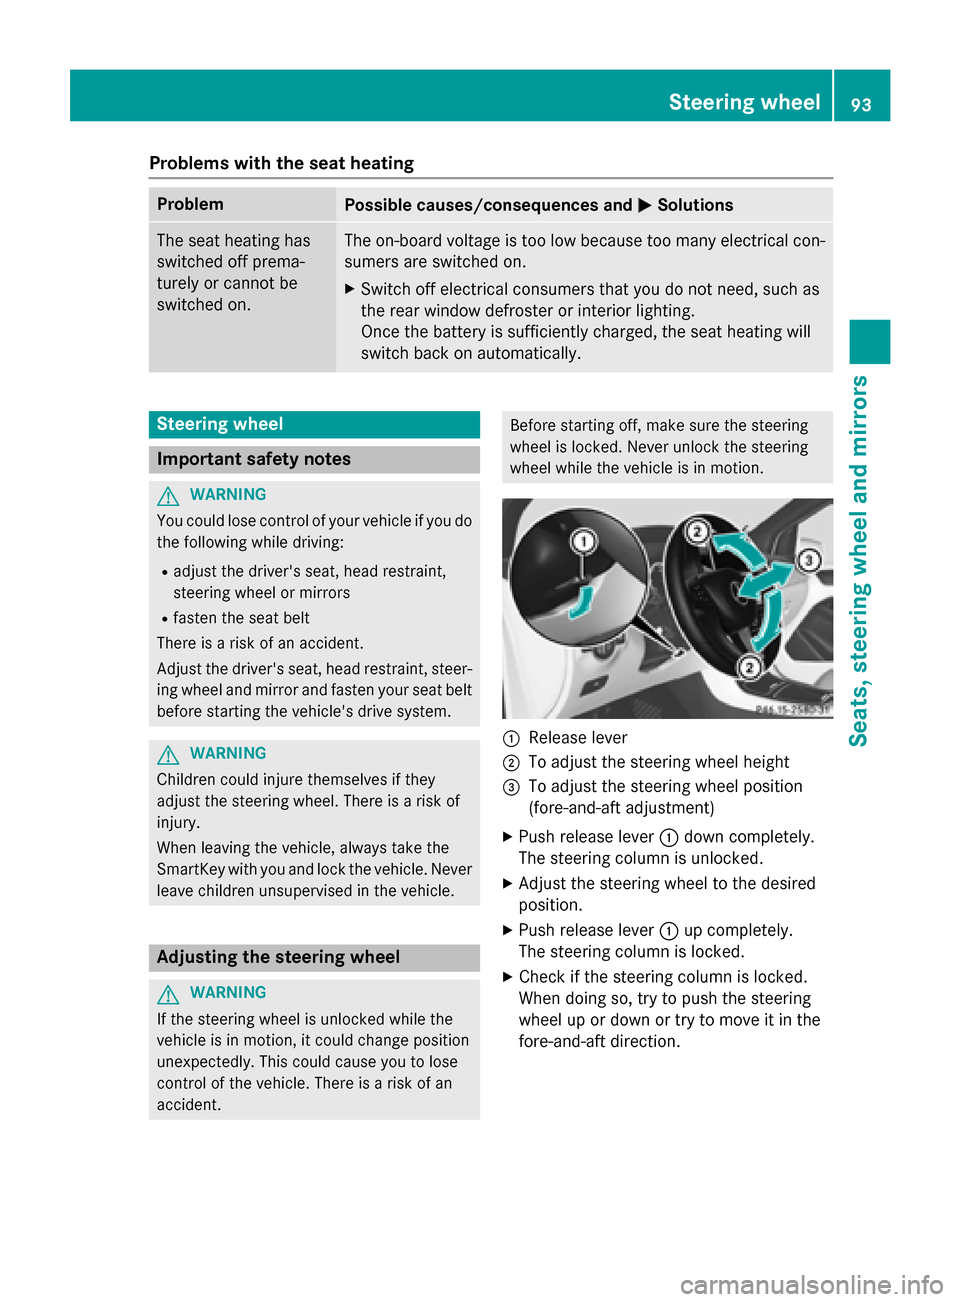
accident. Before starting off, make sure the steering
wheel is locked. Never unlock the steering
wheel while the vehicle is in motion.
:
Release lever
; To adjust the steering wheel height
= To adjust the steering wheel position
(fore-and-aft adjustment)
X Push release lever :down completely.
The steering column is unlocked.
X Adjust the steering wheel to the desired
position.
X Push release lever :up completely.
The steering column is locked.
X Check if the steering column is locked.
When doing so, try to push the steering
wheel up or down or try to move it in the
fore-and-aft direction. Steering wheel
93Seats, steering wheel and mirrors Z
Page 103 of 338
time running lamps or the parking lamps
and low-beam headlamps are switched on
or off automatically depending on the
brightness of the ambient light.
X To switch on automatic headlamp
mode: turn the light switch to Ã.G
WARNING
When the light switch is set to Ã, the low-
beam headlamps may not be switched on
automatically if there is fog, snow or other
causes of poor visibility due to the weather
conditions such as spray. There is a risk of an
accident.
In such situations, turn the light switch to
L.
The automatic headlamp feature is only an
aid. The driver is responsible for the vehicle's lighting at all times.
The daytime running lamps improve the visi-
bility of your vehicle during the day. To do this,
the daytime running lamps function must be
switched on using the on-board computer
(Y page 198).
If the drive system is switched on and you turn
the light switch to TorL, the manual
settings take precedence over the daytime
running lamps.
Low-beam headlamps
Even if the light sensor does not detect that it is dark, the parking lamps and low-beam
headlamps switch on when the ignition is
switched on and the light switch is set to the
L position. This is a particularly useful
function in the event of rain and fog.
X To switch on the low-beam headlamps:
turn the SmartKey to position 2in the igni-
tion lock or start the drive system.
X Turn the light switch to L.
The green Lindicator lamp in the instru-
ment cluster lights up. Rear fog lamp
The rear fog lamp improves visibility of your
vehicle for the traffic behind in the event of
thick fog. Please take note of the country-
specific regulations for the use of rear fog
lamps.
X To switch on the rear fog lamp: turn the
SmartKey to position 2in the ignition lock
or start the drive system.
X Turn the light switch to LorÃ.
X Press the Rbutton.
The yellow Rindicator lamp in the
instrument cluster lights up.
X To switch off the rear fog lamp: press the
R button.
The yellow Rindicator lamp in the
instrument cluster goes out.
Parking lamps ! If the battery charge level is very low, the
parking lamps or standing lamps are
switched off automatically in order to pre-
serve energy to start the drive system.
Always park your vehicle safely and suffi-
ciently lit according to legal standards.
Avoid using the parking lamps Tfor
periods of several hours. Where possible,
switch the right-hand Xor left-hand
W standing lamp on.
X To switch on: turn the light switch to T.
The green Tindicator lamp in the instru-
ment cluster lights up.
Standing lamps
Switching on the standing lamps ensures the
corresponding side of the vehicle is illumina-
ted.
X To switch on the standing lamps: the
SmartKey is not in the ignition lock or it is in position 0.
X Turn the light switch to W(left-hand side
of the vehicle) or X(right-hand side of
the vehicle). Exterior lighting
101Lights andwindshield wipers Z
Page 107 of 338
Interior lighting
Overview of interior lighting
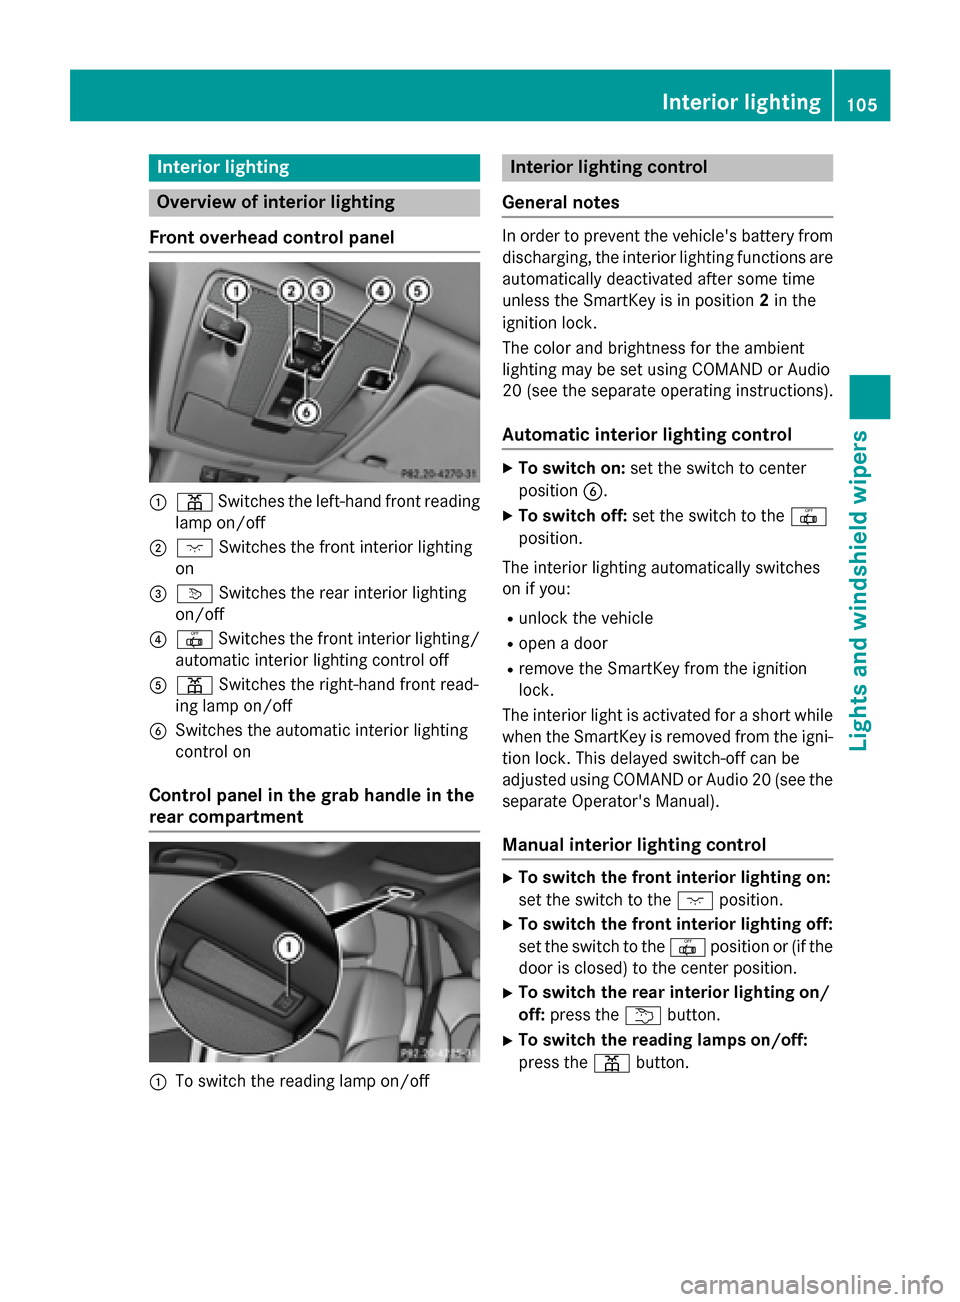
Front overhead control panel :
p Switches the left-hand front reading
lamp on/off
; c Switches the front interior lighting
on
= v Switches the rear interior lighting
on/off
? | Switches the front interior lighting/
automatic interior lighting control off
A p Switches the right-hand front read-
ing lamp on/off
B Switches the automatic interior lighting
control on
Control panel in the grab handle in the
rear compartment :
To switch the reading lamp on/off Interior lighting control
General notes In order to prevent the vehicle's battery from
discharging, the interior lighting functions are
automatically deactivated after some time
unless the SmartKey is in position 2in the
ignition lock.
The color and brightness for the ambient
lighting may be set using COMAND or Audio
20 (see the separate operating instructions).
Automatic interior lighting control X
To switch on: set the switch to center
position B.
X To switch off: set the switch to the |
position.
The interior lighting automatically switches
on if you:
R unlock the vehicle
R open a door
R remove the SmartKey from the ignition
lock.
The interior light is activated for a short while when the SmartKey is removed from the igni-
tion lock. This delayed switch-off can be
adjusted using COMAND or Audio 20 (see the separate Operator's Manual).
Manual interior lighting control X
To switch the front interior lighting on:
set the switch to the cposition.
X To switch the front interior lighting off:
set the switch to the |position or (if the
door is closed) to the center position.
X To switch the rear interior lighting on/
off: press the ubutton.
X To switch the reading lamps on/off:
press the pbutton. Interior lighting
105Lights and windshield wipers Z
Page 124 of 338
X
Press the Ãbutton.
The indicator lamp in the ¬button goes
out. Airflow and air distribution are set to
automatic mode.
or X Turn temperature control :orE counter-
clockwise or clockwise (Y page 117).MAX COOL maximum cooling
The MAX COOL function is only available in
vehicles for the USA.
The MAX COOL function only works when the vehicle is ready to drive.
X To activate: press theÙbutton.
The indicator lamp in the button lights up.
X To deactivate: press theÙbutton.
The indicator lamp goes out. The previously
selected settings are restored.
When you activate MAX COOL, climate con-
trol switches to the following functions:
R maximum cooling
R maximum airflow
R air-recirculation mode on Defrosting the windows
Windows fogged up on the inside X
Activate the ¿"Cooling with air dehu-
midification" function.
X Activate automatic mode Ã.
X If the windows continue to fog up, activate
the ¬ "Windshield defrosting" function.
i You should only select this setting until
the windshield is clear again.
Windows fogged up on the outside X
Activate the windshield wipers.
X Set the air distribution to PorO.
i You should only select this setting until
the windshield is clear again. Rear window defroster
General notes The rear window defroster has a high current
draw. You should therefore switch it off as
soon as the rear window is clear. Otherwise,
the rear window defroster switches off auto-
matically after several minutes.
If the battery voltage is too low, the rear win-
dow defroster may switch off.
Switching on/off X
Turn the SmartKey to position 2in the igni-
tion lock (Y page 131).
X Press the ¤button.
The indicator lamp in the ¤button lights
up or goes out. 122
Operating the climate control systemsClimate control