2015 LINCOLN MKT change time
[x] Cancel search: change timePage 9 of 500

Extended Service Plan 370
Audio System 373
MyLincoln Touch™ system..............................375
Rear seat controls (if equipped)..........................376
MyLincoln Touch™ 378
Privacy Information...................................384
Voice recognition.....................................386
Listening to music....................................390
Phone features.......................................411
Information Menu.....................................419
Settings............................................431
Climatefeatures......................................443
Navigation system.....................................446
Appendices 458
Scheduled Maintenance 476
Normal scheduled maintenance and log.....................481
Index 493
The information contained in this publication was correct at the time of going to
print. In the interest of continuous development, we reserve the right to change
specifications, design or equipment at any time without notice or obligation. No
part of this publication may be reproduced, transmitted, stored in a retrieval
system or translated into any language in any form by any means without our
written permission. Errors and omissions excepted.
© Ford Motor Company 2014
8Table of Contents
2015 MKT(mkt)
Owners Guide gf, 1st Printing, October 2014
USA(fus)
Page 70 of 500

PRINCIPLES OF OPERATION
MyKey allows you to program keys with restricted driving modes to
promote good driving habits. All but one of the keys programmed to the
vehicle can be activated with these restricted modes.
Any keys that have not been programmed are referred to as
administrator keys or admin keys. These can be used to:
•Create a MyKey.
•Program configurable MyKey settings.
•Clear all MyKey features.
When you have programmed a MyKey, you can access the following
information using the information display:
•How many admin keys and MyKeys are programmed to your vehicle.
•The total distance your vehicle has traveled using a MyKey.
Note:All MyKeys are programmed to the same settings. You cannot
program them individually.
Note:For vehicles with intelligent access (push-button start), when both
a MyKey and an admin transmitter are present, the admin transmitter
will be recognized to start the vehicle.
Non-configurable Settings
The following settings cannot be changed by an admin key user:
•Belt-Minder. You cannot disable this feature. The audio system will
mute when the front seat occupants’ safety belts are not fastened.
•Early low fuel warning. The low fuel warning is activated earlier, giving
the MyKey user more time to refuel.
•Driver assist features, if equipped on your vehicle, are forced on:
parking aid, blind spot information system (BLIS) with cross traffic
alert, lane departure warning and forward collision warning system.
•Satellite radio adult content restrictions.
Configurable Settings
With an admin key, you can configure certain MyKey settings when you
first create a MyKey and before you recycle the key or restart the
engine. You can also change the settings afterward with an admin key.
•A vehicle speed limit can be set. Warnings will be shown in the display
followed by an audible tone when your vehicle reaches the set speed.
You cannot override the set speed by fully depressing the accelerator
pedal or by setting cruise control.
MyKey69
2015 MKT(mkt)
Owners Guide gf, 1st Printing, October 2014
USA(fus)
Page 72 of 500

4. PressOKor>to make a selection.
Note:You can clear or change your MyKey settings at any time during
the same key cycle as you created the MyKey. Once you have switched
the engine off, however, you will need an admin key to change or clear
your MyKey settings.
CLEARING ALL MYKEYS
You can clear all MyKeys within the same key cycle as you created the
MyKey. If you switch your ignition off, however, you will need to use an
admin key to clear your MyKeys.
Note:When you clear your MyKeys, you remove all restrictions and
return all MyKeys to their original admin key status at once.
To clear all MyKeys of all MyKey settings, use the information display to
do the following:
1. Access the main menu and selectSettings, thenMyKey.
2. Scroll toClear Alland press theOKbutton.
3. Hold theOKbutton untilALL MYKEYS CLEAREDdisplays .
CHECKING MYKEY SYSTEM STATUS
You can find information about your programmed MyKeys by using the
information display.
MYKEY DISTANCE
Tracks the distance when drivers use a MyKey. The only way to delete
the accumulated distance is by using an admin key to clear your MyKey.
If the distance does not accumulate as expected, then the intended user
is not using the MyKey, or an admin key user recently cleared and then
recreated a MyKey.
NUMBER OF MYKEY(S)
Indicates the number of MyKeys programmed to your vehicle. Use this
feature to detect how many MyKeys you have for your vehicle and
determine when a MyKey has been deleted.
NUMBER OF ADMIN KEY(S)
Indicates how many admin keys are programmed to your vehicle. Use
this feature to determine how many unrestricted keys you have for your
vehicle, and detect if an additional MyKey has been programmed.
USING MYKEY WITH REMOTE START SYSTEMS
MyKey is not compatible with non-Ford-approved aftermarket remote
start systems. If you choose to install a remote start system, please see
your Ford authorized dealer for a Ford-approved remote start system.
MyKey71
2015 MKT(mkt)
Owners Guide gf, 1st Printing, October 2014
USA(fus)
Page 74 of 500

LOCKING AND UNLOCKING
You can use the power door lock control or the remote control to lock
and unlock your vehicle.
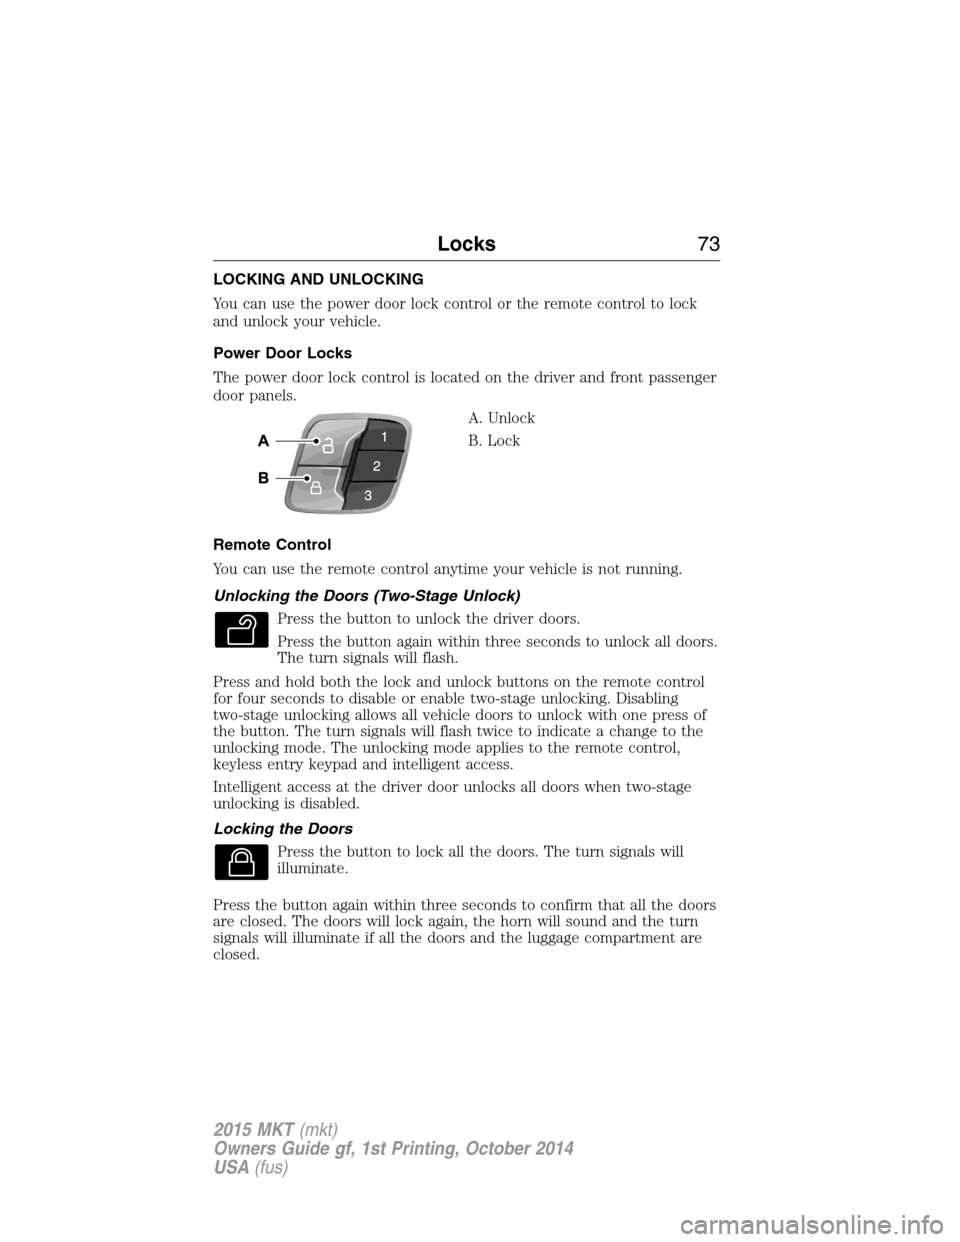
Power Door Locks
The power door lock control is located on the driver and front passenger
door panels.
A. Unlock
B. Lock
Remote Control
You can use the remote control anytime your vehicle is not running.
Unlocking the Doors (Two-Stage Unlock)
Press the button to unlock the driver doors.
Press the button again within three seconds to unlock all doors.
The turn signals will flash.
Press and hold both the lock and unlock buttons on the remote control
for four seconds to disable or enable two-stage unlocking. Disabling
two-stage unlocking allows all vehicle doors to unlock with one press of
the button. The turn signals will flash twice to indicate a change to the
unlocking mode. The unlocking mode applies to the remote control,
keyless entry keypad and intelligent access.
Intelligent access at the driver door unlocks all doors when two-stage
unlocking is disabled.
Locking the Doors
Press the button to lock all the doors. The turn signals will
illuminate.
Press the button again within three seconds to confirm that all the doors
are closed. The doors will lock again, the horn will sound and the turn
signals will illuminate if all the doors and the luggage compartment are
closed.
Locks73
2015 MKT(mkt)
Owners Guide gf, 1st Printing, October 2014
USA(fus)
Page 96 of 500

INSTRUMENT LIGHTING DIMMER
•Tap the top or bottom of the control to brighten or
dim all interior lit components incrementally.
•Press and hold the top of the control to activate the
“dome on” feature. This will turn on the interior
courtesy lights. Fully press and hold the bottom of the
control to turn off the interior courtesy lights.
HEADLAMP EXIT DELAY
You can set the delay time to keep the headlamps on for up to three
minutes after the ignition is turned off.
Follow the steps below to change the delay time (Steps 1 through 6
must be done within 10 seconds):
1. Turn the ignition off.
2. Turn the lighting control to the autolamp position.
3. Turn the lighting control to the off position.
4. Turn the ignition on.
5. Turn the ignition off.
6. Turn the lighting control to the autolamp position. The headlamps and
parking lamps will turn on.
7. Turn the lighting control to the off position when the desired delay
time has been reached. The headlamps and parking lamps will turn off.
You can set the headlamp exit delay to one of the following settings:
•Off
•10 seconds
•20 seconds
•120 seconds
Note:You can also adjust the time delay using the display controls in
the instrument cluster. See theInformation Displayschapter.
Lighting95
2015 MKT(mkt)
Owners Guide gf, 1st Printing, October 2014
USA(fus)
Page 97 of 500

DAYTIME RUNNING LAMPS (IF EQUIPPED)
WARNING:Always remember to turn on your headlamps at
dusk or during inclement weather. The Daytime Running Lamp
(DRL) system does not activate the tail lamps and generally may not
provide adequate lighting during these conditions. Failure to activate
your headlamps under these conditions may result in a collision.
The system will turn the front fog lamps on in low light situations.
The following conditions must be met to activate this feature:
•Switch the ignition on.
•Switch the lighting control to the off, autolamp or parking lamp
position.
•The transmission must be in a gear other than P (Park).
AUTOMATIC HIGH BEAM CONTROL (IF EQUIPPED)
The system will automatically turn on your high beams if it is dark
enough and no other traffic is present. When it detects an approaching
vehicle’s headlights, a preceding vehicle’s tail lamps or street lighting, the
system will turn off the high beams (low beams remain on) before they
distract other drivers.
Note:If it appears that automatic control of the high beams is not
functioning properly, check the windshield in front of the camera for
blockage. A clear view of the road is required for proper system
operation. Any windshield damage in the area of the camera field-of-view
should be repaired.
Note:If a blockage is detected (e.g. bird dropping, bug splatter, snow, or
ice) and no changes are observed, the system will go into low beam
mode until the blockage is cleared. A message may also appear in the
instrument cluster display noting the front camera is blocked.
Note:Typical road dust, dirt and water spots will not affect the
automatic high beam system’s performance. However, in cold or
inclement weather conditions, the automatic high beam system’s
availability may be decreased. If the driver wants to change the beam
state independently of the system, the driver may turn the high beams
on or off using the multifunction switch stalk. Automatic control will
resume when conditions are correct.
96Lighting
2015 MKT(mkt)
Owners Guide gf, 1st Printing, October 2014
USA(fus)
Page 101 of 500

DIRECTION INDICATORS
•To operate the left-hand side
direction indicator, push the lever
down until it stops.
•To operate the right-hand side
direction indicator, push the lever
up until it stops.
Note:Tap the lever up or down to make the direction indicators flash
three times to indicate a lane change.
INTERIOR LAMPS
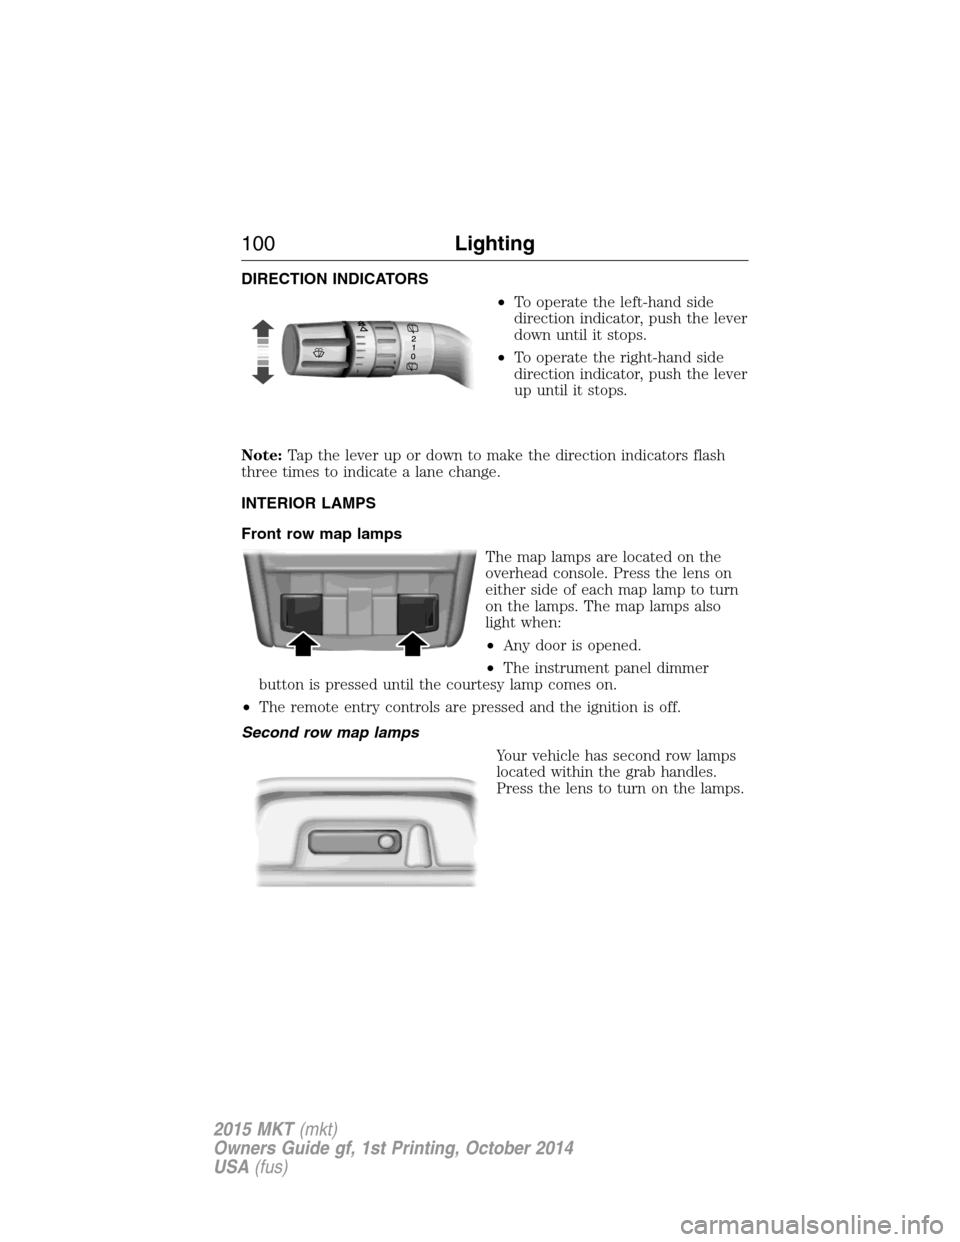
Front row map lamps
The map lamps are located on the
overhead console. Press the lens on
either side of each map lamp to turn
on the lamps. The map lamps also
light when:
•Any door is opened.
•The instrument panel dimmer
button is pressed until the courtesy lamp comes on.
•The remote entry controls are pressed and the ignition is off.
Second row map lamps
Your vehicle has second row lamps
located within the grab handles.
Press the lens to turn on the lamps.
100Lighting
2015 MKT(mkt)
Owners Guide gf, 1st Printing, October 2014
USA(fus)
Page 164 of 500

Programming HomeLink to a Genie Intellicode 2 garage door opener
Note:The Genie Intellicode 2 transmitter must already be programmed
to operate with the garage door opener.
Programing the transmitters
To program HomeLink to the transmitter you must first put the
transmitter into programming mode. To do this:
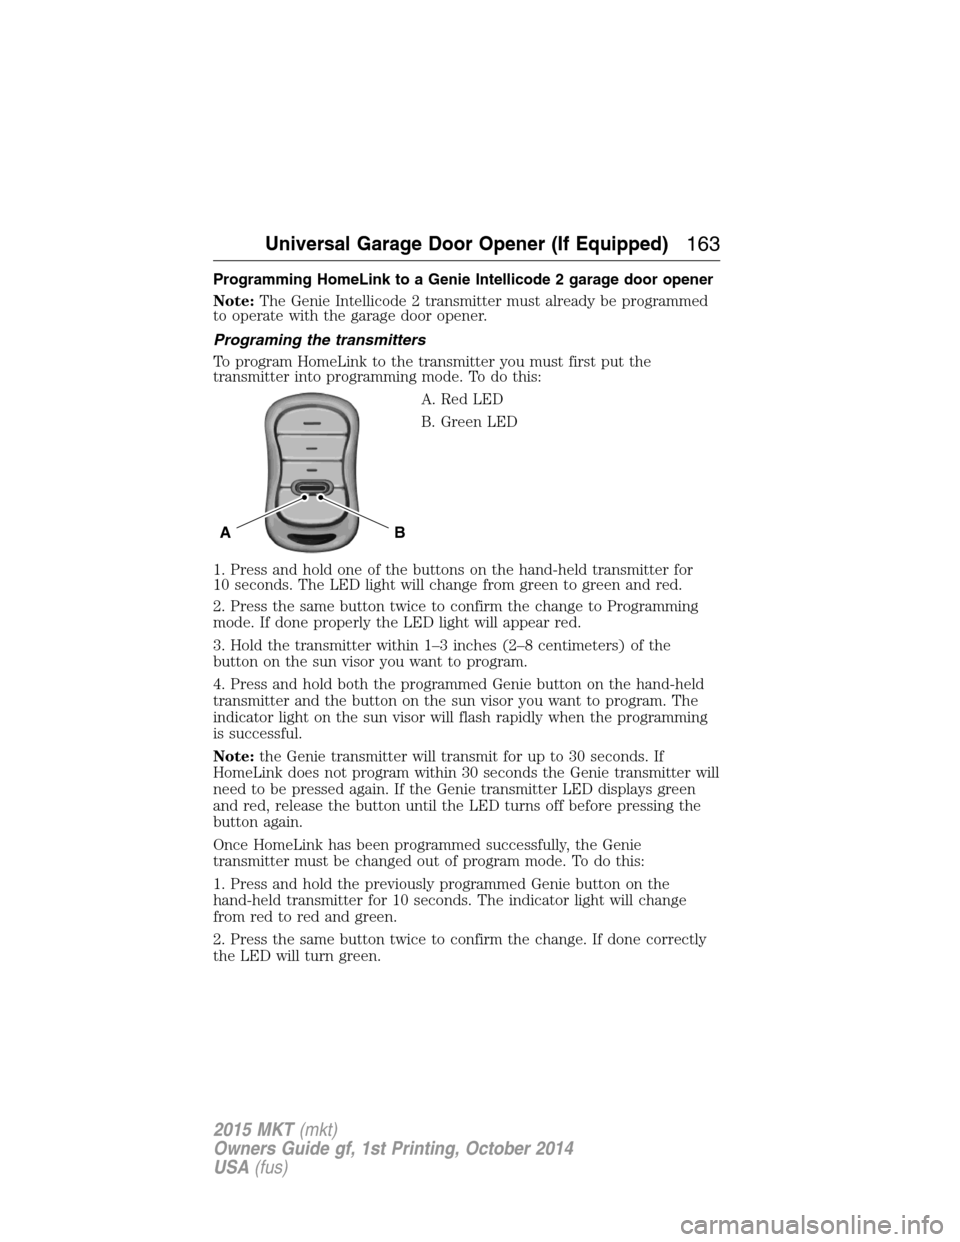
A. Red LED
B. Green LED
1. Press and hold one of the buttons on the hand-held transmitter for
10 seconds. The LED light will change from green to green and red.
2. Press the same button twice to confirm the change to Programming
mode. If done properly the LED light will appear red.
3. Hold the transmitter within 1–3 inches (2–8 centimeters) of the
button on the sun visor you want to program.
4. Press and hold both the programmed Genie button on the hand-held
transmitter and the button on the sun visor you want to program. The
indicator light on the sun visor will flash rapidly when the programming
is successful.
Note:the Genie transmitter will transmit for up to 30 seconds. If
HomeLink does not program within 30 seconds the Genie transmitter will
need to be pressed again. If the Genie transmitter LED displays green
and red, release the button until the LED turns off before pressing the
button again.
Once HomeLink has been programmed successfully, the Genie
transmitter must be changed out of program mode. To do this:
1. Press and hold the previously programmed Genie button on the
hand-held transmitter for 10 seconds. The indicator light will change
from red to red and green.
2. Press the same button twice to confirm the change. If done correctly
the LED will turn green.
BA
Universal Garage Door Opener (If Equipped)163
2015 MKT(mkt)
Owners Guide gf, 1st Printing, October 2014
USA(fus)