Page 283 of 500
Fuse or relay
numberFuse amp
ratingProtected components
35 — Cooling fan (series) relay
36 — Not used
37 — Trailer tow right-hand stop/turn lamps
relay
38 — Trailer tow reverse lamps relay
39 30A** Auxiliary blower motor
40 30A** Left front window
41 30A** Left rear window
42 30A** Passenger power seat
43 20A** Anti-lock brake system valves
44 — Windshield washer relay
45 5A* Rain sensor
46 5A* Canister vent solenoid (EcoBoost
engines)
47 15A* Washer pump
48 10A* Front park lamps
49 — Not used
50 10A* Heated mirrors
51 5A* Powertrain control module — Injector
power monitor (non-EcoBoost
engines)
52 — Not used
53 — Trailer tow left-hand stop/turn lamps
relay
54 — Not used
55 — Wipers relay
56 30A* Fuel injectors, Fuel pump relay
57 20A* Left high-intensity discharge
headlamps
58 10A* Alternator sensor
59 10A* Brake on/off switch
60 10A* Trailer tow back-up lamps
282Fuses
2015 MKT(mkt)
Owners Guide gf, 1st Printing, October 2014
USA(fus)
Page 284 of 500

Fuse or relay
numberFuse amp
ratingProtected components
61 20A* B+ #6 access circuit (limousine/livery)
62 10A* A/C clutch
63 15A* Trailer tow stop/turn lamps
64 15A* Rear wipers
65 20A* B+ #7 access circuit (limousine/livery)
66 — Powertrain control module – vehicle
power relay
67 20A* Vehicle power #2 – Oxygen sensor
heater, Mass airflow sensor, Variable
camshaft timing solenoid, Canister
vent solenoid, Canister purge solenoid
68 20A* Vehicle power #4 (ignition coils)
69 20A* Vehicle power #1 (PCM)
70 15A* Vehicle power #3 (coil) – A/C clutch
relay, Fan control relays, Variable air
conditioning compressor, Auxiliary
transmission warmup, Turbo charge
waste-gate control, Electronic
compressor bypass valve (for turbo
charger), All-wheel drive module,
Positive crackcase ventilation heater
71 — Not used
72 5A* Limousine/livery run/accessory
73 5A* Limousine/livery battery saver
74 — Not used
75 — Not used
76 — Not used
77 — Trailer tow park lamps relay
78 20A* Right high-intensity discharge
headlamps
79 10A* Adaptive cruise control
80 30A* B+ #3 access circuit (limousine/livery)
81 15A* B+ #4 access circuit (limousine/livery)
Fuses283
2015 MKT(mkt)
Owners Guide gf, 1st Printing, October 2014
USA(fus)
Page 285 of 500
Fuse or relay
numberFuse amp
ratingProtected components
82 15A* Rear washer
83 — Not used
84 20A* Trailer tow park lamps
85 15A* B+ #5 access circuit (limousine/livery)
86 5A* Powertrain control module —
keep-alive power, Powertrain control
module relay, Canister vent solenoid
(non-EcoBoost engines)
87 5A* Run/start
88 — Run/start relay
89 10A* Anti–lock brake system module,
Adaptive headlamps module
90 10A* Powertrain control module run/start
91 10A* Adaptive cruise control
92 5A* Front blower relay coil, Power
steering module
93 5A* Auxiliary blower, Rear defroster,
Battery charge / vacuum pump relays
94 30A** Body control module run/start
95 — Not used
96 — Not used
97 — Not used
98 — A/C clutch relay
*Mini Fuses **Cartridge Fuses
284Fuses
2015 MKT(mkt)
Owners Guide gf, 1st Printing, October 2014
USA(fus)
Page 288 of 500

Fuse or relay
numberFuse amp
ratingProtected components
23 15A Steering wheel control module,
Instrument cluster
24 15A Datalink connector, Steering
wheel control module
25 15A Not used (spare)
26 5A Push button start switch
27 20A Intelligent access module
28 15A Not used (spare)
29 20A Radio, Global positioning system
module
30 15A Front park lamps, Trailer tow
relay for park lamps, Front side
markers
31 5A Trailer tow brake controller
32 15A Power window switches and
motors, Power lock switches,
Moonroof, 110V AC power point,
Driver window/mirror switch, Rear
seat switch (livery)
33 10A Suspension module
34 10A Blind spot monitor, 2nd row
heated seats, Reverse sensing
system, Rearview camera, Interior
mirror, Auto high beam/Lane
departure warning/Lane keep
assist module
35 5A Heads-up display, Climate control
humidity sensor, Overdrive cancel
switch (limousine/livery)
36 10A Heated steering wheel
37 10A Refrigerator
38 10A Not used (spare)
Fuses287
2015 MKT(mkt)
Owners Guide gf, 1st Printing, October 2014
USA(fus)
Page 300 of 500

Engine fluid temperature management (EcoBoost engine only)
WARNING:To reduce the risk of collision and injury, be
prepared that the vehicle speed may reduce and the vehicle may
not be able to accelerate with full power until the fluid temperatures
reduce.
Your vehicle has been designed to pull a trailer, but because of the added
load, the vehicle’s engine may temporarily reach higher temperatures
during severe operating conditions such as ascending a long or steep
grade while pulling a trailer in hot ambient temperatures.
At this time, you may notice your engine coolant temperature gauge
needle move toward the H (hot) and the POWER REDUCED TO LOWER
TEMP message may appear on the message center.
You may notice a reduction in the vehicle’s speed caused by reduced
engine power. Your vehicle has been designed to enter this mode if
certain high temperature/high load conditions take place in order to
manage the engine’s fluid temperatures. The amount of speed reduction
will depend on the vehicle loading, towing, grade, ambient temperature,
and other factors. If this occurs, there is no need to pull off the road.
The vehicle can continue to be driven while this message is active.
The air conditioning may also cycle on and off during severe operating
conditions to protect overheating of the engine. When the engine coolant
temperature decreases to a more normal operating temperature, the air
conditioning will turn on once again.
If you notice any of the following:
•the engine coolant temperature gauge moves fully into the red (hot)
area
•the coolant temperature warning light illuminates
•the service engine soon indicator illuminates
1. Pull off the road as soon as safely possible and place the vehicle in P
(Park).
2. Leave the engine running until the coolant temperature gauge needle
moves away from the H range. After several minutes, if this does not
happen, follow the remaining steps.
3. Turn the engine off and wait for it to cool before checking the coolant
level.
Maintenance299
2015 MKT(mkt)
Owners Guide gf, 1st Printing, October 2014
USA(fus)
Page 312 of 500

Note:Failure to use the correct air filter element may result in severe
engine damage. The customer warranty may be void for any damage to
the engine if the correct air filter element is not used.
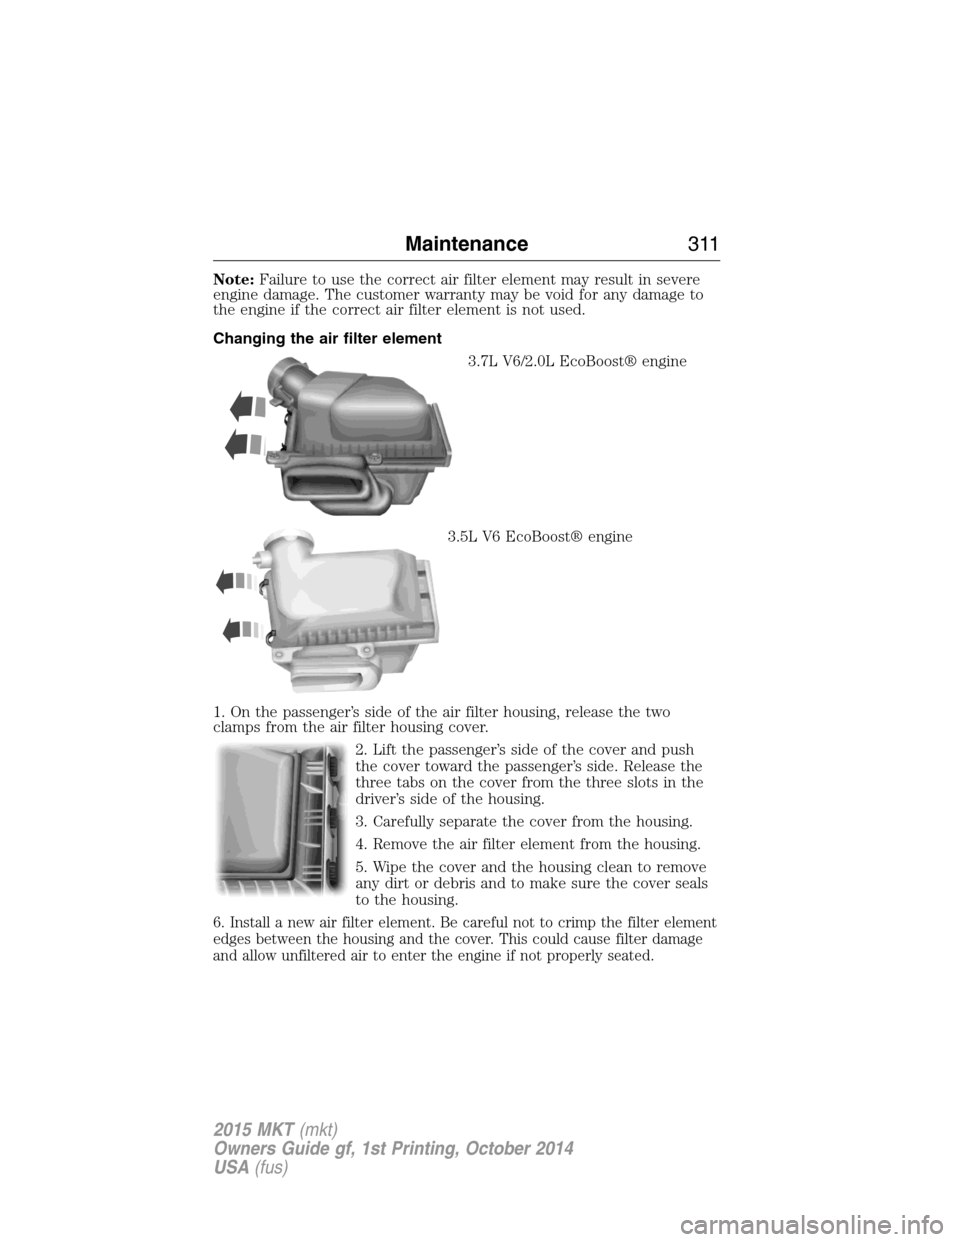
Changing the air filter element
3.7L V6/2.0L EcoBoost® engine
3.5L V6 EcoBoost® engine
1. On the passenger’s side of the air filter housing, release the two
clamps from the air filter housing cover.
2. Lift the passenger’s side of the cover and push
the cover toward the passenger’s side. Release the
three tabs on the cover from the three slots in the
driver’s side of the housing.
3. Carefully separate the cover from the housing.
4. Remove the air filter element from the housing.
5. Wipe the cover and the housing clean to remove
any dirt or debris and to make sure the cover seals
to the housing.
6. Install a new air filter element. Be careful not to crimp the filter element
edges between the housing and the cover. This could cause filter damage
and allow unfiltered air to enter the engine if not properly seated.
Maintenance311
2015 MKT(mkt)
Owners Guide gf, 1st Printing, October 2014
USA(fus)
Page 313 of 500

7. Lower the driver’s side of the cover and slide the three tabs on the
cover into the three slots in the housing.
8. Lower the passenger’s side of the cover. Engage the two clamps to
secure the cover to the housing.
ADJUSTING THE HEADLAMPS
The headlamps on your vehicle are properly aimed at the assembly plant.
If your vehicle has been in an accident, an authorized dealer should
check the alignment of your headlamps.
Vertical Aim Adjustment
1. Park the vehicle directly in front of a wall or screen on a level surface,
approximately 25 feet (7.6 meters) away.
•(1) 8 feet (2.4 meters)
•(2) Center height of lamp to
ground
•(3) 25 feet (7.6 meters)
•(4) Horizontal reference line
2. Measure the height of the
headlamp projector (cross hair mark
on inner lens) center from the
ground and mark an 8 foot
(2.4 meter) horizontal reference line
on the vertical wall or screen at this height (a piece of masking tape
works well).
3. Turn on the headlamps to illuminate the wall or screen and open the
hood.
To see a clearer light pattern for adjusting, you may want to block the
light from one headlamp while adjusting the other.
4. On the wall or screen you will
observe a light pattern with a
distinct horizontal edge towards the
right. If this edge is not at the
horizontal reference line, the beam
will need to be adjusted so the edge
is at the same height as the
horizontal reference line.
312Maintenance
2015 MKT(mkt)
Owners Guide gf, 1st Printing, October 2014
USA(fus)
Page 318 of 500

GENERAL INFORMATION
Your Ford or Lincoln authorized dealer has many quality products
available to clean your vehicle and protect its finishes.
CLEANING PRODUCTS
For best results, use the following products or products of equivalent
quality:
Motorcraft Bug and Tar Remover (ZC-42)
Motorcraft Custom Bright Metal Cleaner (ZC-15)
Motorcraft Detail Wash (ZC-3-A)
Motorcraft Dusting Cloth (ZC-24)
Motorcraft Engine Shampoo and Degreaser (United States only) (ZC-20)
Motorcraft Engine Shampoo (Canada only) (CXC-66-A)
Motorcraft Multi-Purpose Cleaner (Canada only) (CXC-101)
Motorcraft Premium Glass Cleaner (Canada only) (CXC-100)
Motorcraft Premium Quality Windshield Washer Fluid (Canada only)
[CXC-37-(A, B, D or F)]
Motorcraft Premium Windshield Wash Concentrate with Bitterant (United
States only) (ZC-32-B2)
Motorcraft Professional Strength Carpet & Upholstery Cleaner (ZC-54)
Motorcraft Premium Leather and Vinyl Cleaner (ZC-56)
Motorcraft Spot and Stain Remover (United States only) (ZC-14)
Motorcraft Ultra-Clear Spray Glass Cleaner (ZC-23)
Motorcraft Wheel and Tire Cleaner (ZC-37-A)
CLEANING THE EXTERIOR
Wash your vehicle regularly with cool or lukewarm water and a neutral
pH shampoo, such as Motorcraft® Detail Wash.
•Never use strong household detergents or soap, such as dish washing
or laundry liquid. These products can discolor and spot painted
surfaces.
•Never wash a vehicle that is hot to the touch or during exposure to
strong, direct sunlight.
•Dry the vehicle with a chamois or soft terry cloth towel in order to
eliminate water spotting.
Vehicle Care317
2015 MKT(mkt)
Owners Guide gf, 1st Printing, October 2014
USA(fus)