2015 LINCOLN MKT tow
[x] Cancel search: towPage 158 of 500

Unstowing the Third Row Seat
WARNING:Make sure the seat is latched to vehicle floor by
pushing and pulling on the seat. If not latched, the seat may
cause injury during a sudden stop.
Note:Make sure that there are no objects such as books, purses or brief
cases on the load floor before unstowing the seat. Failure to remove all
objects from the top of the load floor prior to unstowing it may cause
damage to the seat.
Note:Make sure the area under the forward portion of the load floor is
free of objects before unstowing the third row seat.
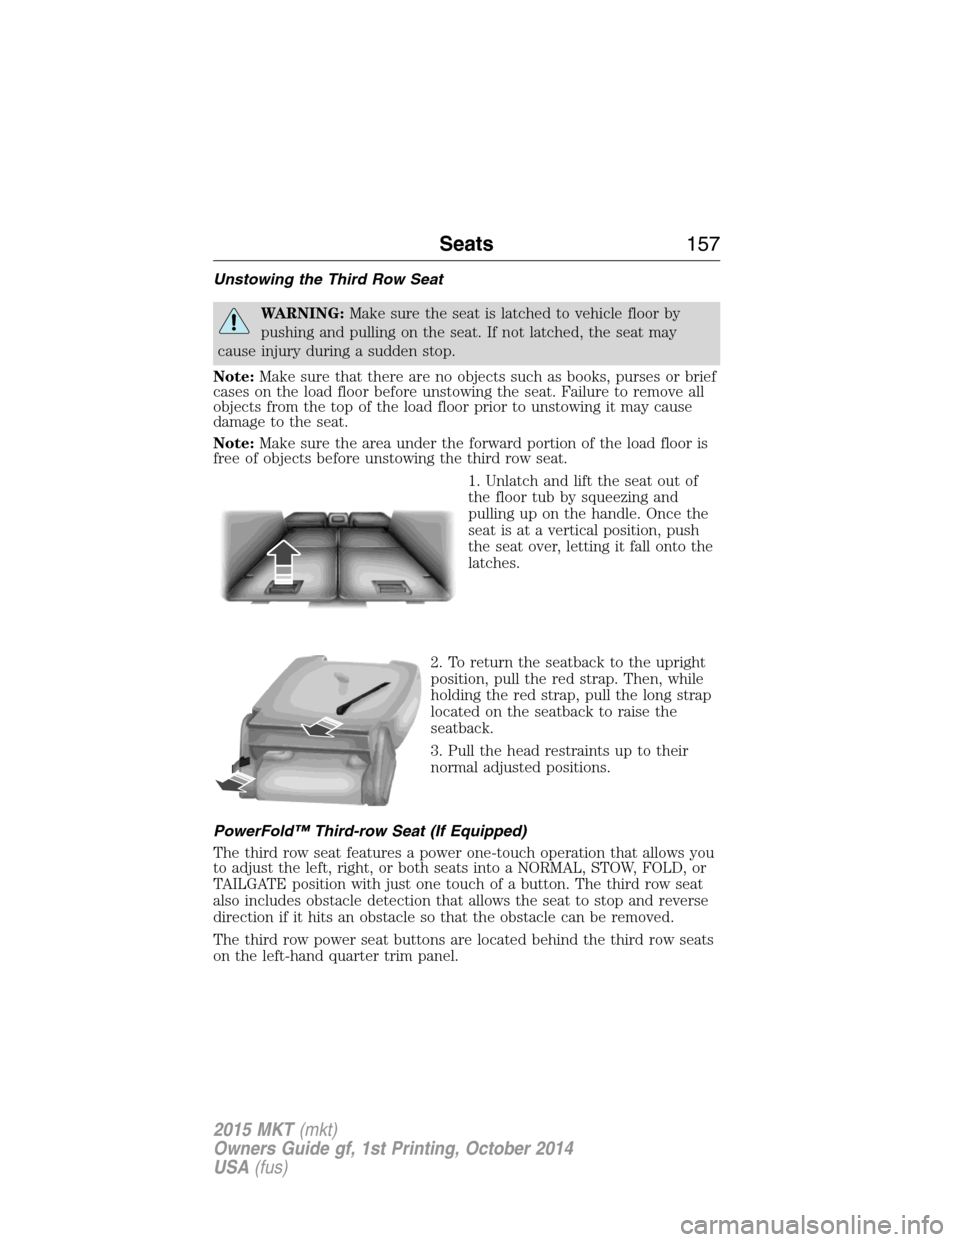
1. Unlatch and lift the seat out of
the floor tub by squeezing and
pulling up on the handle. Once the
seat is at a vertical position, push
the seat over, letting it fall onto the
latches.
2. To return the seatback to the upright
position, pull the red strap. Then, while
holding the red strap, pull the long strap
located on the seatback to raise the
seatback.
3. Pull the head restraints up to their
normal adjusted positions.
PowerFold™ Third-row Seat (If Equipped)
The third row seat features a power one-touch operation that allows you
to adjust the left, right, or both seats into a NORMAL, STOW, FOLD, or
TAILGATE position with just one touch of a button. The third row seat
also includes obstacle detection that allows the seat to stop and reverse
direction if it hits an obstacle so that the obstacle can be removed.
The third row power seat buttons are located behind the third row seats
on the left-hand quarter trim panel.
Seats157
2015 MKT(mkt)
Owners Guide gf, 1st Printing, October 2014
USA(fus)
Page 159 of 500

Note:The power fold seats work only when the transmission is in park
(P) and the tailgate is open. If the ignition is off and the feature is still
running, the battery saver will turn it off after 10 minutes. You can
reactivate the power seats by pressing the unlock button on the remote
entry key fob or by using the unlock procedure on the keyless entry
keypad. SeeSecuriCode keyless keypadin theLockschapter. Keep the
key in the accessory or run position to prevent the feature from timing
out.
Press the seat selection button (D) to select either right-hand seat, the
left-hand seat or both. First, select the seat you would like to adjust,
then select one of the following:
•Press the NORMAL button (A) to return the seat to the normal
seating position.
•Press the STOW button (B) to stow the seat into the tub floor.
•Press the FOLD button (C) (the top portion of the button) to fold
down the seat back.
•Press the TAILGATE button (C) (the bottom portion of the button) to
put the seat into the tailgate position.
Note:Pressing a different button while the power seat feature is already
being performed may cause the first selected seat movement to be
cancelled. Allow the first seat movement to be completed before pressing
a button for another function.
Note:Make sure that there are no objects such as books, purses or brief
cases on the load floor before unstowing the seat. Failure to remove all
objects from the top of the load floor prior to unstowing it may cause
damage to the seat.
Note:In order to allow the seat to complete the stowed position, do not
place objects under the seat before stowing. Remove all objects from the
seat and stowage tub. Sharp objects may result in damage to the seat
upholstery and improper seat function.
NORMAL
STOWRH
BOTH
LH
FOLD
TA I L G AT E
ABCD
158Seats
2015 MKT(mkt)
Owners Guide gf, 1st Printing, October 2014
USA(fus)
Page 169 of 500

CENTER CONSOLE
Stow items in the cupholder carefully as items may become loose during
hard braking, acceleration or collisions, including hot drinks which may
spill.
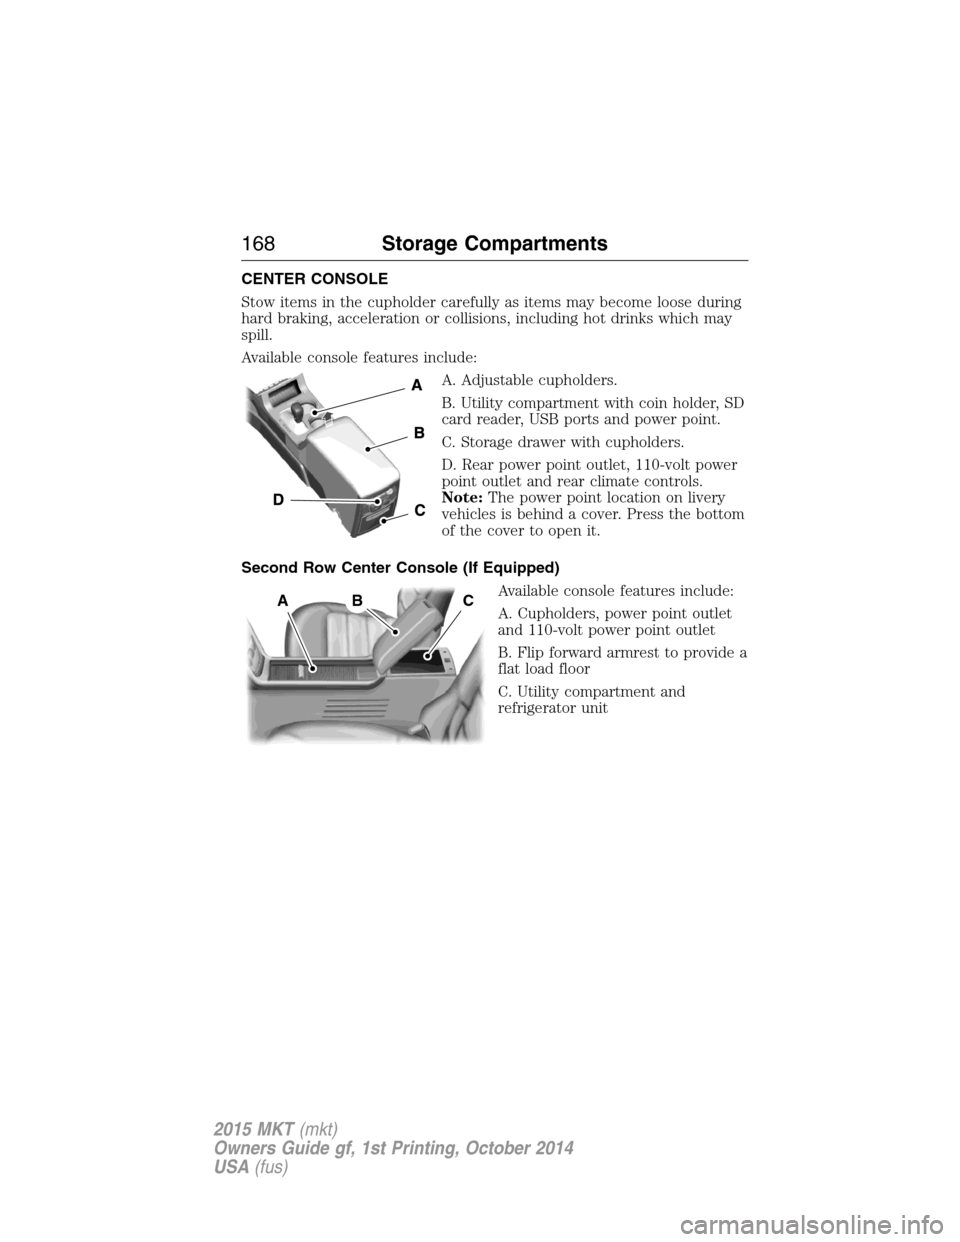
Available console features include:
A. Adjustable cupholders.
B. Utility compartment with coin holder, SD
card reader, USB ports and power point.
C. Storage drawer with cupholders.
D. Rear power point outlet, 110-volt power
point outlet and rear climate controls.
Note:The power point location on livery
vehicles is behind a cover. Press the bottom
of the cover to open it.
Second Row Center Console (If Equipped)
Available console features include:
A. Cupholders, power point outlet
and 110-volt power point outlet
B. Flip forward armrest to provide a
flat load floor
C. Utility compartment and
refrigerator unit
ABC
168Storage Compartments
2015 MKT(mkt)
Owners Guide gf, 1st Printing, October 2014
USA(fus)
Page 177 of 500

The heater acts as a starting aid by warming the engine coolant. This
allows the climate control system to respond quickly. The equipment
includes a heater element (installed in the engine block) and a wire
harness. You can connect the system to a grounded 120–volt A/C
electrical source.
We recommend that you do the following for safe and correct operation:
•Use a 16-gauge outdoor extension cord that is product certified by
Underwriter’s Laboratory or Canadian Standards Association. This
extension cord must be suitable for use outdoors, in cold
temperatures, and be clearly markedSuitable for Use with Outdoor
Appliances.Never use an indoor extension cord outdoors; it could
result in an electric shock or become a fire hazard.
•Use as short an extension cord as possible.
•Do not use multiple extension cords.
•Make sure that when in operation, the extension cord plug and the
heater cord plug connections are free and clear of water. This could
cause an electric shock or fire.
•
Make sure your vehicle is parked in a clean area, clear of combustibles.
•Make sure the heater, heater cord and extension cord are firmly
connected.
•Check for heat anywhere in the electrical hookup once the system has
been operating for approximately 30 minutes.
•Make sure the system is unplugged and properly stowed before driving
your vehicle. Make sure the protective cover seals the prongs of the
block heater cord plug when not in use.
•Keep plug terminals clean and free of dirt and corrosion.
•Make sure the heater system is checked for proper operation before
winter.
Using the Engine Block Heater
Make sure the receptacle terminals are clean and dry before use. To
clean them, use a dry cloth.
The heater uses 0.4 to 1.0 kilowatt-hours of energy per hour of use. The
system does not have a thermostat. It achieves maximum temperature
after approximately three hours of operation. Using the heater longer
than three hours does not improve system performance and
unnecessarily uses electricity.
176Starting and Stopping the Engine
2015 MKT(mkt)
Owners Guide gf, 1st Printing, October 2014
USA(fus)
Page 180 of 500

Octane Recommendations
3.5L V6 EcoBoost, 3.7L V6 TiVCT and 2.0L I4 EcoBoost Engines
We recommend regular unleaded gasoline with a pump (R+M)/2 octane
rating of 87. Some stations offer fuels posted as regular with an octane
rating below 87, particularly in high altitude areas. We do not recommend
fuels with octane levels below 87. To provide improved performance, we
recommend premium fuel for severe duty usage such as trailer tow.
Do not be concerned if your engine sometimes knocks lightly. However, if
it knocks heavily while you are using fuel with the recommended octane
rating, contact an authorized dealer to prevent any engine damage.
RUNNING OUT OF FUEL
Avoid running out of fuel because this situation may have an adverse
effect on powertrain components.
If you have run out of fuel:
•You may need to cycle the ignition from off to on several times after
refueling to allow the fuel system to pump the fuel from the tank to
the engine. On restarting, crank time will be a few seconds longer
than normal. With keyless ignition, just start the engine. Crank time
will be longer than usual.
•Normally, adding 1 gallon (3.8 liters) of fuel is enough to restart the
engine. If the vehicle is out of fuel and on a steep grade, more than
1 gallon (3.8 liters) may be required.
•The service engine soon indicator may come on. For more information
on the service engine soon indicator, seeWarning Lamps and
Indicatorsin theInstrument Clusterchapter.
Refilling with a Portable Fuel Container
WARNING:Do not insert the nozzle of a portable fuel container
or aftermarket funnel into the capless fuel system. This could
damage the fuel system and its seal, and may cause fuel to run onto the
ground instead of filling the tank, which could result in serious personal
injury.
WARNING:Do not try to pry open or push open the capless fuel
system with foreign objects. This could damage the fuel system
and its seal and cause injury to you or others.
Fuel and Refueling179
2015 MKT(mkt)
Owners Guide gf, 1st Printing, October 2014
USA(fus)
Page 200 of 500

GENERAL INFORMATION
Note:Occasional brake noise is normal. If a metal-to-metal, continuous
grinding or continuous squeal sound is present, the brake linings may be
worn out. Have them inspected by an authorized dealer. If your vehicle
has continuous vibration or shudder in the steering wheel while braking,
have your vehicle inspected by an authorized dealer.
Note:Brake dust may accumulate on the wheels, even under normal
driving conditions. Some dust is inevitable as the brakes wear and does
not contribute to brake noise. See theVehicle Carechapter for wheel
cleaning instructions.
See theInstrument Clusterchapter for information on the
brake system warning light.
Wet brakes result in reduced braking efficiency. Gently press the brake
pedal a few times when driving from a car wash or standing water to dry
the brakes.
Brake Over Accelerator
In the event the accelerator pedal becomes stuck or entrapped, apply
steady and firm pressure to the brake pedal to slow your vehicle and
reduce engine power. If you experience this condition, apply the brakes
and bring your vehicle to a safe stop. Turn the engine off, shift to park
(P) and apply the parking brake. Inspect the accelerator pedal and the
area around it for any items or debris that may be obstructing its
movement. If none are found and the condition persists, have your
vehicle towed to the nearest authorized dealer.
Brake Assist
Brake assist detects when you brake heavily by measuring the rate at
which you press the brake pedal. It provides maximum braking efficiency
as long as you press the pedal. Brake assist can reduce stopping
distances in critical situations.
Brakes199
2015 MKT(mkt)
Owners Guide gf, 1st Printing, October 2014
USA(fus)
Page 206 of 500

The system can be turned off using the information display control.
Refer to theInformation Displaychapter.
If a fault is present in the system, a warning message appears in the
information display and does not allow the driver to switch the faulted
system on.
Note:If your vehicle is equipped with MyKey®, it is possible to prevent
turning the sensing system off. Refer to theMyKey®chapter.
Using the Rear Sensing System
The rear sensors are only active when the transmission is inR.Asthe
vehicle moves closer to the obstacle, the rate of the audible warning
increases. When the obstacle is fewer than 12 inches (30 centimeters)
away, the warning sounds continuously. If a stationary or receding object
is detected farther than 12 inches (30 centimeters) from the side of the
vehicle, the tone sounds for only three seconds. Once the system detects
an object approaching, the warning sounds again.
A. Coverage area of up to 6 feet
(2 meters) from the rear bumper
(with a decreased coverage area at
the outer corners of the bumper).
The system detects certain objects while the transmission is inR:
•and moving toward a stationary object at a speed of 3 mph (5 km/h)
or less.
•but not moving, and a moving object is approaching the rear of the
vehicle at a speed of 3 mph (5 km/h) or less.
•and moving at a speed of less than 3 mph (5 km/h) and a moving
object is approaching the rear of the vehicle at a speed of less than
3 mph (5 km/h).
A
Parking Aids205
2015 MKT(mkt)
Owners Guide gf, 1st Printing, October 2014
USA(fus)
Page 207 of 500

ACTIVE PARK ASSIST (IF EQUIPPED)
WARNING:This system is designed to be a supplementary park
aid. It may not work in all conditions and is not intended to
replace the driver’s attention and judgment. The driver is responsible
for avoiding hazards and maintaining a safe distance and speed, even
when the system is in use.
Note:The driver is always responsible for controlling the vehicle,
supervising the system and intervening if required.
The system detects an available parallel parking space and automatically
steers the vehicle into the space (hands-free) while you control the
accelerator, gearshift and brakes. The system visually and/or audibly
instructs the driver to park the vehicle.
The system may not function correctly if something passes between the
front bumper and the parking space (i.e. a pedestrian or cyclist) or if the
edge of the neighboring parked vehicle is high from the ground (i.e. a
bus, tow truck or flatbed truck).
Note:The sensors may not detect objects in heavy rain or other
conditions that cause disruptive reflections.
Note:The sensors may not detect objects with surfaces that absorb
ultrasonic waves.
Note:After a tire change the system will go through a relearning
procedure. During this time the system performance may deteriorate.
The system should not be used if:
•a foreign object (i.e. bike rack or trailer) is attached to the front or
rear of the vehicle or at another location close to the sensors.
•an overhanging object (i.e. surfboard) is attached to the roof.
•the front bumper or side sensors are damaged (i.e. in a collision) or
obstructed by a foreign object (i.e. front bumper cover).
•a mini-spare tire is in use.
206Parking Aids
2015 MKT(mkt)
Owners Guide gf, 1st Printing, October 2014
USA(fus)