2015 LEXUS RX450h ESP
[x] Cancel search: ESPPage 751 of 878

7505-2. Steps to take in an emergency
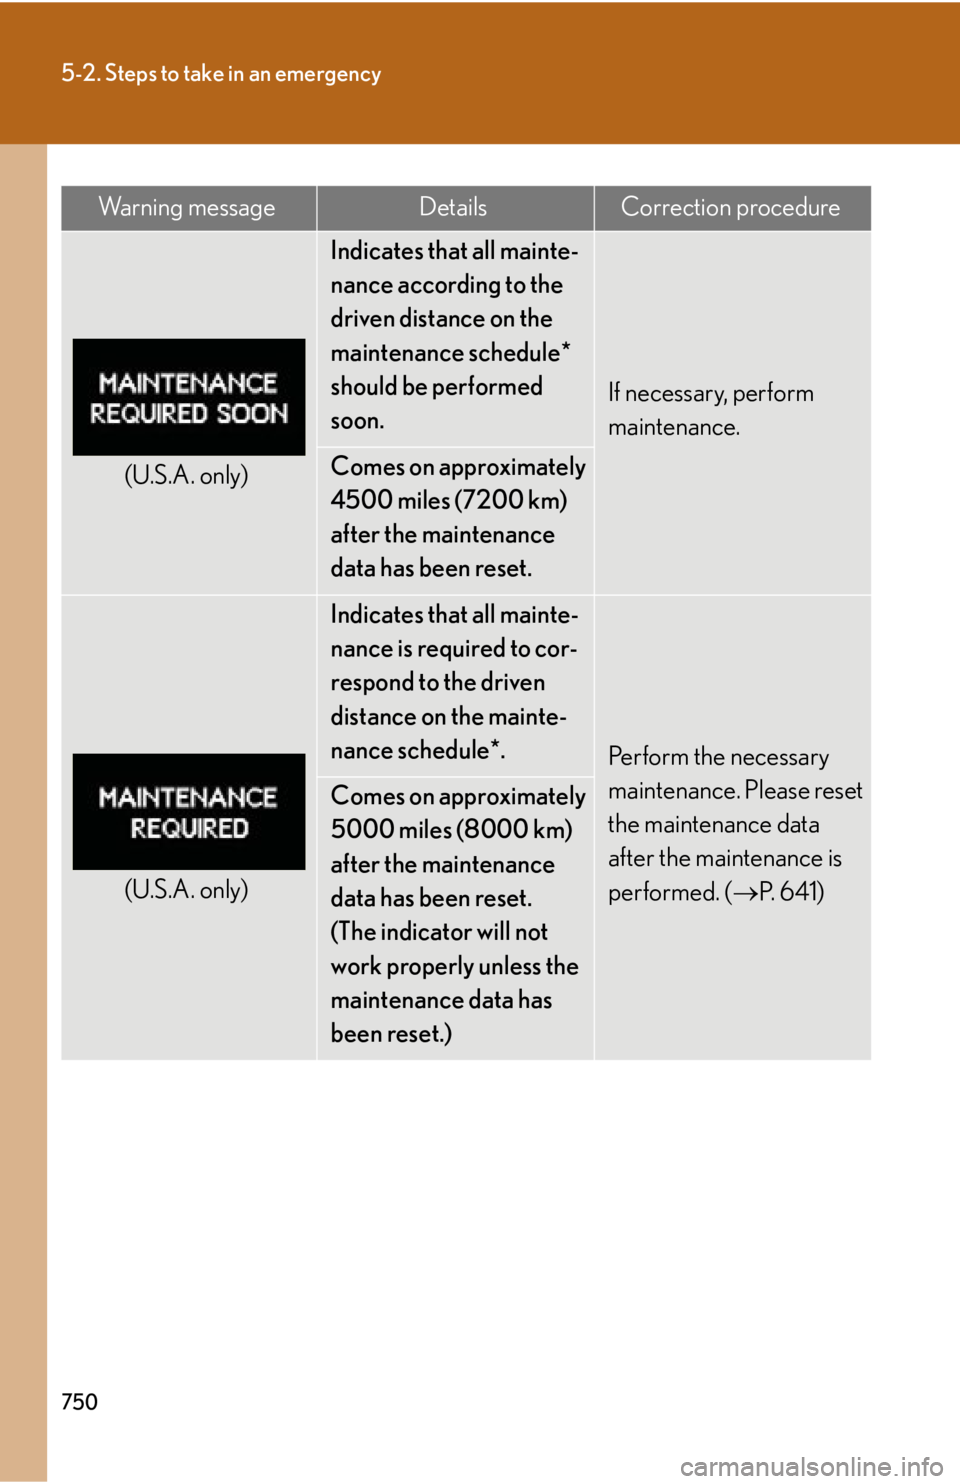
(U.S.A. only) Indicates that all mainte-
nance according to the
driven distance on the
maintenance schedule*
should be performed
soon. If necessary, perform
maintenance.
Comes on approximately
4500 miles (7200 km)
after the maintenance
data has been reset.
(U.S.A. only) Indicates that all mainte-
nance is required to cor-
respond to the driven
distance on the mainte-
nance schedule*.
Perform the necessary
maintenance. Please reset
the maintenance data
after the maintenance is
performed. ( P. 6 4 1 )Comes on approximately
5000 miles (8000 km)
after the maintenance
data has been reset.
(The indicator will not
work properly unless the
maintenance data has
been reset.)Wa r n i n g m e s s a g e Details Correction procedure
Page 792 of 878

5
When trouble arises
7915-2. Steps to take in an emergency
Add coolant if necessary. Water can be used in an emer-
gency if coolant is unavailable.
Start the hybrid system and check for the multi-information dis-
play.
If the message does not disappear:
Stop the hybrid system and contact your Lexus dealer.
If the message is not displayed:
Have the vehicle inspected at the nearest Lexus dealer.STEP 5
CAUTION■
To prevent an accident or injury when in specting under the hood of your vehicle●
If steam is seen coming from under the hood, do not open the hood until the
steam has subsided. The engine compartm ent may be very hot, causing serious
injuries such as burns.●
After the hybrid system has been turned off, check that the indicator on the
“POWER” switch and the “READY” indicator are off.
When the hybrid system is operating, the gasoline engine may automatically
start, or the cooling fans may suddenly operate even if the gasoline engine stops.
Do not touch or approach rotating parts such as the fans, which may lead to fin-
gers or clothing (especially a tie, a scarf or a muffler) getting caught, resulting in
serious injury.●
Do not loosen the radiator cap while the hybrid system and radiator are hot.
Serious injuries, such as burns, may re sult from hot coolant and steam released
under pressure. STEP 6
Page 819 of 878

8186-1. Specifications
■ Traction AA, A, B, C
The traction grades, from highest to lowest, are AA, A, B and C, and
they represent the tire's ability to stop on wet pavement as measured
under controlled condit ions on specif ied government test surfaces of
asphalt and concrete. A tire marked C may have poor traction performance.
Warning: The traction grade assigned to this tire is based on braking
(straight ahead) traction tests and does not include cornering (turning) trac-
tion.
■ Temperature A, B, C
The temperature grades are A (the highest), B, and C, representing
the tire's resistance to the generation of heat and its ability to dissipate
heat when tested under controlled conditions on a specified indoor
laboratory test wheel. Sustained high temperature can cause the material of the tire to degenerate
and reduce tire life, and excessive temperature can lead to sudden tire fail-
ure.
The grade C corresponds to a level of performance which all passenger car
tires must meet under the Federal Mo tor Vehicle Safety Standard No. 109.
Grades B and A represent higher levels of performance on the laboratory
test wheel than the minimum required by law.
Warning: The temperature grades for this tire are established for a tire that
is properly inflated and not overloaded.
Excessive speed, underinflation, or excess ive loading, either separately or in
combination, can cause heat buildup and possible tire failure.
Page 822 of 878

8216-1. Specifications
6
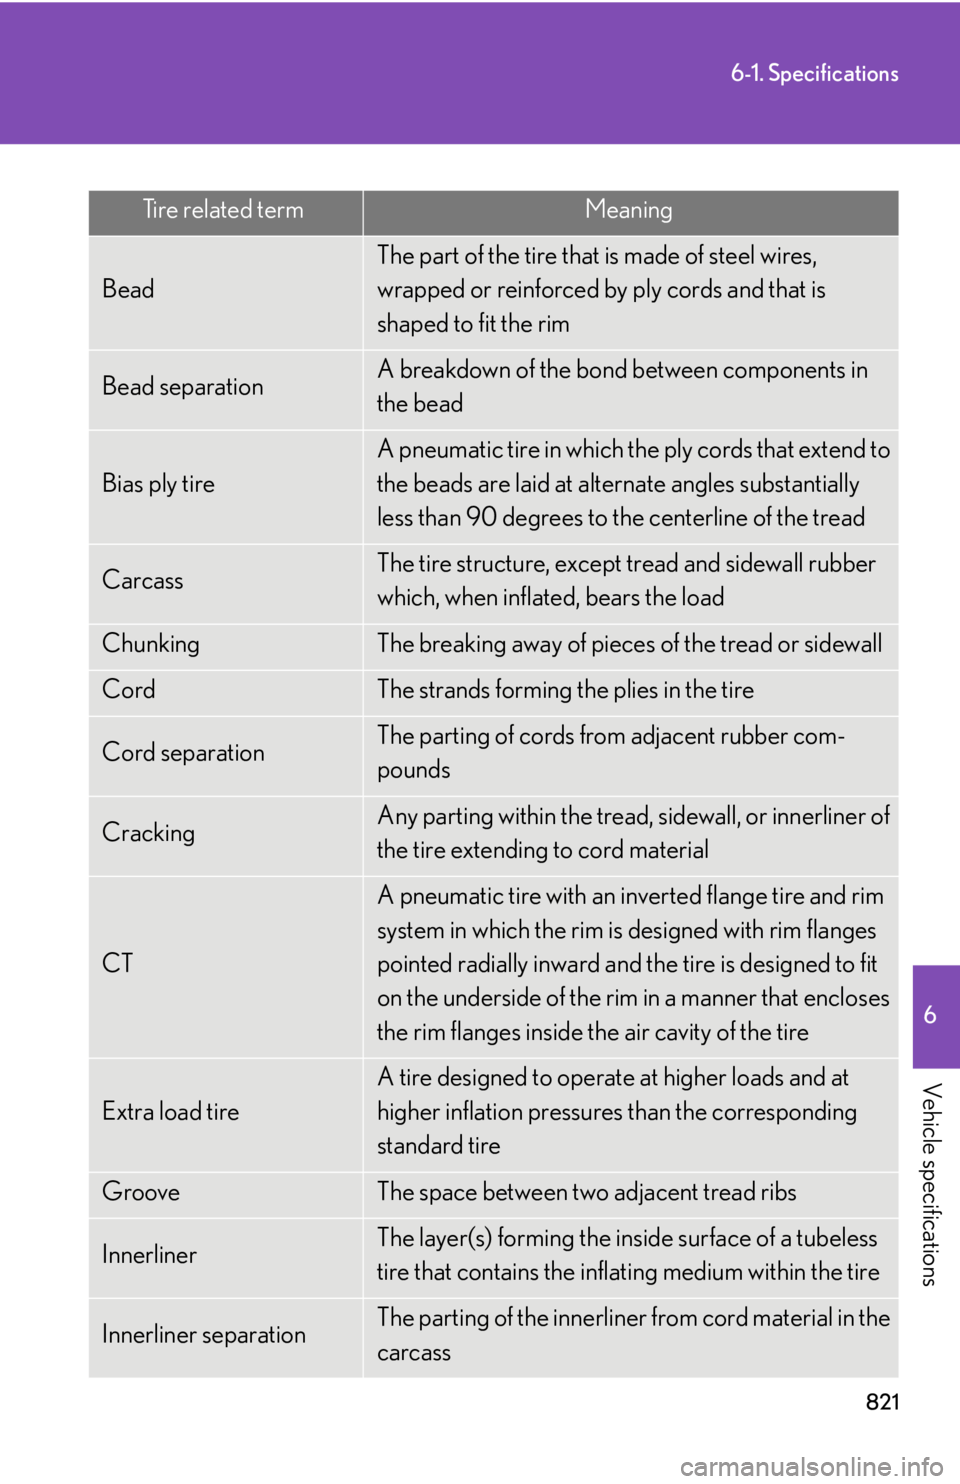
Vehicle specifications Tire related term Meaning
Bead The part of the tire that is made of steel wires,
wrapped or reinforced by ply cords and that is
shaped to fit the rim
Bead separation A breakdown of the bond between components in
the bead
Bias ply tire A pneumatic tire in which the ply cords that extend to
the beads are laid at alternate angles substantially
less than 90 degrees to the centerline of the tread
Carcass The tire structure, except tread and sidewall rubber
which, when inflated, bears the load
Chunking The breaking away of pieces of the tread or sidewall
Cord The strands forming the plies in the tire
Cord separation The parting of cords from adjacent rubber com-
pounds
Cracking Any parting within the tread, sidewall, or innerliner of
the tire extending to cord material
CT A pneumatic tire with an inverted flange tire and rim
system in which the rim is designed with rim flanges
pointed radially inward and the tire is designed to fit
on the underside of the rim in a manner that encloses
the rim flanges inside the air cavity of the tire
Extra load tire A tire designed to operate at higher loads and at
higher inflation pressures than the corresponding
standard tire
Groove The space between two adjacent tread ribs
Innerliner The layer(s) forming the inside surface of a tubeless
tire that contains the inflating medium within the tire
Innerliner separation The parting of the innerliner from cord material in the
carcass
Page 824 of 878

8236-1. Specifications
6
Vehicle specifications Tire related term Meaning
Ply separation A parting of rubber comp ound between adjacent
plies
Pneumatic tire A mechanical device made of rubber, chemicals, fab-
ric and steel or other mate rials, that, when mounted
on an automotive wheel, provides the traction and
contains the gas or fluid that sustains the load
Radial ply tire A pneumatic tire in which the ply cords that extend to
the beads are laid at substantially 90 degrees to the
centerline of the tread
Reinforced tire A tire designed to operate at higher loads and at
higher inflation pressures than the corresponding
standard tire
Section width The linear distance between the exteriors of the side-
walls of an inflated tire, excluding elevations due to
labeling, decoration, or protective bands
Sidewall That portion of a tire between the tread and bead
Sidewall separation The parting of the rubber compound from the cord
material in the sidewall
Snow tire A tire that attains a traction index equal to or greater
than 110, compared to the ASTM E-1136 Standard
Reference Test Tire, when using the snow traction test
as described in ASTM F-1805-00, Standard Test
Method for Single Wheel Driving Traction in a
Straight Line on Snow-and Ice-Covered Surfaces,
and which is marked with an Alpine Symbol (
)
on at least one sidewall
Te s t r i m The rim on which a tire is fitted for testing, and may be
any rim listed as appropriate for use with that tire
Page 849 of 878

8477
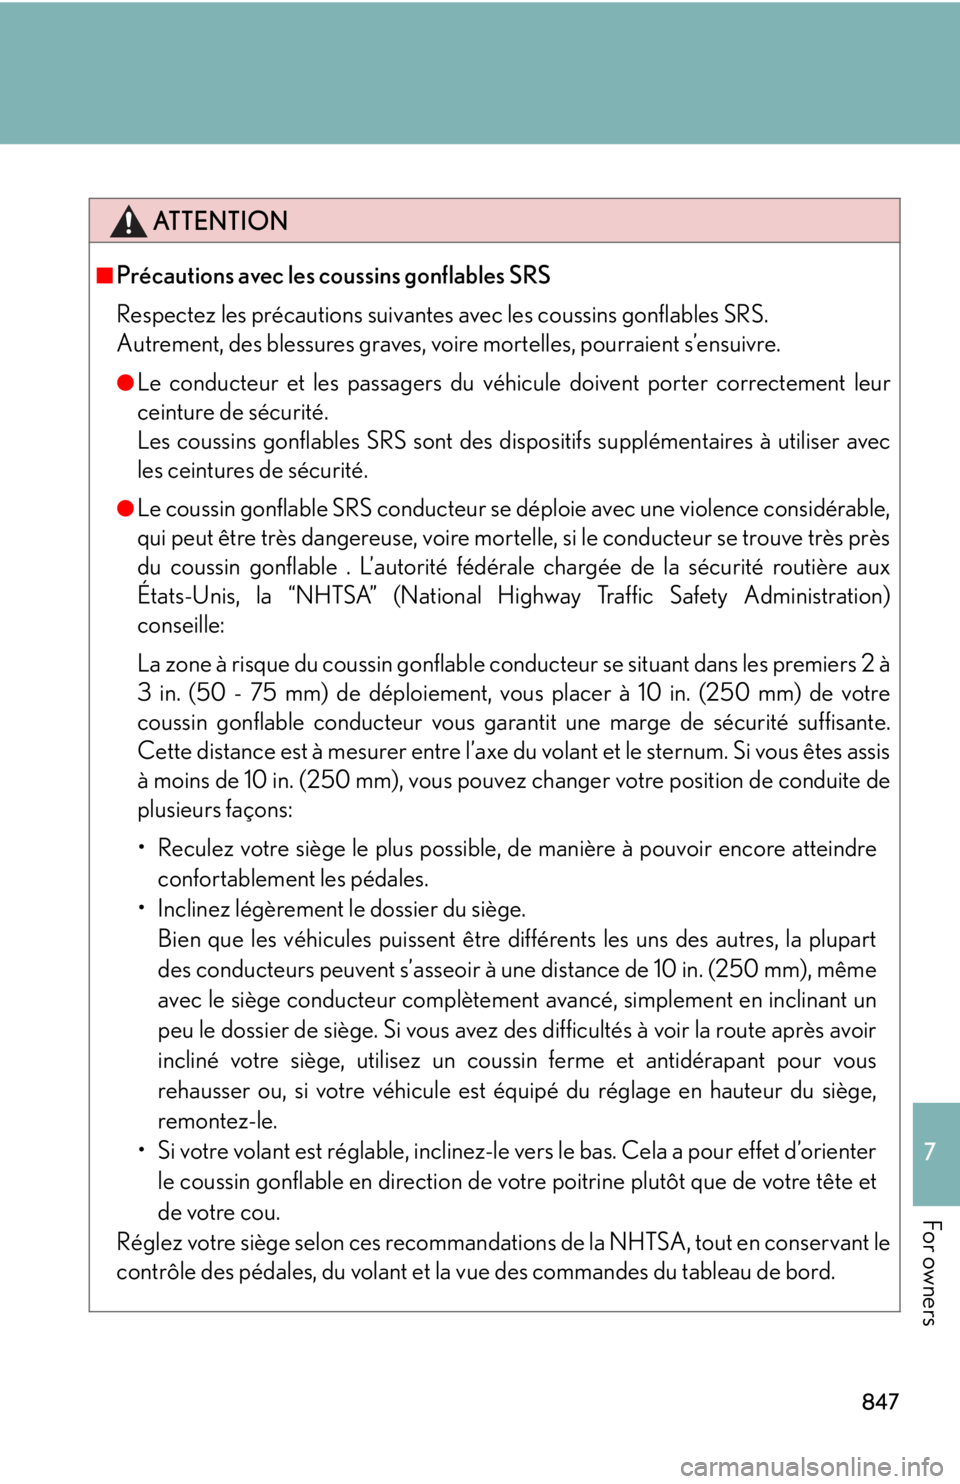
For owners ATTENTION■
Précautions avec les coussins gonflables SRS
Respectez les précautions suivantes avec les coussins gonflables SRS.
Autrement, des blessures graves, voire mortelles, pourraient s’ensuivre. ●
Le conducteur et les passagers du véhicule doivent porter correctement leur
ceinture de sécurité.
Les coussins gonflables SRS sont des dispositifs supplémentaires à utiliser avec
les ceintures de sécurité.●
Le coussin gonflable SRS conducteur se déploie avec une violence considérable,
qui peut être très dangereuse, voire mortelle, si le conducteur se trouve très près
du coussin gonflable . L’autorité fédérale chargée de la sécurité routière aux
États-Unis, la “NHTSA” (National Highway Traffic Safety Administration)
conseille:
La zone à risque du coussin gonflable conducteur se situant dans les premiers 2 à
3 in. (50 - 75 mm) de déploiement, vous placer à 10 in. (250 mm) de votre
coussin gonflable conducteur vous garantit une marge de sécurité suffisante.
Cette distance est à mesurer entre l’axe du volant et le sternum. Si vous êtes assis
à moins de 10 in. (250 mm), vous pouvez changer votre position de conduite de
plusieurs façons:
Reculez votre siège le plus possible, de manière à pouvoir encore atteindre
confortablement les pédales.
Inclinez légèrement le dossier du siège.
Bien que les véhicules puissent être différents les uns des autres, la plupart
des conducteurs peuvent s’asseoir à une distance de 10 in. (250 mm), même
avec le siège conducteur complètement avancé, simplement en inclinant un
peu le dossier de siège. Si vous avez des difficultés à voir la route après avoir
incliné votre siège, utilisez un coussin ferme et antidérapant pour vous
rehausser ou, si votre véhicule est équipé du réglage en hauteur du siège,
remontez-le.
Si votre volant est réglable, inclinez-le vers le bas. Cela a pour effet d’orienter
le coussin gonflable en direction de votre poitrine plutôt que de votre tête et
de votre cou.
Réglez votre siège selon ces recommandations de la NHTSA, tout en conservant le
contrôle des pédales, du volant et la vue des commandes du tableau de bord.
Page 853 of 878

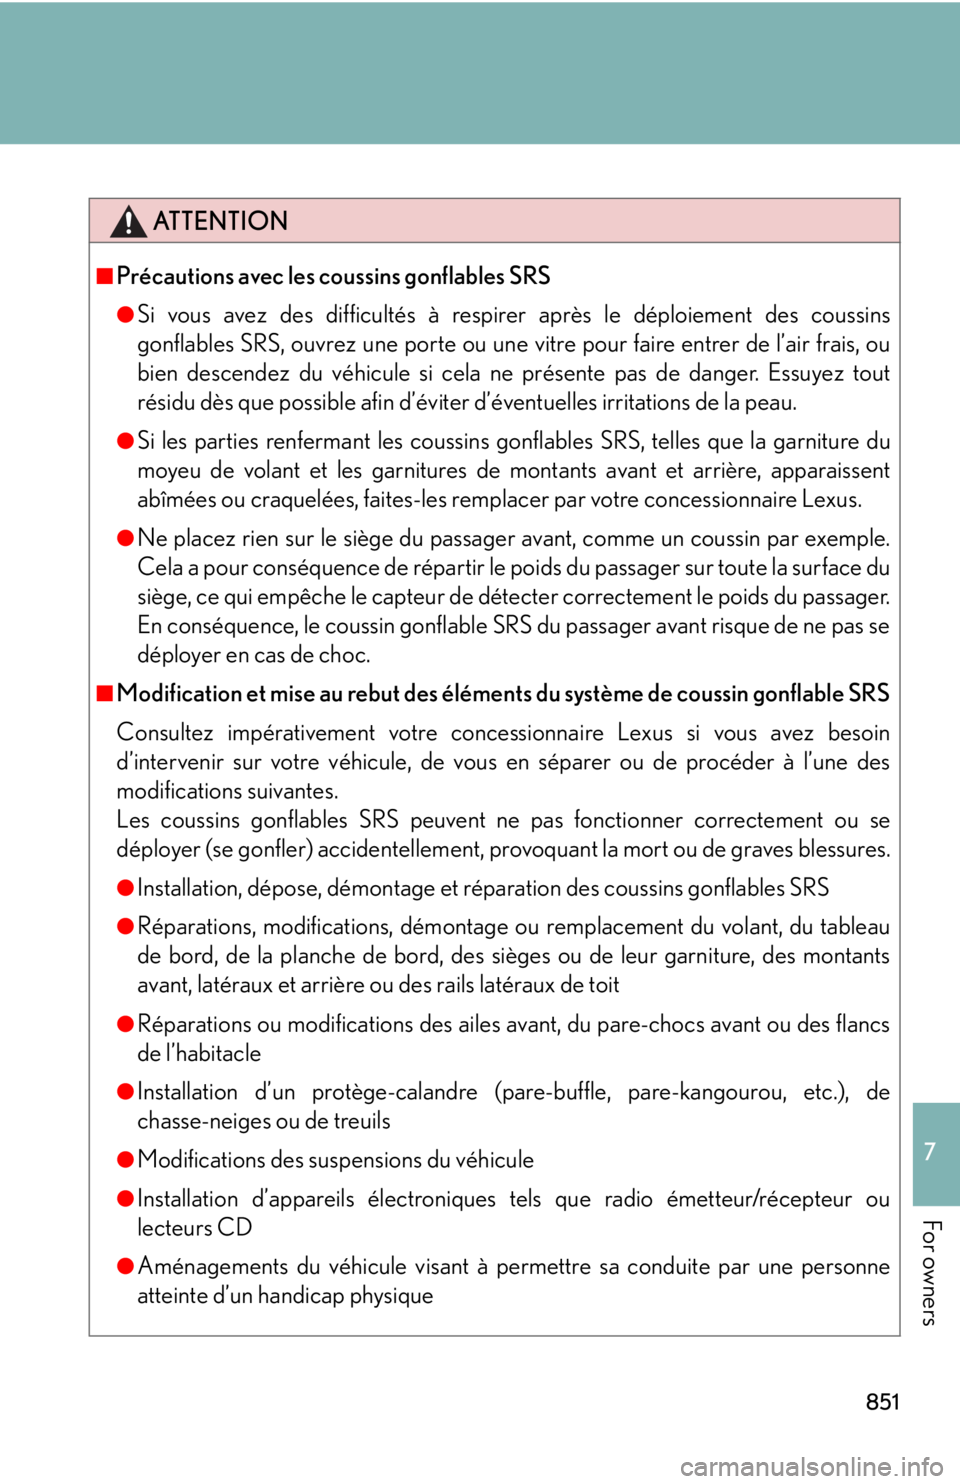
8517
For owners ATTENTION■
Précautions avec les coussins gonflables SRS ●
Si vous avez des difficultés à respirer après le déploiement des coussins
gonflables SRS, ouvrez une porte ou une vitre pour faire entrer de l’air frais, ou
bien descendez du véhicule si cela ne présente pas de danger. Essuyez tout
résidu dès que possible afin d’éviter d’éventuelles irritations de la peau. ●
Si les parties renfermant les coussins gonflables SRS, telles que la garniture du
moyeu de volant et les garnitures de montants avant et arrière, apparaissent
abîmées ou craquelées, faites-les remplacer par votre concessionnaire Lexus.●
Ne placez rien sur le siège du passager avant, comme un coussin par exemple.
Cela a pour conséquence de répartir le poids du passager sur toute la surface du
siège, ce qui empêche le capteur de détecter correctement le poids du passager.
En conséquence, le coussin gonflable SRS du passager avant risque de ne pas se
déployer en cas de choc.■
Modification et mise au rebut des éléments du système de coussin gonflable SRS
Consultez impérativement votre concessionnaire Lexus si vous avez besoin
d’intervenir sur votre véhicule, de vous en séparer ou de procéder à l’une des
modifications suivantes.
Les coussins gonflables SRS peuvent ne pas fonctionner correctement ou se
déployer (se gonfler) accidentellement, provoquant la mort ou de graves blessures. ●
Installation, dépose, démontage et réparation des coussins gonflables SRS●
Réparations, modifications, démontage ou remplacement du volant, du tableau
de bord, de la planche de bord, des sièges ou de leur garniture, des montants
avant, latéraux et arrière ou des rails latéraux de toit●
Réparations ou modifications des ailes avant, du pare-chocs avant ou des flancs
de l’habitacle●
Installation d’un protège-calandre (pare-buffle, pare-kangourou, etc.), de
chasse-neiges ou de treuils
●
Modifications des suspensions du véhicule
●
Installation d’appareils électroniques tels que radio émetteur/récepteur ou
lecteurs CD
●
Aménagements du véhicule visant à permettre sa conduite par une personne
atteinte d’un handicap physique