Page 210 of 878

2102-2. Instrument cluster
■ Average vehicle speed
Displays the average vehicle speed since the function was reset The function can be reset by pushing the “ENTER” switch for longer than
one second when the average vehicle speed is displayed.
■ Cruising range
Displays the estimated maximum distan ce that can be driven with the
quantity of fuel remaining • This distance is computed based on your average fuel consumption. As
a result, the actual distance that can be driven may differ from that dis-
played.
• When only a small amount of fuel is added to the tank, the display may
not be updated.
When refueling, turn the “POWER” switch off. If the vehicle is refueled
without turning the “POWER” switch off, the display may not be
updated.
■ Tire inflation pressure
Displays inflation pressure of each tire. There is no correlation between
the order of the displayed values and the tire positions. If the inflation pressure of any tire drops a certain amount below the tire infla-
tion pressure value currently memorized in the system, the displayed values
will be highlighted.
It may take a few minutes to display the tire inflation pressure after the
“POWER” switch is turned to ON mode. It may also take a few minutes to
display the tire inflation pressure after inflation pressure has been adjusted.
If the tire pressure warning light is on or flashing, a message describing the
situation will be displayed.
Page 220 of 878

2202-3. Operating the lights and windshield wipers
■
Automatic light off system ●
When the headlights are on: The headlights and tail lights turn off 30 seconds
after a door is opened and closed if the “POWER” switch is turned to ACCES-
SORY mode or turned off. (The lights turn off immediately if on the key is
pressed after all the doors are locked.)●
When only the tail lights ar e on: The tail lights turn off automatically if the
“POWER” switch is turned to ACCESSORY mode or turned off and the
driver’s door is opened.
To turn the lights on again, turn the “POWER” switch to ON mode, or turn the light
switch off once and then back to or .
If any of the doors is kept open, the ligh ts automatically turn off after 20 minutes.■
Automatic headlight leveling system (if equipped)
The level of the headlights is automatica lly adjusted according to the number of
passengers and the loading condition of the vehicle to ensure that the headlights do
not interfere with other road users. ■
Light reminder buzzer (headlights)
A buzzer sounds when the “POWER” switch is turned off or turned to ACCES-
SORY mode and the driver's door is open ed while the headlights are turned on.■
Illuminated entry system
If the wireless remote control switch is used to unlock the vehicle when the light
switch is in and the surrounding area is dark, the parking light turns on.■
Customization
Settings (e.g. light sensor sensitivity) can be changed.
(Customizable features P. 825)
NOTICE■
To prevent 12-volt battery discharge
Do not leave the lights on longer than necessary when the hybrid system is off.
Page 227 of 878

2272-3. Operating the light s and windshield wipers
2
When driving ■
Raindrop sensor (vehicles with rain-sensing windshield wipers)
●
If the wiper switch is turned to the position while the “POWER” switch is
in ON mode, the wipers will operate once to show that AUTO mode is acti-
vated.●
When the sensor sensitivity ring is turn ed toward high while in AUTO mode, the
wipers will operate once to indicate that the sensor sensitivity is enhanced.●
If the temperature of the raindrop sensor is 194 F (90 C) or higher, or 5 F
(-15 C) or lower, automatic operation may not occur.
In this case, operate the wipers in any mode other than AUTO.■
If no windshield washer fluid sprays
Check that the washer nozzles are not blocked if there is washer fluid in the wind-
shield washer fluid reservoir.
CAUTION■
Caution regarding the use of windshield wipers in AUTO mode (vehicles with
rain-sensing windshield wipers)
The windshield wipers may operate unexpectedly if the sensor is touched or the
windshield is subject to vibration in AUTO mode. Take care that your fingers or any-
thing else do not become caugh t in the windshield wipers.
■
Caution regarding the use of washer fluid
When it is cold, do not use the washer fluid until the windshield becomes warm. The
fluid may freeze on the windshield and cause low visibility. This may lead to an acci-
dent, resulting in death or serious injury. ●
The raindrop sensor judges the amount
of raindrops.
An optical sensor is adopted. It may not
operate properly when sunlight from the
rising or setting of the sun intermittently
strikes the windshield, or if bugs etc. are
present on the windshield.
Page 230 of 878
2302-3. Operating the lights and windshield wipers
■
The rear window wiper and washer can be operated when
The “POWER” switch is in ON mode.
NOTICE■
When the rear window is dry
Do not use the wipers, as they may damage the rear window.
■
When the washer fluid tank is empty
Damage to the washer fluid pump may be caused if the lever is operated continu-
ally.
■
When a nozzle becomes blocked
In this case, contact your Lexus dealer.
Do not try to clear it with a pin or other object. The nozzle will be damaged. Type B
Off
Intermittent window
wiper operation
Normal window wiper
operation
Washer/wiper dual
operation
Washer/wiper dual
operation
Page 237 of 878
2372-4. Using other driving systems
2
When driving Accelerate or decelerate the
vehicle to the desired speed,
and push the lever down to set
the speed. “SET” will be displayed.
The vehicle speed at the
moment the lever is released
becomes the set speed.
■ Adjusting the set speed
To change the set speed, operate the lever until the desired set
speed is displayed.
Increases the speed
Decreases the speed Fine adjustment: Momentarily
move the lever in the desired
direction.
Large adjustment: Hold the
lever in the desired direction.
In the vehicle-to-vehicle distance control mode, the set speed will be
increased or decreased as follows:
When the set speed is shown in “MPH”
Fine adjustment: By approximately 1 mph (1.6 km/h) each time the lever is
operated
Large adjustment: By approximately 5 mph (8 km/h) for each 0.75 sec-
onds the lever is held STEP 2
Page 242 of 878

2422-4. Using other driving systems
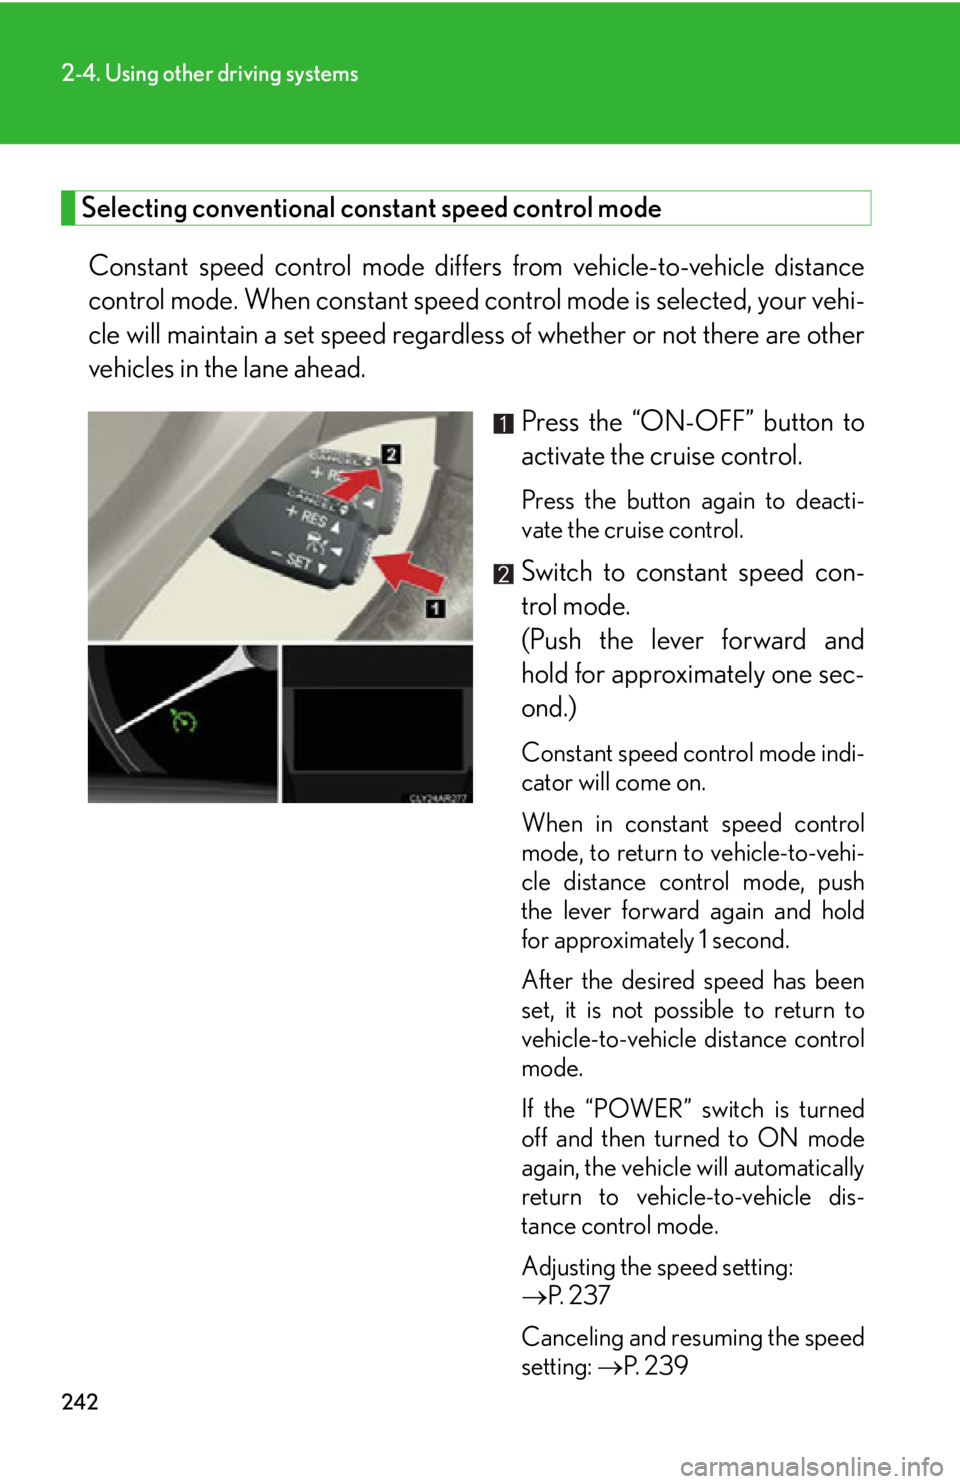
Selecting conventional constant speed control mode
Constant speed control mode differs from vehicle-to-vehicle distance
control mode. When constant speed control mode is selected, your vehi-
cle will maintain a set speed regardless of whether or not there are other
vehicles in the lane ahead.
Press the “ON-OFF” button to
activate the cruise control. Press the button again to deacti-
vate the cruise control.
Switch to constant speed con-
trol mode.
(Push the lever forward and
hold for approximately one sec-
ond.) Constant speed control mode indi-
cator will come on.
When in constant speed control
mode, to return to vehicle-to-vehi-
cle distance control mode, push
the lever forward again and hold
for approximately 1 second.
After the desired speed has been
set, it is not possible to return to
vehicle-to-vehicle distance control
mode.
If the “POWER” switch is turned
off and then turned to ON mode
again, the vehicle will automatically
return to vehicle-to-vehicle dis-
tance control mode.
Adjusting the speed setting:
P. 2 3 7
Canceling and resuming the speed
setting: P. 2 3 9
Page 259 of 878

2592-4. Using other driving systems
2
When driving ■
Changing display modes
The rear view monitor display mode ca n be changed while the screen is on.●
To temporarily disable the rear view monitor system
●
To constantly disable the rear view monitor system
●
To re-enable the rear view monitor system
Press . The indicator will turn green.■
Selecting a language (English, French or Spanish) Press .
The indicator will turn amber.
The system will be re-enabled once the
“POWER” switch is turned off and then
turned to ON mode.
Press and hold for 12 to 15 seconds.
The screen will turn off and on after 6 sec-
onds. Keep pressing the button until the
screen turns back off. The indicator will
flash amber.
The system will not automatically turn on
again after the “POWER” switch is off and
then turned to ON mode.
Press and hold for 6 to 12
seconds.
The screen will turn on and the
indicator will turn green.
Press .
Each time
is pressed
and released, the language
changes. A message will flash
in the mirror for 5 seconds
after the button is released,
indicating that the change has
been completed. STEP 1
STEP 2
Page 301 of 878

3012-5. Driving information
2
When driving Vehicle load limits
■
Total load capacity and seating capacity
These details are also described on th e tire and loading information label.
( P. 6 7 9 )
CAUTION
■
Overloading the vehicle
Do not overload the vehicle.
It may not only cause damage to the tire s, but also degrade steering and braking
ability, resulting in an accident. Vehicle load limits include total load capacity, seating capacity, TWR
(Trailer Weight Rating) and cargo capacity.
■ Total load capacity (vehicle capacity weight): ( P. 7 9 8 )Total load capacity means the combined weight of occupants, cargo and
luggage.
■ Seating capacity: 5 occupants (Front 2, Rear 3) Seating capacity means the maximum number of occupants whose esti-
mated average weight is 150 lb. (68 kg) per person.
■ TWR (Trailer Weight Rating) (AWD models with towing package):
( P. 310, 798)TWR means the maximum gross trailer weight (trailer weight plus its
cargo weight) that your vehicle is able to tow.
■ TWR (Trailer Weight Rating) (2WD models and AWD models
without towing package) Lexus does not recommend towing a trailer with your vehicle.
■ Cargo capacity Cargo capacity may increase or decrease depending on the weight and
the number of occupants.