Page 209 of 878

2092-2. Instrument cluster
2
When driving
Trip information
■ Energy monitor
Displays the status of the hybrid system ( P. 4 0 )
■ Current fuel consumption
Displays the current ra te of fuel consumption
■ Average fuel consumption after refueling
Displays the average fuel consumptio n since the vehicle was last refu-
eled
Use the displayed average fuel consumption as a reference.
■ Average fuel consumption
Displays the average fuel consumpti on since the function was reset
• The function can be reset by pushing the “ENTER” switch for longer
than one second when the average fuel consumption is displayed.
• Use the displayed average fuel consumption as a reference. Other contents Details
Outside temperature Displays the outside temperature
Dynamic radar cruise control display
(if equipped) ( P. 2 3 6 ) Automatically displayed when using
dynamic radar cruise control
Customization ( P. 8 2 5 ) Settings of functions such as the
door lock and light illumination time
can be changed
Wa r n i n g m e s s a g e ( P. 74 3 ) Automatically displayed when a mal-
function occurs in one of the vehi-
cle's systems
Page 210 of 878

2102-2. Instrument cluster
■ Average vehicle speed
Displays the average vehicle speed since the function was reset The function can be reset by pushing the “ENTER” switch for longer than
one second when the average vehicle speed is displayed.
■ Cruising range
Displays the estimated maximum distan ce that can be driven with the
quantity of fuel remaining • This distance is computed based on your average fuel consumption. As
a result, the actual distance that can be driven may differ from that dis-
played.
• When only a small amount of fuel is added to the tank, the display may
not be updated.
When refueling, turn the “POWER” switch off. If the vehicle is refueled
without turning the “POWER” switch off, the display may not be
updated.
■ Tire inflation pressure
Displays inflation pressure of each tire. There is no correlation between
the order of the displayed values and the tire positions. If the inflation pressure of any tire drops a certain amount below the tire infla-
tion pressure value currently memorized in the system, the displayed values
will be highlighted.
It may take a few minutes to display the tire inflation pressure after the
“POWER” switch is turned to ON mode. It may also take a few minutes to
display the tire inflation pressure after inflation pressure has been adjusted.
If the tire pressure warning light is on or flashing, a message describing the
situation will be displayed.
Page 234 of 878

2342-4. Using other driving systems
■
Cruise control can be set when ●
The shift lever is in D or range 4 or higher of S has been selected. ●
Vehicle speed is above 25 mph (40 km/h). ■
Accelerating after setting the vehicle speed ●
The vehicle can be accelerated normally. After acceleration, the set speed
resumes.●
Even without canceling the cruise cont rol, the set speed can be increased by
first accelerating the vehicle to the desired speed and then pushing the lever
down to set the new speed.■
Automatic cruise control cancelation
Cruise control will stop maintaining the ve hicle speed in any of the following situa-
tions.
●
Actual vehicle speed falls more than approximately 10 mph (16 km/h) below the
preset vehicle speed.
At this time, the memorized set speed is not retained.
●
Actual vehicle speed is below approximately 25 mph (40 km/h).
●
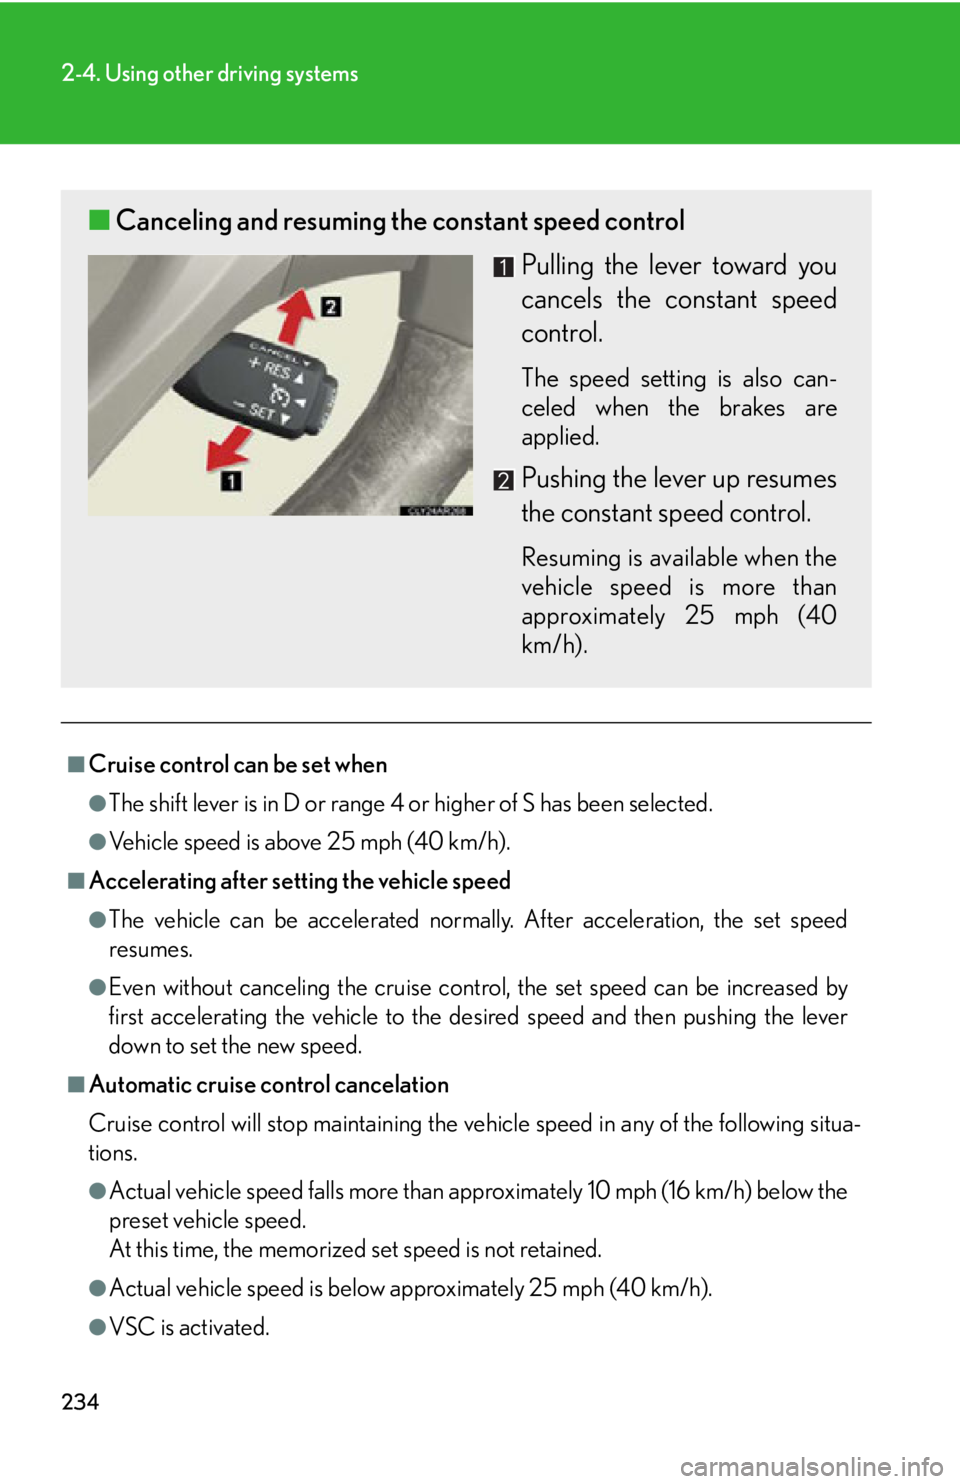
VSC is activated.■ Canceling and resuming the constant speed control
Pulling the lever toward you
cancels the constant speed
control. The speed setting is also can-
celed when the brakes are
applied.
Pushing the lever up resumes
the constant speed control. Resuming is available when the
vehicle speed is more than
approximately 25 mph (40
km/h).
Page 315 of 878

3152-5. Driving information
2
When driving ■
Auto current cut-off function
In case of over current, the auto cut-off function stops the power flowing to the
trailer lights to prevent damage to the vehicle’s electrical system.
This function is activated when the rated current of any of the following trailer light
circuit components is exceeded: ●
Tail lights: maximum 7.8 A ●
Stop/turn signal light (right): maximum 4.5 A●
Stop/turn signal light (left): maximum 4.5 A■
When the auto current cut function is activated
If a trailer light does not come on due to the activation of the auto current cut func-
tion, the light system will need to be reset.
Follow the reset procedure shown below. ●
If a tail light does not come on, turn off the headlight switch.●
If the right-side stop/turn signal light does not come on, put the turn signal in the
off position or remove foot from the brake pedal.●
If the left-side stop/turn signal light does not come on, put the turn signal in the
off position or remove foot from the brake pedal.
If the emergency flashers do not operate, press the emergency flasher switch to
turn them off.
After the light system is reset, operate the light switches again to see if the lights
operate normally.
If the lights do not operate normally, have the vehicle inspected by your Lexus
dealer.
Page 336 of 878
3363-1. Lexus Display Audio system
■ Delete personal data
Select “Delete Personal Data” on the “General Settings” screen.
Select “Delete”. Check carefully beforehand, as
data cannot be retrieved once
deleted.
A confirmation screen will be displayed. Select “Yes”.
The following personal data can be deleted or turn ed to their default set-
tings. •Phonebook data
• Call history data
• Speed dial data
•Bluetooth
devices data
• Phone sound settings
• Detailed Bluetooth
settings
• Sound settings
• Preset switch data
• Last used radio station STEP 1
STEP 2
STEP 3
Page 365 of 878
3653-3. Using the Lexus Display Audio system
3
Interior features Using the radio Press the “RADIO” button or “AUDIO” button on the Lexus Display Audio
controller and then select “AM”, “FM” or “SAT”.
■ Control panel Audio control screen
Mute button
Frequency adjust-
ment knob
Seek/preset station
selector button
AM/FM/SAT mode buttons“PWR·VOL” knob
Po w e r Vo l u m e
Page 366 of 878
3663-3. Using the Lexus Display Audio system
■ Audio control screen
Pressing the “RADIO” button or “A UDIO” button on the Lexus Dis-
play Audio controller displays the audio control screen from any
screens of the selected source.
“Presets” screen
“Options” screen “Options” screen appears
Audio source selection
screen appears
Changing the Multicast Ch
Information in the music
under broadcasting is mem-
orized
Selecting HD Radio™ tech-
nology
Setting the sound
( P. 4 2 4 )
Displaying text messages
Scanning for receivable sta-
tion
Preset stations
“Presets” screen appears
Selecting program type or
channel category
RBDS message display on/
off
Displaying traffic messages
Page 367 of 878

3673-3. Using the Lexus Display Audio system
3
Interior features Selecting a station
■ Seek tuning
Press and hold “ ” or “ ” on the “PRST•TRACK” button.
■ Manual tuning
Turn the “TUNE•SCROLL” knob.
■ Preset stations
Press “ ” or “ ” on the “PRST•TRACK” butto n or select desired preset
stations.
Setting station presets (excluding XM ®
Satellite Radio)
Radio mode has a mix preset function, which can store up to 36 stations
(6 station per page 6 page) from any of the AM, FM or SAT bands.
Search for desired stations by turning the “TUNE•SCROLL”
knob or pressing and holding “ ” or “ ” on the “PRST•TRACK”
button.
Select and hold one of the pr eset stations (1-6 every page).
Scanning radio stations (excluding XM ®
Satellite Radio)
Select “SCAN” on the screen. “SCAN” appears on the screen. The ra dio will find the next station and
stay there for 10 seconds if “All” or “HD Only” is selected, or 5 seconds
if “Analog” is selected ( P. 371), and then scan again.
Select “SCAN” once again when the desired station is reached.STEP 1
STEP 2
STEP 1
STEP 2