Page 669 of 886

6694-3. Do-it-yourself maintenance
4
Maintenance and care CAUTION■
When raising your vehicle
Make sure to observe the following precautions to reduce the possibility of death or
serious injury:
●
When using a floor jack, follow the instructions of the manual provided with the
jack.●
Do not use the jack that wa s supplied with your vehicle.●
Do not put any part of your body underneath the vehicle when it is supported
only by the floor jack.●
Always use floor jack and/or automotive jack stands on a solid, flat, level surface.●
Do not start the engine while the vehicle is supported by the floor jack.●
Stop the vehicle on level, firm ground, firmly set the parking brake and shift the
shift lever to P.●
Make sure to set the floor jack properly at the jack point.
Raising the vehicle with an improperly positioned floor jack will damage the vehi-
cle and may cause the vehicle to fall off the floor jack.●
Do not raise the vehicle while someone is in the vehicle.●
When raising the vehicle, do not place any objects on top of or underneath the
floor jack. ●
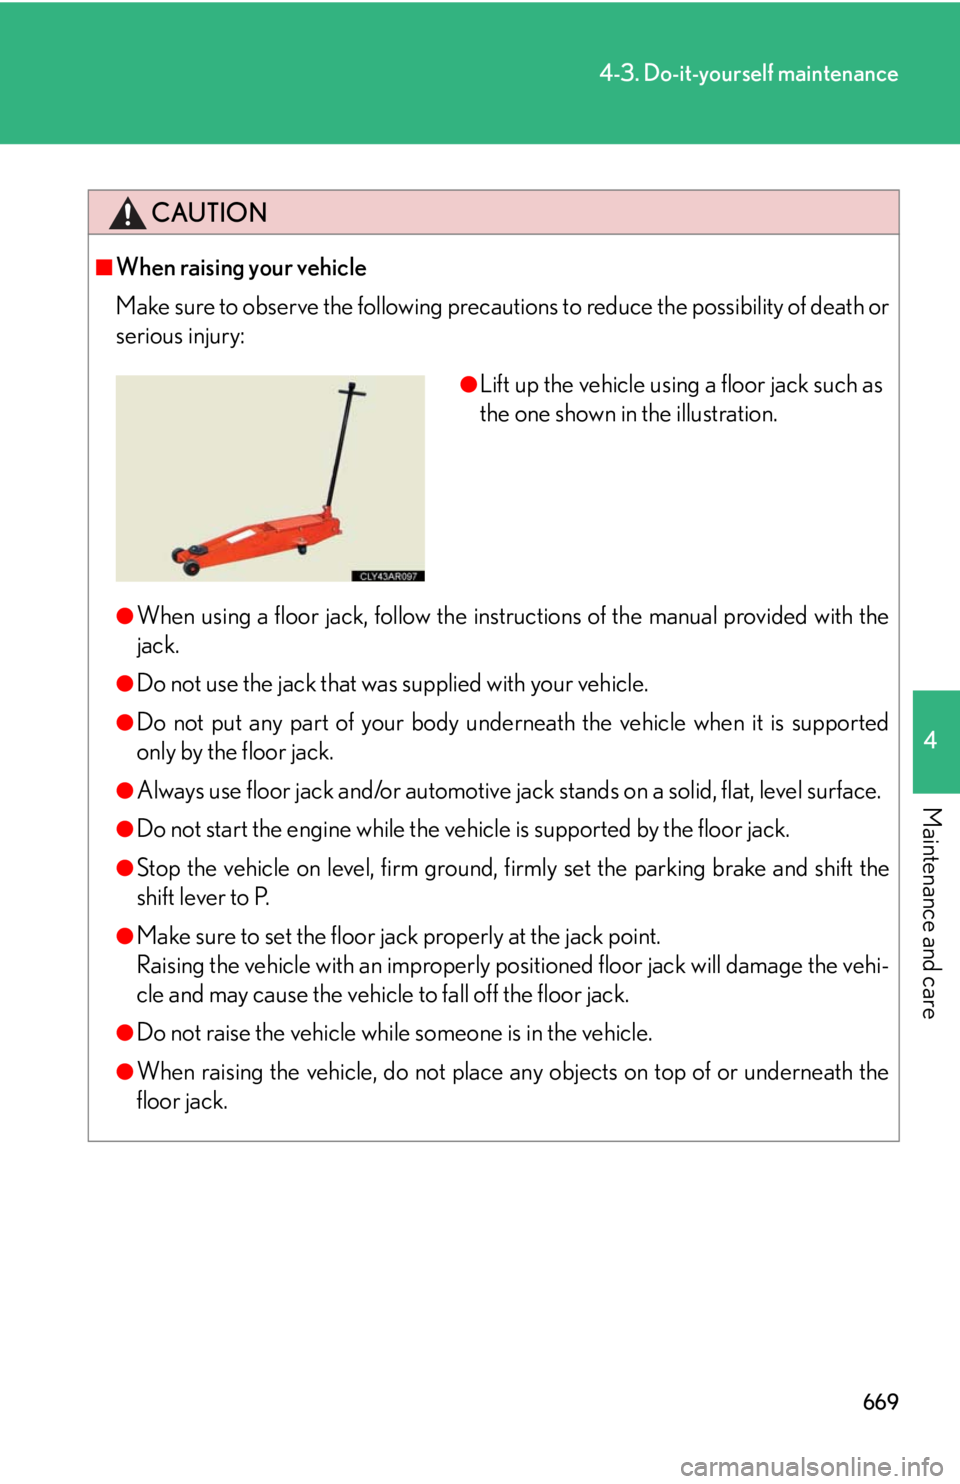
Lift up the vehicle using a floor jack such as
the one shown in the illustration.
Page 681 of 886

6814-3. Do-it-yourself maintenance
4
Maintenance and care Battery
Check the battery as follows.
■ Battery exterior
Make sure that the battery terminals are not corroded and that there
are no loose connections, cracks, or loose clamps.
Terminals
Hold-down clamp
■
Before recharging
When recharging, the battery produces hydrogen gas which is flammable and
explosive. Therefore, observe the following before recharging: ●
If recharging with the battery installed on the vehicle, be sure to disconnect the
ground cable.●
Make sure the power switch on the charger is off when connecting and discon-
necting the charger cables to the battery.■
After recharging/reconnecting the battery
In some cases, the engine may not start. Follow the procedure below to initialize the
system.
Shift the shift lever to P, and turn the “ENGINE START STOP” switch off.
Open and close any of the doors.
Start the engine. (If the engine does not start first time, repeat the proce-
dure.)
If the engine will not start even after mult iple attempts at the above method, contact
your Lexus dealer. STEP 1
STEP 2
STEP 3
Page 686 of 886
6864-3. Do-it-yourself maintenance
■ How to initialize the tire pressure warning system
Park the vehicle in a safe plac e and turn the “ENGINE START
STOP” switch off. While the vehicle is moving, initialization is not performed.
Adjust the tire inflation pressure to the specified co ld tire inflation
pressure level. ( P. 815)Make sure to adjust the tire pressure to the specified cold tire inflation
pressure level. The tire pressure warning system will operate based on
this pressure level.
Turn the “ENGINE START STOP” switch to IGNITION ON
mode.
Press and hold the tire pressure
warning reset switch until the tire
pressure warning light blinks
slowly 3 times.
Wait for a few minutes in “ENG INE START STOP” switch to on,
and then turn the “ENGINE START STOP” switch off.STEP 1
STEP 2
STEP 3
STEP 4
STEP 5
Page 689 of 886

6894-3. Do-it-yourself maintenance
4
Maintenance and care ■
The initialization operation ●
Make sure to carry out initialization af ter adjusting the tire inflation pressure.
Also, make sure the tires are cold before carrying out initialization or tire infla-
tion pressure adjustment.●
If you have accidentally turned the “ENGINE START STOP” switch off during
initialization, it is not necessary to pres s the reset switch again as initialization
will restart automatically when the “ENGINE START STOP” switch has been
turned to IGNITION ON mode for the next time.●
If you accidentally press the reset switch when initialization is not necessary,
adjust the tire inflation pressure to th e specified level when the tires are cold,
and conduct initialization again.■
When the initialization of the tire pressure warning system has failed
Initialization can be completed in a few minutes. However, in the following cases,
the settings have not been recorded and the system will not operate properly. If
repeated attempts to record tire inflation pressure settings are unsuccessful, have
the vehicle inspected by your Lexus dealer. ●
When operating the tire pressure warnin g reset switch, the tire pressure warn-
ing light does not blink 3 times. ●
After carrying out the initialization proc edure, the tire pressure warning light
blinks for 1 minute then stays on after driving for 20 minutes.
Page 699 of 886
6994-3. Do-it-yourself maintenance
4
Maintenance and care Air conditioning filter The air conditioning filter must be changed regularly to maintain air condi-
tioning efficiency.
■ Removal method
Turn the “ENGINE START STOP” switch off.
Open the glove box. Lift and
remove the partition.
Remove the glove box cover.STEP 1
STEP 2
STEP 3
Page 703 of 886
7034-3. Do-it-yourself maintenance
4
Maintenance and care Checking and replacing fuses If any of the electrical components do not operate, a fuse may have blown.
If this happens, check and re place the fuses as necessary.
Turn the “ENGINE START STOP” switch off.
After a system failure, see “Fuse layout and amperage ratings”
for details about which fuse to check. ( P. 7 0 6 )
Remove the engine compartment cover. ( P. 671)
Open the fuse box cover.
Engine compartment
Push the tab in and lift the lid off.
Driver's side instrument panel
Remove the lid.STEP 1
STEP 2
STEP 3
STEP 4
Page 707 of 886

7074-3. Do-it-yourself maintenance
4
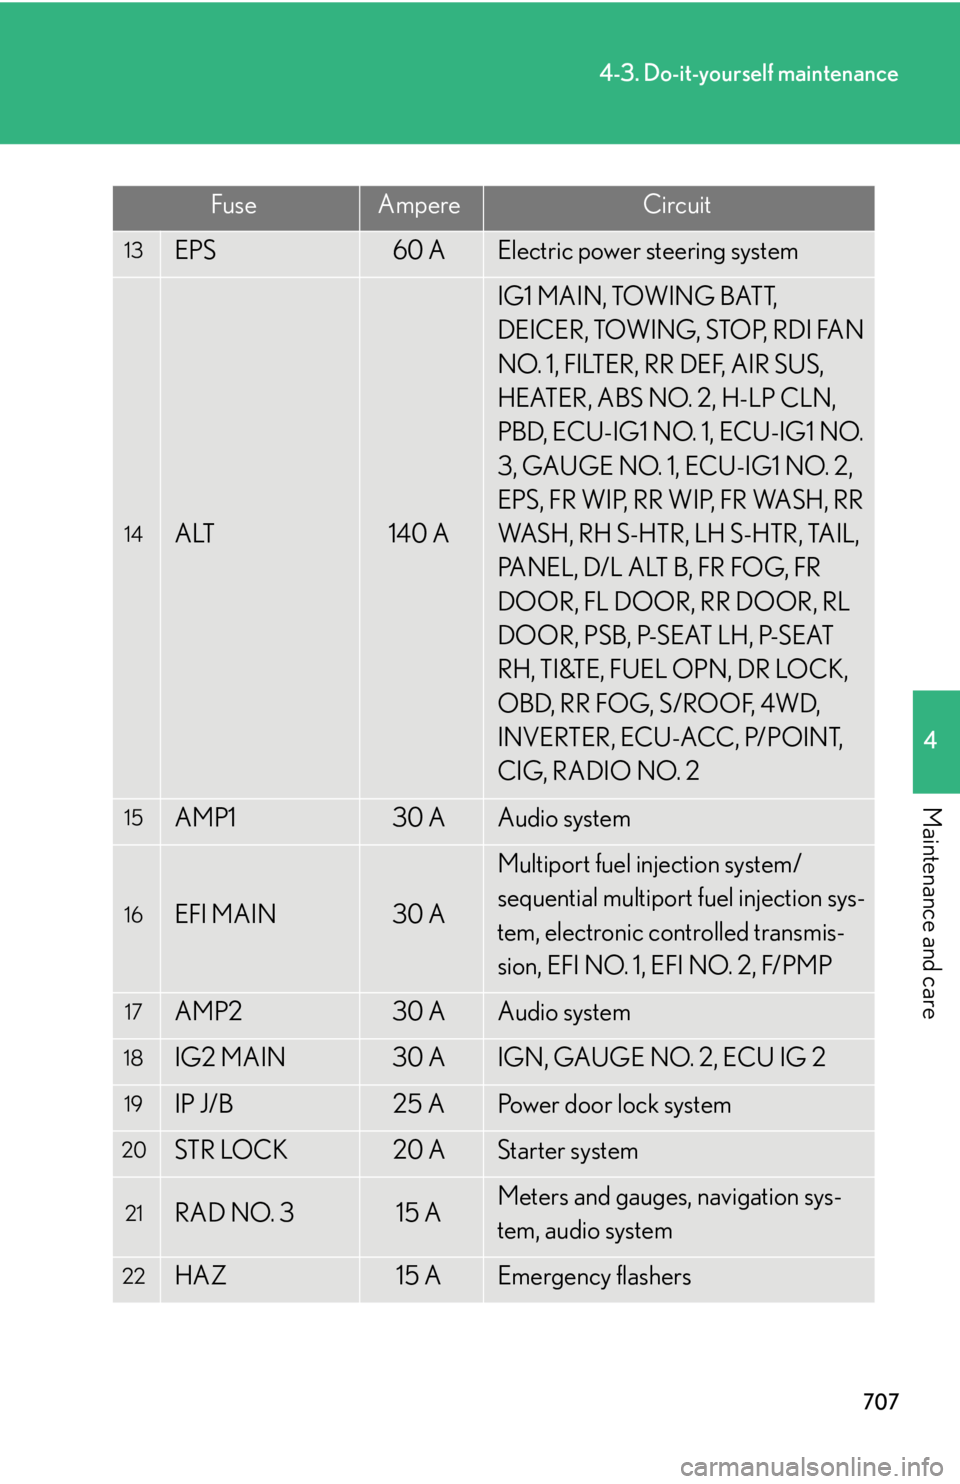
Maintenance and care 13
EPS 60 A Electric power steering system
14
ALT 140 A IG1 MAIN, TOWING BATT,
DEICER, TOWING, STOP, RDI FAN
NO. 1, FILTER, RR DEF, AIR SUS,
HEATER, ABS NO. 2, H-LP CLN,
PBD, ECU-IG1 NO. 1, ECU-IG1 NO.
3, GAUGE NO. 1, ECU-IG1 NO. 2,
EPS, FR WIP, RR WIP, FR WASH, RR
WASH, RH S-HTR, LH S-HTR, TAIL,
PANEL, D/L ALT B, FR FOG, FR
DOOR, FL DOOR, RR DOOR, RL
DOOR, PSB, P-SEAT LH, P-SEAT
RH, TI&TE, FUEL OPN, DR LOCK,
O B D, R R F O G, S / R O O F, 4 W D,
INVERTER, ECU-ACC, P/POINT,
CIG, RADIO NO. 215
AMP1 30 A Audio system16
EFI MAIN 30 A Multiport fuel injection system/
sequential multiport fuel injection sys-
tem, electronic controlled transmis-
sion, EFI NO. 1, EFI NO. 2, F/PMP17
AMP2 30 A Audio system18
IG2 MAIN 30 A IGN, GAUGE NO. 2, ECU IG 219
IP J/B 25 A Power door lock system20
STR LOCK 20 A Starter system
21
RAD NO. 3 15 A Meters and gauges, navigation sys-
tem, audio system
22
HAZ 15 A Emergency flashersFuse Ampere Circuit
Page 709 of 886

7094-3. Do-it-yourself maintenance
4
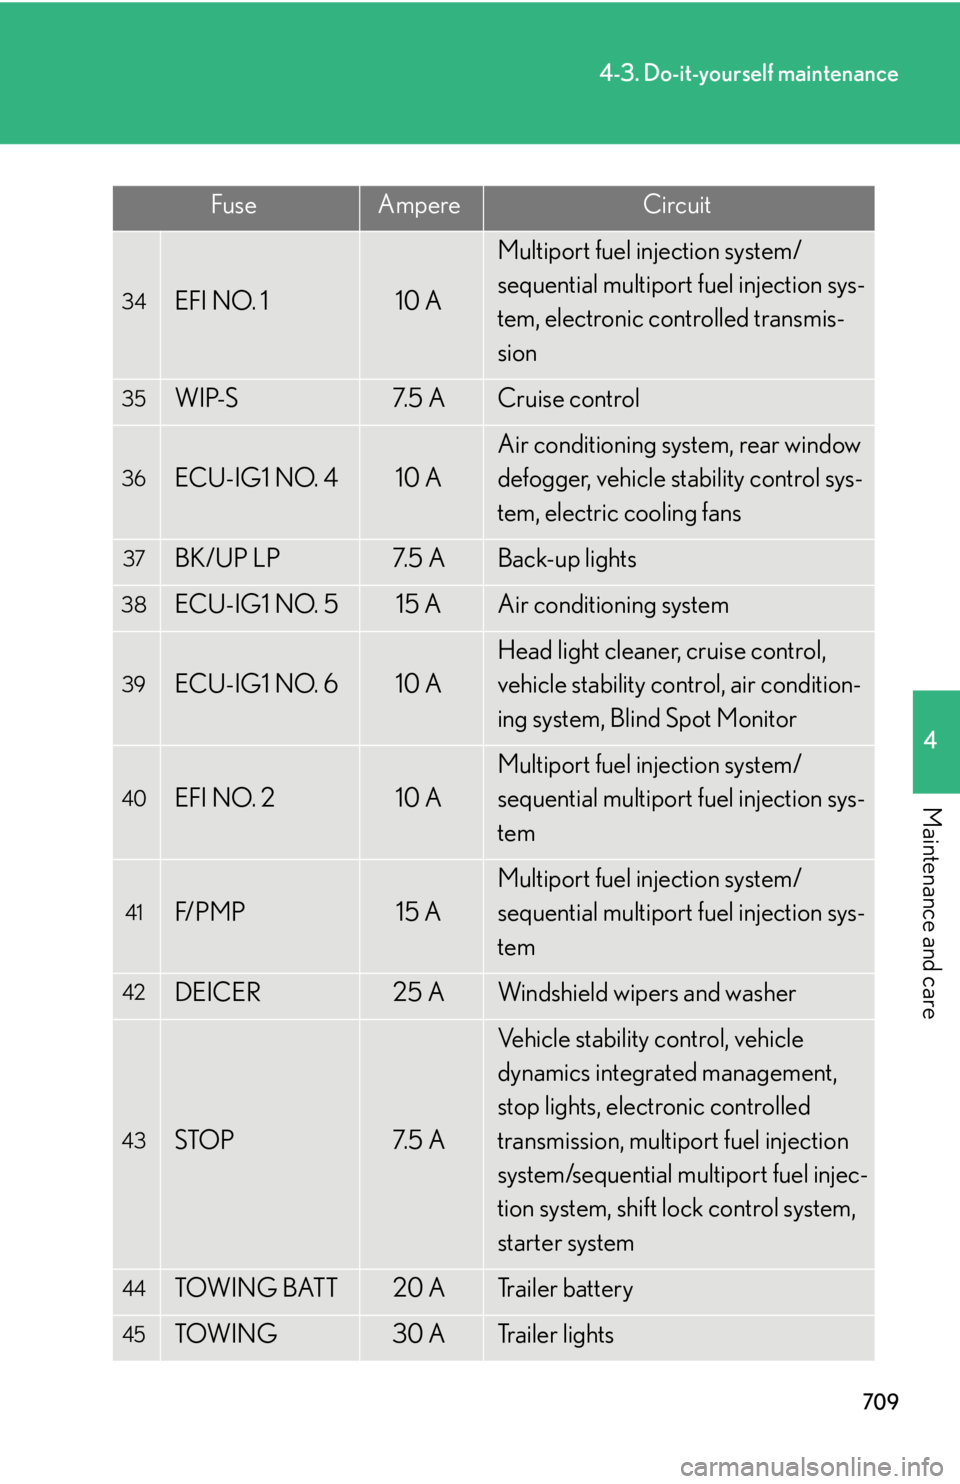
Maintenance and care 34
EFI NO. 1 10 A Multiport fuel injection system/
sequential multiport fuel injection sys-
tem, electronic controlled transmis-
sion35
WIP-S 7. 5 A Cruise control36
ECU-IG1 NO. 4 10 A Air conditioning system, rear window
defogger, vehicle stability control sys-
tem, electric cooling fans37
BK/UP LP 7. 5 A Back-up lights38
ECU-IG1 NO. 5 15 A Air conditioning system39
ECU-IG1 NO. 6 10 A Head light cleaner, cruise control,
vehicle stability control, air condition-
ing system, Blind Spot Monitor40
EFI NO. 2 10 A Multiport fuel injection system/
sequential multiport fuel injection sys-
tem41
F/ P M P 15 A Multiport fuel injection system/
sequential multiport fuel injection sys-
tem42
DEICER 25 A Windshield wipers and washer
43
STOP 7. 5 A Vehicle stability control, vehicle
dynamics integrated management,
stop lights, electronic controlled
transmission, multiport fuel injection
system/sequential multiport fuel injec-
tion system, shift lock control system,
starter system
44
TOW I N G BAT T 20 A Trailer battery
45
TOW I N G 30 A Trailer lightsFuse Ampere Circuit