Page 181 of 492
4101
Features of your vehicle
Glove box lamp (if equipped)
The glove box lamp comes on when
the glove box is opened.
To prevent unnecessary charging
system drain, close the glove box
securely after using the glove box.
Vanity mirror lamp
(if equipped)
Pull the sunvisor downward and you
can turn the vanity mirror lamp ON or
OFF by pushing the button.
: To turn the lamp ON.
To turn the lamp OFF.
To prevent unnecessary charging
system drain, turn off the lamp by
pushing the O button after using the
lamp.
OPS043057
OAM042336
Page 212 of 492

Features of your vehicle
132
4
These compartments can be used to
store small items.
To avoid possible theft, do not
leave valuables in the storage
compartment.
Always keep the storage compart- ment covers closed while driving.
Do not attempt to place so many
items in the storage compartment
that the storage compartment
cover cannot close securely.Center console storage
These compartments can be used to
store small items required by the
driver or front passenger.
To open the center console storage,
pull up the lever. (Type B)
Glove box
To open the glove box, push the but-
ton and the glove box will automati-
cally open. Close the glove box after
use.
Always keep the glove box closed
while the vehicle is in operation.
STORAGE COMPARTMENT
OPS043062WARNING - Flammable
materials
Do not store, propane cylinders
or other flammable/explosive
materials in the vehicle. These
items may catch fire and/or
explode if the vehicle is exposed
to hot temperatures for extended
periods.
OPS043060
OPS043061
■ Type B
■Type A
Page 221 of 492

4141
Features of your vehicle
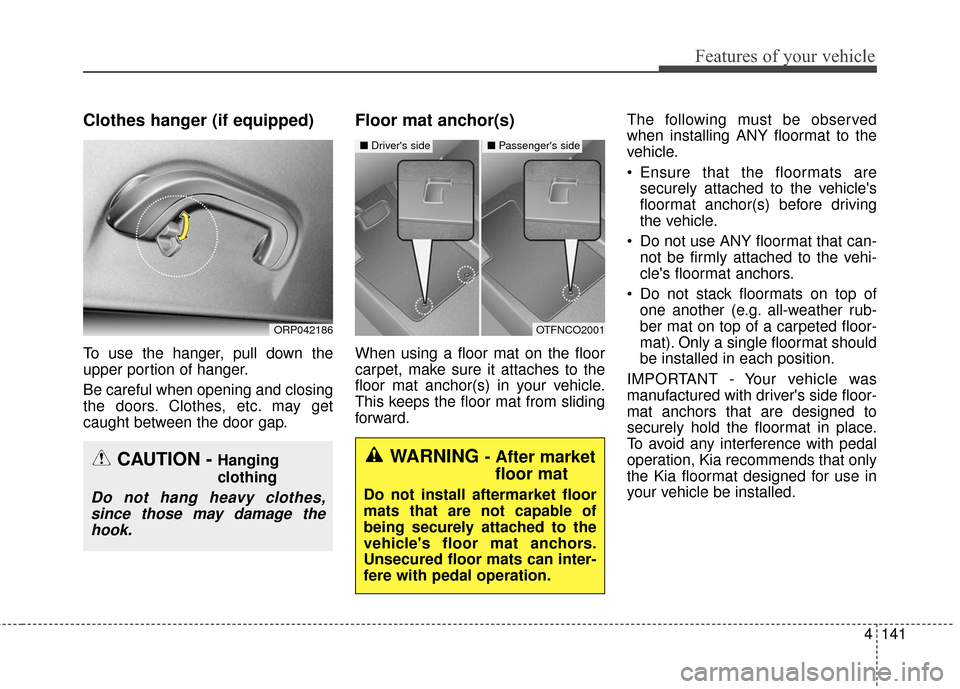
Clothes hanger (if equipped)
To use the hanger, pull down the
upper portion of hanger.
Be careful when opening and closing
the doors. Clothes, etc. may get
caught between the door gap.
Floor mat anchor(s)
When using a floor mat on the floor
carpet, make sure it attaches to the
floor mat anchor(s) in your vehicle.
This keeps the floor mat from sliding
forward.The following must be observed
when installing ANY floormat to the
vehicle.
Ensure that the floormats are
securely attached to the vehicle's
floormat anchor(s) before driving
the vehicle.
Do not use ANY floormat that can- not be firmly attached to the vehi-
cle's floormat anchors.
Do not stack floormats on top of one another (e.g. all-weather rub-
ber mat on top of a carpeted floor-
mat). Only a single floormat should
be installed in each position.
IMPORTANT - Your vehicle was
manufactured with driver's side floor-
mat anchors that are designed to
securely hold the floormat in place.
To avoid any interference with pedal
operation, Kia recommends that only
the Kia floormat designed for use in
your vehicle be installed.
OTFNCO2001
■ Driver's side■ Passenger's side
WARNING - After market
floor mat
Do not install aftermarket floor
mats that are not capable of
being securely attached to the
vehicle's floor mat anchors.
Unsecured floor mats can inter-
fere with pedal operation.
CAUTION - Hanging
clothing
Do not hang heavy clothes,
since those may damage thehook.
ORP042186
Page 222 of 492
Features of your vehicle
142
4
Luggage net holder
(if equipped)
To keep items from shifting in the
cargo area, you can use the holders
located in the cargo area to attach
the luggage net.
If necessary, contact your authorized
Kia dealer to obtain a luggage net.
To prevent damage to the goods or
the vehicle, care should be taken
when carrying fragile or bulky objects
in the luggage compartment.
Cargo area cover (if equipped)
Use the cargo area cover to hide
items stored in the cargo area.
WARNING - Luggage net
Always keep your face and
body out of the luggage net
recoil path and avoid using
the luggage net when the
straps have visible signs of
wear or damage. The luggage
net can snap and cause
injuries.
All cargo should be evenly distributed, properly secured
and never piled higher than
the seatback.
OPS043193
OPS043199
Page 223 of 492
4143
Features of your vehicle
To use the cargo area cover, insert
the 4 edges into the slots.
WARNING - Objects
Do not place objects on the cargo area cover. Such
objects may be thrown about
inside the vehicle and possi-
bly injure vehicle occupants
during an accident or when
braking.
All cargo should be evenly distributed, properly secured
and never piled higher than
the seatback.
CAUTION - Luggage
Since the cargo area cover maybe damaged or malformed, donot apply excessive force to thecover or do not put the heavyloads on it.
OPS043200
Page 225 of 492
4145
Features of your vehicle
When carrying large objects on theroof, make sure they do not exceed
the overall roof length or width.
The vehicle center of gravity will be higher when items are loaded onto
the roof. Avoid sudden starts, brak-
ing, sharp turns, abrupt maneuvers
or high speeds that may result in
loss of vehicle control or rollover
resulting in an accident.
To prevent damage or loss of cargo while driving, check frequently
before or while driving to make
sure the items on the roof are
securely fastened.
WARNING- Driving with
roof load
Always drive slow and turn cor-
ners carefully when carrying
items on the roof rack. The vehi-
cle center of gravity will be
higher when items are loaded
onto the roof rack.
Page 263 of 492

4183
Features of your vehicle
Pairing Key / Key
on the Steering Remote
Controller
When No Devices have beenPaired
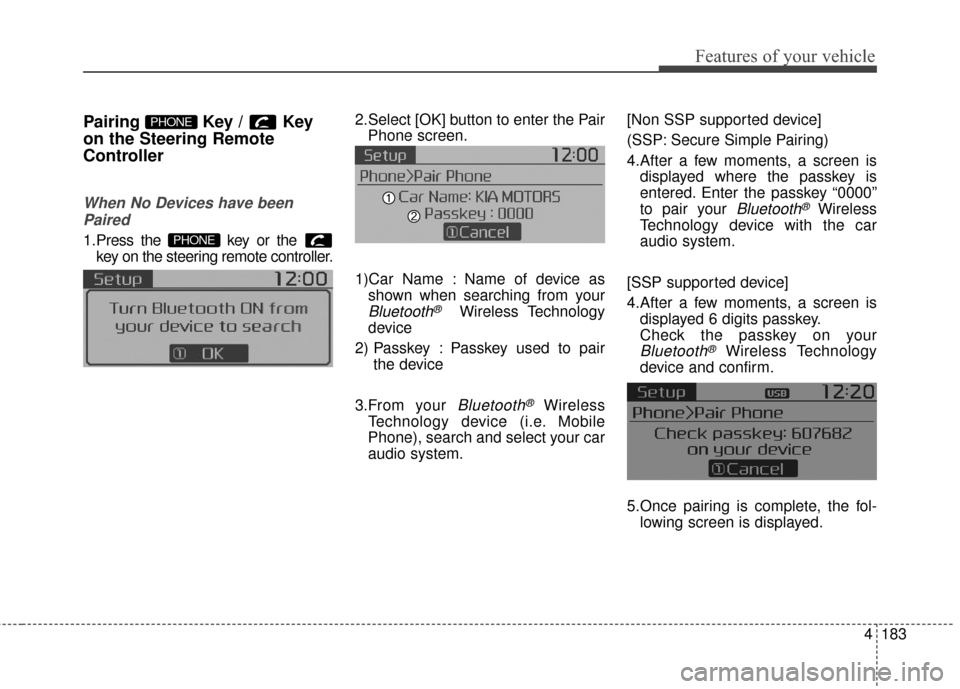
1.Press the key or the key on the steering remote controller.
The following screen is displayed. 2.Select [OK] button to enter the Pair
Phone screen.
1)Car Name : Name of device as shown when searching from your
Bluetooth®Wireless Technology
device
2) Passkey : Passkey used to pair the device
3.From your
Bluetooth®Wireless
Technology device (i.e. Mobile
Phone), search and select your car
audio system. [Non SSP supported device]
(SSP: Secure Simple Pairing)
4.After a few moments, a screen is
displayed where the passkey is
entered. Enter the passkey “0000”
to pair your
Bluetooth®Wireless
Technology device with the car
audio system.
[SSP supported device]
4.After a few moments, a screen is displayed 6 digits passkey.
Check the passkey on your
Bluetooth®Wireless Technology
device and confirm.
5.Once pairing is complete, the fol- lowing screen is displayed.
PHONE
PHONE
Page 278 of 492

Features of your vehicle
198
4
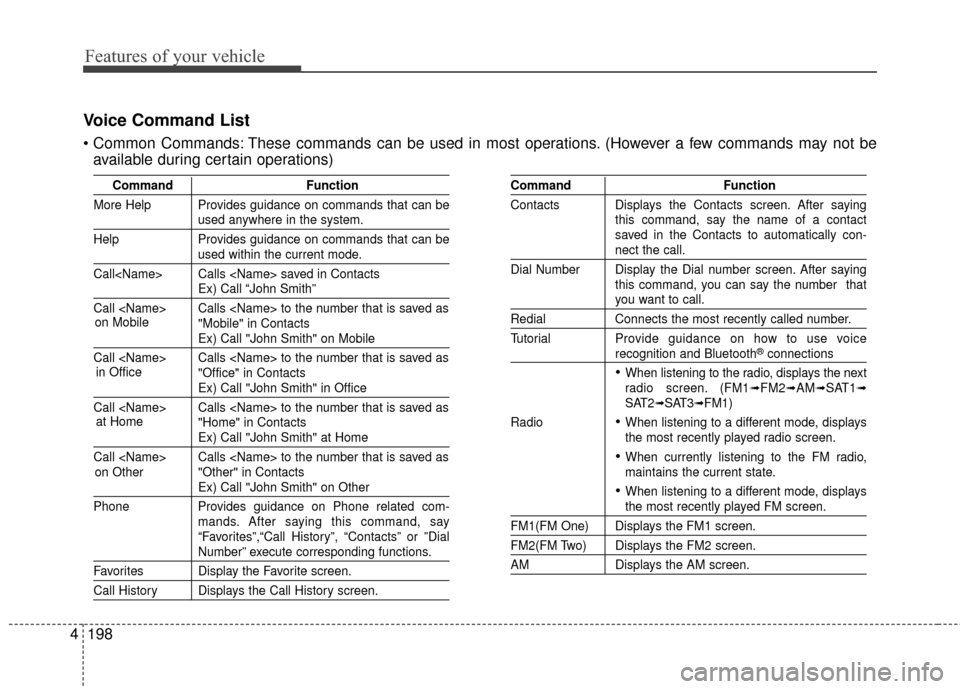
Voice Command List
These commands can be used in most operations. (However a few commands may not be
available during certain operations)
Command Function
More Help Provides guidance on commands that can be
used anywhere in the system.
Help Provides guidance on commands that can be
used within the current mode.
Call Calls saved in Contacts
Ex) Call “John Smith”
Call Calls to the number that is saved as "Mobile" in Contacts
Ex) Call "John Smith" on Mobile
Call Calls to the number that is saved as "Office" in Contacts
Ex) Call "John Smith" in Office
Call Calls to the number that is saved as "Home" in Contacts
Ex) Call "John Smith" at Home
Call Calls to the number that is saved as "Other" in Contacts
Ex) Call "John Smith" on Other
Phone Provides guidance on Phone related com- mands. After saying this command, say
“Favorites”,“Call History”, “Contacts” or ”Dial
Number” execute corresponding functions.
Favorites Display the Favorite screen.
Call History Displays the Call History screen.
Command Function
Contacts Displays the Contacts screen. After saying this command, say the name of a contact
saved in the Contacts to automatically con-
nect the call.
Dial Number Display the Dial number screen. After saying this command, you can say the number that
you want to call.
RedialConnects the most recently called number.
Tutorial Pro vide guidance on how to use voice
recognition and Bluetooth®connections
When listening to the radio, displays the next
radio screen. (FM1➟FM2➟AM➟SAT1➟SAT2➟SAT3➟FM1)
Radio
When listening to a different mode, displays
the most recently played radio screen.
When currently listening to the FM radio,
maintains the current state.
When listening to a different mode, displaysthe most recently played FM screen.
FM1(FM One) Displays the FM1 screen.
FM2(FM Two) Displays the FM2 screen.
AM Displays the AM screen.
on Mobile
in Officeat Home
on Other