Page 11 of 407

Your vehicle at a glance
42
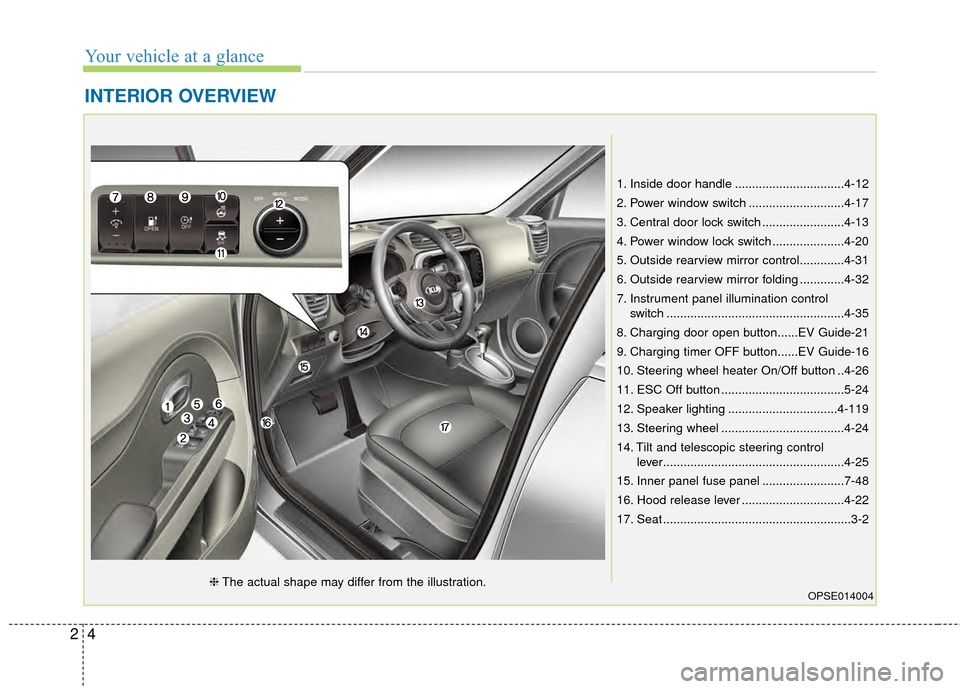
INTERIOR OVERVIEW
1. Inside door handle ................................4-12
2. Power window switch ............................4-17
3. Central door lock switch ........................4-13
4. Power window lock switch .....................4-20
5. Outside rearview mirror control.............4-31
6. Outside rearview mirror folding .............4-32
7. Instrument panel illumination controlswitch ....................................................4-35
8. Charging door open button......EV Guide-21
9. Charging timer OFF button......EV Guide-16
10. Steering wheel heater On/Off button ..4-26
11. ESC Off button ....................................5-24
12. Speaker lighting ................................4-119
13. Steering wheel ....................................4-24
14. Tilt and telescopic steering control lever.....................................................4-25
15. Inner panel fuse panel ........................7-48
16. Hood release lever ..............................4-22
17. Seat .......................................................3-2
OPSE014004❈ The actual shape may differ from the illustration.
Page 75 of 407
45
Features of your vehicle
Door Lock
Using the door handle button
1. Carry the smart key.
2. Close all doors, hood and tailgate.
3. Press the button of the outsidedoor handle.
4. The hazard warning lights will blink and the chime will sound once.
5. Make sure that doors are locked by pulling the outside door handle. The button will only operate when the
smart key is within 0.7~1m (28~40 in.)
from the outside door handle.
Even though you press the outside
door handle button, the doors will not
lock and the chime will sound for 3
seconds if any of following occur:
• The smart key is in the vehicle.
The POWER button is in ON posi-
tion.
Any door except the tailgate is open. Using the button on the smart key
1 Close all doors, hood and tailgate.
2. Press the lock button(1).
3. The hazard warning lights will blink
and the chime will sound once.
4. Make sure that doors are locked by pulling the outside door handle.
OXMA043316/Q
OPS043010
Page 92 of 407
Features of your vehicle
22
4
Opening the hood
1. Pull the release lever to unlatch
the hood. The hood should pop
open slightly.
Open the hood after turning off the
vehicle on a flat surface, shifting the
shift lever to the P (Park) position
and setting the parking brake. 2. Go to the front of the vehicle, raise
the hood slightly, pull the second-
ary latch (1) inside of the hood
center and lift the hood (2).
3. Raise the hood. It will completely rise by itself after it has been
raised about halfway.
Closing the hood
1. Before closing the hood, check thefollowing:
partment must be correctly
installed.
2. Lower the hood halfway and push down to securely lock in place.
HOOD
OPS043024
OPSE044025WARNING
Before closing the hood, ensure
that all obstructions are removed
from the hood opening. Closing
the hood with an obstruction
present in the hood opening may
result in severe personal injury.
Page 93 of 407
423
Features of your vehicle
WARNING- Unsecuredhood
Always double check to be sure
that the hood is firmly latched
before driving away. If it is not
latched, the hood could fly open
while the vehicle is being driven,
causing a total loss of visibility,
which might result in an accident.
WARNING- Fire risk
Do not leave gloves, rags or any
other combustible material in the
motor compartment. Doing so
may cause a heat-induced fire.
Page 248 of 407

What to do in an emergency
86
IF THE VEHICLE OVERHEATS
1. Pull off the road and stop as soonas it is safe to do so.
2. Place the shift lever in P and set the parking brake. If the air condi-
tioning is on, turn it off.
3. If coolant is running out under the vehicle or steam is coming out
from underneath the hood, stop
the vehicle. Do not open the hood
until the coolant has stopped run-
ning or the steaming has stopped.
If there is no visible loss of coolant
and no steam, leave the vehicle
running and check to be sure cool-
ing fan is operating. If the fan is not
running, turn the vehicle off.
4. Check for coolant leaking from the radiator, hoses or under the vehi-
cle. (If the air conditioning had been
in use, it is normal for cold water to
be draining from it when you stop). 5. If you cannot find the cause of the
overheating, wait until the radiator
temperature has returned to nor-
mal. Then, if coolant has been lost,
carefully add coolant to the reser-
voir to bring the fluid level in the
reservoir up to the halfway mark.
6. Proceed with caution, keeping alert for further signs of overheat-
ing. If overheating happens again,
call an authorized Kia dealer for
assistance.
Serious loss of coolant indicates there
is a leak in the cooling system and
this should be checked as soon as
possible by an authorized Kia dealer.
WARNING- Radiator cap
Do not remove the radiator cap
when the radiator is hot. This
may result in coolant being
blown out of the opening and
cause serious burns.
Page 323 of 407
Maintenance
60
7
1. Turn off the vehicle and open the
hood.
2. Disconnect the power connector from the back of the headlight
assembly.
3. Disconnect the negative batterycable.
4. Loosen the retaining bolts. 5. Pull out the end of the front
bumper.
If you can reach the bulb without
removing the headlight assembly,
you do not need to do step 4,5 and 6.
6. Remove the headlight assembly from the body of the vehicle.
OPSE074018
OPSE074019
Page 369 of 407

24
■
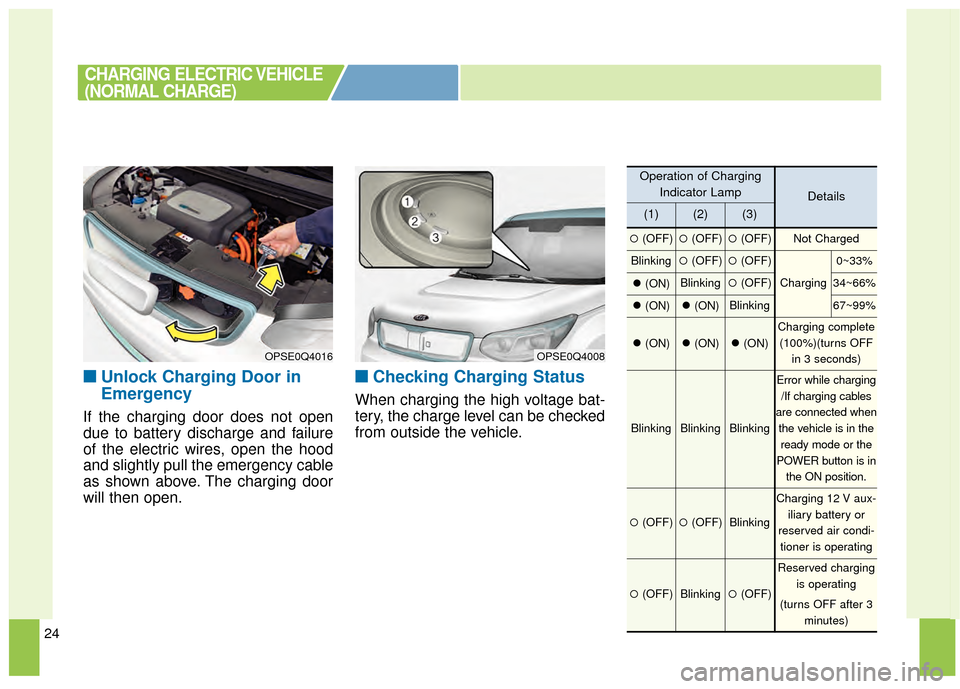
■Unlock Charging Door in
Emergency
If the charging door does not open
due to battery discharge and failure
of the electric wires, open the hood
and slightly pull the emergency cable
as shown above. The charging door
will then open.
■ ■Checking Charging Status
When charging the high voltage bat-
tery, the charge level can be checked
from outside the vehicle.
CHARGING ELECTRIC VEHICLE
(NORMAL CHARGE)
OPSE0Q4016OPSE0Q4008
Operation of Charging
Indicator Lamp
Details
(1)(2)(3)
�(OFF)�(OFF)�(OFF)Not Charged
Blinking�(OFF)�(OFF)
Charging
0~33%
�(ON)Blinking�(OFF)34~66%
�(ON)�(ON)Blinking67~99%
�(ON)�(ON)�(ON)
Charging complete
(100%)(turns OFF in 3 seconds)
BlinkingBlinkingBlinking
Error while charging/If charging cables
are connected when the vehicle is in theready mode or the
POWER button is in the ON position.
�(OFF)�(OFF)Blinking
Charging 12 V aux- iliary battery or
reserved air condi- tioner is operating
�(OFF)Blinking�(OFF)
Reserved charging is operating
(turns OFF after 3 minutes)
Page 374 of 407

29
❈During cold weather, quick charg-
ing may not be available to prevent
high voltage battery degradation.
You can start charging when the Power button is in the OFF posi-
tion and the shift lever is in P
(Park).
After charging has started, you
can use electrical components
such as the radio by pressing the
Power button to ACC or ON posi-
tion.
If you move the shift lever from P (Park) to R (Reverse), N (Neutral),
D (Drive), charging stops immedi-
ately. If you want to start charging
again, place the shift lever to P
(Park) and press the Power button
to the OFF position. Unplug and
reconnect the charging cable to
start charging again.
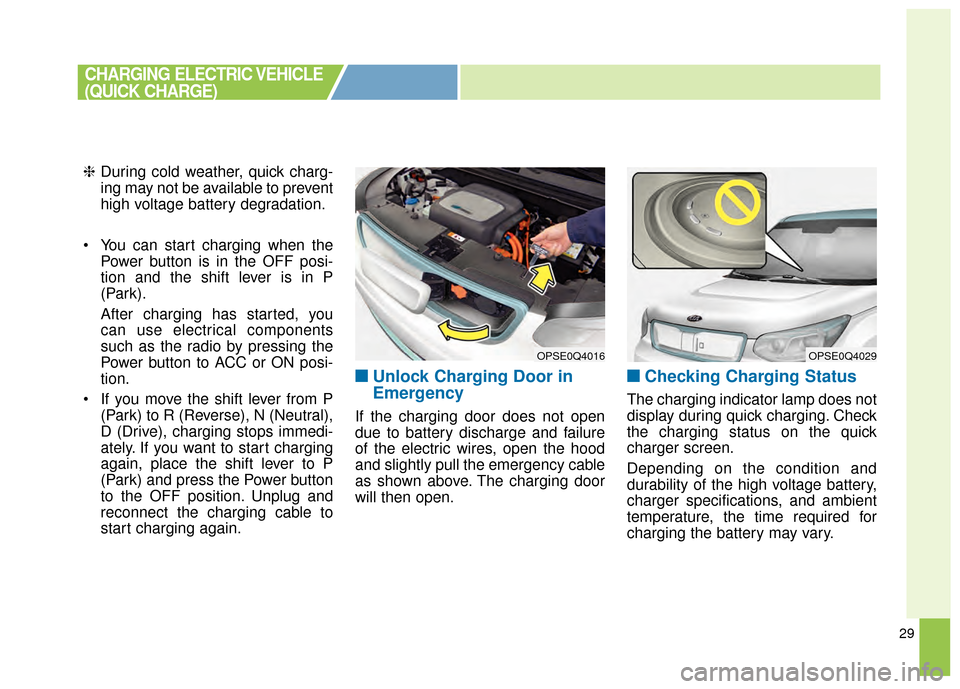
■ ■Unlock Charging Door in
Emergency
If the charging door does not open
due to battery discharge and failure
of the electric wires, open the hood
and slightly pull the emergency cable
as shown above. The charging door
will then open.
■ ■Checking Charging Status
The charging indicator lamp does not
display during quick charging. Check
the charging status on the quick
charger screen.
Depending on the condition and
durability of the high voltage battery,
charger specifications, and ambient
temperature, the time required for
charging the battery may vary.
OPSE0Q4016OPSE0Q4029
CHARGING ELECTRIC VEHICLE
(QUICK CHARGE)