Page 25 of 50
*
The Surround View Monitor (SVM) is a parking support system that shows the areas around the front, rear, left, and right
sides of the vehicle via four cameras displaye")
23
Surround View Monitor (SVM)*
The Surround View Monitor (SVM) is a parking support system that shows the areas around the front, rear, left, and right
sides of the vehicle via four cameras displayed in the Navigation screen .
Surround View Monitor Video To view a video on your mobile device, snap this QR Code or visit the listed website .
Refer to page 2 for more information .
QR CODE
www.KuTechVideos.com/yp13/2015
Front SVM - when in Drive & Neutral: Rear SVM - when in Reverse:
Displays the front side and SVM images simultaneously on the screen
Displays the front side image on the screen
Displays the front side and left side images
simultaneously on the screen
Displays the front side and right side images simultaneously on the screen
Displays the rear view and SVM images simultaneously on the screen
Displays the rear side image on the screen
Displays the rear and left side images simultaneously on the screen
Displays the rear and right side images simultaneously on the screen
REMINDER: The SVM camera is equipped with an optical lens to provide a wider range of vision and may appear different from the actual distance .
Front SVM operation:
•The camera view will display on the Navigation screen in both Drive and Neutral
•In Drive, the camera view will continue to display until the vehicle is above approximately 13 mph
• The camera view will reappear on the Navigation screen whenever the vehicle drops below approximately 13 mph
The Front SVM camera is ON when:
1 . The ENGINE START/STOP button is On
2 . The gear shift is in Drive or Neutral
3 . The SVM button is pressed ON
Rear SVM operation:
•The camera view will automatically display on the Navigation screen when the vehicle is shifted into Reverse
•The camera view will turn off when the vehicle is shifted out of Reverse
Che ck yo ur sur roun dings for safety.
The Front SVM camera will turn off when the gear shift is moved into Park or Reverse or the SVM button is pressed .
QUICK TIP
The Surround View Monitor system is only a supplemental device. Drivers should not rely solely on the SVM information when parking and backing up. Drivers should always pay attention and directly check the left/right and rear.
Camera View Modes – To change camera view modes, press the icons shown below on the Navigation screen to select the mode .
ALWAYS CHECK THE OWNER’S MANUAL FOR COMPLETE OPER ATING INFORMATION AND SAFET Y WARNINGS. *IF EQUIPPED
CENTER PANEL
Page 26 of 50
 for prolonged periods of time with the ENGINE START/STOP button in the ACC position (Engine OFF ) could cause the battery to discharge .
Aux/USB/iP")
24
REMINDER: Using the power outlet (accessory plug) for prolonged periods of time with the ENGINE START/STOP button in the ACC position (Engine OFF ) could cause the battery to discharge .
Aux/USB/iPod® Port, Power
Outlets and AC Inverter*
Digital Clock* USB Port Video To view a video on your mobile device, snap this QR Code or visit the listed website .
Refer to page 2 for more information .
QR CODE
www.KuTechVideos.com/yp13/2015
For more information on the Aux/USB/iPod® Port, Power Outlets and AC Inverter, refer to the Owner's Manual.
Standard Audio System Clock Setup:
Press the H button to advance the time by one hour . Press the M
button to advance the time by one minute .
UVO eServices System Clock Setup:
Press the CLOCK button to display the Clock setting screen . Then
use the on-screen buttons to navigate through setup .
AVN System Clock Setup:
Press the Setup button . Then press the on-screen Clock icon to
enter clock settings .
H
M
A USB charger* and power port is located
in the Center Panel and rear of the Center
Console
B AC Inverter*, 115V 100 watt, outlets are
located in the rear of the Center console
and the luggage zone*
Press the DONE button on the navigation screen to ensure changes are saved .
QUICK TIP
Press and hold both for more than 5 seconds to switch from 12- to 24-hour formats .
QUICK TIP
The power outlets are inactive when the ENGINE START/STOP button is OFF .
QUICK TIP
AAC115V
MAX100W
AC115V
MAX150W
B
SEDONA FEATURES & FUNCTIONS GUIDE
*IF EQUIPPED
CENTER PANEL
Page 27 of 50
25
P: Park
R: Reverse
N: Neutral
D: Drive
[+]: Sport Mode Upshift
[–]: Sport Mode Downshift
Sport Mode: To enter Sport mode, move shift lever from D to
left gate .
To shift while in Sport mode, move shift lever up [+] to upshift
or down [–] to downshift .
Automatic Gear Shift with Sportmatic® Shifting
•Press brake pedal and depress release button to move gearshift from N to P, N to R or from P to any gear •Sport mode downshifts are made automatically when the vehicle slows down . When the vehicle stops, 1st gear is automatically selected
QUICK TIPS
Sportmatic® Shifting Video To view a video on your mobile device, snap this QR Code or visit the listed website .
Refer to page 2 for more information .
QR CODE
www.KuTechVideos.com/yp13/2015
ALWAYS CHECK THE OWNER’S MANUAL FOR COMPLETE OPER ATING INFORMATION AND SAFET Y WARNINGS. *IF EQUIPPED
CENTER PANEL
Page 28 of 50

26
AUTO
AUTO
FRONT
CLIMATE
Cluster ionizerA/C REAR
LOCKREAR
ON
OFF
MODE REAR
LOCKSYNC
MODE OFF
REAR
FRONTREAR
PUSH
SYNCPUSH
AUTO
Automatic Climate Control
AUTO
AUTO
FRONT
CLIMATE
Cluster ionizer
A/C REAR
LOCKREAR
ON
OFF
MODE REAR
LOCKSYNC
MODE OFF
REAR
FRONTREAR
PUSH
SYNCPUSH
AUTO
Rear Climate Control
A Driver's temperature control knob
B AUTO (automatic control) button
C Climate information screen selection button
D Passenger’s temperature control knob
E SYNC temperature control selection button
F Front fan speed control button
G Air Conditioning Off button
H Mode Selection button
I Rear fan speed control button
J A /C on button
K Air intake control button
L Front windshield defroster button
M Rear window defroster button
N Rear control lock button
O Rear control on button
P Rear temperature control knob
Q Rear temperature control buttons
R Rear AUTO climate control button
S Rear mode selection button
T Rear air conditioning OFF button
U Rear fan speed control buttons
AD
EB
C
P
FGHI
JKLMNO
U
TSR
Q
SEDONA FEATURES & FUNCTIONS GUIDE
*IF EQUIPPED
CENTER PANEL
Page 29 of 50

27
Climate Control Auto Function
1 . Press AUTO to select Full Auto Operation
2 . Press MODE button to control which vents air flows through
3 . Press SYNC to select Sync Temperature Control Operation
REMINDERS:
• When in AUTO mode, Air Flow Mode and Fan Speed do not display on the Climate Control Display
•Warm air may flow in through vents if Recirculated Air button is not pressed ON (LED lit)
• Your Automatic Climate Control system may differ from those in the illustrations . See your Owner’s Manual for more details
Air Flow Modes
To select Air Flow Modes, press the mode buttons to cycle
through to desired mode:
Face-Level
Bi-Level
F lo o r- L evel
Floor/Defrost-Level
Defog Inside Windshield:
1 . Set Front Fan Speed to desired position
2 . Set desired Temperature
3 . Press the Front Defrost button
Defrost Outside Windshield:
1 . Set Front Fan Speed to the highest position
2 . Set Temperature to Hot
3 . Press the Front Defrost button
•Defrost Mode activates A /C and opens Fresh Air Vent to help dehumidify the air and improve Defroster performance •During Auto Operation, the A /C indicator will NOT illuminate . The fan speed, air intake, air flow and air conditioning may automatically be engaged at any time to reach desired temperature and reduce humidity •Keep inside glass as clean as possible to reduce window fogging
QUICK TIPS
ALWAYS CHECK THE OWNER’S MANUAL FOR COMPLETE OPER ATING INFORMATION AND SAFET Y WARNINGS. *IF EQUIPPED
CENTER PANEL
Page 30 of 50

28
Defrost Outside Windshield:
1 . Set Fan Speed to the highest position
2 . Set desired Temperature
3 . Press the Defrost button
Defog Inside Windshield:
1 . Set Fan Speed to desired position
2 . Set desired Temperature
3 . Press the Defrost button
REMINDER: Your Manual Climate Control system may differ from those in the illustrations . See your Owner’s Manual for more details .
Air Flow Modes
To select Air Flow Modes, press the Mode
selection buttons:
Face-Level
Bi-Level
F lo o r- L evel
Floor/Defrost-Level
Manual Climate Control*
01
2
3
4
0 1
2
3
4
A/C
REAR LOCK REAR ON
REAR
A/C
REAR
REAR
FRONTMAX
OFF
0 1
2
3
4
0 1
2
3
4
A/C
REAR LOCK REAR ON
REAR
A/C
REAR
REAR
FRONTMAX
OFF
Rear Climate Control*
A Front fan speed control knob
B Front window defroster button
C Rear window defroster button
D Air conditioning button
E Air intake control button
F Front temperature control knob
G Front mode selection buttons
H Rear fan speed control knob
I Rear temperature control knob
J Rear control lock button
K Rear control on button
L Rear air conditioning OFF button
M Rear fan speed control buttons
N Rear mode selection buttons
O Rear temperature control buttons
AF
LMO
BC
G
JHI
D
K
E
N
SEDONA FEATURES & FUNCTIONS GUIDE
*IF EQUIPPED
CENTER PANEL
Page 31 of 50

29
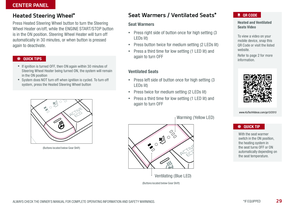
Heated Steering Wheel*
Press Heated Steering Wheel button to turn the Steering
Wheel Heater on/off, while the ENGINE START/STOP button
is in the ON position . Steering Wheel Heater will turn off
automatically in 30 minutes, or when button is pressed
again to deactivate .
ACTIVE
ECO
(Buttons located below Gear Shift)
•If ignition is turned OFF, then ON again within 30 minutes of Steering Wheel Heater being turned ON, the system will remain in the ON position •System does NOT turn off when ignition is cycled . To turn off system, press the Heated Steering Wheel button
QUICK TIPS
Heated and Ventilated Seats Video To view a video on your mobile device, snap this QR Code or visit the listed website .
Refer to page 2 for more information .
QR CODE
www.KuTechVideos.com/yp13/2015
Seat Warmers
•Press right side of button once for high setting (3
LEDs lit)
•Press button twice for medium setting (2 LEDs lit)
•Press a third time for low setting (1 LED lit) and
again to turn OFF
Ventilated Seats
•Press left side of button once for high setting (3
LEDs lit)
•Press twice for medium setting (2 LEDs lit)
•Press a third time for low setting (1 LED lit) and
again to turn OFF
Seat Warmers / Ventilated Seats*
With the seat warmer switch in the ON position, the heating system in the seat turns OFF or ON automatically depending on the seat temperature .
QUICK TIP
ACTIVE
ECO
(Buttons located below Gear Shift)
Warming ( Yellow LED)
Ventilating (Blue LED)
ALWAYS CHECK THE OWNER’S MANUAL FOR COMPLETE OPER ATING INFORMATION AND SAFET Y WARNINGS. *IF EQUIPPED
CENTER PANEL
Page 32 of 50
30
Front Seat Headrest Adjustment
To raise headrest: Pull headrest up .
To lower headrest: Press lock A, then press the headrest down .
Driver Position Memory System*
The integrated system stores into memory the position of the
Driver’s Seat and the Outside Rearview Mirrors .
To store positions into memory, first place the Gear Shift into
P (Park) while the ENGINE START/STOP button is in the ON
position . Then:
1 . Adjust the Driver’s Seat and the Outside Mirrors
2 . Press the SET button B on the control panel . System will
beep once
3 . Press one of the memory buttons C within 5 seconds . The
system will beep twice when memory has been stored
SET
1
2
(Buttons located on Driver's Door Panel)
A
B
C
SEDONA FEATURES & FUNCTIONS GUIDE
*IF EQUIPPED
SEATING


![KIA SEDONA 2015 Features and Functions Guide 25
P: Park
R: Reverse
N: Neutral
D: Drive
[+]: Sport Mode Upshift
[–]: Sport Mode Downshift
Sport Mode: To enter Sport mode, move shift lever from D to
left gate .
To shift while in Sport mode,](/manual-img/2/54951/w960_54951-26.png "KIA SEDONA 2015 Features and Functions Guide 25
P: Park
R: Reverse
N: Neutral
D: Drive
[+]: Sport Mode Upshift
[–]: Sport Mode Downshift
Sport Mode: To enter Sport mode, move shift lever from D to
left gate .
To shift while in Sport mode,")
