2015 JEEP RENEGADE reset
[x] Cancel search: resetPage 42 of 220

ELECTRONIC SPEED CONTROL
When engaged, the Electronic Speed Control takes over accelerator operations at
speeds greater than 25 mph (40 km/h).
The Electronic Speed Control buttons are located on the right side of the steering
wheel.
NOTE:
• In order to ensure proper operation,
the Electronic Speed Control System
has been designed to shut down if
multiple Speed Control functions are
operated at the same time. If this oc-
curs, the Electronic Speed Control
System can be reactivated by pushing
the Electronic Speed Control ON/OFF
button and resetting the desired ve-
hicle set speed.
• The Electronic Speed Control function
will not work in 4WD Low Range.
To A c t i v a t e
Push the ON/OFF button to activate the
Electronic Speed Control. The Cruise In-
dicator Light in the Electronic Vehicle
Information Center (EVIC) or Driver Infor-
mation Display (DID) will illuminate. To
turn the system off, push the ON/OFF button a second time. The Cruise Indicator
Light will turn off. The system should be turned off when not in use.
WARNING!
Leaving the Electronic Speed Control system on when not in use is dangerous. You
could accidentally set the system or cause it to go faster than you want. You could
lose control and have an accident. Always leave the system OFF when you are not
using it.
Electronic Speed Control Buttons
1 — SET+/ACCEL 4 — SET-/DECEL2 — RESUME 5 — CANCEL3 — ON/OFF
OPERATING YOUR VEHICLE
40
Page 83 of 220

Maintaining Your Uconnect® Access Account
Reinstalling An App (Uconnect® 6.5AN)
You can easily correct many Application related issues you may be experiencing by
resetting the App back to the factory setting. From the vehicle’s radio touchscreen,
complete the following steps:
1. Press the Uconnect®“Apps” button and open the Uconnect®Store. Go to My
Apps.
2. In My Apps, select “Settings,” then “Reinstall App.” Press “Continue.”
3. Your Apps have been successfully re-installed.
Canceling Your Subscription
Should you want to cancel your subscription, you can remove your account informa-
tion using the same procedure contained in the Selling Your Vehicle section.
Selling Your Vehicle
When you sell your vehicle, we recommend that you remove your Uconnect®Access
Account information from the vehicle. You can do this using the radio touchscreen in
the vehicle or on the Mopar Owner Connect website (moparownerconnect.com).
Removing your account information cancels your subscription and makes your
vehicle factory-ready for a new owner/subscriber.
1. From your vehicle’s radio touchscreen, select “Uconnect®Store” from the Apps
Menu.
2. Select “My Apps,” then “Settings.” Press “Remove Uconnect®Account.”
3. Enter your Uconnect®Security PIN, and select “Continue.”
For additional information on Uconnect®:
• U.S. residents - visit DriveUconnect.com or call 1-877-855-8400.
• Canadian Residents - visit DriveUconnect.ca or call, 1-800-465-2001 (English)
or 1-800-387-9983 (French).
ELECTRONICS
81
Page 93 of 220

•iHeartRadio— iHeartRadio provides instant access to more than 1,500 live radiostations from across the country and allows listeners to create custom musicstations inspired by their favorite artists or songs.
•Pandora®— Pandora®gives people the music and comedy they love anytime,anywhere. Personalized stations launch instantly, with the input of a favorite artist,track, comedian, or genre.
•Slacker Radio— Enjoy millions of songs and hundreds of handcrafted stations.
NOTE:
For detailed information on how to use Via Mobile apps visit the Mopar OwnerConnect website (moparownerconnect.com) and log in using the username and
password you set up when registering for Uconnect®Access.
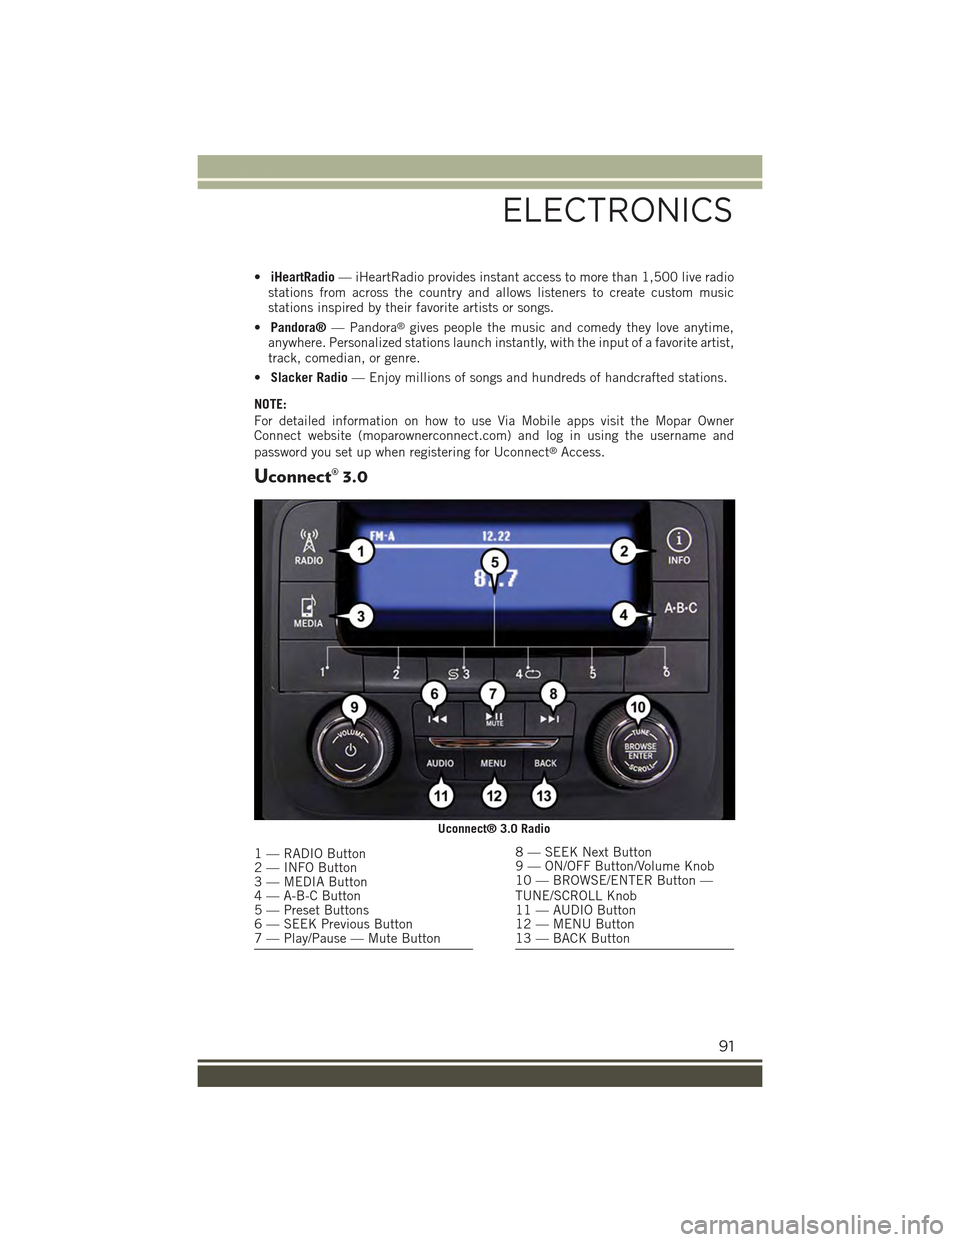
Uconnect® 3.0
Uconnect® 3.0 Radio
1 — RADIO Button2 — INFO Button3 — MEDIA Button4 — A-B-C Button5 — Preset Buttons6 — SEEK Previous Button7 — Play/Pause — Mute Button
8 — SEEK Next Button9 — ON/OFF Button/Volume Knob10 — BROWSE/ENTER Button —TUNE/SCROLL Knob11 — AUDIO Button12 — MENU Button13 — BACK Button
ELECTRONICS
91
Page 94 of 220

Clock Setting
1. Push the Menu button at the bottom of the radio, and push the Enter/Browse
button for System Settings. Next, select the Time and Format setting and then
select Set Time by pushing the Enter/Browse button.
2. Adjust the hours or minutes by turning the Tune/Scroll knob, then pushing the
Enter/Browse button to move to the next entry. You can also select 12hr or 24hr
format by turning the Tune/Scroll knob, then pushing the Enter/Browse button on
the desired selection.
3. Once the time is set push the “Back” button to exit the time screen.
Audio
• Push the AUDIO button on the radio faceplate.
The Audio Menu shows the following options for you to customize your audio settings.
Treble, Mid, Bass, Fade, Balance, Speed Adjusted Volume, Loudness
• Select the desired setting to adjust, then push the ENTER/BROWSE button. Turnthe TUNE/SCROLL knob to adjust the setting + or - 9. Push the “Back” buttonwhen done.
Radio Operation
Seek Previous/Next Buttons
• Push to seek through radio stations in AM, FM or SXM bands.
• Hold either button to bypass stations without stopping.
Store Radio Presets
• The Presets are available for all Radio Modes, and are activated by pushing any of
the six Preset buttons.
• When you are receiving a station that you wish to commit into memory, push and
hold the desired numbered button for more than two seconds, or until you hear a
confirmation beep.
• The Radio stores up to 18 presets in each of the Radio modes. Push the A-B-C
button on the faceplate to select the A, B or C preset list.
ELECTRONICS
92
Page 97 of 220

3. Press the “Up” or “Down” arrows to adjust the hours or minutes, then select the
“AM” or “PM” button on the touchscreen. You can also select 12hr or 24hr
format by pressing the desired button on the touchscreen.
4. Once the time is set press the “Done” button on the touchscreen to exit the time
screen.
NOTE:
In the Clock Setting Menu you can also select Display Clock. Display Clock turns the
clock display in the status bar on or off.
Equalizer, Balance And Fade
1. Push the MORE button on the faceplate below the display then press the
“Setting” button on the touchscreen.
2. Scroll down and press the “Audio” button on the touchscreen to open the Audio
menu.
3. The Audio Menu shows the following options for you to customize your audio
settings.
Equalizer
• Press the “Equalizer” button on the touchscreen to adjust the Bass, Mid and
Treble. Use the “+” or “-” button on the touchscreen to adjust the equalizer to your
desired settings.
Balance/Fade
• Press the “Balance/Fade” button on the touchscreen to adjust the sound from the
speakers. Use the arrow buttons on the touchscreen to adjust the sound level from
the front and rear or right and left side speakers. Press the Center “C” button on
the touchscreen to reset the balance and fade to the factory setting.
Speed Adjusted Volume — If Equipped
• Press the “Speed Adjusted Volume” button on the touchscreen to select between
OFF, 1, 2 or 3. This will decrease the radio volume relative to a decrease in vehicle
speed.
Loudness
• Press the “Loudness” button on the touchscreen to select the Loudness feature.
When this feature is activated it improves sound quality at lower volumes.
Surround Sound — If Equipped
• Press the “Surround Sound” button on the touchscreen, select On or Off followed
by pressing the back arrow button on the touchscreen. When this feature is
activated, it provides simulated surround sound mode.
ELECTRONICS
95
Page 98 of 220

Radio Operation
Store Radio Presets
The Radio stores up to 12 presets in each of the Radio modes. Four presets are visible
at the top of the radio screen. Pressing the “All” button on the touchscreen on the
radio home screen will display all of the preset stations for that mode.
• When you are receiving a station that you wish to commit into memory, press and
hold the desired numbered button on the touchscreen for more than two seconds,
or until you hear a confirmation beep.
Seek Next/Previous Buttons
• Press to seek through radio stations in AM, FM or SXM bands.
• Hold either button to bypass stations without stopping.
Radio Operation
1 — Radio Station Preset2 — All Presets3 — Seek Next4 — Audio Settings
5 — Station Information6 — Direct Tune7 — Radio Band8 — Seek Previous
ELECTRONICS
96
Page 110 of 220

Radio
• To access the Radio mode, press the RADIO button below the screen.
Selecting Radio Stations
• Press the desired radio band (AM, FM or SXM) button.
Seek Next/Seek Previous
• Press the “Seek Arrow” buttons on the touchscreen for less than two seconds to
seek through radio stations.
• Press and hold either Seek Arrow button on the touchscreen for more than two
seconds to bypass stations without stopping. The radio will stop at the next
listenable station once the Seek Arrow button on the touchscreen is released.
Direct Tune
• Tune directly to a radio station by pressing the “Tune” button on the touchscreen
on the screen, and entering the desired station number.
Uconnect® 6.5AN Radio
1 — Radio Station Presets2 — Toggle Presets3 — HD Radio Available4 — Audio Settings5 — Seek Next
6 — Direst Tune Radio Stations7 — Seek Previous8 — Browse/Manage Presets9 — Radio Bands
ELECTRONICS
108
Page 111 of 220

Store Radio Presets
• Your radio can store 36 total preset stations, 12 presets per band (AM, FM and
SXM). They are shown at the top of your radio screen. To see the 12 preset stations
per band, press the “Arrow” button on the touchscreen at the top right of the
screen to toggle between the two sets of six presets.
• You can also see all presets for a band by pressing the "Browse" button on the
touchscreen. This browse screen lets you delete a preset and shows the station
frequency, name and genre.
• To set a station into memory press and hold the desired numbered button on the
touchscreen for more than two seconds or until you hear a confirmation beep.
SiriusXM Premier Over 160 Channels
Get every channel available on your satellite radio, and enjoy all you want, all in one
place. Hear commercial-free music plus sports, news, talk and entertainment. Get all
the premium programming, including Howard Stern, every NFL game, Oprah Radio®,
every MLB®and NHL®game, every NASCAR®race and more. And get 20+ Xtra
channels, including SiriusXM Latino, a selection of channels dedicated to Spanish
language programming.
• To access SiriusXM Satellite Radio, press the “SXM” button on the main Radio
screen.
The following describes features that are available when in SiriusXM Satellite Radio
mode.
Seek Up/Seek Down
• Press the “Seek Arrow” buttons on the touchscreen for less than two seconds to
seek through channels in SXM mode.
• Press and hold either arrow button on the touchscreen for more than two seconds
to bypass channels without stopping. The radio will stop at the next listenable
channel once the arrow button on the touchscreen is released.
Direct Tune
• Tune directly to a SXM channel by pressing the “Tune” button on the touchscreen
on the screen, and entering the desired station number.
Traffic & Weather
Automatically tells you when Traffic & Weather for a favorite city is available, and
gives you the option to switch to that channel.
Fav
Activates the favorites menu. You can add up to 50 favorite artists or songs. Just
press Add Fav Artist or Add Fav Song while the song is playing. You will then be
alerted any time one of these songs, or works by these artists, is playing on other
SiriusXM channels.
ELECTRONICS
109