2015 JEEP RENEGADE center console
[x] Cancel search: center consolePage 47 of 220

Max Defrost
• Push the MAX Defrost button to change the current airflow setting to Defrost
mode. Performing this function will cause the ATC to change to manual mode, the
blower speed will increase to full, the A/C compressor is turned ON, the tempera-
ture controls are set to (HI), defrost mode is selected, rear defroster is turned ON,
and the air recirculation is turned OFF.
• If the MAX Defrost mode is turned OFF, the climate system will return to the
previous setting.
SYNC
• Push the SYNC button to synchronize the passenger temperature setting with the
driver temperature setting.
• Changing the passenger temperature setting while in Sync will automatically exit
this feature.
Mode Buttons
• The airflow distribution modes can be adjusted so air comes from the instrument
panel, floor, de-mist, and defrost outlets. One, two or all modes may be selected at
any one time.
Heated Mirrors
• The mirrors are heated to melt frost or ice. This feature is activated whenever you
turn on the rear window defroster.
ELECTRIC PARK BRAKE (EPB)
Your vehicle is equipped with a new Electric Park Brake System (EPB) that offers
greater convenience. The EPB switch is located in the center console.
Park Brake Switch
OPERATING YOUR VEHICLE
45
Page 113 of 220

• SiriusXM services require subscriptions, sold separately after the 12-month trial
included with the new vehicle purchase.If you decide to continue your service at the
end of your trial subscription, the plan you choose will automatically renew and bill at
then-current rates until you call SiriusXM at 1-866-635-2349 for U.S. residents and
1-888-539-7474 for Canadian residents to cancel. See SiriusXM Customer Agreement
for complete terms at www.siriusxm.com for U.S. residents and www.siriusxm.ca for
Canadian residents.All fees and programming subject to change. Our satellite
service is available only to those at least 18 and older in the 48 contiguous USA
and D.C. Our Sirius satellite service is also available in PR (with coverage
limitations). Our Internet radio service is available throughout our satellite service
area and in AK and HI. © 2014 Sirius XM Radio Inc. Sirius, XM and all related
marks and logos are trademarks of Sirius XM Radio Inc.
MEDIA HUB – PLAYING iPod®/USB/MP3 DEVICES
There are many ways to play music from iPod®/MP3 players or USB devices through
your vehicle's sound system.
Audio Jack (AUX)
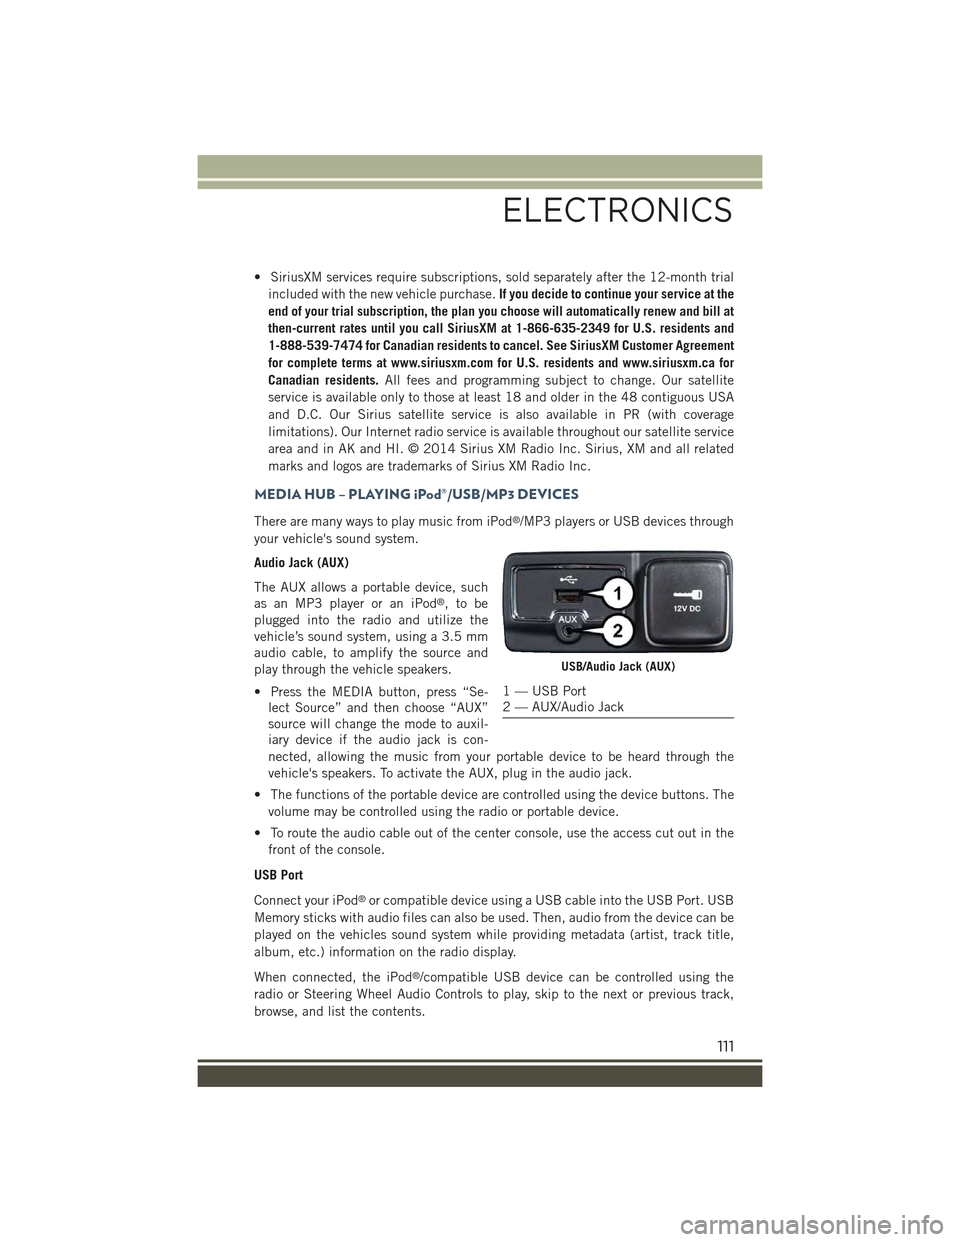
The AUX allows a portable device, such
as an MP3 player or an iPod®,tobe
plugged into the radio and utilize the
vehicle’s sound system, using a 3.5 mm
audio cable, to amplify the source and
play through the vehicle speakers.
• Press the MEDIA button, press “Se-
lect Source” and then choose “AUX”
source will change the mode to auxil-
iary device if the audio jack is con-
nected, allowing the music from your portable device to be heard through the
vehicle's speakers. To activate the AUX, plug in the audio jack.
• The functions of the portable device are controlled using the device buttons. The
volume may be controlled using the radio or portable device.
• To route the audio cable out of the center console, use the access cut out in the
front of the console.
USB Port
Connect your iPod®or compatible device using a USB cable into the USB Port. USB
Memory sticks with audio files can also be used. Then, audio from the device can be
played on the vehicles sound system while providing metadata (artist, track title,
album, etc.) information on the radio display.
When connected, the iPod®/compatible USB device can be controlled using the
radio or Steering Wheel Audio Controls to play, skip to the next or previous track,
browse, and list the contents.
USB/Audio Jack (AUX)
1 — USB Port2 — AUX/Audio Jack
ELECTRONICS
111
Page 114 of 220

The USB device battery charges when plugged into the USB port (if supported by the
specific device).
• To route the USB/iPod®cable out of the center console, use the access cut out.
NOTE:
• When connecting your iPod®device for the first time, the system may take several
minutes to read your music, depending on the number of files. For example, the
system will take approximately five minutes for every 1,000 songs loaded on the
device. Also during the reading process, the Shuffle and Browse functions will be
disabled. This process ensures the full use of your iPod®features and only
happens the first time it is connected. After the first time, the reading process of
your iPod®will take considerably less time unless changes are made or new songs
are added to the play list.
• The USB port supports certain Mini, Classic, Nano, Touch, and iPhone®devices.
The USB port also supports playing music from compatible external USB Mass
Storage Class memory devices. Some iPod®software versions may not fully
support the USB port features. Please visit Apple’s website for iPod®software
updates.
Bluetooth® Streaming Audio
If equipped with Uconnect®Voice Command, your Bluetooth®-equipped iPod®
devices, cell phones or other media players, may also be able to stream music to your
vehicle's sound system. Your connected device must be Bluetooth®-compatible, and
paired with your system (see Uconnect®Phone for pairing instructions). You can
access the music from your connected Bluetooth®device by pressing the
“Bluetooth®” button on the touchscreen while in Media mode.
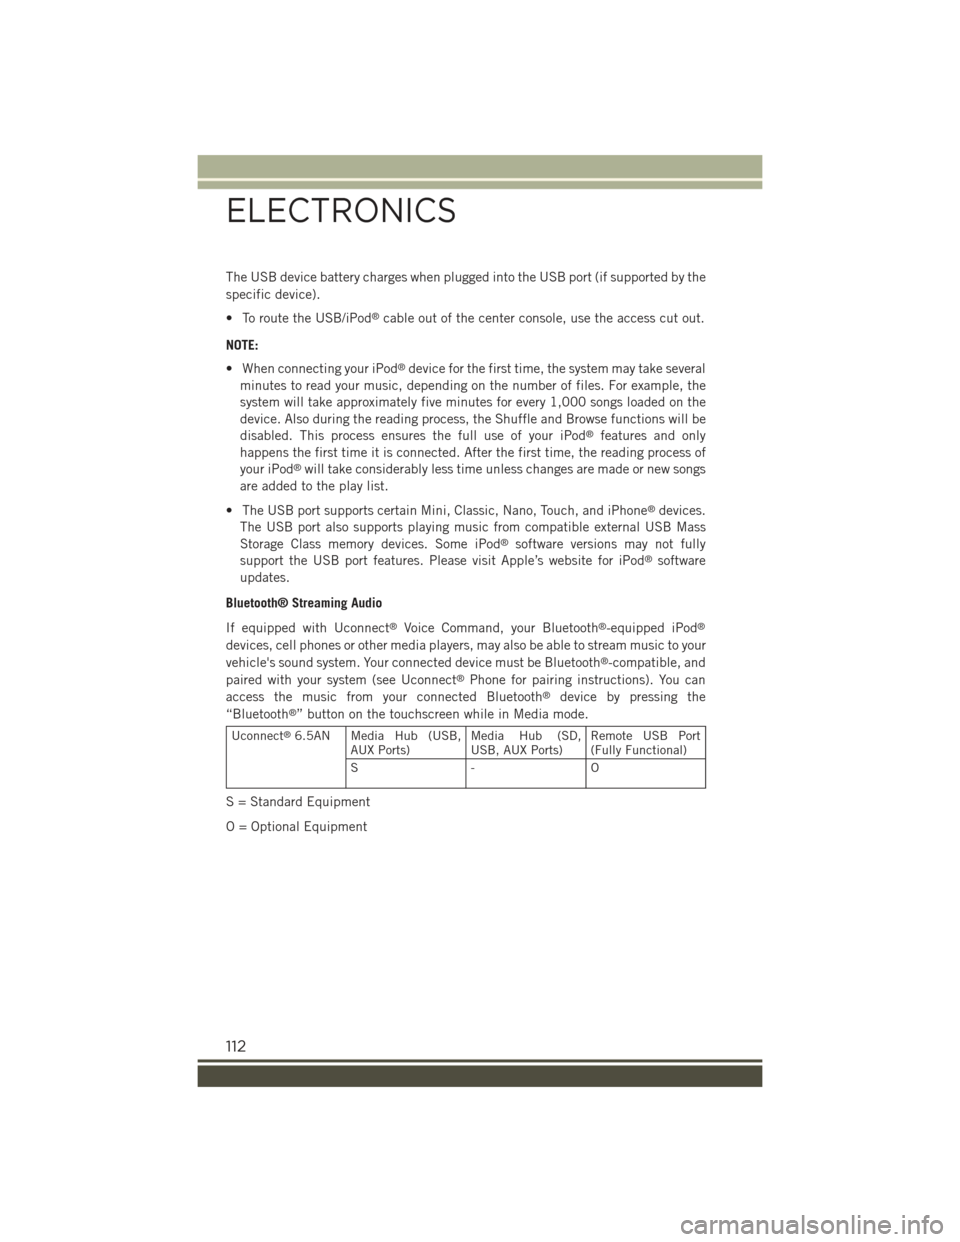
Uconnect®6.5AN Media Hub (USB,AUX Ports)Media Hub (SD,USB, AUX Ports)Remote USB Port(Fully Functional)
S- O
S = Standard Equipment
O = Optional Equipment
ELECTRONICS
112
Page 148 of 220

PROGRAMMABLE FEATURES
Uconnect® Customer Programmable Features
The Uconnect®system allows you to access Customer Programmable feature
settings such as Display, Units, Voice, Clock, Safety & Driving Assistance, Lights,
Doors & Locks, Engine Off Options, Audio, Phone/Bluetooth®, SiriusXM Setup,
System Information, Restore Default Settings, Clear Personal Data, and Compass
(Uconnect®5.0) through buttons on the touchscreen.
• For the Uconnect 5.0 system, push the Morebutton on the faceplate, then
press the “Settings”button on the touchscreen. For the Uconnect 6.5 system,
push the Settingsbutton located on the right side of the display. When making
a selection, scroll up or down until the preferred setting is highlighted, then press
and release the preferred setting until the selection is highlighted showing that
setting has been selected. Depending on the vehicles options, the following
feature settings are available:
• Display• Audio
• Units• Phone/Bluetooth®
• Voice• SiriusXM Setup
• Clock• System Information
• Safety & Driving Assistance• Restore Default Settings
• Lights• Clear Personal Data
• Doors & Locks• Compass (Uconnect®5.0)
• Engine Off Options
POWER INVERTER — IF EQUIPPED
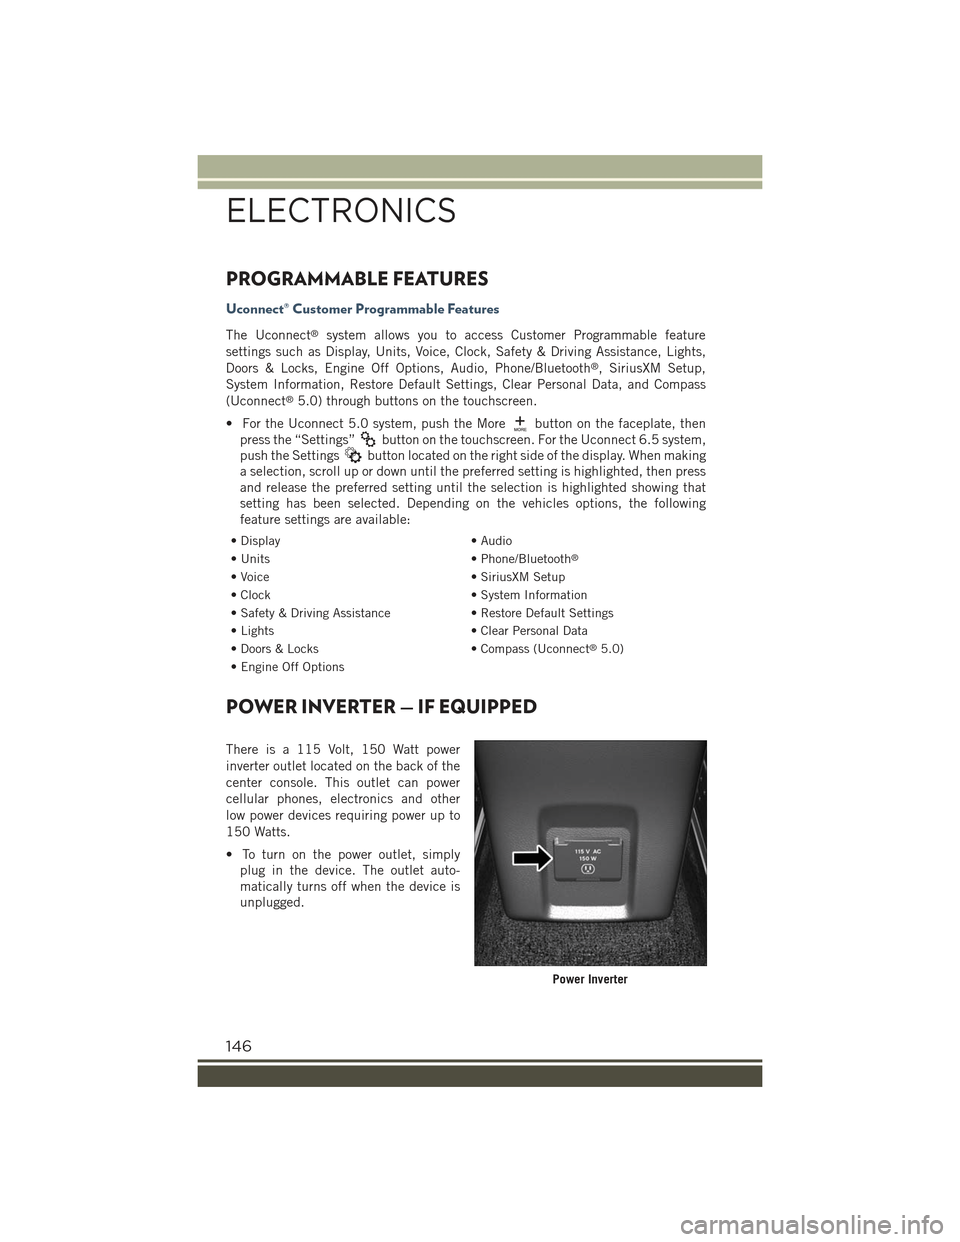
There is a 115 Volt, 150 Watt power
inverter outlet located on the back of the
center console. This outlet can power
cellular phones, electronics and other
low power devices requiring power up to
150 Watts.
• To turn on the power outlet, simply
plug in the device. The outlet auto-
matically turns off when the device is
unplugged.
Power Inverter
ELECTRONICS
146
Page 180 of 220

WARNING!
• Do not use a chain for freeing a stuck vehicle. Chains may break, causingserious injury or death.
• Stand clear of vehicles when pulling with tow hooks. Tow straps may becomedisengaged, causing serious injury.
CAUTION!
Tow hooks are for emergency use only, to rescue a vehicle stranded off road. Do not use
tow hooks for tow truck hookup or highway towing. You could damage your vehicle.
SHIFT LEVER OVERRIDE
If a malfunction occurs and the shift lever cannot be moved out of the PARK position,you can use the following procedure to temporarily move the shift lever:
1. Turn the engine OFF.
2. Apply the Electric Park Brake.
3. Carefully separate the shift lever bezel and boot assembly from the center
console.
4. Push and maintain firm pressure on
the brake pedal.
5. Insert a small screwdriver or similar
tool down into the shift lever override
access hole (at the right front corner
of the shift lever assembly), and push
and hold the override release lever
down.
6. Move the shift lever to the NEUTRAL
position.
7. The vehicle may then be started in
NEUTRAL.
8. Reinstall the shift lever bezel.Shift Lever Bezel Location
WHAT TO DO IN EMERGENCIES
178