Page 57 of 132

Main Navigation Menu
Finding Points Of Interest
• From the main Navigation menu, press the “Where To?” button on the touch-
screen, then press the “Points of Interest” button on the touchscreen.
• Select a Category, then a subcategory,
if necessary.
• Select your destination and press the
“Go” button on the touchscreen.
Finding A Place By Spelling The Name
• From the Main Navigation Menu press
the “Where To?” button on the touch-
screen. Next, press the “Points of In-
terest” button on the touchscreen then
press the “Spell Name” button on the touchscreen.
• Enter the name of your destination.
• Press the “Done” button on the touchscreen.
• Select your destination and press the “Go” button on the touchscreen.
Entering A Destination Address
• From the main Navigation menu press the “Where To?” button on the touch-
screen, then press the “Address” button on the touchscreen.
• Follow the on-screen prompts to enter the address then press the “Go” button on
the touchscreen.
Setting Your Home Location
• From the main Navigation menu press the "Tools" icon. Next select the "My Data"
folder icon. Then select "Set Home Location."
• You may enter your address directly, use your current location as your home
address, or choose from recently found locations.
Edit Home Location
• From the main Navigation menu press the “Where To?” button on the touch-
screen, then press the "Tools" icon. Next, press the "My Data" folder.
• You may enter a new address directly, use your current location or choose from
recently found locations.
Go Home
• A Home location must be saved in the system. From the Main Navigation menu,
press the “Where To?” button on the touchscreen, then press the “Go Home”
button on the touchscreen.
Main Navigation Menu
ELECTRONICS
55
Page 58 of 132
Following Your Route
Your route is marked with a magenta line on the map. If you depart from the original
route, your route is recalculated. A speed limit icon could appear as you travel on
major roadways.
Adding A Via Point
To add a stop between the current location and the end destination (Via Point) you
must be navigating a route.
• Press the “back arrow” icon multiple times to return to the Main Navigation menu.
• Press the “Where To?” button on the touchscreen, then search for the additional
stop. Select the destination you wish to add from the given search results.
• Press the “Go” button on the touchscreen, then press "Add as a Via Point" button
on the touchscreen and press the "Done" button on the touchscreen.
Following Your Route
1 — Distance To Next Turn2 — Current Location3 — Zoom In4 — Zoom Out5 — Current Speed
6 — Drag Map For Different View7 — Your Location On The Map8 — Estimated Time Of Arrival9 — Navigation Main Menu
ELECTRONICS
56
Page 59 of 132

Taking A Detour
To take a detour you must be navigating a route.
• Press the “back arrow” icon button on the touchscreen multiple times to return to
the Main Navigation menu.
• Press the “Detour” button on the touchscreen.
NOTE:
If the route you are currently taking is the only reasonable option, the device might
not calculate a detour.
Acquiring Satellites
The GPS Satellite strength bars indicate the strength of your satellite reception.
• Acquiring satellite signals can take a few minutes. When at least one of the bars
is green, your device has acquired satellite signals.
• You may experience delays receiving satellite signals when in areas with an
obstructed view to the sky, such as garages, tunnels, or large cities with tall
buildings.
SiriusXM SATELLITE RADIO/TRAVEL LINK
SiriusXM Travel Link requires a subscription, sold separately after the five year trial
subscription included with your vehicle purchase and is ONLY available in the United
States.
To access SiriusXM Satellite Radio, push the RADIO/MEDIA or RADIO button on the
faceplate, then press the “SAT” button on the touchscreen.
The following describes features that are available when in SiriusXM Satellite Radio
mode.
Info
• Press the “i” button on the touchscreen to view detailed information about the
current SiriusXM Satellite channel.
SiriusXM Parental Controls
• SiriusXM offers the option to permanently block selected channels. Call
1-888-539-7474 and request the Family Package.
•Uconnect® 430/430N and 730N:Push the MENU button on the faceplate while in
SiriusXM Satellite Radio Mode, then press the “Channel Lock” to enable and/or
disable desired channels. The SEEK and SCAN function will then only display
channels without Channel lock.
ELECTRONICS
57
Page 60 of 132

Search/Browse
• Press the “magnifying glass” button on the touchscreen to search/browse the
SiriusXM channel listing by Favorites and Categories such as Song, Artist and
Channel Name. The Search/Browse also allows you manage your Favorites.
SiriusXM Satellite Radio Favorites (SAT Favorites)
You can save 50 favorite songs and 50 favorite artists.
• Press the “add favorite” button on the
touchscreen to add either the song or
the artist of the currently playing pro-
gram to the SAT Favorites list. The
favorite star will appear in the upper
right corner, below the SAT button on
the touchscreen.
You will see a favorite star indicator in the
upper right side of the screen below the
SAT button on the touchscreen and a pop
up will alert you that a favorite song or artist is currently playing on one of the
SiriusXM satellite radio channels.
NOTE:
Refer to your Uconnect®730N or 430/
430N User's Manual on the DVD for more
information.
SAT Browse
Manage SAT Favorites
Favorite Artist Alert
ELECTRONICS
58
Page 61 of 132
Display SAT Favorites List
• Press the “Search/Browse” button on the touchscreen and select “Favorites” from
the SAT Browse screen.
• Press the desired favorites button on
the touchscreen to switch the SAT
tuner to the corresponding channel.
You may use the “LIST” button on the
touchscreen to toggle between:
• Favorite Songs
• Favorite Artists
• Currently playing favoritesSat Favorites Browse
Sat Favorites Artist
ELECTRONICS
59
Page 62 of 132
.
Push the REPLAY button to listen to
the st")
Replay
• While you are in SAT mode, you can
replay 44 minutes of the current Siri-
usXM channel (when the channel is
changed, this audio buffer is erased).
Push the REPLAY button to listen to
the stored audio.
• You can press the on-screen controls
to pause and rewind audio playback,
press the SCAN button to preview each
of the tracks stored in the buffer, or
select a track from the list.
• The time displayed below the bar indicates how much time is present between the
current buffer play position and the live broadcast.
Replay Option Option Description
Play/Pause Press to pause content playback. Press “Pause/Play” again to resumeplayback.
Rewind/RW Rewinds the channel content in steps of five seconds. Press and holdto rewind continuously, then release to begin playing content at thatpoint.
Fast Forward/FW Forwards the content, and works similarly to Rewind/RW. However,Fast Forward/FW can only be used when content has been previouslyrewound.
Replay Time Displays the amount of time in the upper center of the screen bywhich your content lags the live channel.
Live Resumes playback of live content at any time while replaying re-wound content.
Sat Favorites Replay
ELECTRONICS
60
Page 63 of 132
SiriusXM Travel Link (Uconnect® 730N & Uconnect® 430N Only)
NOTE:
SiriusXM Travel Link requires a subscription, sold separately after the five year trial
subscription included with your vehicle purchase and is ONLY available in the United
States.
SiriusXM Travel Link brings a wealth of useful information into your vehicle, right to
your fingertips.
• To access Travel Link, push the MENU button on the faceplate, then the “Travel
Link” button on the touchscreen.
1 – FavoritesView and store your favorite location, theater and sport teams forquick access.
2 – ForecastView detailed weather conditions, forecasts and ski/snowboardingconditions at resorts.
3 – Ski InfoView ski and snowboarding conditions at ski resorts.
4 – Fuel PricesView detailed price information for fuel stations.
5 – MoviesView information on movies that are playing at theaters.
6 – SportsView sports scores and upcoming events for all major sports.
SiriusXM Travel Link
ELECTRONICS
61
Page 64 of 132

STEERING WHEEL AUDIO CONTROLS
The steering wheel audio controls are located on the rear surface of the steering
wheel.
Right Switch
• Push the switch up or down to in-
crease or decrease the volume.
• Push the button in the center to
change modes AM/FM/CD/SAT.
Left Switch
• Push the switch up or down to search
for the next listenable station or select
the next or previous CD track.
• Push the button in the center to select
the next preset station (radio) or to
change CDs if equipped with a CD
Changer.
iPod®/USB/MP3 CONTROL
There are many ways to play music from iPod®/MP3 players or USB devices through
your vehicle's sound system.
The remote USB port, located in the glove box, allows you to connect an iPod®into
the vehicle's sound system.
•Non-Touchscreen Radios:To hear audio from devices connected to the USB port,
push the “AUX” button on the radio faceplate.
•Touchscreen Radios:To hear audio from devices connected to the USB port, push
the MEDIA button on the faceplate, then press the “AUX” or “iPod®” button on the
touchscreen.
When connected to this feature:
• The iPod®can be controlled using the
radio buttons to Play, Browse, and List
the iPod®or external devices contents.
• The iPod®battery charges when
plugged into the USB port (if sup-
ported by the specific audio device).
• Compatible iPod®devices may also be
controllable using voice commands.
Refer to the Owner's Manual on the DVD for details.
Steering Wheel Audio Controls(Rearview Of Steering Wheel)
iPod®/USB/MP3 Control
ELECTRONICS
62
 1
1 2
2 3
3 4
4 5
5 6
6 7
7 8
8 9
9 10
10 11
11 12
12 13
13 14
14 15
15 16
16 17
17 18
18 19
19 20
20 21
21 22
22 23
23 24
24 25
25 26
26 27
27 28
28 29
29 30
30 31
31 32
32 33
33 34
34 35
35 36
36 37
37 38
38 39
39 40
40 41
41 42
42 43
43 44
44 45
45 46
46 47
47 48
48 49
49 50
50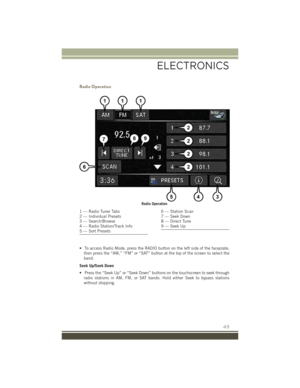 51
51 52
52 53
53 54
54 55
55 56
56 57
57 58
58 59
59 60
60 61
61 62
62 63
63 64
64 65
65 66
66 67
67 68
68 69
69 70
70 71
71 72
72 73
73 74
74 75
75 76
76 77
77 78
78 79
79 80
80 81
81 82
82 83
83 84
84 85
85 86
86 87
87 88
88 89
89 90
90 91
91 92
92 93
93 94
94 95
95 96
96 97
97 98
98 99
99 100
100 101
101 102
102 103
103 104
104 105
105 106
106 107
107 108
108 109
109 110
110 111
111 112
112 113
113 114
114 115
115 116
116 117
117 118
118 119
119 120
120 121
121 122
122 123
123 124
124 125
125 126
126 127
127 128
128 129
129 130
130 131
131


NOTE:
SiriusXM Travel Link requires a subscription, sold separately after the five year trial
subscription included with your vehicle purc")