Page 33 of 132

To Decrease Speed
• When the Electronic Speed Control is set, you can decrease speed by pushing the
SET-button.
The drivers preferred units can be selected through the instrument panel settings if
equipped. Refer to “ Understanding Your Instrument Panel” on the Owners Manual
DVD for more information. The speed decrement shown is dependant on the chosen
speed unit of U.S. (mph) or Metric (km/h):
U.S. Speed (mph)
• Pushing the SET-button once will result in a 1 mph decrease in set speed. Each
subsequent tap of the button results in a decrease of 1 mph.
• If the button is continually pushed, the set speed will continue to decrease until
the button is released, then the new set speed will be established.
Metric Speed (km/h)
• Pushing the SET-button once will result in a 1 km/h decrease in set speed. Each
subsequent tap of the button results in a decrease of 1 km/h.
• If the button is continually pushed, the set speed will continue to decrease until
the button is released, then the new set speed will be established.
Resume
To resume a previously selected set speed in memory, push the RES + button and
release.
Cancel
Push the CANCEL button, or apply the brakes to cancel the set speed and maintain
the set speed memory.
Push the ON/OFF button to turn the system off and erase the set speed memory.
WARNING!
• Leaving the Electronic Speed Control system on when not in use is dangerous.
You could accidentally set the system or cause it to go faster than you want. You
could lose control and have a collision. Always leave the Electronic Speed
Control system off when you are not using it.
• Electronic Speed Control can be dangerous where the system cannot maintain
a constant speed. Your vehicle could go too fast for the conditions, and you
could lose control. A collision could be the result. Do not use Electronic Speed
Control in heavy traffic or on roads that are winding, icy, snow-covered or
slippery.
OPERATING YOUR VEHICLE
31
Page 34 of 132

CONTINUOUSLY VARIABLE AUTOMATIC
TRANSMISSION (CVT)
While conventional automatic transmissions typically have 4, 5 or 6 speeds, the
Continuously Variable Transmission (CVT) has an infinite number of speeds. This allows
it to adjust to exactly the right ratio to optimize performance and fuel economy.
Under hard acceleration, you may hear more engine noise than with a conventional
transmission. The CVT may also occasionally feel like it is “shifting.” These
characteristics are perfectly normal and contribute to the CVT's efficiency.
SIX-SPEED AUTOMATIC TRANSMISSION
This electronically-controlled transmission provides a precise shift schedule. The
transmission electronics are self-calibrating; therefore, the first few shifts on a new
vehicle may be somewhat abrupt. This is a normal condition, and precision shifts will
develop within a few hundred miles (kilometers).
The transmission shift lever has only PARK, REVERSE, NEUTRAL, and DRIVE shift
positions. Manual shifts can be made using the Autostick®shift control. Moving the shift
lever to the left or right (-/+) while in the DRIVE position will manually select the
transmission gear, and will display the current gear in the instrument cluster as 6, 5, 4,
3, 2, 1.
Refer to your Owner’s Manual on the DVD for further information.
MANUAL CLIMATE CONTROLS
Manual Climate Controls
1 — Rotate Blower Control2 — Push Air Recirculation Button3 — Rotate Temperature Control
4 — Push A/C Button5 — Rotate Mode Control6 — Push Rear Window Defroster
OPERATING YOUR VEHICLE
32
Page 35 of 132

Air Recirculation
• Use Recirculation for maximum A/C operation.
• For window defogging, turn the Recirculation button off.
• Recirculation is allowed in floor mode and defrost/floor (mix mode).
Heated Mirrors
The exterior mirrors are heated to melt frost or ice. This feature is activated whenever
you turn on the rear window defroster.
AUTOMATIC TEMPERATURE CONTROLS (ATC)
Automatic Operation
• Turn the Mode and Blower Controls to the AUTO position.
• Select the desired temperature by rotating the Temperature Control.
• The system will maintain the set temperature automatically.
Air Conditioning (A/C)
• If the air conditioning button is pushed while in AUTO mode, the indicator light
will flash three times to indicate the cabin air is being controlled automatically.
Automatic Temperature Controls
1 — Rotate Blower Control2 — Push Air Recirculation Button3 — Rotate Temperature Control
4 — Push A/C Button5 — Rotate Mode Control6 — Push Rear Window Defroster
OPERATING YOUR VEHICLE
33
Page 36 of 132

Air Recirculation
• Use Recirculation for maximum A/C operation.
• For window defogging, turn the Recirculation button off.
• If the Recirculation button is pushed while in the AUTO mode, the indicator light
may flash three times to indicate the cabin air is being controlled automatically.
Heated Mirrors
The exterior mirrors are heated to melt frost or ice. This feature is activated whenever
you turn on the rear window defroster.
POWER SUNROOF
The power sunroof switch is located on the overhead console.
Opening Sunroof
Express Open
Press the switch rearward and release it within one-half second. The sunroof will fully
open and stop automatically.
Manual Open
Press and hold the switch rearward to open the sunroof. Any release of the switch will
stop the movement, and the sunroof will remain in a partially open position until the
switch is pressed again.
Venting Sunroof
Press and release the button and the sunroof will open to the vent position.
This is called “Express Vent” and will occur regardless of sunroof position. During
Express Vent operation, any movement of the switch will stop the sunroof.
Closing Sunroof
Express Closing
Press the switch forward and release it within one-half second. The sunroof will fully
close automatically from any position.
Manual Closing
Press and hold the switch forward to close the sunroof. Any release of the switch will
stop the movement, and the sunroof will remain in a partially closed position until the
switch is pressed again.
OPERATING YOUR VEHICLE
34
Page 37 of 132

Pinch Protection Feature
This feature will detect an obstruction in the opening of the sunroof during Express
Close operation. If an obstruction in the path of the sunroof is detected, the sunroof
will automatically retract. Remove the obstruction if this occurs. Next, press the
switch forward and release to Express Close.
NOTE:
If three consecutive sunroof close attempts result in Pinch Protect reversals, the
fourth close attempt will be a Manual Close movement with Pinch Protect disabled.
WARNING!
• Never leave children alone in a vehicle, or with access to an unlocked vehicle.
Never leave the Key Fob in or near the vehicle, or in a location accessible to
children. Occupants, particularly unattended children, can become entrapped
by the power sunroof while operating the power sunroof switch. Such entrap-
ment may result in serious injury or death.
• In a collision, there is a greater risk of being thrown from a vehicle with an open
sunroof. You could also be severely injured or killed. Always fasten your seat
belt properly and make sure all passengers are properly secured.
• Do not allow small children to operate the sunroof. Never allow your fingers,
other body parts, or any object to project through the sunroof opening. Injury
may result.
WIND BUFFETING
Wind buffeting can be described as a helicopter-type percussion sound. If buffeting
occurs with the rear windows open, adjust the front and rear windows together.
If buffeting occurs with the sunroof open, adjust the sunroof opening, or adjust any
window. This will minimize buffeting.
OPERATING YOUR VEHICLE
35
Page 38 of 132
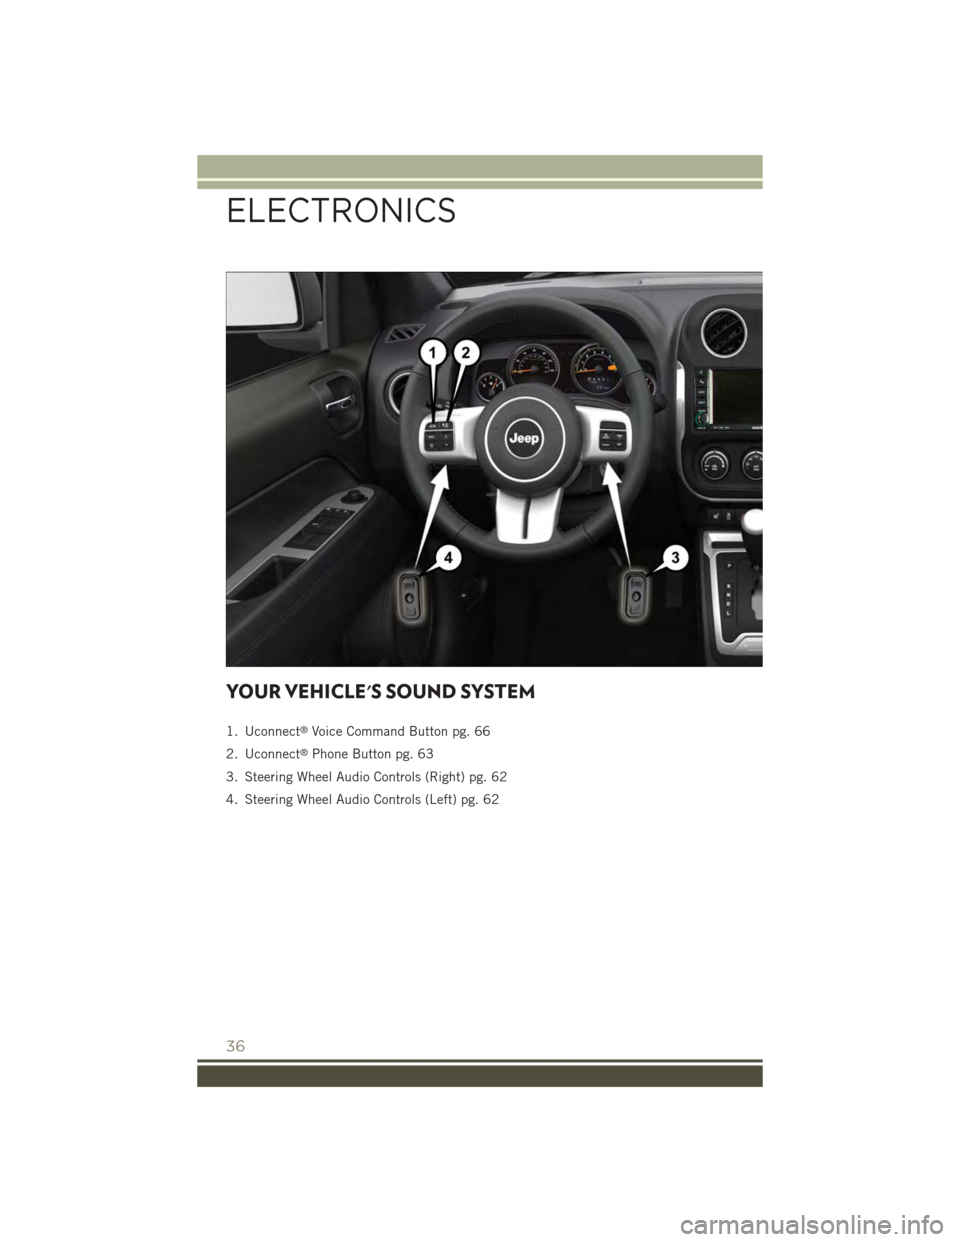
YOUR VEHICLE'S SOUND SYSTEM
1. Uconnect®Voice Command Button pg. 66
2. Uconnect®Phone Button pg. 63
3. Steering Wheel Audio Controls (Right) pg. 62
4. Steering Wheel Audio Controls (Left) pg. 62
ELECTRONICS
36
Page 39 of 132
5. USB Port on Radio pg. 51
6. Audio Jack pg. 46
7. Front Power Outlet pg. 76
8. USB Port (inside glove box) pg. 62
ELECTRONICS
37
Page 40 of 132
Uconnect® 130
NOTE:
• Your radio has many features that add to the comfort and convenience for you and
your passengers.
• Some of these radio features should not be used when driving because they take
your eyes from the road or your attention from driving.
Clock Setting
1. Push and hold the TIME button until the hours blink.
2. Turn the TUNE/SCROLL control knob to set the hours.
3. Push the TUNE/SCROLL control knob until the minutes begin to blink.
4. Turn the TUNE/SCROLL control knob to set the minutes.
Uconnect® 130
1 — CD Eject Button2 — Seek Down Button3 — Seek Up Button4 — AM/FM Button5 — Disc Mode Button6 — AUX Mode Button7 — Rewind Button8 — Fast Forward Button
9 — Set Clock Button10 — Audio Settings/Rotate To Tune11 — Radio Sales Code12 — Audio Jack13 — Set Preset/CD Random Play14 — Station Presets Buttons15 — ON/OFF/Rotate For Volume
ELECTRONICS
38