Page 77 of 636

help keep you in position, away from inflating Side Air
Bags. To get the best protection from the Side Air Bags,
occupants must wear their seat belts properly and sit
upright with their backs against the seats. Children must
be properly restrained in a child restraint or booster seat
that is appropriate for the size of the child.
WARNING!
•Side Air Bags need room to inflate. Do not lean
against the door or window. Sit upright in the
center of the seat.
•Being too close to the Side Air Bags during deploy-
ment could cause you to be severely injured or
killed.
•Relying on the Side Air Bags alone could lead to
more severe injuries in a collision. The Side Air
Bags work with your seat belt to restrain you
(Continued)
WARNING!(Continued)
properly. In some collisions, Side Air Bags won’t
deploy at all. Always wear your seat belt even
though you have Side Air Bags.
NOTE:Air bag covers may not be obvious in the interior
trim, but they will open during air bag deployment.
Side Impacts
In side impacts, the side impact sensors aid the ORC in
determining the appropriate response to impact events.
The system is calibrated to deploy the Side Air Bags on
the impact side of the vehicle during impacts that require
Side Air Bag occupant protection. In side impacts, the
Side Air Bags deploy independently; a left side impact
deploys the left Side Air Bags only and a right side
impact deploys the right Side Air Bags only.2
THINGS TO KNOW BEFORE STARTING YOUR VEHICLE 75
Page 110 of 636

WARNING!(Continued)
cause serious injury or death.
•It is extremely dangerous to ride in a cargo area,
inside or outside of a vehicle. In a collision, people
riding in these areas are more likely to be seriously
injured or killed.
•Do not allow people to ride in any area of your
vehicle that is not equipped with seats and seat
belts.
•Be sure everyone in your vehicle is in a seat and
using a seat belt properly.
Exhaust Gas
WARNING!
Exhaust gases can injure or kill. They contain carbon
monoxide (CO), which is colorless and odorless.
(Continued)
WARNING!(Continued)
Breathing it can make you unconscious and can
eventually poison you. To avoid breathing (CO),
follow these safety tips:
•Do not run the engine in a closed garage or in
confined areas any longer than needed to move
your vehicle in or out of the area.
•If you are required to drive with the trunk/liftgate/
rear doors open, make sure that all windows are
closed and the climate control BLOWER switch is
set at high speed. DO NOT use the recirculation
mode.
•If it is necessary to sit in a parked vehicle with the
engine running, adjust your heating or cooling
controls to force outside air into the vehicle. Set the
blower at high speed.
108 THINGS TO KNOW BEFORE STARTING YOUR VEHICLE
Page 122 of 636
▫Retractable Cargo Area Cover — If Equipped . . .272
▫Rear Cargo Tie-Downs.................274
�REAR WINDOW FEATURES..............276
▫Rear Window Wiper/Washer.............276▫Rear Window Defroster.................277
�ROOF LUGGAGE RACK — IF EQUIPPED.....278
120 UNDERSTANDING THE FEATURES OF YOUR VEHICLE
Page 123 of 636

MIRRORS
Inside Day/Night Mirror — If Equipped
A single ball joint mirror is provided in the vehicle. It is
a twist on mirror that has a fixed position at the wind-
shield. The mirror installs on the windshield button with
a counterclockwise rotation and requires no tools for
mounting. The mirror head can be adjusted up, down,
left, and right for various drivers. The mirror should be
adjusted to center on the view through the rear window.
Headlight glare from vehicles behind you can be reduced
by moving the small control under the mirror to the night
position (toward the rear of the vehicle). The mirror
should be adjusted while the small control under the
mirror is set in the day position (toward the windshield).
Automatic Dimming Mirror — If Equipped
A single ball joint mirror is provided in the vehicle. It is
a twist on mirror that has a fixed position at the wind-
shield. The mirror installs on the windshield button with
a counterclockwise rotation and requires no tools for
mounting. The mirror head can be adjusted up, down,
Adjusting Rearview Mirror
3
UNDERSTANDING THE FEATURES OF YOUR VEHICLE 121
Page 124 of 636
left, and right for various drivers. The mirror should be
adjusted to center on the view through the rear window.
This mirror automatically adjusts for headlight glare
from vehicles behind you.
NOTE:The Automatic Dimming Mirror feature is dis-
abled when the vehicle is in reverse gear to improve rear
view viewing.
The Automatic Dimming Mirror feature can be turned
On or Off through the touchscreen.
•Push the Mirror Dimmer button once to turn the
feature On.
•Push the Mirror Dimmer button a second time to turn
the feature Off.If equipped, the rearview mirror contains an ASSIST and
a 9-1-1 button.
Automatic Dimming Mirror
122 UNDERSTANDING THE FEATURES OF YOUR VEHICLE
Page 132 of 636

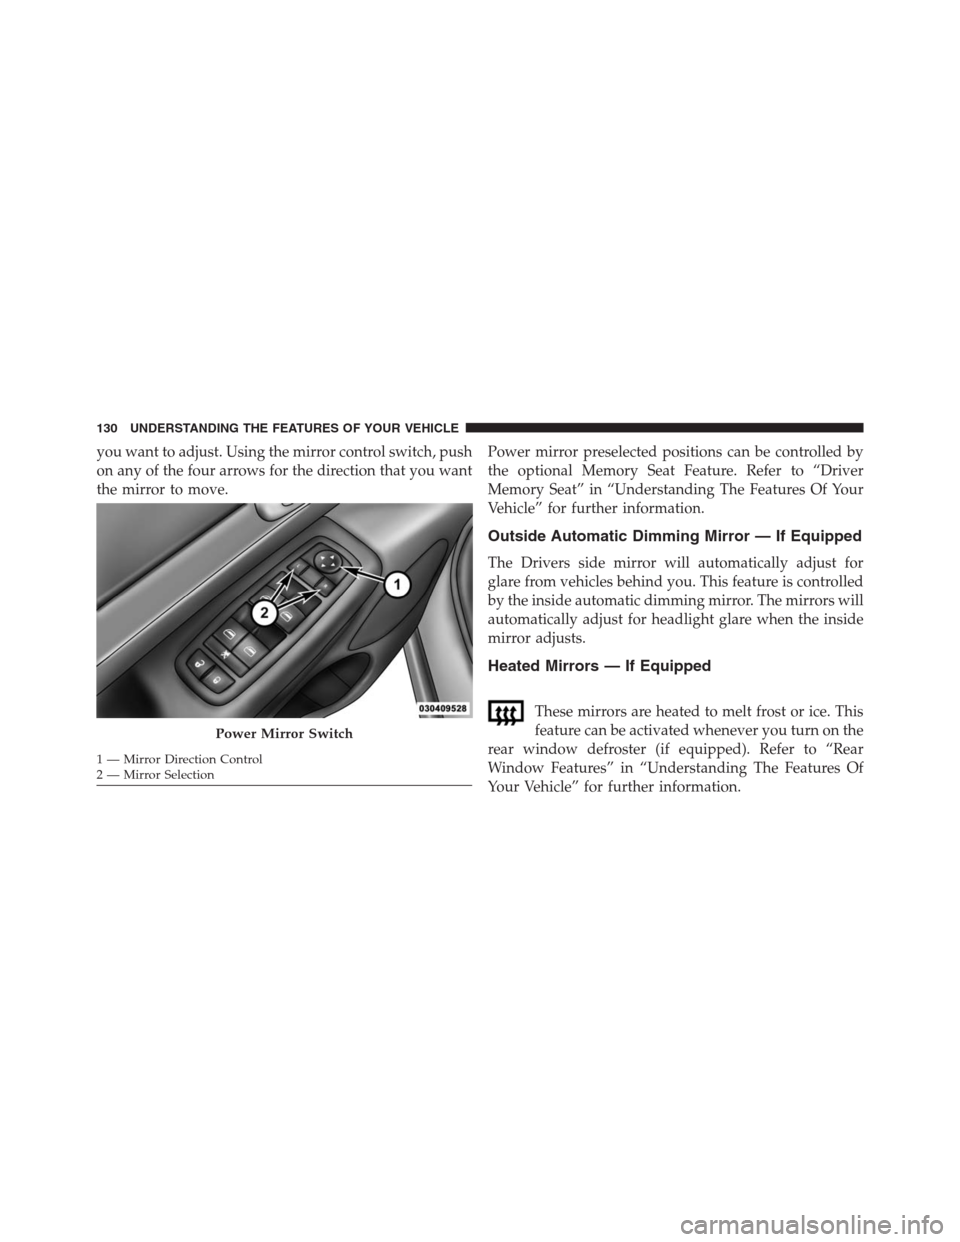
you want to adjust. Using the mirror control switch, push
on any of the four arrows for the direction that you want
the mirror to move.Power mirror preselected positions can be controlled by
the optional Memory Seat Feature. Refer to “Driver
Memory Seat” in “Understanding The Features Of Your
Vehicle” for further information.
Outside Automatic Dimming Mirror — If Equipped
The Drivers side mirror will automatically adjust for
glare from vehicles behind you. This feature is controlled
by the inside automatic dimming mirror. The mirrors will
automatically adjust for headlight glare when the inside
mirror adjusts.
Heated Mirrors — If Equipped
These mirrors are heated to melt frost or ice. This
feature can be activated whenever you turn on the
rear window defroster (if equipped). Refer to “Rear
Window Features” in “Understanding The Features Of
Your Vehicle” for further information.
Power Mirror Switch
1 — Mirror Direction Control
2 — Mirror Selection
130 UNDERSTANDING THE FEATURES OF YOUR VEHICLE
Page 177 of 636

Flash-To-Pass
You can signal another vehicle with your headlights by
partially pulling the multifunction lever toward the steer-
ing wheel. This will cause the high beam headlights to
turn on until the lever is released.
High/Low Beam Switch
Push the multifunction lever toward the instrument
panel to switch the headlights to high beam. Pulling the
multifunction back toward the steering wheel will turn
the low beams back on, or shut the high beams off.
WINDSHIELD WIPERS AND WASHERS
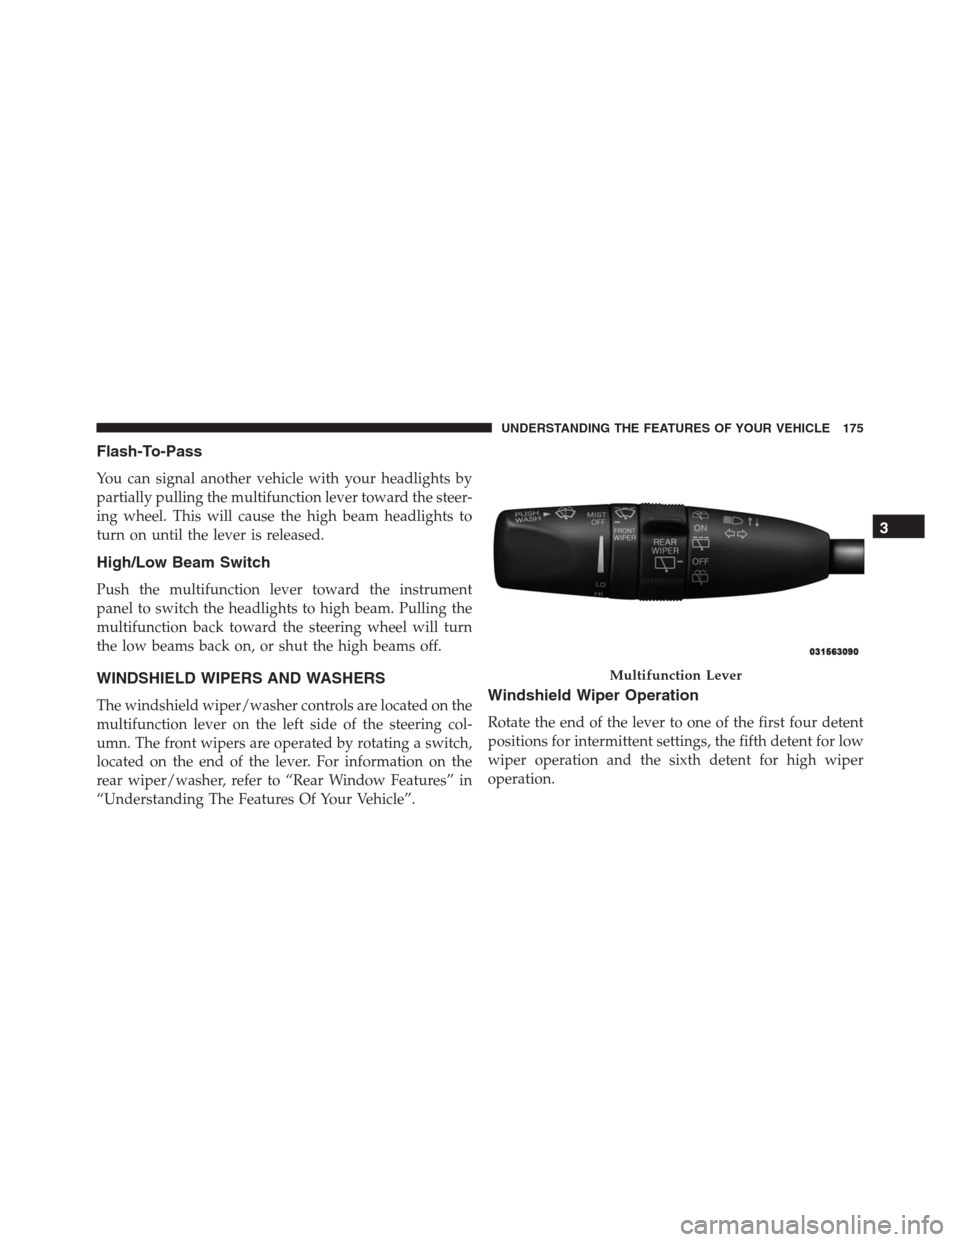
The windshield wiper/washer controls are located on the
multifunction lever on the left side of the steering col-
umn. The front wipers are operated by rotating a switch,
located on the end of the lever. For information on the
rear wiper/washer, refer to “Rear Window Features” in
“Understanding The Features Of Your Vehicle”.Windshield Wiper Operation
Rotate the end of the lever to one of the first four detent
positions for intermittent settings, the fifth detent for low
wiper operation and the sixth detent for high wiper
operation.
Multifunction Lever
3
UNDERSTANDING THE FEATURES OF YOUR VEHICLE 175
Page 255 of 636

Pinch Protect Feature
This feature will detect an obstruction in the opening of
the sunroof during Express Close operation. If an ob-
struction in the path of the sunroof is detected, the
sunroof will automatically retract. Remove the obstruc-
tion if this occurs. Next, push the switch forward and
release to Express Close.
NOTE:If three consecutive sunroof close attempts result
in Pinch Protect reversals, the fourth close attempt will be
a Manual Close movement with Pinch Protect disabled.
Venting Sunroof — Express
Push and release the Vent button within one half second
and the sunroof will open to the vent position. This is
called “Express Vent” and it will occur regardless of
sunroof position. During Express Vent operation, any
movement of the switch will stop the sunroof.
Sunshade Operation
The sunshade can be opened manually. However, the
sunshade will open automatically as the sunroof opens.
NOTE:The sunshade cannot be closed if the sunroof is
open.
Wind Buffeting
Wind buffeting can be described as the perception of
pressure on the ears or a helicopter-type sound in the
ears. Your vehicle may exhibit wind buffeting with the
windows down, or the sunroof (if equipped) in certain
open or partially open positions. This is a normal occur-
rence and can be minimized. If the buffeting occurs with
the rear windows open, open the front and rear windows
together to minimize the buffeting. If the buffeting occurs
with the sunroof open, adjust the sunroof opening to
minimize the buffeting or open any window.
3
UNDERSTANDING THE FEATURES OF YOUR VEHICLE 253