Page 160 of 636

Reclining Rear Seat
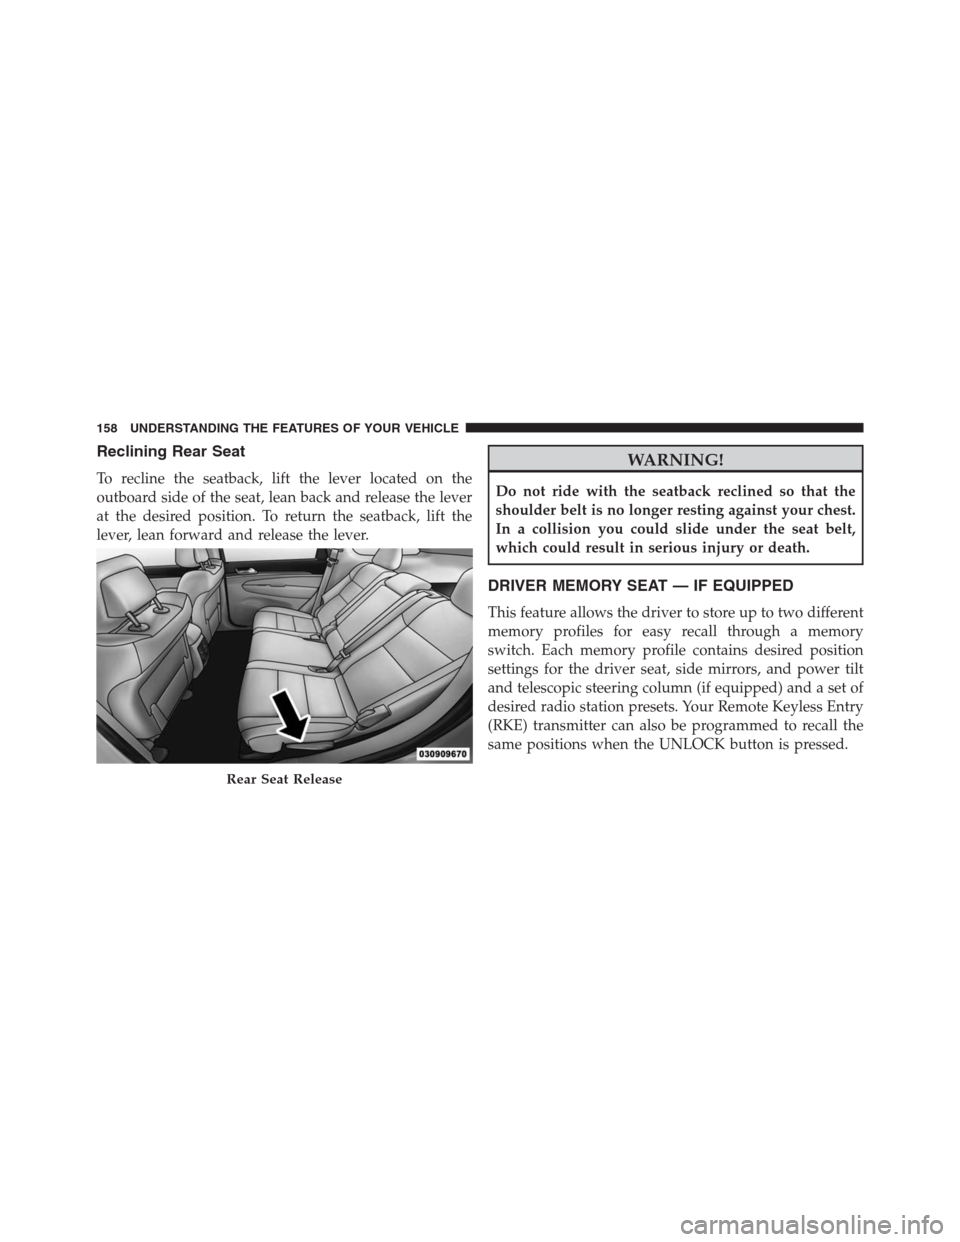
To recline the seatback, lift the lever located on the
outboard side of the seat, lean back and release the lever
at the desired position. To return the seatback, lift the
lever, lean forward and release the lever.
WARNING!
Do not ride with the seatback reclined so that the
shoulder belt is no longer resting against your chest.
In a collision you could slide under the seat belt,
which could result in serious injury or death.
DRIVER MEMORY SEAT — IF EQUIPPED
This feature allows the driver to store up to two different
memory profiles for easy recall through a memory
switch. Each memory profile contains desired position
settings for the driver seat, side mirrors, and power tilt
and telescopic steering column (if equipped) and a set of
desired radio station presets. Your Remote Keyless Entry
(RKE) transmitter can also be programmed to recall the
same positions when the UNLOCK button is pressed.
Rear Seat Release
158 UNDERSTANDING THE FEATURES OF YOUR VEHICLE
Page 186 of 636

NOTE:In order to ensure proper operation, the Elec-
tronic Speed Control System has been designed to shut
down if multiple Speed Control functions are operated at
the same time. If this occurs, the Electronic Speed Control
System can be reactivated by pushing the Electronic
Speed Control ON/OFF button and resetting the desired
vehicle set speed.
To Activate
Push the ON/OFF button to activate the electronic speed
control. CRUISE CONTROL READY will appear on the
instrument cluster to indicate the electronic speed control
is on. To turn the system off, push the ON/OFF button a
second time. CRUISE CONTROL OFF will appear on the
instrument cluster to indicate the electronic speed control
is off. The system should be turned off when not in use.
WARNING!
Leaving the Electronic Speed Control system on
when not in use is dangerous. You could accidentally
set the system or cause it to go faster than you want.
You could lose control and have an accident. Always
leave the system OFF when you are not using it.
To Set A Desired Speed
Turn the Electronic Speed Control ON. When the vehicle
has reached the desired speed, push the SET (+) or SET (-)
button and release. Release the accelerator and the ve-
hicle will operate at the selected speed. Once a speed has
been set a message CRUISE CONTROL SET TO MPH
(km/h) will appear indicating what speed was set. A
CRUISE indicator lamp, along with set speed will also
appear and stay on in the instrument cluster when the
speed is set.
184 UNDERSTANDING THE FEATURES OF YOUR VEHICLE
Page 189 of 636

Using Electronic Speed Control On Hills
The transmission may downshift on hills to maintain the
vehicle set speed.
NOTE:The Electronic Speed Control system maintains
speed up and down hills. A slight speed change on
moderate hills is normal.
On steep hills, a greater speed loss or gain may occur so
it may be preferable to drive without Electronic Speed
Control.
WARNING!
Electronic Speed Control can be dangerous where the
system cannot maintain a constant speed. Your ve-
hicle could go too fast for the conditions, and you
could lose control and have an accident. Do not use
Electronic Speed Control in heavy traffic or on roads
that are winding, icy, snow-covered or slippery.
ADAPTIVE CRUISE CONTROL (ACC) — IF
EQUIPPED
Adaptive Cruise Control (ACC) increases the driving
convenience provided by cruise control while traveling
on highways and major roadways. However, it is not a
safety system and not designed to prevent collisions.
Electronic Speed Control function performs differently.
Please refer to the proper section within this chapter.
ACC will allow you to keep cruise control engaged in
light to moderate traffic conditions without the constant
need to reset your cruise control. ACC utilizes a radar
sensor and a forward facing camera designed to detect a
vehicle directly ahead of you.
NOTE:
•If the sensor does not detect a vehicle ahead of you,
ACC will maintain a fixed set speed.
3
UNDERSTANDING THE FEATURES OF YOUR VEHICLE 187
Page 190 of 636

•If the ACC sensor detects a vehicle ahead, ACC will
apply limited braking or acceleration (not to exceed
the original set speed) automatically to maintain a
preset following distance, while matching the speed of
the vehicle ahead.
The Cruise Control system has two control modes:
•Adaptive Cruise Control mode for maintaining an
appropriate distance between vehicles.
•Normal (fixed speed) electronic speed control mode
for cruising at a constant preset speed. For additional
information, refer to “Normal (Fixed Speed) Cruise
Control Mode” in this section.
NOTE:Normal (fixed speed) electronic speed control
will not react to preceding vehicles. Always be aware of
the mode selected.You can change the mode by using the Cruise Control
buttons. The two control modes function differently.
Always confirm which mode is selected.
WARNING!
•Adaptive Cruise Control (ACC) is a convenience
system. It is not a substitute for active driving
involvement. It is always the driver ’s responsibil-
ity to be attentive of road, traffic, and weather
conditions, vehicle speed, distance to the vehicle
ahead; and, most importantly, brake operation to
ensure safe operation of the vehicle under all road
conditions. Your complete attention is always re-
quired while driving to maintain safe control of
your vehicle. Failure to follow these warnings can
result in a collision and death or serious personal
injury.
(Continued)
188 UNDERSTANDING THE FEATURES OF YOUR VEHICLE
Page 266 of 636
The power inverter is designed with built-in overload
protection. If the power rating of 150 Watts is exceeded,
the power inverter will automatically shut down. Once
the electrical device has been removed from the outlet the
inverter should automatically reset. To avoid overloadingthe circuit, check the power ratings on electrical devices
prior to using the inverter.
WARNING!
To avoid serious injury or death:
•Do not insert any objects into the receptacles.
•Do not touch with wet hands.
•Close the lid when not in use.
•If this outlet is mishandled, it may cause an electric
shock and failure.
Power Inverter
264 UNDERSTANDING THE FEATURES OF YOUR VEHICLE
Page 283 of 636
UNDERSTANDING YOUR INSTRUMENT PANEL
CONTENTS
�INSTRUMENT PANEL FEATURES..........284
�INSTRUMENT CLUSTER — PREMIUM.......285
�INSTRUMENT CLUSTER DESCRIPTIONS.....286
�DRIVER INFORMATION DISPLAY (DID)......295
▫DID Displays........................297
▫Engine Oil Life Reset..................299
▫DID Messages.......................300
▫DID White Telltales....................303
▫DID Amber Telltales...................303
▫DID Red Telltales......................304▫DID Green Telltales....................307
▫DID Selectable Menu Items..............307
�Uconnect® SETTINGS....................315
▫Buttons On The Faceplate................316
▫Buttons On The Touchscreen..............317
▫Customer Programmable Features — Uconnect®
8.4 Personal Settings...................317
▫SRT Performance Pages.................336
�Uconnect® RADIOS — IF EQUIPPED........340
�
iPod®/USB/MP3 CONTROL — IF EQUIPPED . . .340
4
Page 295 of 636

U.S. Federal regulations require that upon transfer of
vehicle ownership, the seller certify to the purchaser the
correct mileage that the vehicle has been driven. If your
odometer needs to be repaired or serviced, the repair
technician should leave the odometer reading the same
as it was before the repair or service. If she/he cannot do
so, then the odometer must be set at zero, and a sticker
must be placed in the door jamb stating what the mileage
was before the repair or service. It is a good idea for you
to make a record of the odometer reading before the
repair/service, so that you can be sure that it is properly
reset, or that the door jamb sticker is accurate if the
odometer must be reset at zero.
When the appropriate conditions exist, this Driver Infor-
mation Display (DID) messages. Refer to “Driver Infor-
mation Display” in this section.16. Selectable DID Menu
This area of the cluster will display the DID selectable
menu. For further information, refer to “Driver Informa-
tion Display (DID)” in this section.
17. Air Bag Warning Light
This light will turn on for four to eight seconds
as a bulb check when the ignition switch is first
turned to the ON/RUN position. If the light is
either not on during starting, stays on, or turns
on while driving, have the system inspected at an autho-
rized dealer as soon as possible. Refer to “Occupant
Restraints” in “Things To Know Before Starting Your
Vehicle” for further information.
18. Vehicle Security Light
This light will flash rapidly for approximately
15 seconds when the vehicle security alarm is
arming. The light will flash at a slower speed
4
UNDERSTANDING YOUR INSTRUMENT PANEL 293
Page 299 of 636

•DOWN Arrow Button
Push and release the DOWN arrow button to
scroll downward through the main menu and
submenus.
•RIGHT Arrow Button
Push and release the RIGHT arrow button to
access the information screens or submenu
screens of a main menu item.
•BACK Arrow Button
Push the LEFT arrow button to return to the
main menu from an info screen or submenu
item.
•OK Button
The OK button may be used for the following:
SelectionReset (hold)
Clearing (hold)
DID Displays
The DID displays are located in the center portion of the
cluster and consist of multiple sections:
1. Main Screen — The inner ring of the display will
illuminate in grey under normal conditions, yellow for
non critical warnings, red for critical warnings, and
white for on demand information.
2. Audio Information and Sub-menu Information —
Whenever there are submenus available, the position
within the submenus is shown here.
3. Reconfigurable Telltales/Information
4. Telltales/Indicators
5. Gear Selector Status (PRNDL)
4
UNDERSTANDING YOUR INSTRUMENT PANEL 297