2015 JEEP GRAND CHEROKEE height
[x] Cancel search: heightPage 87 of 717
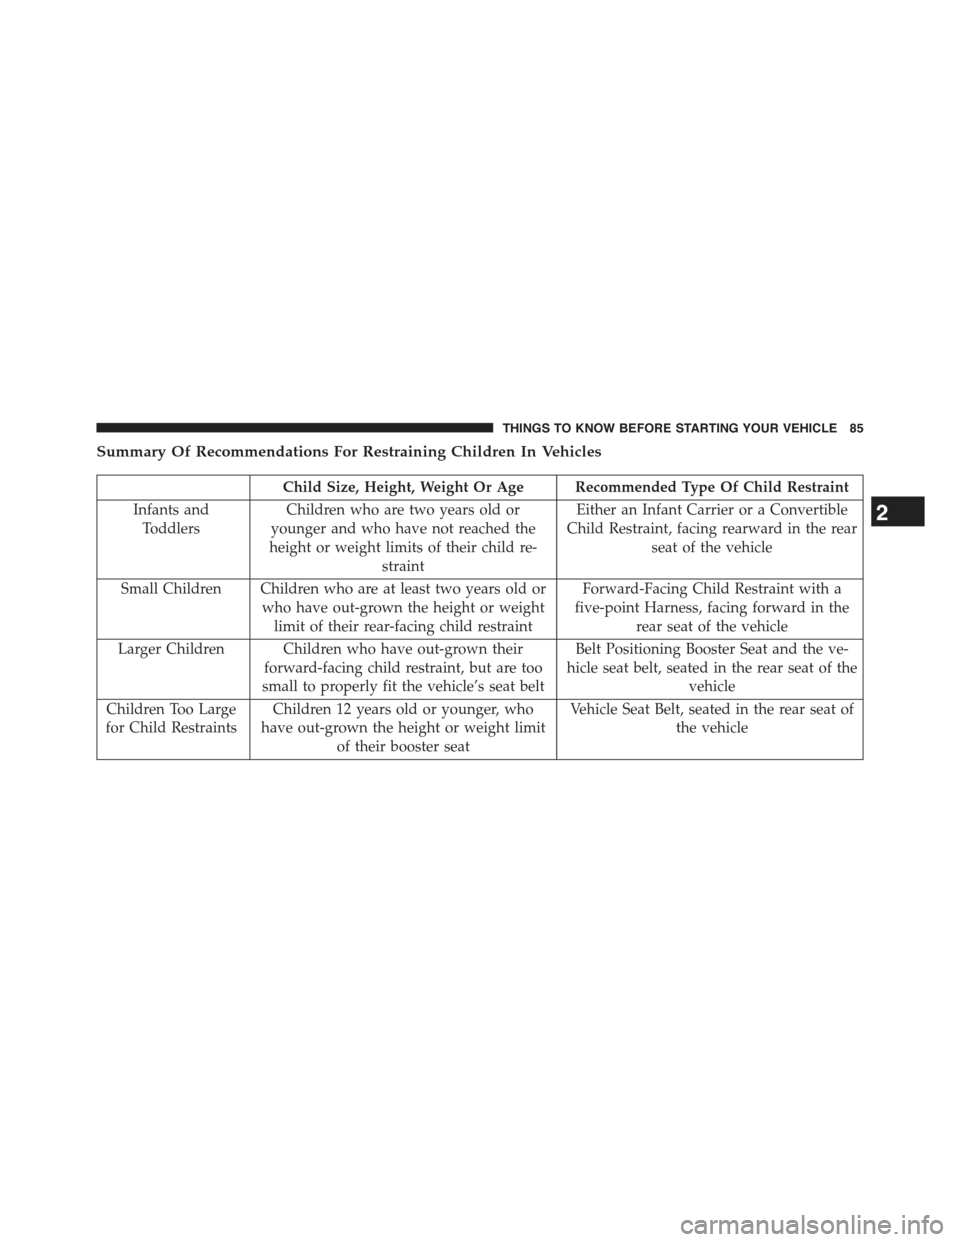
Summary Of Recommendations For Restraining Children In Vehicles
Child Size, Height, Weight Or Age Recommended Type Of Child Restraint
Infants and
Toddlers
Children who are two years old or
younger and who have not reached the
height or weight limits of their child re-
straint
Either an Infant Carrier or a Convertible
Child Restraint, facing rearward in the rear
seat of the vehicle
Small Children Children who are at least two years old or
who have out-grown the height or weight
limit of their rear-facing child restraint
Forward-Facing Child Restraint with a
five-point Harness, facing forward in the
rear seat of the vehicle
Larger Children Children who have out-grown their
forward-facing child restraint, but are too
small to properly fit the vehicle’s seat belt
Belt Positioning Booster Seat and the ve-
hicle seat belt, seated in the rear seat of the
vehicle
Children Too Large
for Child Restraints
Children 12 years old or younger, who
have out-grown the height or weight limit
of their booster seat
Vehicle Seat Belt, seated in the rear seat of
the vehicle
2
THINGS TO KNOW BEFORE STARTING YOUR VEHICLE 85
Page 88 of 717
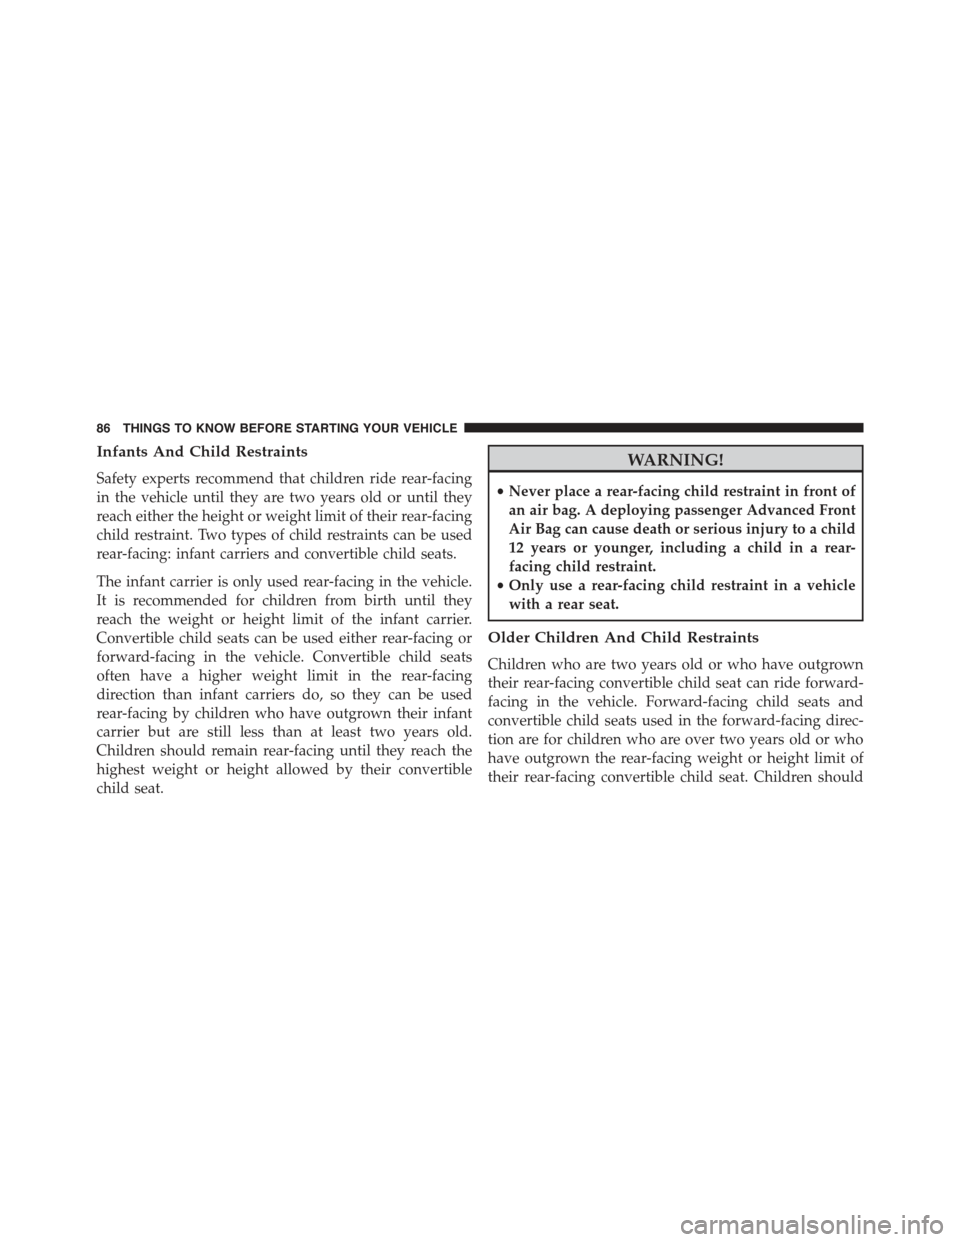
Infants And Child Restraints
Safety experts recommend that children ride rear-facing
in the vehicle until they are two years old or until they
reach either the height or weight limit of their rear-facing
child restraint. Two types of child restraints can be used
rear-facing: infant carriers and convertible child seats.
The infant carrier is only used rear-facing in the vehicle.
It is recommended for children from birth until they
reach the weight or height limit of the infant carrier.
Convertible child seats can be used either rear-facing or
forward-facing in the vehicle. Convertible child seats
often have a higher weight limit in the rear-facing
direction than infant carriers do, so they can be used
rear-facing by children who have outgrown their infant
carrier but are still less than at least two years old.
Children should remain rear-facing until they reach the
highest weight or height allowed by their convertible
child seat.
WARNING!
•Never place a rear-facing child restraint in front of
an air bag. A deploying passenger Advanced Front
Air Bag can cause death or serious injury to a child
12 years or younger, including a child in a rear-
facing child restraint.
•Only use a rear-facing child restraint in a vehicle
with a rear seat.
Older Children And Child Restraints
Children who are two years old or who have outgrown
their rear-facing convertible child seat can ride forward-
facing in the vehicle. Forward-facing child seats and
convertible child seats used in the forward-facing direc-
tion are for children who are over two years old or who
have outgrown the rear-facing weight or height limit of
their rear-facing convertible child seat. Children should
86 THINGS TO KNOW BEFORE STARTING YOUR VEHICLE
Page 89 of 717
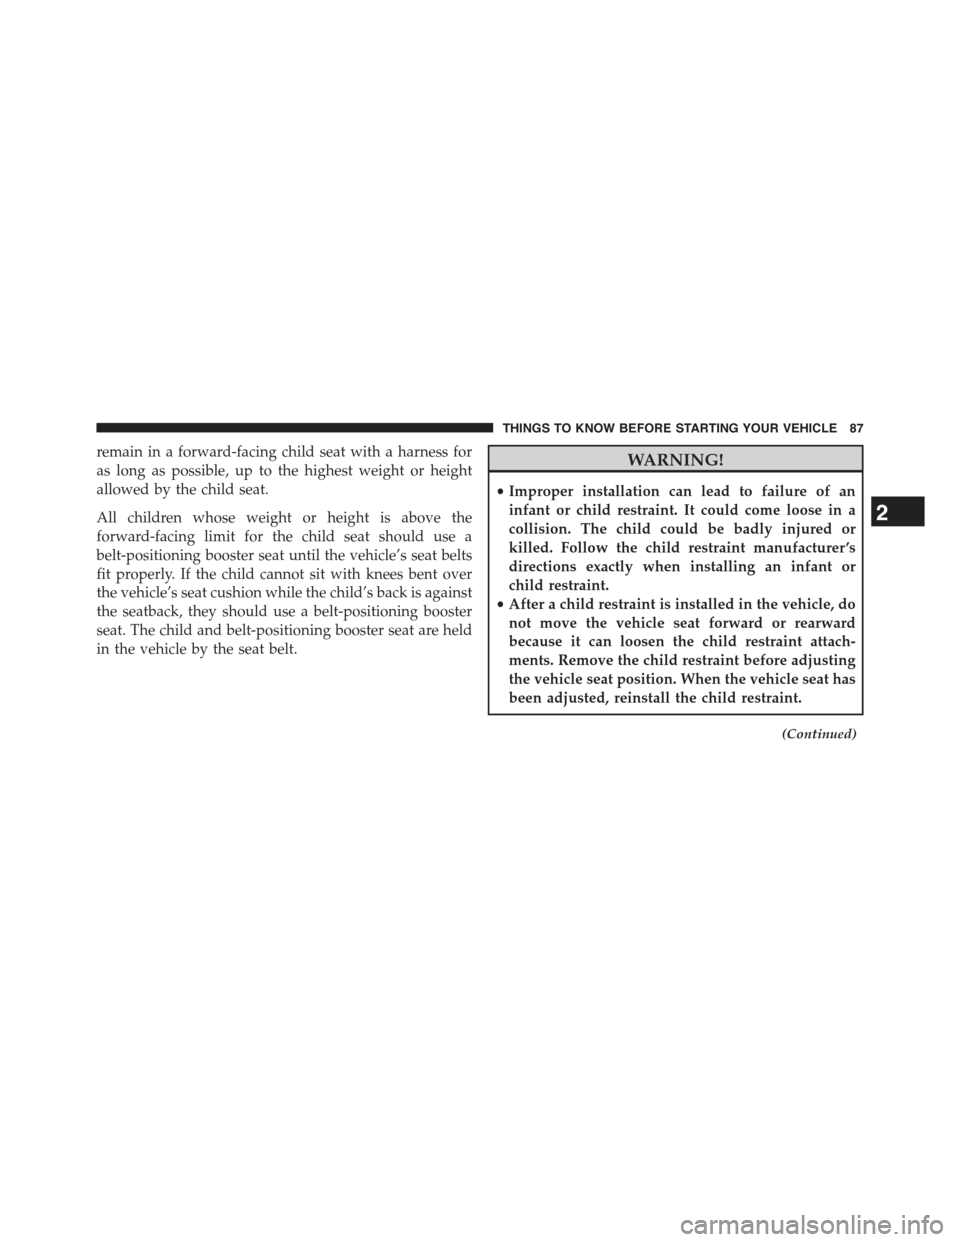
remain in a forward-facing child seat with a harness for
as long as possible, up to the highest weight or height
allowed by the child seat.
All children whose weight or height is above the
forward-facing limit for the child seat should use a
belt-positioning booster seat until the vehicle’s seat belts
fit properly. If the child cannot sit with knees bent over
the vehicle’s seat cushion while the child’s back is against
the seatback, they should use a belt-positioning booster
seat. The child and belt-positioning booster seat are held
in the vehicle by the seat belt.
WARNING!
•Improper installation can lead to failure of an
infant or child restraint. It could come loose in a
collision. The child could be badly injured or
killed. Follow the child restraint manufacturer ’s
directions exactly when installing an infant or
child restraint.
•After a child restraint is installed in the vehicle, do
not move the vehicle seat forward or rearward
because it can loosen the child restraint attach-
ments. Remove the child restraint before adjusting
the vehicle seat position. When the vehicle seat has
been adjusted, reinstall the child restraint.
(Continued)
2
THINGS TO KNOW BEFORE STARTING YOUR VEHICLE 87
Page 147 of 717
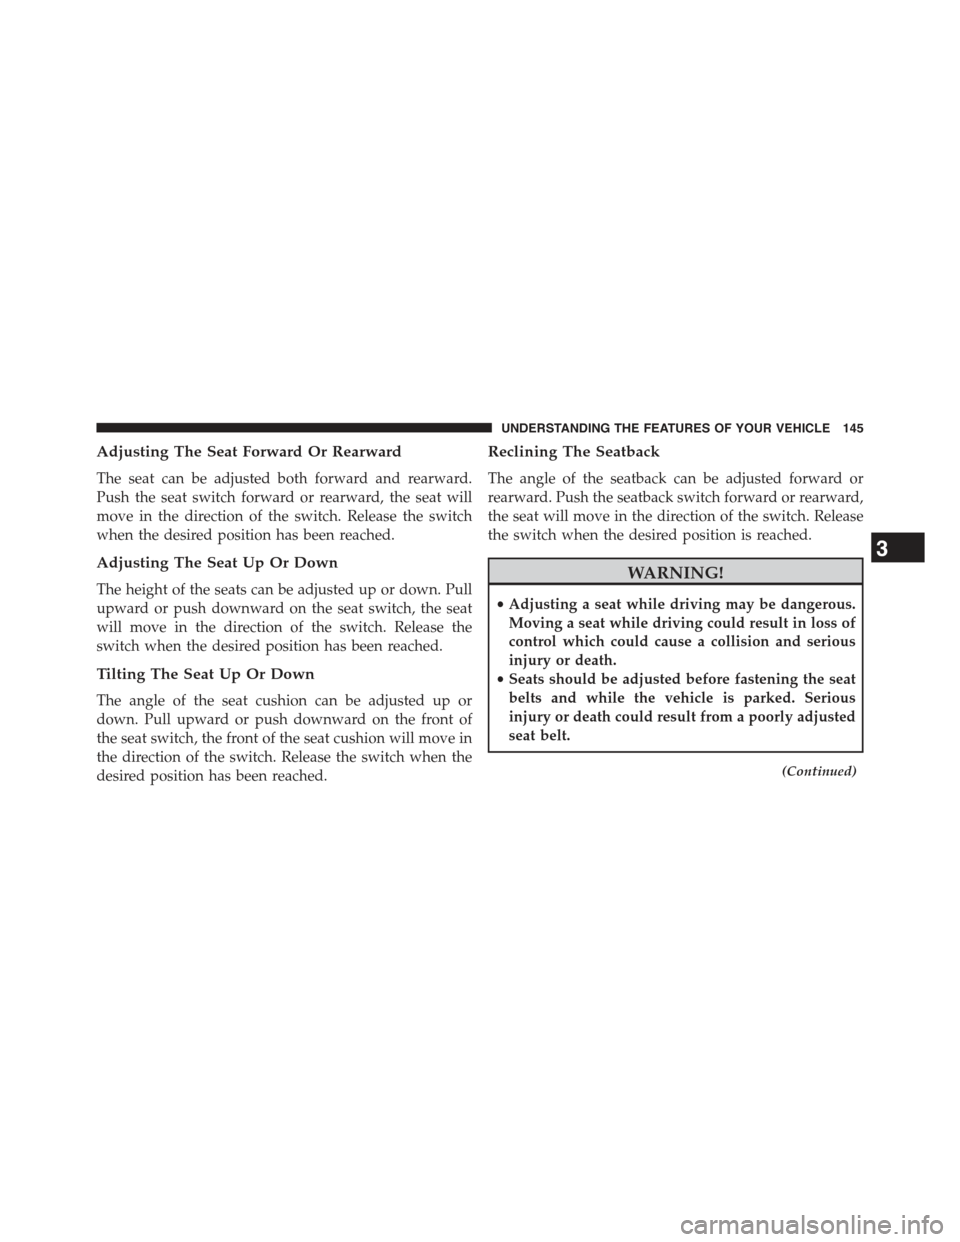
Adjusting The Seat Forward Or Rearward
The seat can be adjusted both forward and rearward.
Push the seat switch forward or rearward, the seat will
move in the direction of the switch. Release the switch
when the desired position has been reached.
Adjusting The Seat Up Or Down
The height of the seats can be adjusted up or down. Pull
upward or push downward on the seat switch, the seat
will move in the direction of the switch. Release the
switch when the desired position has been reached.
Tilting The Seat Up Or Down
The angle of the seat cushion can be adjusted up or
down. Pull upward or push downward on the front of
the seat switch, the front of the seat cushion will move in
the direction of the switch. Release the switch when the
desired position has been reached.
Reclining The Seatback
The angle of the seatback can be adjusted forward or
rearward. Push the seatback switch forward or rearward,
the seat will move in the direction of the switch. Release
the switch when the desired position is reached.
WARNING!
•Adjusting a seat while driving may be dangerous.
Moving a seat while driving could result in loss of
control which could cause a collision and serious
injury or death.
•Seats should be adjusted before fastening the seat
belts and while the vehicle is parked. Serious
injury or death could result from a poorly adjusted
seat belt.
(Continued)
3
UNDERSTANDING THE FEATURES OF YOUR VEHICLE 145
Page 172 of 717
To Deactivate
1. Pull the multifunction lever toward you (or rearward
in car) to manually deactivate the system (normal
operation of low beams).
2. Push back on the multifunction lever once again to
reactivate the system.
Daytime Running Lights — If Equipped
The Daytime Running Lights (low intensity) come on
whenever the engine is running, and the transmission is
not in the PARK position. The lights will remain on until
the ignition is switched to the OFF or ACC position or the
parking brake is engaged.
NOTE:If a turn signal is activated, the DRL lamp on the
same side of the vehicle will turn off for the duration of
the turn signal activation. Once the turn signal is no
longer active, the DRL lamp will illuminate.
The headlight switch must be used for normal nighttime
driving.
Automatic Headlight Leveling — HID Headlights
Only
This feature prevents the headlights from interfering
with the vision of oncoming drivers. Headlight leveling
automatically adjusts the height of the headlight beam in
reaction to changes in vehicle pitch.
Adaptive Bi-Xenon High Intensity Discharge
Headlights — If Equipped
This system automatically swivels the headlight beam
pattern horizontally to provide increased illumination in
the direction the vehicle is steering.
170 UNDERSTANDING THE FEATURES OF YOUR VEHICLE
Page 310 of 717
•Doors Open
•Liftgate Open
•Gear Not Available
•Shift Not Allowed
•Vehicle Speed To High To Shift
•Shift to Neutral then Drive or Reverse
•Autostick Unavailable Service Required
•Automatic Unavailable Use Autostick Service Req.
•Transmission Getting Hot Press Brake
•Trans. Hot Stop Safely Shift to Park Wait to Cool
•Transmission Cool Ready to Drive
•Service Transmission
•Service Shifter
•Engage Park Brake to Prevent Rolling
•Transmission Too cold Idle with Engine On
•Washer Fluid Low
•Service Air Suspension System
•Normal Ride Height Achieved
•Aerodynamic Ride Height Achieved
•Off Road 1 Ride Height Achieved
•Off Road 2 Ride Height Achieved
•Entry/Exit Ride Height Achieved
•Selected Ride Height Not Permitted
•Service Air Suspension System Immediately
•Reduce Speed To Maintain Selected Ride Height
•Air Suspension System Cooling Down Please Wait
308 UNDERSTANDING YOUR INSTRUMENT PANEL
Page 311 of 717
•Vehicle Cannot Be Lowered Door Open
•Off Road 2 Watch For Clearance
•Entry/Exit Watch For Clearance
•Air Suspension Temporarily Disabled For jacking And
Tire Change
•Battery Low Start Engine To Change Ride Height
The Reconfigurable Telltales section is divided into the
white telltales area on the right, amber telltales in the
middle, and red telltales on the left.
DID White Telltales
This area will show reconfigurable white caution tell-
tales. These telltales include:
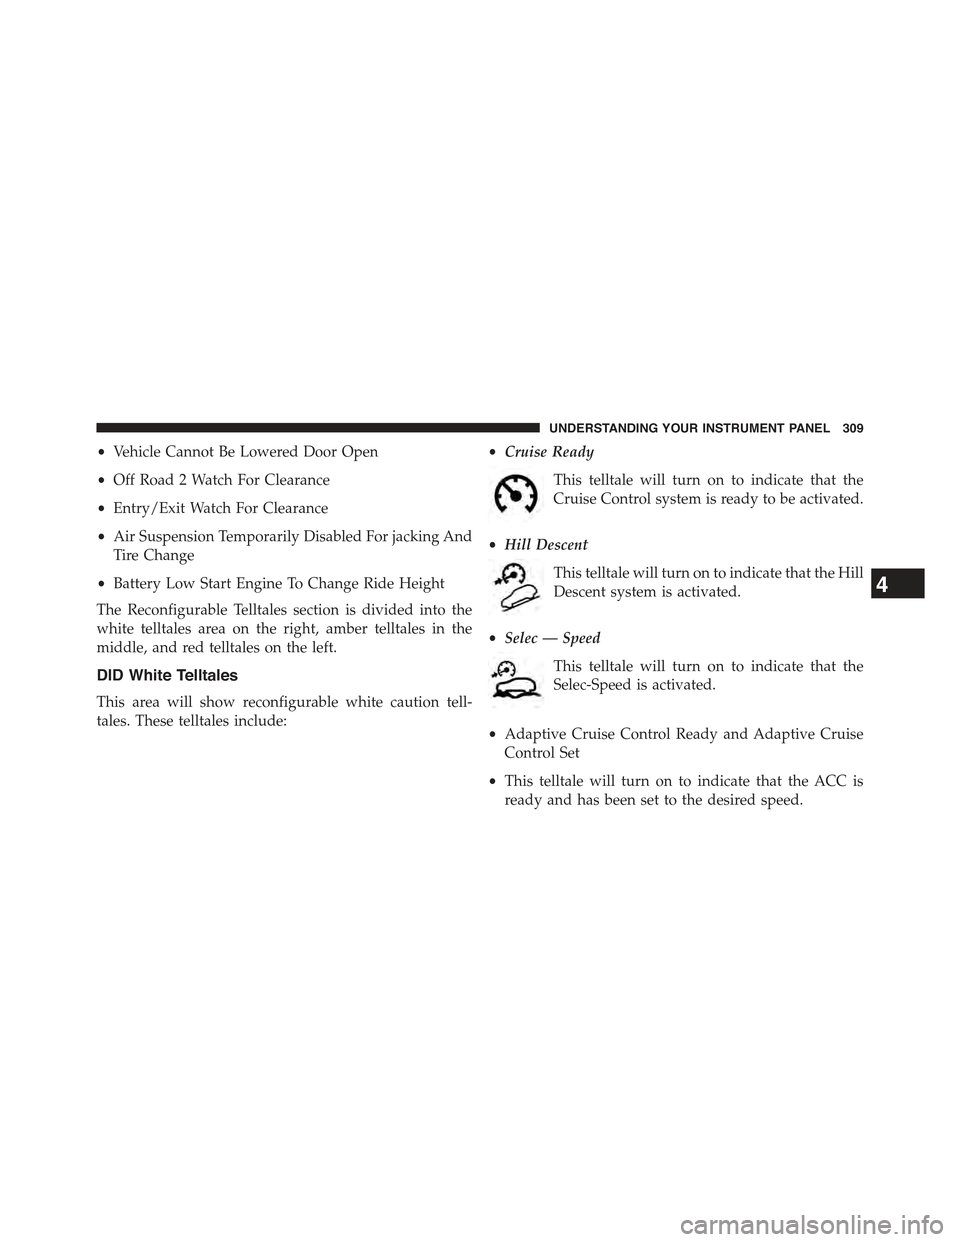
•Cruise Ready
This telltale will turn on to indicate that the
Cruise Control system is ready to be activated.
•Hill Descent
This telltale will turn on to indicate that the Hill
Descent system is activated.
•Selec — Speed
This telltale will turn on to indicate that the
Selec-Speed is activated.
•Adaptive Cruise Control Ready and Adaptive Cruise
Control Set
•This telltale will turn on to indicate that the ACC is
ready and has been set to the desired speed.
4
UNDERSTANDING YOUR INSTRUMENT PANEL 309
Page 335 of 717
“60,” or “90” seconds to select your desired time interval.
Press the back arrow button on the touchscreen to return
to the previous menu.
•Engine Off Power Delay
When this feature is selected, the power window
switches, radio, Uconnect® phone system (if equipped),
DVD video system (if equipped), power sunroof (if
equipped), and power outlets will remain active for up to
10 minutes after the ignition is cycled to OFF. Opening
either front door will cancel this feature. Press the “En-
gine Off Power Delay” button on the touchscreen and
choose from “0 sec,” “45 sec,” “5 min” or “10 min” to
select your desired time interval. Then press the arrow
back button on the touchscreen.
•Auto Entry/Exit — If Equipped
When this feature is selected, it automatically lowers the
vehicle ride height position when shifted into park. Press
the “Auto Entry/Exit” button on the touchscreen and
choose from “On” or “Off.” Press the back arrow button
on the touchscreen to return to the previous menu.
Suspension — If Equipped
After pressing the “Suspension” button on the touch-
screen the following settings will be available:
•Auto Entry/Exit Suspension
When this feature is selected, the vehicle automatically
lowers from ride height position when vehicle shifted to
park for easy entry/exit. To make your selection, press
the “Auto Entry/Exit” button on the touchscreen, select
“On” or “Off” followed by pressing the back arrow
button on the touchscreen.
•Display Suspension Messages
When “All” is selected, all the Air Suspension Alerts will
be displayed. When “Warning Only” is selected only the
Air Suspension Warnings will be displayed.
4
UNDERSTANDING YOUR INSTRUMENT PANEL 333