2015 JEEP GRAND CHEROKEE change time
[x] Cancel search: change timePage 20 of 717
At the time of purchase, the original owner is provided
with a four-digit Personal Identification Number (PIN).
Keep the PIN in a secure location. This number is
required for authorized dealer replacement of Key Fobs.
Duplication of Key Fobs may be performed at an autho-
rized dealer. This procedure consists of programming a
blank Key Fob to the vehicle electronics. A blank Key Fob
is one that has never been programmed.
NOTE:When having the Sentry Key® Immobilizer Sys-
tem serviced, bring all vehicle keys with you to an
authorized dealer.
Customer Key Programming
Programming Key Fobs or RKE transmitters may be
performed at an authorized dealer.
General Information
The Sentry Key® system complies with FCC rules part 15
and with RSS-210 of Industry Canada. Operation is
subject to the following conditions:
•This device may not cause harmful interference.
•This device must accept any interference that may be
received, including interference that may cause unde-
sired operation.
NOTE:Changes or modifications not expressly approved
by the party responsible for compliance could void the
user’s authority to operate the equipment.
18 THINGS TO KNOW BEFORE STARTING YOUR VEHICLE
Page 25 of 717
To Unlock The Doors And Liftgate
Push and release the UNLOCK button on the RKE
transmitter once to unlock the driver’s door or twice
within five seconds to unlock all doors and liftgate. The
turn signal lights will flash to acknowledge the unlock
signal. The illuminated entry system will also turn on.
If the vehicle is equipped with Passive Entry, refer to
“Keyless Enter-N-Go™” in “Things To Know Before
Starting Your Vehicle” for further information.
1st Push Of Key Fob Unlocks
This feature lets you program the system to unlock either
the driver’s door or all doors on the first push of the
UNLOCK button on the RKE transmitter. To change the
current setting, refer to “Uconnect® Settings” in “Under-
standing Your Instrument Panel” for further information.
Flash Lamps With Lock
This feature will cause the turn signal lights to flash when
the doors are locked or unlocked with the RKE transmit-
ter. This feature can be turned on or turned off. To change
the current setting, refer to “Uconnect® Settings” in
“Understanding Your Instrument Panel” for further in-
formation.
Headlight Illumination On Approach
This feature activates the headlights for up to 90 seconds
when the doors are unlocked with the RKE transmitter.
The time for this feature is programmable on vehicles
equipped through Uconnect®. To change the current
setting, refer to “Uconnect® Settings” in “Understanding
Your Instrument Panel” for further information.
2
THINGS TO KNOW BEFORE STARTING YOUR VEHICLE 23
Page 112 of 717

WARNING!(Continued)
•If it is necessary to sit in a parked vehicle with the
engine running, adjust your heating or cooling
controls to force outside air into the vehicle. Set the
blower at high speed.
The best protection against carbon monoxide entry into
the vehicle body is a properly maintained engine exhaust
system.
Whenever a change is noticed in the sound of the exhaust
system, when exhaust fumes can be detected inside the
vehicle, or when the underside or rear of the vehicle is
damaged, have a competent mechanic inspect the com-
plete exhaust system and adjacent body areas for broken,
damaged, deteriorated, or mispositioned parts. Open
seams or loose connections could permit exhaust fumes
to seep into the passenger compartment. In addition,
inspect the exhaust system each time the vehicle is raised
for lubrication or oil change. Replace as required.
Safety Checks You Should Make Inside The
Vehicle
Seat Belts
Inspect the seat belt system periodically, checking for
cuts, frays, and loose parts. Damaged parts must be
replaced immediately. Do not disassemble or modify the
system.
Front seat belt assemblies must be replaced after a
collision. Rear seat belt assemblies must be replaced after
a collision if they have been damaged (i.e., bent retractor,
torn webbing, etc.). If there is any question regarding seat
belt or retractor condition, replace the seat belt.
Air Bag Warning Light
The light should come on and remain on for
four to eight seconds as a bulb check when the
ignition switch is first turned ON. If the light is
11 0 T H I N G S TO K N O W B E F O R E S TA R T I N G Y O U R V E H I C L E
Page 138 of 717

•The BSM system detection zone DOES NOT change if
your vehicle is towing a trailer. Therefore, visually
verify the adjacent lane is clear for both your vehicle
and trailer before making a lane change. If the trailer or
other object (i.e., bicycle, sports equipment) extends
beyond the side of your vehicle, this may result in the
BSM warning light remaining illuminated the entire
time the vehicle is in a forward gear.
The area on the rear fascia where the radar sensors are
located must remain free of snow, ice, and dirt/road
contamination so that the BSM system can function
properly. Do not block the area of the rear fascia where
the radar sensors are located with foreign objects (bum-
per stickers, bicycle racks, etc.).The BSM system notifies the driver of objects in the
detection zones by illuminating the BSM warning light
located in the outside mirrors in addition to sounding an
audible (chime) alert and reducing the radio volume.
Refer to “Modes Of Operation” for further information.
Sensor Location
136 UNDERSTANDING THE FEATURES OF YOUR VEHICLE
Page 145 of 717
NOTE:The BSM system will store the current operating
mode when the vehicle is shut off. Each time the vehicle
is started the previously stored mode will be recalled and
used.
General Information
This vehicle has systems that operate on radio frequency
that comply with Part 15 of the Federal Communications
Commission (FCC) rules and with Industry Canada
Standards RSS- GEN/210/220/310.
Operation is subject to the following two conditions:
1. The device may not cause harmful interference.
2. The device must accept any interference received,
including interference that may cause undesired op-
eration of the device.
Changes or modifications to any of these systems by
other than an authorized service facility could void
authorization to use this equipment.
SEATS
Seats are part of the Occupant Restraint System of the
vehicle.
WARNING!
•It is dangerous to ride in a cargo area, inside or
outside of a vehicle. In a collision, people riding in
these areas are more likely to be seriously injured
or killed.
•Do not allow people to ride in any area of your
vehicle that is not equipped with seats and seat
belts. In a collision, people riding in these areas are
more likely to be seriously injured or killed.
•Be sure everyone in your vehicle is in a seat and
using a seat belt properly.
3
UNDERSTANDING THE FEATURES OF YOUR VEHICLE 143
Page 152 of 717
Front Heated Seats
The front heated seats control buttons are located within
the climate or controls screen of the touchscreen.
•Press the heated seat buttononce to turn the
HIGH setting ON.
•Press the heated seat buttona second time to turn
the LOW setting ON.
•Press the heated seat buttona third time to turn
the heating elements OFF.
If the HIGH-level setting is selected, the system will
automatically switch to LOW-level after approximately
60 minutes of continuous operation. At that time, the
display will change from HIGH to LOW, indicating the
change. The LOW-level setting will turn OFF automati-
cally after approximately 45 minutes.
NOTE:The engine must be running for the heated seats
to operate.
Vehicles Equipped With Remote Start
On models that are equipped with remote start, the
heated seats can be programed to come on during a
remote start.
This feature can be programmed through the Uconnect®
system. Refer to “Uconnect® Settings” in “Understand-
ing Your Instrument Panel” for further information.
Rear Heated Seats — If Equipped
On some models, the two rear outboard seats may be
equipped with heated seats. There are two heated seat
switches that allow the rear passengers to operate the
seats independently. The heated seat switches for each
heater are located on the rear of the center console.
150 UNDERSTANDING THE FEATURES OF YOUR VEHICLE
Page 153 of 717
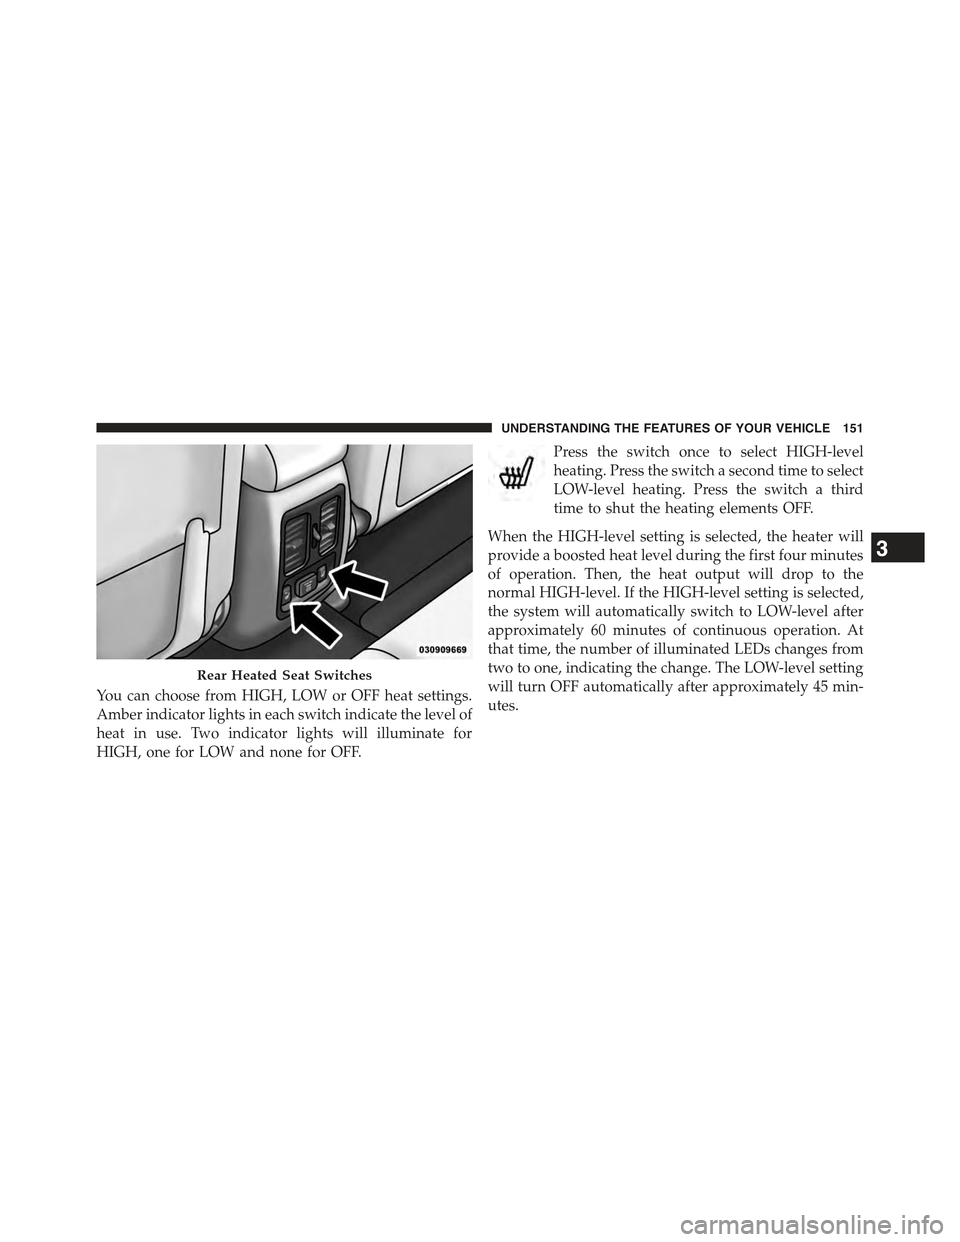
You can choose from HIGH, LOW or OFF heat settings.
Amber indicator lights in each switch indicate the level of
heat in use. Two indicator lights will illuminate for
HIGH, one for LOW and none for OFF.
Press the switch once to select HIGH-level
heating. Press the switch a second time to select
LOW-level heating. Press the switch a third
time to shut the heating elements OFF.
When the HIGH-level setting is selected, the heater will
provide a boosted heat level during the first four minutes
of operation. Then, the heat output will drop to the
normal HIGH-level. If the HIGH-level setting is selected,
the system will automatically switch to LOW-level after
approximately 60 minutes of continuous operation. At
that time, the number of illuminated LEDs changes from
two to one, indicating the change. The LOW-level setting
will turn OFF automatically after approximately 45 min-
utes.
Rear Heated Seat Switches
3
UNDERSTANDING THE FEATURES OF YOUR VEHICLE 151
Page 172 of 717
To Deactivate
1. Pull the multifunction lever toward you (or rearward
in car) to manually deactivate the system (normal
operation of low beams).
2. Push back on the multifunction lever once again to
reactivate the system.
Daytime Running Lights — If Equipped
The Daytime Running Lights (low intensity) come on
whenever the engine is running, and the transmission is
not in the PARK position. The lights will remain on until
the ignition is switched to the OFF or ACC position or the
parking brake is engaged.
NOTE:If a turn signal is activated, the DRL lamp on the
same side of the vehicle will turn off for the duration of
the turn signal activation. Once the turn signal is no
longer active, the DRL lamp will illuminate.
The headlight switch must be used for normal nighttime
driving.
Automatic Headlight Leveling — HID Headlights
Only
This feature prevents the headlights from interfering
with the vision of oncoming drivers. Headlight leveling
automatically adjusts the height of the headlight beam in
reaction to changes in vehicle pitch.
Adaptive Bi-Xenon High Intensity Discharge
Headlights — If Equipped
This system automatically swivels the headlight beam
pattern horizontally to provide increased illumination in
the direction the vehicle is steering.
170 UNDERSTANDING THE FEATURES OF YOUR VEHICLE