2015 JEEP GRAND CHEROKEE maintenance
[x] Cancel search: maintenancePage 211 of 717

To keep the ACC System operating properly, it is impor-
tant to note the following maintenance items:
•Always keep the sensor clean. Carefully wipe the
sensor lens with a soft cloth. Be cautious not to damage
the sensor lens.
•Do not remove any screws from the sensor. Doing so
could cause an ACC system malfunction or failure and
require a sensor realignment.
•If the sensor or front end of the vehicle is damaged due
to a collision, see your authorized dealer for service.
•Do not attach or install any accessories near the sensor,
including transparent material or aftermarket grilles.
Doing so could cause an ACC system failure or
malfunction.
When the condition that deactivated the system is no
longer present, the system will return to the “Adaptive
Cruise Control Off” state and will resume function by
simply reactivating it.
NOTE:
•If the “ACC/FCW Unavailable Wipe Front Radar
Sensor” message occurs frequently (e.g. more than
once on every trip) without any snow, rain, mud, or
other obstruction, have the radar sensor realigned at
your authorized dealer.
•Installing a snow plow, front-end protector, an after-
market grille or modifying the grille is not recom-
mended. Doing so may block the sensor and inhibit
ACC/FCW operation.
3
UNDERSTANDING THE FEATURES OF YOUR VEHICLE 209
Page 262 of 717
Sunroof Maintenance
Use only a nonabrasive cleaner and a soft cloth to clean
the glass panel.
Ignition Off Operation
NOTE:
•The power sunroof switch can remain active for up to
approximately ten minutes after the vehicles ignition is
cycled to the Off position. Opening either front door
will cancel this feature.
•This feature is programmable using the Uconnect®
System. Refer to “Uconnect® Settings” in “Under-
standing Your Instrument Panel” for further informa-
tion.
COMMANDVIEW® SUNROOF WITH POWER
SHADE — IF EQUIPPED
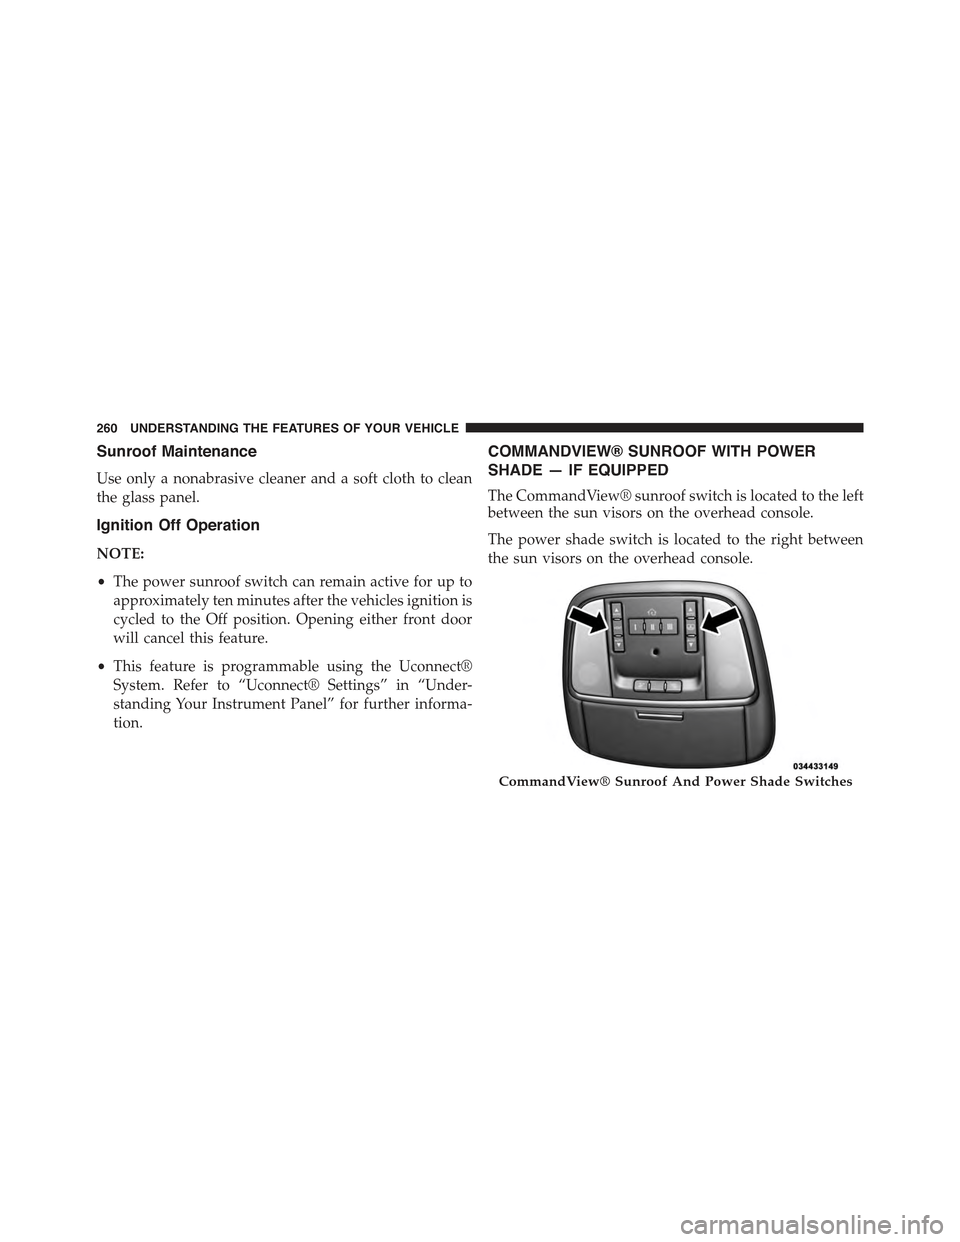
The CommandView® sunroof switch is located to the left
between the sun visors on the overhead console.
The power shade switch is located to the right between
the sun visors on the overhead console.
CommandView® Sunroof And Power Shade Switches
260 UNDERSTANDING THE FEATURES OF YOUR VEHICLE
Page 266 of 717
sunroof will automatically retract. Remove the obstruc-
tion if this occurs. Next, press the switch forward and
release to Express Close.
NOTE:If three consecutive sunroof close attempts result
in Pinch Protect reversals, the fourth close attempt will be
a Manual Close movement with Pinch Protect disabled.
Wind Buffeting
Wind buffeting can be described as the perception of
pressure on the ears or a helicopter-type sound in the
ears. Your vehicle may exhibit wind buffeting with the
windows down, or the sunroof (if equipped) in certain
open or partially open positions. This is a normal occur-
rence and can be minimized. If the buffeting occurs with
the rear windows open, open the front and rear windows
together to minimize the buffeting. If the buffeting occurs
with the sunroof open, adjust the sunroof opening to
minimize the buffeting or open any window.
Sunroof Maintenance
Use only a non-abrasive cleaner and a soft cloth to clean
the glass panel.
Ignition Off Operation
NOTE:
•The power sunroof switch can remain active for up to
approximately ten minutes after the vehicles ignition is
cycled to the Off position. Opening either front door
will cancel this feature.
•This feature is programmable using the Uconnect®
System. Refer to “Uconnect® Settings” in “Under-
standing Your Instrument Panel” for further informa-
tion.
Sunroof Fully Closed
Press the switch forward and release to ensure that the
sunroof is fully closed.
264 UNDERSTANDING THE FEATURES OF YOUR VEHICLE
Page 290 of 717
!Uconnect® RADIOS — IF EQUIPPED........359
!iPod®/USB/MP3 CONTROL — IF EQUIPPED . . .359
!Uconnect® REAR SEAT ENTERTAINMENT
SYSTEM — IF EQUIPPED.................360
▫Getting Started.......................360
▫Dual Video Screen.....................362
▫Blu-ray™ Disc Player...................362
▫Play Video Games.....................365
▫Play A DVD/Blu-ray™ Disc Using The
Touchscreen Radio.....................366
▫Important Notes For Dual Video Screen
System.............................368
▫Blu-ray™ Disc Player Remote Control — If
Equipped...........................369
▫Replacing The Remote Control Batteries......370
▫Headphones Operation.................371
▫Controls............................372
▫Replacing The Headphone Batteries.........373
▫Unwired® Stereo Headphone Lifetime Limited
Warranty...........................373
!STEERING WHEEL AUDIO CONTROLS — IF
EQUIPPED...........................381
▫Radio Operation......................381
▫CD Player...........................382
!CD/DVD/Blu-ray™ Disc MAINTENANCE . . . .382
!RADIO OPERATION AND MOBILE PHONES . .383
▫Regulatory And Safety Information.........383
288 UNDERSTANDING YOUR INSTRUMENT PANEL
Page 299 of 717
The light also will turn on when the parking brake is
applied with the ignition switch in the ON/RUN posi-
tion.
NOTE:This light shows only that the parking brake is
applied. It does not show the degree of brake application.
13. Fuel Gauge/Fuel Door Reminder
The fuel pump symbol points to the side of the vehicle
where the fuel door is located. The pointer shows the
level of fuel in the fuel tank when the ignition switch is in
the ON/RUN position.
14. Tire Pressure Monitoring Telltale Light
Each tire, including the spare (if provided),
should be checked monthly when cold and
inflated to the inflation pressure recommended
by the vehicle manufacturer on the vehicle
placard or tire inflation pressure label. (If your vehicle
has tires of a different size than the size indicated on the
vehicle placard or tire inflation pressure label, you should
determine the proper tire inflation pressure for those
tires.)
As an added safety feature, your vehicle has been
equipped with a Tire Pressure Monitoring System
(TPMS) that illuminates a low tire pressure telltale when
one or more of your tires is significantly under-inflated.
Accordingly, when the low tire pressure telltale illumi-
nates, you should stop and check your tires as soon as
possible, and inflate them to the proper pressure. Driving
on a significantly under-inflated tire causes the tire to
overheat and can lead to tire failure. Under-inflation also
reduces fuel efficiency and tire tread life, and may affect
the vehicle’s handling and stopping ability.
Please note that the TPMS is not a substitute for proper
tire maintenance, and it is the driver ’s responsibility to
maintain correct tire pressure, even if under-inflation has
not reached the level to trigger illumination of the TPMS
low tire pressure telltale.
4
UNDERSTANDING YOUR INSTRUMENT PANEL 297
Page 307 of 717

is in the RUN state. Examples of this message type are
“Remote Start Aborted - Door Ajar” and “Press Brake
Pedal and Push Button to Start”.
•Five Second Unstored Messages
When the appropriate conditions occur, this type of
message takes control of the main display area for five
seconds and then returns to the previous screen. An
example of this message type is “Automatic High Beams
On”.
Engine Oil Life Reset
Oil Change Required
Your vehicle is equipped with an engine oil change
indicator system. The “Oil Change Required” message
will display in the DID for five seconds after a single
chime has sounded, to indicate the next scheduled oil
change interval. The engine oil change indicator system
is duty cycle based, which means the engine oil change
interval may fluctuate, dependent upon your personal
driving style.
Unless reset, this message will continue to display each
time you turn the ignition switch to the ON/RUN
position or cycle the ignition to the ON/RUN position if
equipped with Keyless Enter-N-Go™. To turn off the
message temporarily, push and release the OK button. To
reset the oil change indicator system (after performing
the scheduled maintenance) refer to the following proce-
dure.
Vehicles Equipped With Keyless Enter-N-Go™
1. Without pushing the brake pedal, push and release the
ENGINE START/STOP button and place the ignition
to the ON/RUN position (do not start the engine.)
2. Fully push the accelerator pedal, slowly, three times
within 10 seconds.
4
UNDERSTANDING YOUR INSTRUMENT PANEL 305
Page 384 of 717
The button located in the center of the left-hand control
will tune to the next preset station that you have pro-
grammed in the radio preset button.
CD Player
Pushing the top of the switch once will go to the next
track on the CD. Pushing the bottom of the switch once
will go to the beginning of the current track, or to the
beginning of the previous track if it is within one second
after the current track begins to play.
If you push the switch up or down twice, it plays the
second track; three times, it will play the third, etc.
CD/DVD/Blu-ray™ Disc MAINTENANCE
To keep a CD/DVD/Blu-ray™ Disc in good condition,
take the following precautions:
1. Handle the disc by its edge; avoid touching the
surface.
2. If the disc is stained, clean the surface with a soft cloth,
wiping from center to edge.
3. Do not apply paper or tape to the disc; avoid scratch-
ing the disc.
4. Do not use solvents such as benzene, thinner, cleaners,
or anti-static sprays.
5. Store the disc in its case after playing.
6. Do not expose the disc to direct sunlight.
7. Do not store the disc where temperatures may become
too high.
NOTE:If you experience difficulty in playing a particular
disc, it may be damaged (i.e., scratched, reflective coating
removed, a hair, moisture or dew on the disc) oversized,
or have protection encoding. Try a known good disc
before considering disc player service.
382 UNDERSTANDING YOUR INSTRUMENT PANEL
Page 396 of 717
The operator can also select the direction of the airflow
by selecting one of the available mode settings. A/C
operation and Recirculation control can also be manually
selected in Manual operation.
NOTE:Each of these features operates independently
from each other. If any feature is controlled manually,
temperature control will continue to operate automati-
cally.
Operating Tips
NOTE:Refer to the chart at the end of this section for
suggested control settings for various weather condi-
tions.
Summer Operation
The engine cooling system must be protected with a
high-quality antifreeze coolant to provide proper corro-
sion protection and to protect against engine overheating.
A solution of 50% OAT (Organic Additive Technology)
coolant that meets the requirements of Chrysler Material
Standard MS-12106 and 50% water is recommended.
Refer to “Maintenance Procedures” in “Maintaining Your
Vehicle” for proper coolant selection.
Winter Operation
Use of the air Recirculation mode during winter months
is not recommended because it may cause window
fogging.
Vacation Storage
Any time you store your vehicle or keep it out of service
(i.e., vacation) for two weeks or more, run the air
conditioning system at idle for about five minutes in the
fresh air and high blower setting. This will ensure
adequate system lubrication to minimize the possibility
of compressor damage when the system is started again.
394 UNDERSTANDING YOUR INSTRUMENT PANEL