Page 145 of 653

3-59
Convenient features of your vehicle
3
4. Firmly press, hold for 5 secondsand release the programmed HomeLink ®
button up to two sepa-
rate times to activate the door. If the
door does not activate, press and
hold the just-trained HomeLink ®
but-
ton and observe the indicator light.
stantly, programming is complete
and your device should activatewhen the HomeLink ®
button is
pressed and released.
for 2 seconds and then turns to a
constant light, continue with
"Programming" steps 5-7 to com-
plete the programming of a rolling
code equipped device (most com-
monly a garage door opener).
5. At the garage door opener receiv- er (motor-head unit) in the garage,
locate the "learn" or "smart" but-
ton. This can usually be foundwhere the hanging antenna wire isattached to the motor-head unit. 6. Firmly press and release the
"learn" or "smart" button. (The
name and color of the button vary
by manufacturer). There are 30seconds to initiate step 7.
7. Return to the vehicle and firmly press, hold for 2 seconds and
release the programmedHomeLink ®
button. Repeat the
"press/hold/release" sequence a
second time, and, depending on
the brand of the garage dooropener (or other rolling code
equipped device), repeat thissequence a third time to complete
the programming process.
HomeLink ®
should now activate your
rolling code equipped device.Gate operator & Canadian program-
ming
During programming, your handheld
transmitter may automatically stop
transmitting. Continue to press the
Integrated HomeLink ®
Wireless
Control System button (note steps 2
through 3 in the Programming portion
of this document) while you press
and re-press ("cycle") your handheld
transmitter every two seconds untilthe frequency signal has been
learned. The indicator light will flash
slowly and then rapidly after several
seconds upon successful training.
Operating HomeLink ®
To operate, simply press and release
the programmed HomeLink
®
button.
Activation will now occur for the
trained device (i.e. garage door
opener, gate operator, security sys-
tem, entry door lock, home/office
lighting, etc.). For convenience, the
hand-held transmitter of the device
may also be used at any time.
Page 156 of 653
3-70
Convenient features of your vehicle
Sunroof open warming
If the driver removes the ignition key
(Smart key : turns off the engine) and
opens the driver’s side door whenthe sunroof is not fully closed, the
warning chime will sound for approx-imately 7 seconds and
- Type A : Sunroof Open WarningLight will illuminate or blink for
approximately 7 seconds.
- Type B : Sunroof Open image will appear on the LCD display.
Close the sunroof securely when
leaving your vehicle.
Roller blind
Open and close the roller blind man- ually using the handle (1).
Always open the roller blind before
opening or closing the sunroof.
✽✽ NOTICE
You may see wrinkles on the roller
blind. It is normal because of its
material characteristic.
■ Type B
■ Type A
WEL-400/OLMB043457
Use the handle when opening
and closing the roller blind. If
the handle is not used, it may
cause misalignment or damage.
CAUTION
OLMB043221
Page 158 of 653
3-72
Convenient features of your vehicle
Closing the hood
1. Before closing the hood, check thefollowing:
partment must be correctly installed.
bustible material must be
removed from the engine com-
partment.
2. Return the support rod to its clip to prevent it from rattling.
3. Lower the hood halfway and push down to securely lock in place.
Then double check to be sure the
hood is secure.
Before closing the hood, ensure all obstructions are
removed from around thehood opening.
Always double check that the
hood is firmly latched before
driving away. If it is not
latched, the hood could open
while the vehicle is being driv-
en, causing a total loss of vis-
ibility, which might result in anaccident.
Do not move the vehicle with the hood in the raised posi-
tion, as vision is obstructed,
which might result in an acci-
dent, and the hood could fall
or be damaged.
WARNING
Page 163 of 653

3-77
Convenient features of your vehicle
3
Closing the fuel filler door
1. To install the fuel tank cap, turn itclockwise until it clicks one time.
2. Close the fuel filler door until it is latched securely.
If the Malfunction Indicator Light ( )
comes ON, turn the engine off and
check or retighten the fuel filler cap
until it clicks one time. If the
Malfunction Indicator Light ( ) does
not go off, have your vehicle checked
by your HYUNDAI dealer.
Gasoline is highly flammable
and explosive. Failure to follow
these guidelines may result in
SERIOUS INJURY or DEATH:
Read and follow all warnings posted at the gas station.
Before refueling, note the
location of the Emergency
Gasoline Shut-Off, if available,at the gas station.
Before touching the fuel noz-
zle, you should eliminate the
potential build-up of static
electricity by touching a metal
part of the vehicle, a safe dis-
tance away from the fuel filler
neck, nozzle, or other gas
source, with your bare hand.
Do not use cellular phones
while refueling. Electric cur-
rent and/or electronic interfer-
ence from cellular phones can
potentially ignite fuel vapors
and cause a fire. (Continued)
WARNING (Continued)
Do not get back into a vehicle
once you have begun refuel-
ing. You can generate a build-
up of static electricity by
touching, rubbing or sliding
against any item or fabric
capable of producing static
electricity. Static electricity
discharge can ignite fuel
vapors causing a fire. If you
must re-enter the vehicle, you
should once again eliminate
potentially dangerous static
electricity discharge by touch-
ing a metal part of the vehicle,
away from the fuel filler neck,
nozzle or other gasoline source,
with your bare hand.(Continued)
Page 164 of 653

3-78
Convenient features of your vehicle
✽✽NOTICE
Make sure to refuel your vehicle according to the "Fuel
Requirements" suggested in the
Introduction chapter.
Do not spill fuel on the exterior surfaces of the vehicle. Any type of
fuel spilled on painted surfaces
may damage the paint.
(Continued)
Do not use matches or a lighter and do not smoke or
leave a lit cigarette in your
vehicle while at a gas station,
especially during refueling.
Do not over-fill or top-off your
vehicle tank, which can cause
gasoline spillage.
If a fire breaks out during refu-
eling, leave the vicinity of the
vehicle, and immediately con-
tact the manager of the gasstation and then contact the
local fire department. Follow
any safety instructions they
provide.
If pressurized fuel sprays out,
it can cover your clothes or
skin and thus subject you to
the risk of fire and burns.
Always remove the fuel cap
carefully and slowly. If the cap
is venting fuel or if you hear a
hissing sound, wait until the
condition stops before com-
pletely removing the cap.
(Continued)
(Continued)
Always check that the fuel cap
is installed securely to pre-
vent fuel spillage in the eventof an accident.
If the fuel filler cap requires
replacement, use only a gen-
uine HYUNDAI cap or the equiv-
alent specified for your vehicle.An incorrect fuel filler cap canresult in a serious malfunctionof the fuel system or emission
control system.
CAUTION
(Continued)
When using an approved
portable fuel container, be sureto place the container on the
ground prior to refueling. Static
electricity discharge from the
container can ignite fuel vapors
causing a fire. Once refueling
has begun, contact between
your bare hand and the vehicleshould be maintained until the
filling is complete.
Use only approved portable
plastic fuel containers designed
to carry and store gasoline.
When refueling, always move
the shift lever to the P (Park)
position, set the parking
brake, and place the ignition
switch to the LOCK/OFF posi-
tion. Sparks produced byelectrical components relatedto the engine can ignite fuel
vapors causing a fire.
(Continued)
Page 202 of 653
3-116
Convenient features of your vehicle
Center console storage
To open the center console storage:
Pull up the lever.
SSTT OO RRAA GG EE CC OO MM PPAA RRTTMM EENN TTSS
NEVER store cigarette lighters,
propane cylinders, or other
flammable/explosive materials
in the vehicle. These items may
catch fire or explode if the vehi-
cle is exposed to hot tempera-
tures for extended periods.
WARNING
ALWAYS keep the storage com-
partment covers closed securely
while driving. Items inside your
vehicle are moving as fast as the
vehicle. If you have to stop or
turn quickly, or if there is a
crash, the items may fly out of
the compartment and may cause
an injury if they strike the driver
or a passenger.
WARNING
To avoid possible theft, do not
leave valuables in the storage
compartments.
CAUTION
OLMB043278
Page 208 of 653

3-122
Convenient features of your vehicle
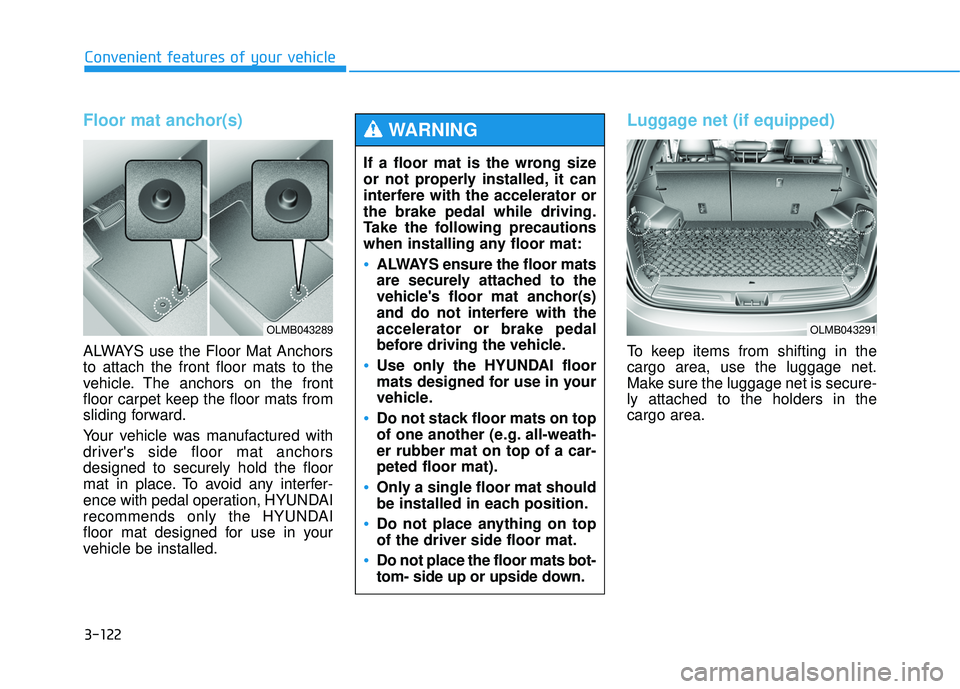
Floor mat anchor(s)
ALWAYS use the Floor Mat Anchors to attach the front floor mats to the
vehicle. The anchors on the front
floor carpet keep the floor mats from
sliding forward.
Your vehicle was manufactured with
driver's side floor mat anchorsdesigned to securely hold the floor
mat in place. To avoid any interfer-
ence with pedal operation, HYUNDAI
recommends only the HYUNDAI
floor mat designed for use in your
vehicle be installed.
Luggage net (if equipped)
To keep items from shifting in the cargo area, use the luggage net.
Make sure the luggage net is secure-ly attached to the holders in the cargo area.
If a floor mat is the wrong size
or not properly installed, it can
interfere with the accelerator orthe brake pedal while driving.
Take the following precautions
when installing any floor mat:
ALWAYS ensure the floor mats
are securely attached to the
vehicle's floor mat anchor(s)
and do not interfere with theaccelerator or brake pedal
before driving the vehicle.
Use only the HYUNDAI floor
mats designed for use in your
vehicle.
Do not stack floor mats on top
of one another (e.g. all-weath-er rubber mat on top of a car-peted floor mat).
Only a single floor mat should
be installed in each position.
Do not place anything on top of the driver side floor mat.
Do not place the floor mats bot-
tom- side up or upside down.
WARNING
OLMB043289OLMB043291
Page 209 of 653
3-123
Convenient features of your vehicle
3
Cargo security screen (if equipped)
Use the cargo security screen to hide items stored in the cargo area.
To use the cargo security screen:
1. Pull the cargo security screentowards the rear of the vehicle by
the handle.
2. Insert the guide pin into the guide.
When the cargo security screen is not in use:
1. Pull the cargo security screen backward and up to release it from
the guides.
2. The cargo security screen will automatically retract.
✽✽ NOTICE
The cargo security screen may not
automatically retract if the screen is
not fully extended. If this is the case,
pull out the screen, then slowly allow
it to retract.
OLMB043292
OLMB043293