2015 HYUNDAI TUCSON ECU
[x] Cancel search: ECUPage 508 of 653
5-62
Driving your vehicle
Driving with a trailer
Towing a trailer requires a certain
amount of experience. Before setting
out for the open road, you must get
to know your trailer. Acquaint your-
self with the feel of handling and
braking with the added weight of the
trailer. And always keep in mind that
the vehicle you are driving is now
longer and not nearly as responsive
as your vehicle is by itself.
Before you start, check the trailer
hitch and platform, safety chains,
electrical connector(s), lights, tires
and brakes.
During your trip, occasionally check
to be sure that the load is secure,
and that the lights and trailer brakes
are still working.
Distance
Stay at least twice as far behind the
vehicle ahead as you would when
driving your vehicle without a trailer.
This can help you avoid situations
that require heavy braking and sud-
den turns.
Passing
You will need more passing distance
up ahead when you’re towing a trail-
er. And, because of the increased
vehicle length, you’ll need to go
much farther beyond the passed
vehicle before you can return to your
lane.
Backing up
Hold the bottom of the steering
wheel with one hand. Then, to move
the trailer to the left, move your hand
to the left. To move the trailer to the
right, move your hand to the right.
Always back up slowly and, if possi-
ble, have someone guide you.
Making turns
When you’re turning with a trailer,
make wider turns than normal. Do
this so your trailer won’t strike soft
shoulders, curbs, road signs, trees,
or other objects. Avoid jerky or sud-
den maneuvers. Signal well in
advance.
Page 516 of 653
5-70
Driving your vehicle
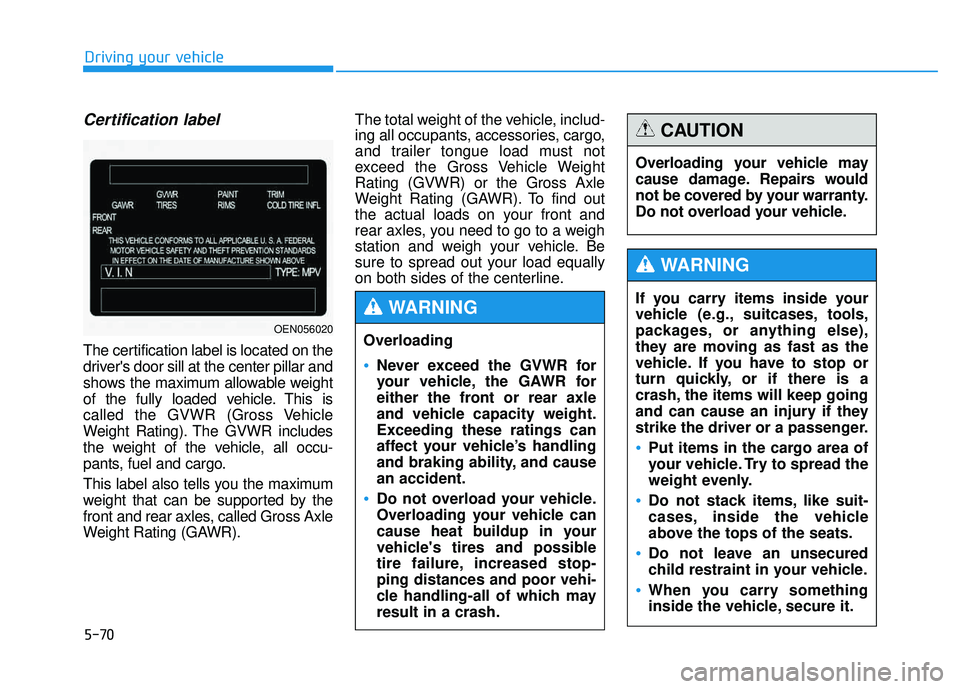
Certification label
The certification label is located on the
driver's door sill at the center pillar and
shows the maximum allowable weight
of the fully loaded vehicle. This is
called the GVWR (Gross Vehicle
Weight Rating). The GVWR includes
the weight of the vehicle, all occu-
pants, fuel and cargo.
This label also tells you the maximum
weight that can be supported by the
front and rear axles, called Gross Axle
Weight Rating (GAWR).The total weight of the vehicle, includ-
ing all occupants, accessories, cargo,
and trailer tongue load must not
exceed the Gross Vehicle Weight Rating (GVWR) or the Gross Axle
Weight Rating (GAWR). To find out
the actual loads on your front and
rear axles, you need to go to a weigh
station and weigh your vehicle. Be
sure to spread out your load equally
on both sides of the centerline.
OEN056020
If you carry items inside your
vehicle (e.g., suitcases, tools,
packages, or anything else),
they are moving as fast as the
vehicle. If you have to stop or
turn quickly, or if there is a
crash, the items will keep going
and can cause an injury if they
strike the driver or a passenger.
Put items in the cargo area of
your vehicle. Try to spread the
weight evenly.
Do not stack items, like suit-
cases, inside the vehicle
above the tops of the seats.
Do not leave an unsecured
child restraint in your vehicle.
When you carry something
inside the vehicle, secure it.
WARNING
Overloading
Never exceed the GVWR for
your vehicle, the GAWR for
either the front or rear axle
and vehicle capacity weight.Exceeding these ratings can
affect your vehicle’s handling
and braking ability, and causean accident.
Do not overload your vehicle.
Overloading your vehicle can
cause heat buildup in your
vehicle's tires and possible
tire failure, increased stop-ping distances and poor vehi-
cle handling-all of which mayresult in a crash.
WARNING
Overloading your vehicle may
cause damage. Repairs would
not be covered by your warranty.
Do not overload your vehicle.
CAUTION
Page 531 of 653
6-15
What to do in an emergency
6
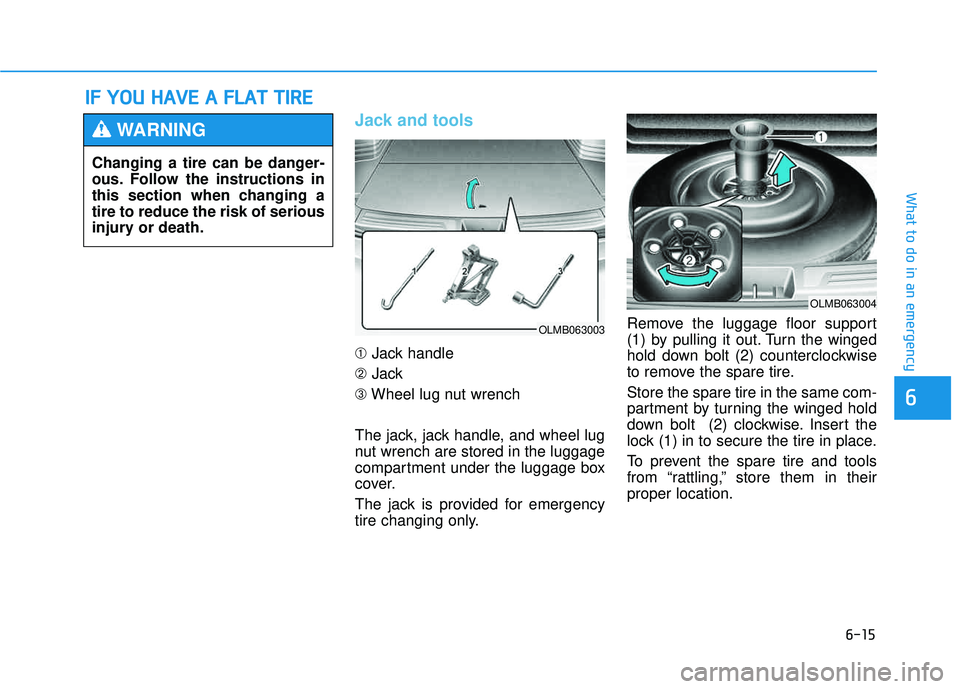
Jack and tools
➀Jack handle
➁ Jack
➂ Wheel lug nut wrench
The jack, jack handle, and wheel lug
nut wrench are stored in the luggage
compartment under the luggage box
cover.
The jack is provided for emergency
tire changing only. Remove the luggage floor support
(1) by pulling it out. Turn the winged
hold down bolt (2) counterclockwise
to remove the spare tire. Store the spare tire in the same com-
partment by turning the winged hold
down bolt (2) clockwise. Insert the
lock (1) in to secure the tire in place.
To prevent the spare tire and tools
from “rattling,” store them in theirproper location.
II
FF YY OO UU HH AAVVEE AA FF LLAA TT TT IIRR EE
Changing a tire can be danger-
ous. Follow the instructions in
this section when changing atire to reduce the risk of serious
injury or death.
WARNING
OLMB063003
OLMB063004
Page 534 of 653
6-18
What to do in an emergency
9.Loosen the lug nuts with the wheellug nut wrench and remove them
with your fingers. Remove the
wheel from the studs and lay it flat
on the ground out of the way.
Remove any dirt or debris from the
studs, mounting surfaces, andwheel.
10. Install the spare tire onto the studs of the hub.
11. Tighten the lug nuts with your fin- gers onto the studs with the
smaller end of the lug nuts clos-est to the wheel.
12. Lower the vehicle to the ground by turning the jack handle coun-
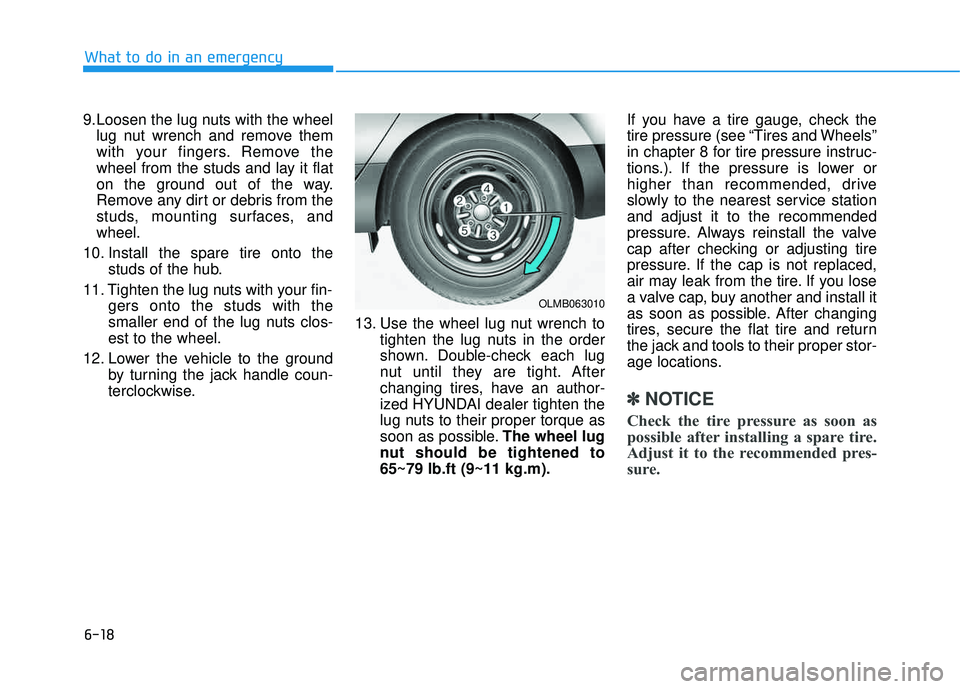
terclockwise. 13. Use the wheel lug nut wrench to
tighten the lug nuts in the order
shown. Double-check each lug
nut until they are tight. After
changing tires, have an author-
ized HYUNDAI dealer tighten the
lug nuts to their proper torque as
soon as possible. The wheel lug
nut should be tightened to65~79 lb.ft (9~11 kg.m). If you have a tire gauge, check the
tire pressure (see “Tires and Wheels”
in chapter 8 for tire pressure instruc-
tions.). If the pressure is lower or
higher than recommended, drive
slowly to the nearest service stationand adjust it to the recommended
pressure. Always reinstall the valve
cap after checking or adjusting tire
pressure. If the cap is not replaced,
air may leak from the tire. If you lose
a valve cap, buy another and install it
as soon as possible. After changing
tires, secure the flat tire and return
the jack and tools to their proper stor-
age locations.
✽✽
NOTICE
Check the tire pressure as soon as
possible after installing a spare tire.
Adjust it to the recommended pres-
sure.
OLMB063010
Page 535 of 653
6-19
What to do in an emergency
6If any of the equipment such as the
jack, lug nuts, studs, or other equip-ment is damaged or in poor condi-tion, do not attempt to change the
tire and call for assistance.
Use of compact spare tires
Compact spare tires are designed for
emergency use only. Drive carefullyon the compact spare tire and
always follow the safety precautions.When driving with the compact spare
tire mounted to your vehicle:
Check the tire pressure after
installing the compact spare tire. The compact spare tire should be
inflated to 60 psi (420 kPa).
Do not take this vehicle through an automatic car wash while the com-pact spare tire is installed.
Do not use the compact spare tire on any other vehicle because thistire has been designed especially
for your vehicle.
The compact spare tire’s tread life is shorter than a regular tire.
Inspect your compact spare tire
regularly and replace worn com-
pact spare tires with the same sizeand design, mounted on the samewheel.
Do not use more than one compact spare tire at a time.
Do not tow a trailer while the com- pact spare tire is installed.
Your vehicle has metric threads
on the studs and lug nuts. Make
certain during tire changing
that the same nuts that were
removed are reinstalled. If you
have to replace your lug nuts
make sure they have metric
threads to avoid damaging thestuds and ensure the wheel is
properly secured to the hub.
Consult an authorized
HYUNDAI dealer for assistance.CAUTION
To prevent compact spare tire
failure and loss of control pos-
sibly resulting in an accident:
Use the compact spare tire
only in an emergency.
NEVER operate your vehicle
over 50 mph (80 km/h).
Do not exceed the vehicle’s
maximum load rating or the
load carrying capacity shown
on the sidewall of the com-
pact spare tire.
Do not use the compact spare
tire continuously. Repair orreplace the original tire as
soon as possible to avoid fail-
ure of the compact spare tire.
WARNING
Page 539 of 653
6-23
What to do in an emergency
6
When towing your vehicle in an emergency without wheel dollies:
1.Place the ignition switch in theACC position.
2.Place the shift lever in N (Neutral).
3.Release the parking brake.
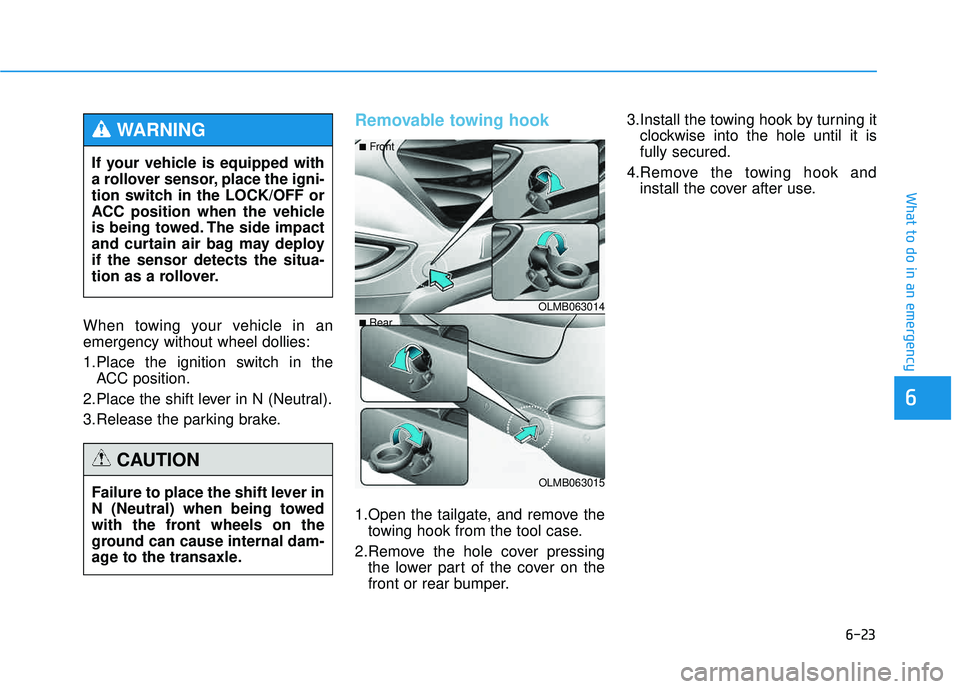
Removable towing hook
1.Open the tailgate, and remove the towing hook from the tool case.
2.Remove the hole cover pressing the lower part of the cover on the
front or rear bumper. 3.Install the towing hook by turning it
clockwise into the hole until it isfully secured.
4.Remove the towing hook and install the cover after use.
Failure to place the shift lever in
N (Neutral) when being towed
with the front wheels on the
ground can cause internal dam-
age to the transaxle.
CAUTION
OLMB063014
OLMB063015
■
Front
■ Rear
If your vehicle is equipped with
a rollover sensor, place the igni-
tion switch in the LOCK/OFF or
ACC position when the vehicle
is being towed. The side impact
and curtain air bag may deployif the sensor detects the situa-
tion as a rollover.
WARNING
Page 540 of 653
6-24
What to do in an emergency
Emergency towing
If towing is necessary, we recom-
mend you have it done by an author-
ized HYUNDAI dealer or a commer-
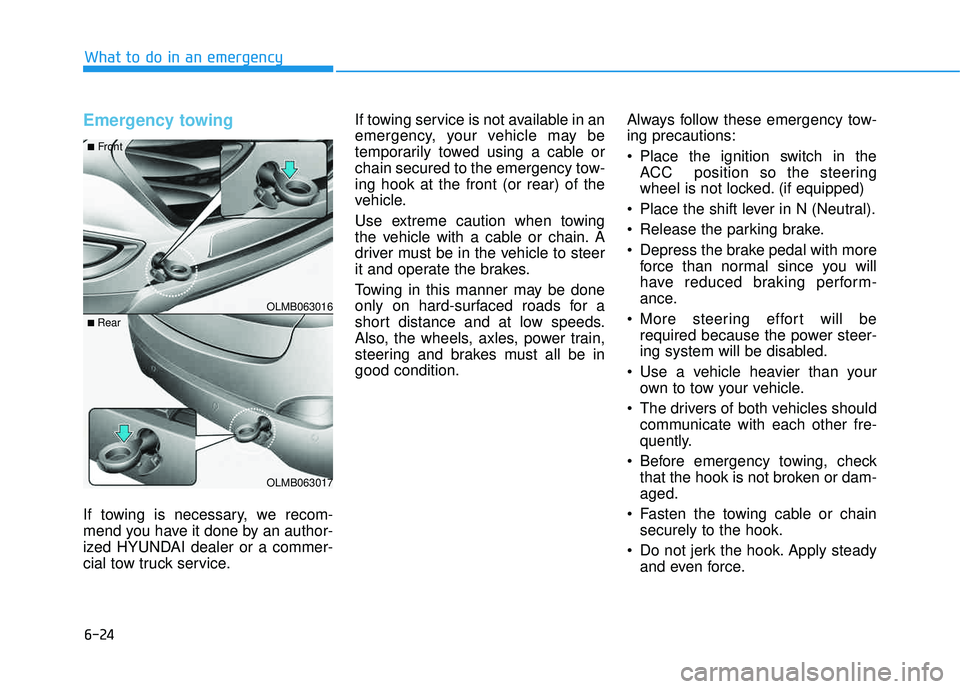
cial tow truck service.If towing service is not available in an
emergency, your vehicle may be
temporarily towed using a cable or
chain secured to the emergency tow-ing hook at the front (or rear) of the
vehicle.
Use extreme caution when towing
the vehicle with a cable or chain. A
driver must be in the vehicle to steer
it and operate the brakes.
Towing in this manner may be done
only on hard-surfaced roads for a
short distance and at low speeds.
Also, the wheels, axles, power train,
steering and brakes must all be ingood condition.
Always follow these emergency tow-ing precautions:
Place the ignition switch in the
ACC position so the steering
wheel is not locked. (if equipped)
Place the shift lever in N (Neutral).
Release the parking brake.
Depress the brake pedal with more force than normal since you will
have reduced braking perform-
ance.
More steering effort will be required because the power steer-
ing system will be disabled.
Use a vehicle heavier than your own to tow your vehicle.
The drivers of both vehicles should communicate with each other fre-
quently.
Before emergency towing, check that the hook is not broken or dam-aged.
Fasten the towing cable or chain securely to the hook.
Do not jerk the hook. Apply steady and even force.
OLMB063016
OLMB063017
■
Front
■ Rear
Page 576 of 653
7-35
7
Maintenance
PPAA RRKK IINN GG BB RRAA KKEE
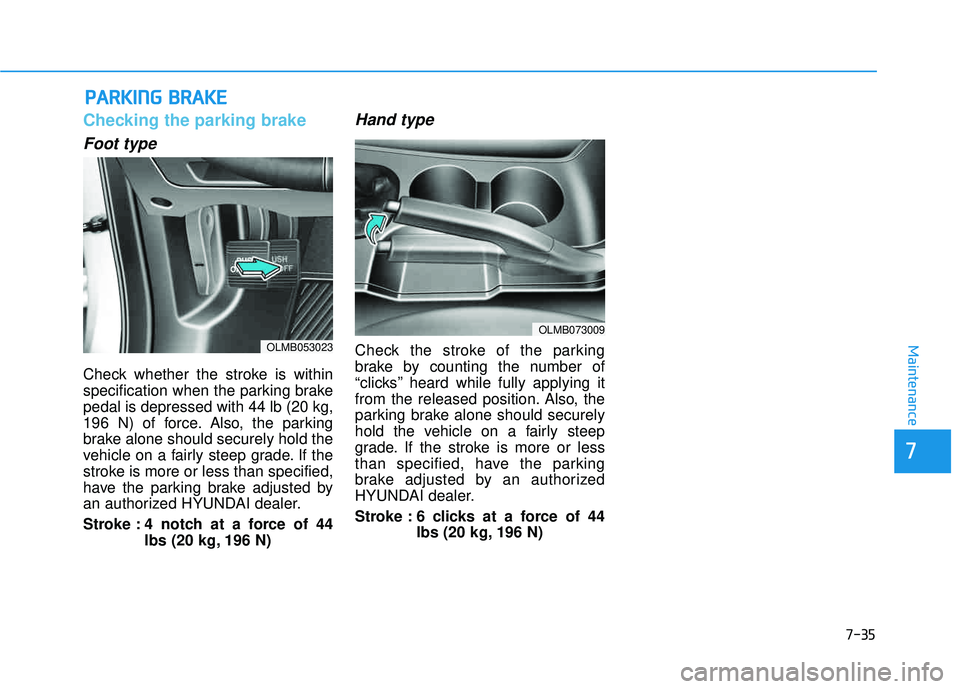
Checking the parking brake
Foot type
Check whether the stroke is within
specification when the parking brakepedal is depressed with 44 lb (20 kg,
196 N) of force. Also, the parking
brake alone should securely hold the
vehicle on a fairly steep grade. If the
stroke is more or less than specified,
have the parking brake adjusted by
an authorized HYUNDAI dealer.
Stroke : 4 notch at a force of 44
lbs (20 kg, 196 N)
Hand type
Check the stroke of the parking
brake by counting the number of
“clicks’’ heard while fully applying it
from the released position. Also, the
parking brake alone should securely
hold the vehicle on a fairly steep
grade. If the stroke is more or less
than specified, have the parking
brake adjusted by an authorized
HYUNDAI dealer.
Stroke : 6 clicks at a force of 44lbs (20 kg, 196 N)OLMB053023
OLMB073009