Page 653 of 785
What to do in an emergency
2 6
ROAD WARNING
Hazard warning flasher
The hazard warning flasher serves as
a warning to other drivers to exercise
extreme caution when approaching,
overtaking, or passing your vehicle.It should be used whenever emer-
gency repairs are being made or
when the vehicle is stopped near the
edge of a roadway.
Depress the flasher switch with the
ignition switch in any position. The
flasher switch is located in the center
console switch panel. All turn signal
lights will flash simultaneously.
When you must make such an emer-
gency stop, always pull off the road
as far as possible.
• The hazard warning flasher oper-
ates whether your vehicle is run-
ning or not.
• The turn signals do not work when
the hazard flasher is on.
• Care must be taken when using
the hazard warning flasher while
the vehicle is being towed.
• To turn the hazard warning lights
off, push the switch again.
ODM042242
ODM042243
■Type A
■ Type B
Page 674 of 785
623
What to do in an emergency
BASIC TROUBLESHOOTING GUIDE
Engine overheatingO
Low fuel levelOO
Fuel lines cloggedOO
Fuel pump defectiveOO
Strainer cloggedOO
Rich mixtureOOO
Water intrusion into fuelOOO
Coolant leakageO
High idle speedO
Engine oil insufficient or defectiveOO
Battery fluid shortageOO
Battery dischargedOOO
Battery terminal poor contactOO
Starter or ignition switch malfunctionO
Ignition timing incorrectOOO
Spark plugs deterioratedOO
Spark plugs defectiveO
Starter won't function
Engine turns over but
will not start
Engine misfires
Engine overheats
Engine stops while
driving
Fuel consumption is
excessive
Brake pedal is spongy
Braking power is
insufficient
Steering wheel is heavy
Steering wheel shakesSteering wheel pulls to
one side while drivingVehicle pulls to one
side while braking
Tire wear is abnormalCharge warning light\
comes on while drivingWipers, horn or lights
won't funciton
Battery discharge is
excessive
SYMPTOM
PROBABLE CAUSE
Page 675 of 785
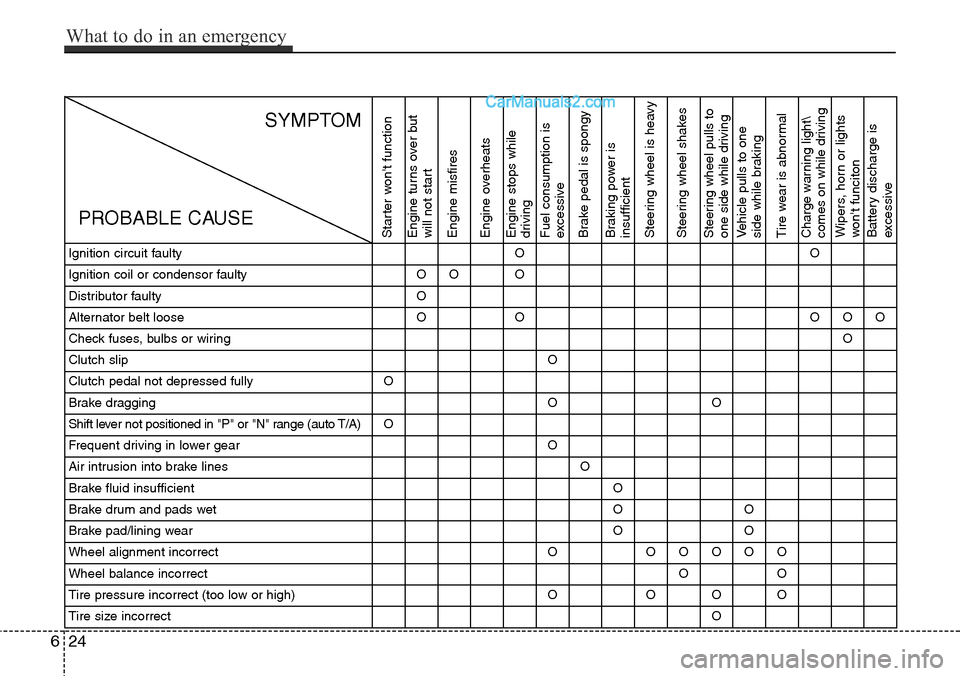
Ignition circuit faultyOO
Ignition coil or condensor faultyOOO
Distributor faultyO
Alternator belt looseOOOOO
Check fuses, bulbs or wiringO
Clutch slipO
Clutch pedal not depressed fullyO
Brake draggingOO
Shift lever not positioned in "P" or "N" range (auto T/A)O
Frequent driving in lower gearO
Air intrusion into brake linesO
Brake fluid insufficientO
Brake drum and pads wetOO
Brake pad/lining wearOO
Wheel alignment incorrectOOOOOO
Wheel balance incorrectOO
Tire pressure incorrect (too low or high)OOOO
Tire size incorrectO
Starter won't function
Engine turns over but
will not start
Engine misfires
Engine overheats
Engine stops while
driving
Fuel consumption is
excessive
Brake pedal is spongy
Braking power is
insufficient
Steering wheel is heavy
Steering wheel shakesSteering wheel pulls to
one side while drivingVehicle pulls to one
side while braking
Tire wear is abnormalCharge warning light\
comes on while drivingWipers, horn or lights
won't funciton
Battery discharge is
excessive
SYMPTOM
PROBABLE CAUSE
624
What to do in an emergency
Page 682 of 785
77
Maintenance
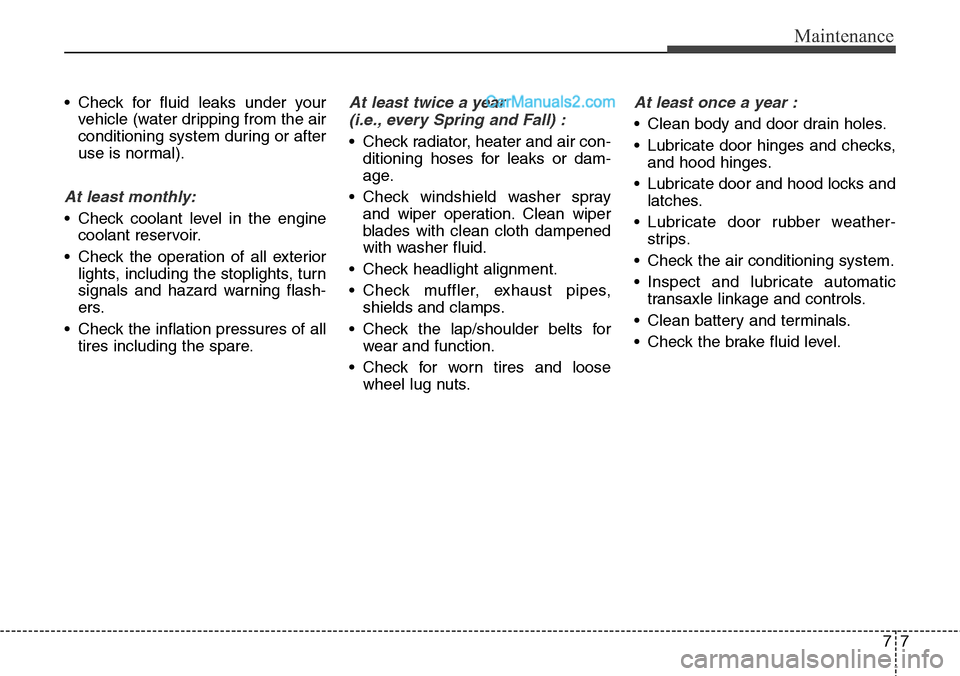
• Check for fluid leaks under your
vehicle (water dripping from the air
conditioning system during or after
use is normal).
At least monthly:
• Check coolant level in the engine
coolant reservoir.
• Check the operation of all exterior
lights, including the stoplights, turn
signals and hazard warning flash-
ers.
• Check the inflation pressures of all
tires including the spare.
At least twice a year
(i.e., every Spring and Fall) :
• Check radiator, heater and air con-
ditioning hoses for leaks or dam-
age.
• Check windshield washer spray
and wiper operation. Clean wiper
blades with clean cloth dampened
with washer fluid.
• Check headlight alignment.
• Check muffler, exhaust pipes,
shields and clamps.
• Check the lap/shoulder belts for
wear and function.
• Check for worn tires and loose
wheel lug nuts.
At least once a year :
• Clean body and door drain holes.
• Lubricate door hinges and checks,
and hood hinges.
• Lubricate door and hood locks and
latches.
• Lubricate door rubber weather-
strips.
• Check the air conditioning system.
• Inspect and lubricate automatic
transaxle linkage and controls.
• Clean battery and terminals.
• Check the brake fluid level.
Page 726 of 785
751
Maintenance
Battery recharging
Your vehicle has a maintenance-free,
calcium-based battery.
• If the battery becomes discharged
in a short time (because, for exam-
ple, the headlights or interior lights
were left on while the vehicle was
not in use), recharge it by slow
charging (trickle) for 10 hours.
• If the battery gradually discharges
because of high electric load while
the vehicle is being used, recharge
it at 20-30A for two hours.(Continued)
• When lifting a plastic-cased
battery, excessive pressure
on the case may cause battery
acid to leak, resulting in per-
sonal injury. Lift with a battery
carrier or with your hands on
opposite corners.
• Never attempt to recharge the
battery when the battery
cables are connected.
• The electrical ignition system
works with high voltage.
Never touch these compo-
nents with the engine running
or the ignition switched on.
Failure to follow the above
warnings can result in serious
bodily injury or death.CAUTION
• Always charge the battery
fully to prevent battery case
damage in low temperature
area.
• If you connect unauthorized
electronic devices to the bat-
tery, the battery may dis-
charge. Never use unautho-
rized devices.
Page 743 of 785
Maintenance
68 7
FUSES
A vehicle’s electrical system is pro-
tected from electrical overload dam-
age by fuses.This vehicle has 2 fuse panels, one
located in the driver’s side panel bol-
ster, the other in the engine compart-
ment near the battery.
If any of your vehicle’s lights, acces-
sories, or controls do not work, check
the appropriate circuit fuse. If a fuse
has blown, the element inside the
fuse will be melted.
If the electrical system does not
work, first check the driver’s side
fuse panel.
Always replace a blown fuse with
one of the same rating.
Before replacing an open fuse, dis-
connect the negative battery cable.
If the replacement fuse blows, this
indicates an electrical problem. Avoid
using the system involved and imme-
diately consult an authorized
HYUNDAI dealer.
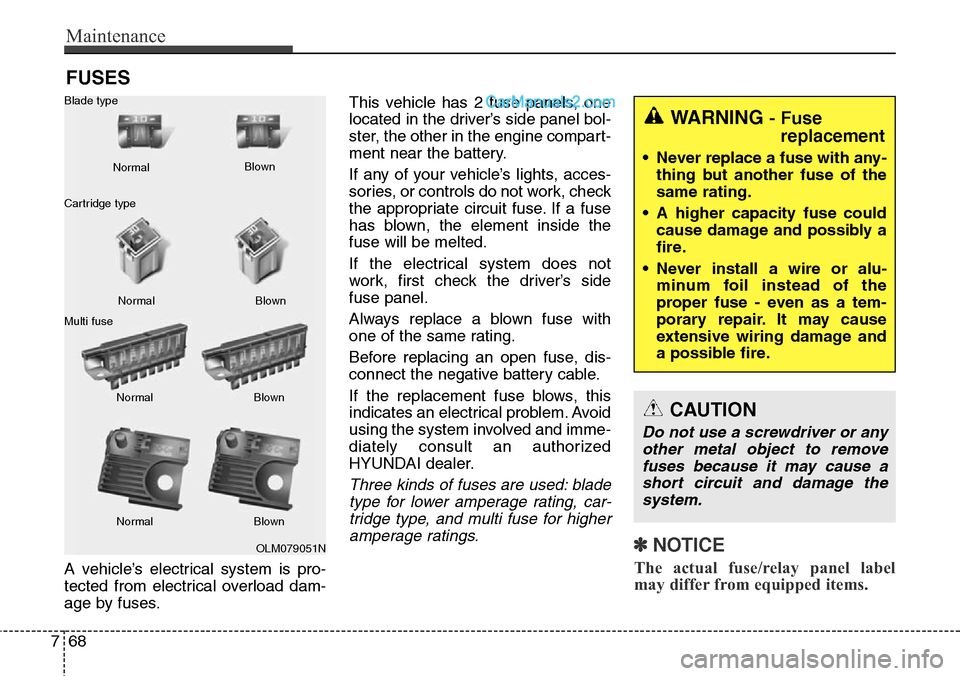
Three kinds of fuses are used: blade
type for lower amperage rating, car-
tridge type, and multi fuse for higher
amperage ratings.
✽NOTICE
The actual fuse/relay panel label
may differ from equipped items.
OLM079051N Normal Normal Blade type
Cartridge type
Multi fuseBlown
Blown
Normal Blown
Normal Blown
WARNING - Fuse
replacement
• Never replace a fuse with any-
thing but another fuse of the
same rating.
• A higher capacity fuse could
cause damage and possibly a
fire.
• Never install a wire or alu-
minum foil instead of the
proper fuse - even as a tem-
porary repair. It may cause
extensive wiring damage and
a possible fire.
CAUTION
Do not use a screwdriver or any
other metal object to remove
fuses because it may cause a
short circuit and damage the
system.
Page 755 of 785
Maintenance
80 7
LIGHT BULBS
Use only the bulbs of the specified
wattage.
✽NOTICE
After heavy, driving rain or wash-
ing, headlamp and taillamp lenses
could appear frosty. This condition
is caused by the temperature differ-
ence between the lamp inside and
outside. This is similar to the con-
densation on your windows inside
your vehicle during the rain and
doesn’t indicate a problem with
your vehicle. If the water leaks into
the lamp bulb circuitry, have the
vehicle checked by an authorized
HYUNDAI dealer.WARNING - Working on
the lights
Prior to working on the light,
firmly apply the parking brake,
ensure that the ignition switch
is turned to the “LOCK” position
and turn off the lights to avoid
sudden movement of the vehi-
cle and burning your fingers or
receiving an electric shock.
CAUTION
Be sure to replace the burned-
out bulb with one of the same
wattage rating. Otherwise, it
may cause damage to the fuse
or electric wiring system.
CAUTION
If you don’t have necessary
tools, the correct bulbs and the
expertise, consult an authorized
HYUNDAI dealer. In many cases,
it is difficult to replace vehicle
light bulbs because other parts
of the vehicle must be removed
before you can get to the bulb.
This is especially true if you
have to remove the headlight
assembly to get to the bulb(s).
Removing/installing the head-
light assembly can result in
damage to the vehicle.