Page 132 of 785
439
Features of your vehicle
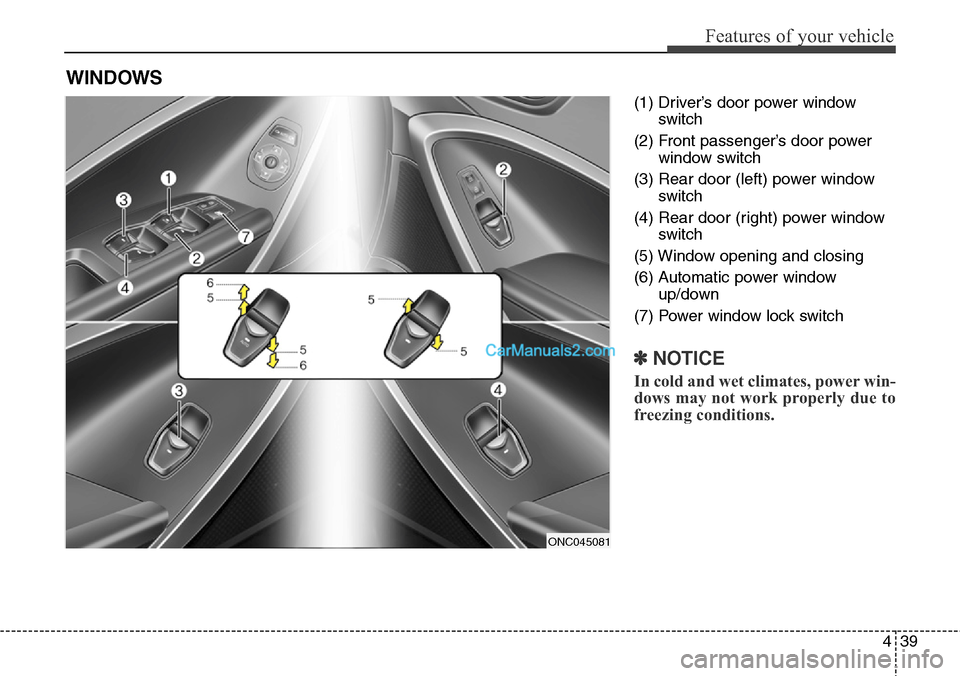
(1) Driver’s door power window
switch
(2) Front passenger’s door power
window switch
(3) Rear door (left) power window
switch
(4) Rear door (right) power window
switch
(5) Window opening and closing
(6) Automatic power window
up/down
(7) Power window lock switch
✽NOTICE
In cold and wet climates, power win-
dows may not work properly due to
freezing conditions.
WINDOWS
ONC045081
Page 133 of 785
Features of your vehicle
40 4
Power windows
The ignition switch must be in the ON
position for power windows to operate.
Each door has a power window
switch that controls that door's win-
dow. The driver has a power window
lock switch which can block the oper-
ation of passenger windows. The dri-
ver’s door has a master power win-
dow switch that controls all the win-
dows in the vehicle. The power win-
dows can be operated for approxi-
mately 30 seconds after the ignition
key is removed or turned to the ACC
or LOCK position. However, if the
front doors open, the power windows
cannot be operated within the 30
second period.
✽NOTICE
While driving with the rear windows
down or with the sunroof (if
equipped) in an open (or partially
open) position, your vehicle may
demonstrate a wind buffeting or
pulsation noise. This noise is a nor-
mal occurrence and can be reduced
or eliminated by taking the follow-
ing actions. If the noise occurs with
one or both of the rear windows
down, partially lower both front
windows approximately one inch. If
you experience the noise with the
sunroof open, slightly reduce the
size of the sunroof opening.
Window opening and closing
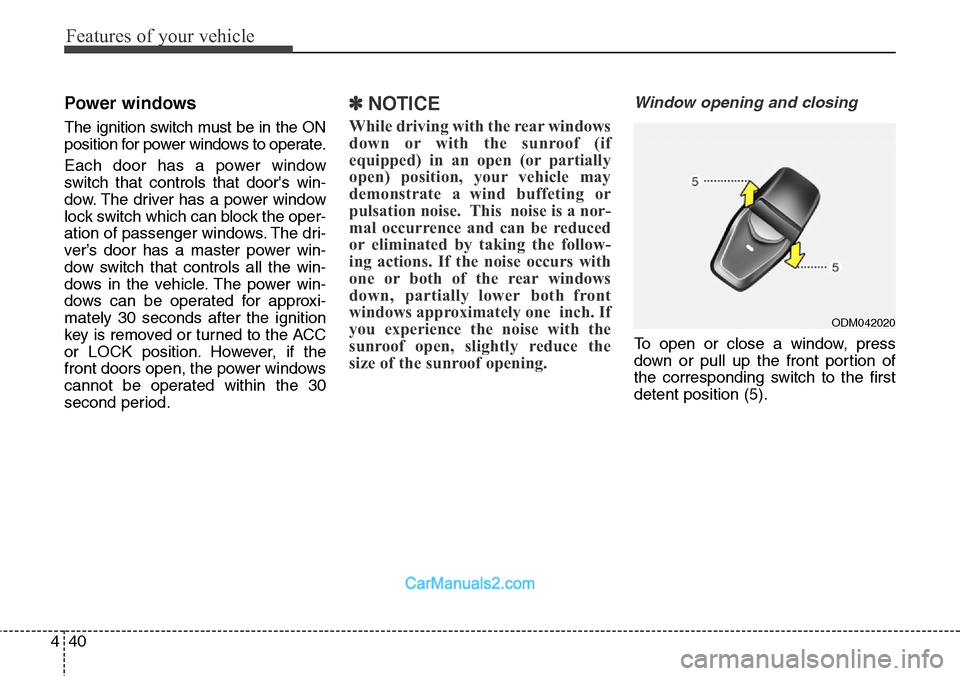
To open or close a window, press
down or pull up the front portion of
the corresponding switch to the first
detent position (5).
ODM042020
Page 135 of 785
Features of your vehicle
42 4
If the window detects the resistance
while the power window switch is
pulled up continuously, the window
will stop upward movement then
lower approximately 2.5 cm (1 in.). If
the power window switch is pulled up
continuously again within 5 seconds
after the window is lowered by the
automatic window reversal feature,
the automatic window reversal will
not operate.
✽NOTICE
The automatic reverse feature for
the driver’s window is only active
when the “auto up” feature is used
by fully pulling up the switch. The
automatic reverse feature will not
operate if the window is raised using
the halfway position on the power
window switch.
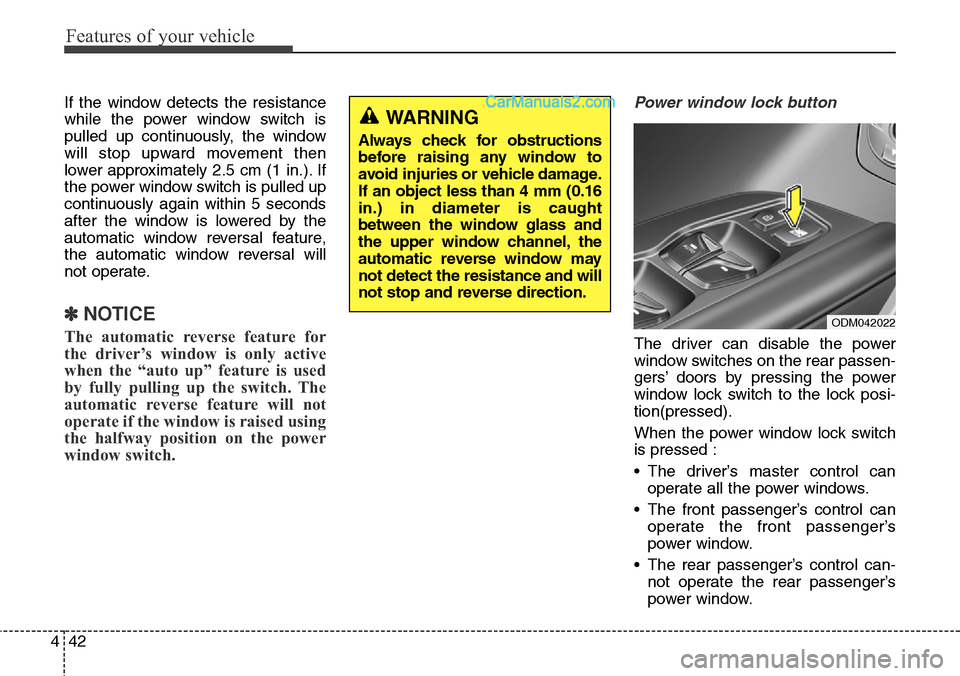
Power window lock button
The driver can disable the power
window switches on the rear passen-
gers’ doors by pressing the power
window lock switch to the lock posi-
tion(pressed).
When the power window lock switch
is pressed :
• The driver’s master control can
operate all the power windows.
• The front passenger’s control can
operate the front passenger’s
power window.
• The rear passenger’s control can-
not operate the rear passenger’s
power window.
WARNING
Always check for obstructions
before raising any window to
avoid injuries or vehicle damage.
If an object less than 4 mm (0.16
in.) in diameter is caught
between the window glass and
the upper window channel, the
automatic reverse window may
not detect the resistance and will
not stop and reverse direction.
ODM042022
Page 136 of 785
443
Features of your vehicle
CAUTION
• To prevent possible damage
to the power window system,
do not open or close two win-
dows or more at the same
time. This will also ensure the
longevity of the fuse.
• Never try to operate the main
switch on the driver's door
and the individual door win-
dow switch in opposing direc-
tions at the same time. If this is
done, the window will stop and
cannot be opened or closed.
WARNING - Windows
• NEVER leave the keys in your
vehicle with unsupervised
children, when the engine is
running.
• NEVER leave any child unat-
tended in the vehicle. Even
very young children may inad-
vertently cause the vehicle to
move, entangle themselves in
the windows, or otherwise
injure themselves or others.
• Always double check to make
sure all arms, hands, head
and other obstructions are
safely out of the way before
closing a window.
• Do not allow children to play
with the power windows. Keep
the driver’s door power win-
dow lock switch in the LOCK
position (depressed). Serious
injury can result from uninten-
tional window operation by
the child.
• Do not extend any head or
arms outside through the win-
dow opening while driving.
Page 139 of 785
Features of your vehicle
46 4
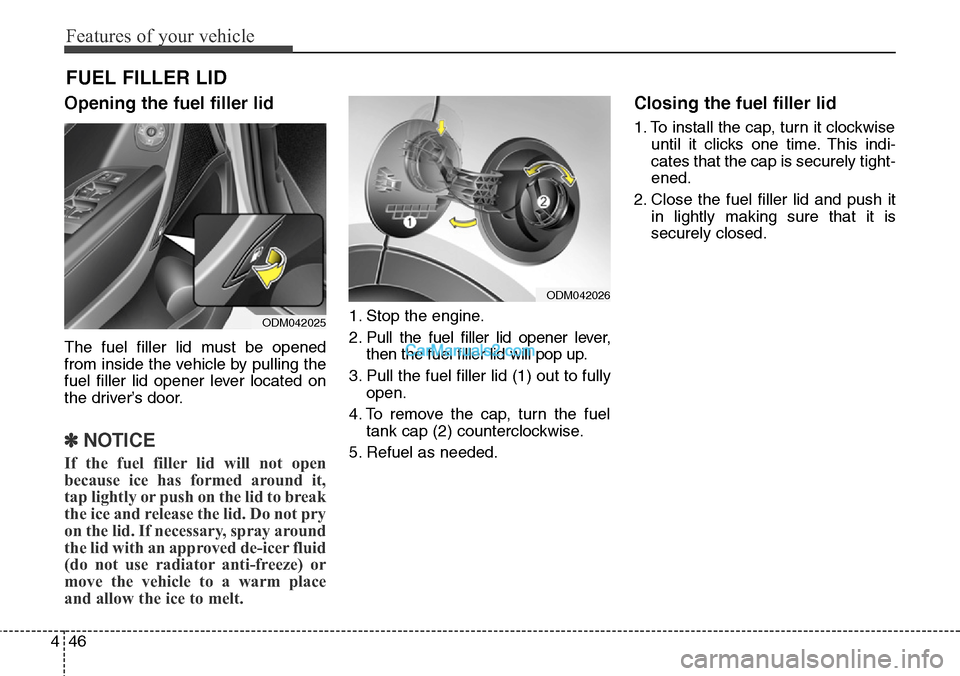
Opening the fuel filler lid
The fuel filler lid must be opened
from inside the vehicle by pulling the
fuel filler lid opener lever located on
the driver’s door.
✽NOTICE
If the fuel filler lid will not open
because ice has formed around it,
tap lightly or push on the lid to break
the ice and release the lid. Do not pry
on the lid. If necessary, spray around
the lid with an approved de-icer fluid
(do not use radiator anti-freeze) or
move the vehicle to a warm place
and allow the ice to melt.
1. Stop the engine.
2. Pull the fuel filler lid opener lever,
then the fuel filler lid will pop up.
3. Pull the fuel filler lid (1) out to fully
open.
4. To remove the cap, turn the fuel
tank cap (2) counterclockwise.
5. Refuel as needed.
Closing the fuel filler lid
1. To install the cap, turn it clockwise
until it clicks one time. This indi-
cates that the cap is securely tight-
ened.
2. Close the fuel filler lid and push it
in lightly making sure that it is
securely closed.
FUEL FILLER LID
ODM042025
ODM042026
Page 143 of 785
Features of your vehicle
50 4
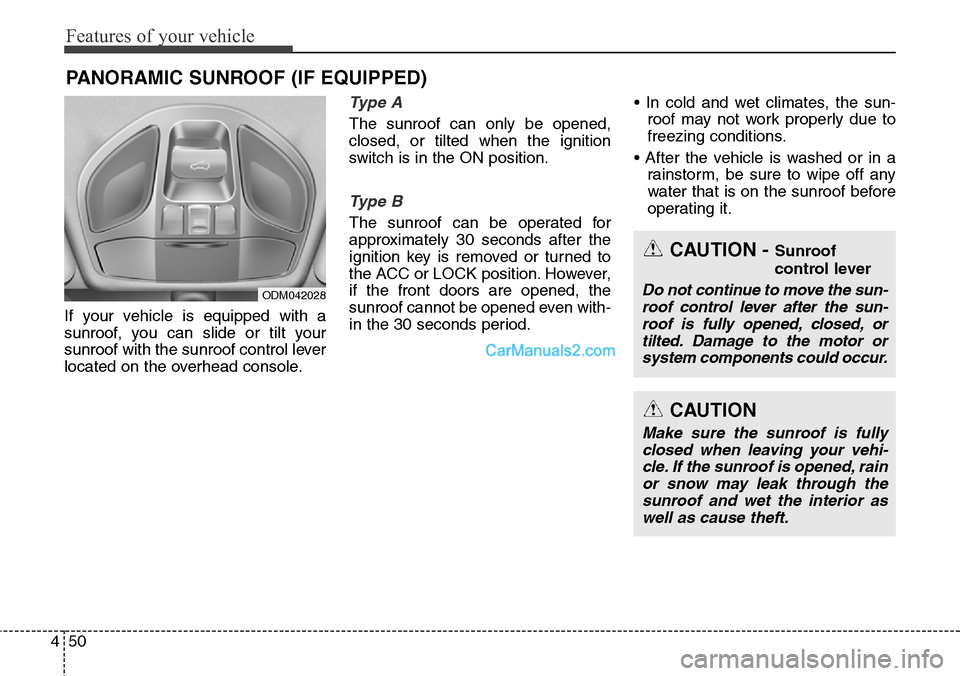
If your vehicle is equipped with a
sunroof, you can slide or tilt your
sunroof with the sunroof control lever
located on the overhead console.
Type A
The sunroof can only be opened,
closed, or tilted when the ignition
switch is in the ON position.
Type B
The sunroof can be operated for
approximately 30 seconds after the
ignition key is removed or turned to
the ACC or LOCK position. However,
if the front doors are opened, the
sunroof cannot be opened even with-
in the 30 seconds period.• In cold and wet climates, the sun-
roof may not work properly due to
freezing conditions.
• After the vehicle is washed or in a
rainstorm, be sure to wipe off any
water that is on the sunroof before
operating it.
PANORAMIC SUNROOF (IF EQUIPPED)
ODM042028
CAUTION - Sunroof
control lever
Do not continue to move the sun-
roof control lever after the sun-
roof is fully opened, closed, or
tilted. Damage to the motor or
system components could occur.
CAUTION
Make sure the sunroof is fully
closed when leaving your vehi-
cle. If the sunroof is opened, rain
or snow may leak through the
sunroof and wet the interior as
well as cause theft.
Page 162 of 785
469
Features of your vehicle
1. Press and hold the button for
more than 6 seconds. When the
compass memory is cleared a "C"
will appear in the display.
2. To calibrate the compass, drive
the vehicle in 2 complete circles at
less than 8 km/h (5 mph).
Integrated HomeLink
®Wireless Control
System
The HomeLink
®Wireless Control
System provides a convenient way to
replace up to three hand-held radio-
frequency (RF) transmitters with a
single built-in device. This innovative
feature will learn the radio frequency
codes of most current transmitters to
operate devices such as gate opera-
tors, garage door openers, entry
door locks, security systems, even
home lighting. Both standard and
rolling code-equipped transmitters
can be programmed by following the
outlined procedures. Additional
HomeLink
®information can be found
at: www.homelink.com or by calling
1-800-355-3515.Retain the original transmitter of the
RF device you are programming for
use in other vehicles as well as for
future HomeLink
®programming. It is
also suggested that upon the sale of
the vehicle, the programmed
HomeLink
®buttons be erased for
security purposes.
CAUTION
Before programming HomeLink®
to a garage door opener or gate
operator, make sure that people
and objects are out of the way of
the device to prevent potential
harm or damage. Do not use
HomeLink
®with any garage door
opener that lacks the safety stop
and reverse features required by
U.S. federal safety standards
(this includes any garage door
opener model manufactured
before April 1, 1982). A garage
door that cannot detect an object
- signaling the door to stop and
reverse - does not meet current
U.S. federal safety standards.
Using a garage door opener with-
out these features increases the
risk of serious injury or death.
Page 165 of 785
Features of your vehicle
72 4
Gate operator & Canadian pro-
gramming
During programming, your handheld
transmitter may automatically stop
transmitting. Continue to press the
Integrated HomeLink
®Wireless
Control System button (note steps 2
through 4 in the Standard
Programming portion of this docu-
ment) while you press and re-press
("cycle") your handheld transmitter
every two seconds until the frequen-
cy signal has been learned. The indi-
cator light will flash slowly and then
rapidly after several seconds upon
successful training.
Operating HomeLink
®
To operate, simply press and release
the programmed HomeLink®button.
Activation will now occur for the
trained device (i.e. garage door
opener, gate operator, security sys-
tem, entry door lock, home/office
lighting, etc.). For convenience, the
hand-held transmitter of the device
may also be used at any time.Reprogramming a single
HomeLink
®button
To program a new device to a previ-
ously trained HomeLink
®button, fol-
low these steps:
1. Press and hold the desired
HomeLink
®button. Do NOT release
until step 4 has been completed.
2. When the indicator light begins to
flash slowly (after 20 seconds),
position the handheld transmitter 1
to 3 inches away from the
HomeLink
®surface.
3. Press and hold the handheld
transmitter button. The HomeLink
®
indicator light will flash, first slowly
and then rapidly.
4. When the indicator light begins to
flash rapidly, release both buttons.
5. Press and hold the just-trained
HomeLink
®button and observe
the red Status Indicator LED. If the
indicator light stays on constantly,
programming is complete and
your new device should activate.Erasing HomeLink
®buttons
Individual buttons cannot be erased.
However, to erase all three pro-
grammed buttons:
1. Press and hold the two outer
HomeLink
®buttons until the indi-
cator light begins to flash-after 20
seconds.
2. Release both buttons. Do not hold
for longer than 30 seconds.
The Integrated HomeLink
®Wireless
Control System is now in the training
(learn) mode and can be pro-
grammed at any time following the
appropriate steps in the Programming
sections above.
FCC ID: NZLZTVHL3
IC: 4112A-ZTVHL3