Page 201 of 498
4121
Features of your vehicle
INTERIOR FEATURES
LCD monitor (Clock and out-
side temperature) (if equipped)
Clock
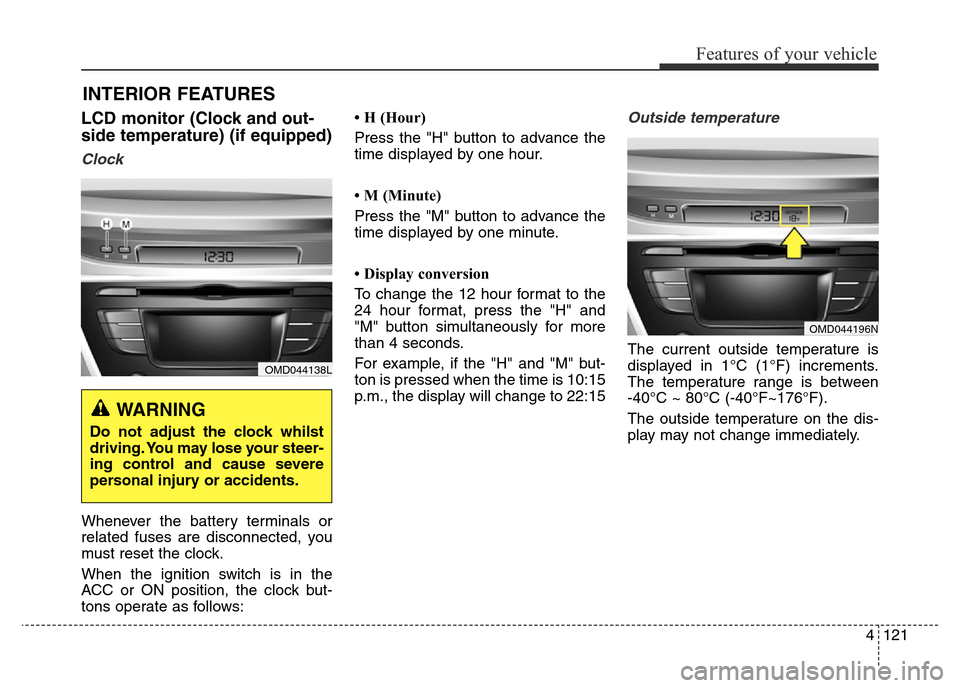
Whenever the battery terminals or
related fuses are disconnected, you
must reset the clock.
When the ignition switch is in the
ACC or ON position, the clock but-
tons operate as follows:• H (Hour)
Press the "H" button to advance the
time displayed by one hour.
• M (Minute)
Press the "M" button to advance the
time displayed by one minute.
• Display conversion
To change the 12 hour format to the
24 hour format, press the "H" and
"M" button simultaneously for more
than 4 seconds.
For example, if the "H" and "M" but-
ton is pressed when the time is 10:15
p.m., the display will change to 22:15
Outside temperature
The current outside temperature is
displayed in 1°C (1°F) increments.
The temperature range is between
-40°C ~ 80°C (-40°F~176°F).
The outside temperature on the dis-
play may not change immediately.
OMD044138L
WARNING
Do not adjust the clock whilst
driving. You may lose your steer-
ing control and cause severe
personal injury or accidents.
OMD044196N
Page 205 of 498
4125
Features of your vehicle
Power outlet (if equipped)
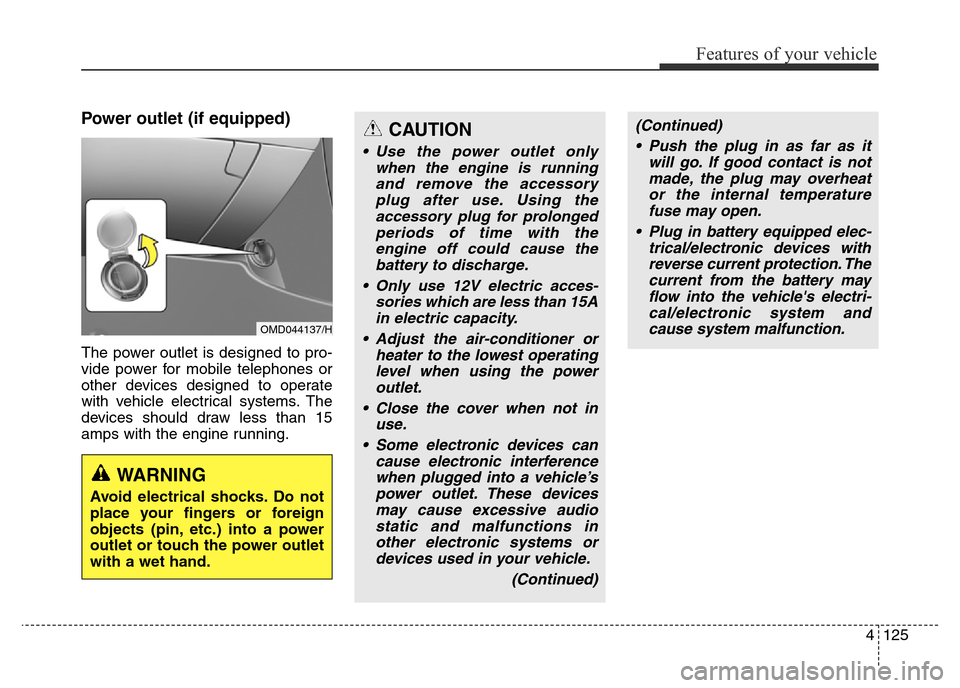
The power outlet is designed to pro-
vide power for mobile telephones or
other devices designed to operate
with vehicle electrical systems. The
devices should draw less than 15
amps with the engine running.
OMD044137/H
CAUTION
• Use the power outlet only
when the engine is running
and remove the accessory
plug after use. Using the
accessory plug for prolonged
periods of time with the
engine off could cause the
battery to discharge.
• Only use 12V electric acces-
sories which are less than 15A
in electric capacity.
• Adjust the air-conditioner or
heater to the lowest operating
level when using the power
outlet.
• Close the cover when not in
use.
• Some electronic devices can
cause electronic interference
when plugged into a vehicle’s
power outlet. These devices
may cause excessive audio
static and malfunctions in
other electronic systems or
devices used in your vehicle.
(Continued)
WARNING
Avoid electrical shocks. Do not
place your fingers or foreign
objects (pin, etc.) into a power
outlet or touch the power outlet
with a wet hand.
(Continued)
• Push the plug in as far as it
will go. If good contact is not
made, the plug may overheat
or the internal temperature
fuse may open.
• Plug in battery equipped elec-
trical/electronic devices with
reverse current protection. The
current from the battery may
flow into the vehicle's electri-
cal/electronic system and
cause system malfunction.
Page 320 of 498
Driving your vehicle
16 5
✽NOTICE
If the smart key battery is weak or
the smart key does not work cor-
rectly, you can start the engine by
pressing the Engine Start/Stop but-
ton with the smart key in the direc-
tion of the picture above.
OMD051013R
CAUTION
To prevent damage to the vehi-
cle:
Do not press the Engine
Start/Stop button for more than
10 seconds except when the
stop lamp fuse is blown.
When the stop lamp fuse is
blown, you can't start the engine
normally. Replace the fuse with
a new one. If you are not able to
replace the fuse, you can start
the engine by pressing and
holding the Engine Start/Stop
button for 10 seconds with the
Engine Start/Stop button in the
ACC position.
For your safety always press the
brake and/or clutch pedal before
starting the engine.
Page 396 of 498
Maintenance
Engine compartment . . . . . . . . . . . . . . . . . . . . . . . . 7-3
Maintenance services . . . . . . . . . . . . . . . . . . . . . . . . 7-4
• Owner’s responsibility . . . . . . . . . . . . . . . . . . . . . . . . . 7-4
• Owner maintenance precautions . . . . . . . . . . . . . . . . 7-4
Owner maintenance . . . . . . . . . . . . . . . . . . . . . . . . 7-7
• Owner maintenance schedule . . . . . . . . . . . . . . . . . . . 7-7
Scheduled maintenance service . . . . . . . . . . . . . . 7-9
Explanation of scheduled maintenance items . . . 7-19
Engine oil. . . . . . . . . . . . . . . . . . . . . . . . . . . . . . . . . 7-23
• Checking the engine oil level . . . . . . . . . . . . . . . . . . 7-23
• Changing the engine oil and filter . . . . . . . . . . . . . . . 7-24
Engine coolant . . . . . . . . . . . . . . . . . . . . . . . . . . . . 7-26
• Checking the coolant level . . . . . . . . . . . . . . . . . . . . . 7-26
• Changing the coolant . . . . . . . . . . . . . . . . . . . . . . . . . 7-28
Brake/clutch fluid . . . . . . . . . . . . . . . . . . . . . . . . . . 7-29
• Checking the brake/clutch fluid level . . . . . . . . . . . 7-29
Washer fluid . . . . . . . . . . . . . . . . . . . . . . . . . . . . . . 7-30
• Checking the washer fluid level . . . . . . . . . . . . . . . . 7-30
Parking brake . . . . . . . . . . . . . . . . . . . . . . . . . . . . . 7-30
• Checking the parking brake . . . . . . . . . . . . . . . . . . 7-30
Air cleaner. . . . . . . . . . . . . . . . . . . . . . . . . . . . . . . . 7-31
• Filter replacement . . . . . . . . . . . . . . . . . . . . . . . . . . . 7-31
Climate control air filter . . . . . . . . . . . . . . . . . . . . 7-32
• Filter inspection . . . . . . . . . . . . . . . . . . . . . . . . . . . . . . 7-32• Filter replacement . . . . . . . . . . . . . . . . . . . . . . . . . . . . 7-32
Wiper blades . . . . . . . . . . . . . . . . . . . . . . . . . . . . . . 7-34
• Blade inspection . . . . . . . . . . . . . . . . . . . . . . . . . . . . . . 7-34
• Blade replacement . . . . . . . . . . . . . . . . . . . . . . . . . . . . 7-34
Battery . . . . . . . . . . . . . . . . . . . . . . . . . . . . . . . . . . . 7-37
• For best battery service . . . . . . . . . . . . . . . . . . . . . . . 7-37
• Battery capacity label . . . . . . . . . . . . . . . . . . . . . . . . . 7-38
• Battery recharging . . . . . . . . . . . . . . . . . . . . . . . . . . . 7-39
• Reset items . . . . . . . . . . . . . . . . . . . . . . . . . . . . . . . . . . 7-40
Tyres and wheels . . . . . . . . . . . . . . . . . . . . . . . . . . 7-41
• Tyre care. . . . . . . . . . . . . . . . . . . . . . . . . . . . . . . . . . . . 7-41
• Recommended cold tyre inflation pressures . . . . . . . 7-41
• Checking tyre inflation pressure . . . . . . . . . . . . . . . . 7-43
• Tyre rotation . . . . . . . . . . . . . . . . . . . . . . . . . . . . . . . . 7-44
• Wheel alignment and tyre balance . . . . . . . . . . . . . . 7-45
• Tyre replacement . . . . . . . . . . . . . . . . . . . . . . . . . . . . . 7-45
• Wheel replacement . . . . . . . . . . . . . . . . . . . . . . . . . . . 7-47
• Tyre traction . . . . . . . . . . . . . . . . . . . . . . . . . . . . . . . . 7-47
• Tyre maintenance . . . . . . . . . . . . . . . . . . . . . . . . . . . . 7-47
• Tyre sidewall labeling . . . . . . . . . . . . . . . . . . . . . . . . . 7-47
• Low aspect ratio tyre . . . . . . . . . . . . . . . . . . . . . . . . . 7-52
Fuses . . . . . . . . . . . . . . . . . . . . . . . . . . . . . . . . . . . . 7-53
• Instrument panel fuse replacement . . . . . . . . . . . . . . 7-54
• Engine compartment panel fuse replacement . . . . . 7-55
7
Page 398 of 498
73
Maintenance
ENGINE COMPARTMENT
OMD071047R
❈The actual engine compartment in the vehicle may differ from the illustration.1. Engine oil filler cap
2. Engine oil dipstick
3. Brake/clutch* fluid reservoir
4. Positive battery terminal
5. Negative battery terminal
6. Fuse box
7. Air cleaner
8. Radiator cap
9. Engine coolant reservoir
10. Windscreen washer fluid reservoir
* : if equipped
■■Petrol Engine (1.8L)
Page 448 of 498
753
Maintenance
FUSES
A vehicle’s electrical system is pro-
tected from electrical overload dam-
age by fuses.
This vehicle has 2 fuse panels, one
located in the driver’s side panel bol-
ster, the other in the engine compart-
ment near the battery.
If any of your vehicle’s lights, acces-
sories, or controls do not work, check
the appropriate circuit fuse. If a fuse
has blown, the element inside the
fuse will have melted.
If the electrical system does not
work, first check the driver’s side
fuse panel.
Before replacing a blown fuse, dis-
connect the negative battery cable.
Always replace a blown fuse with
one of the same rating.
If the replacement fuse blows, this
indicates an electrical problem. Avoid
using the system involved and imme-
diately consult an authorised
HYUNDAI dealer.
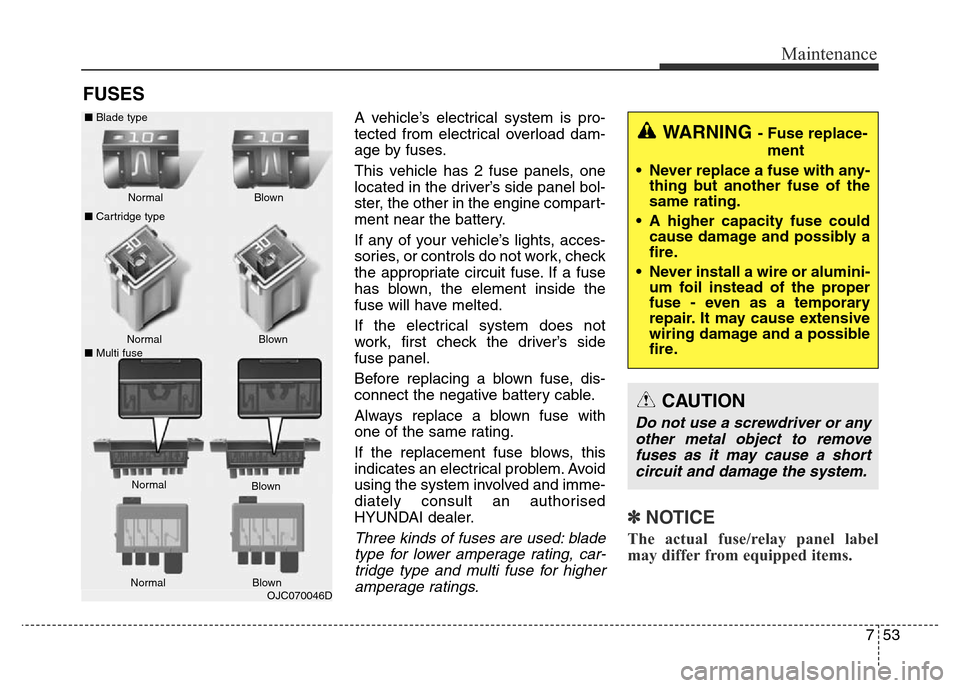
Three kinds of fuses are used: blade
type for lower amperage rating, car-
tridge type and multi fuse for higher
amperage ratings.
✽NOTICE
The actual fuse/relay panel label
may differ from equipped items.
WARNING - Fuse replace-
ment
• Never replace a fuse with any-
thing but another fuse of the
same rating.
• A higher capacity fuse could
cause damage and possibly a
fire.
• Never install a wire or alumini-
um foil instead of the proper
fuse - even as a temporary
repair. It may cause extensive
wiring damage and a possible
fire.
CAUTION
Do not use a screwdriver or any
other metal object to remove
fuses as it may cause a short
circuit and damage the system.
OJC070046D NormalNormal
■Cartridge type
■Multi fuseBlown
Blown
Normal
Blown ■Blade type
NormalBlown
Page 449 of 498
Maintenance
54 7
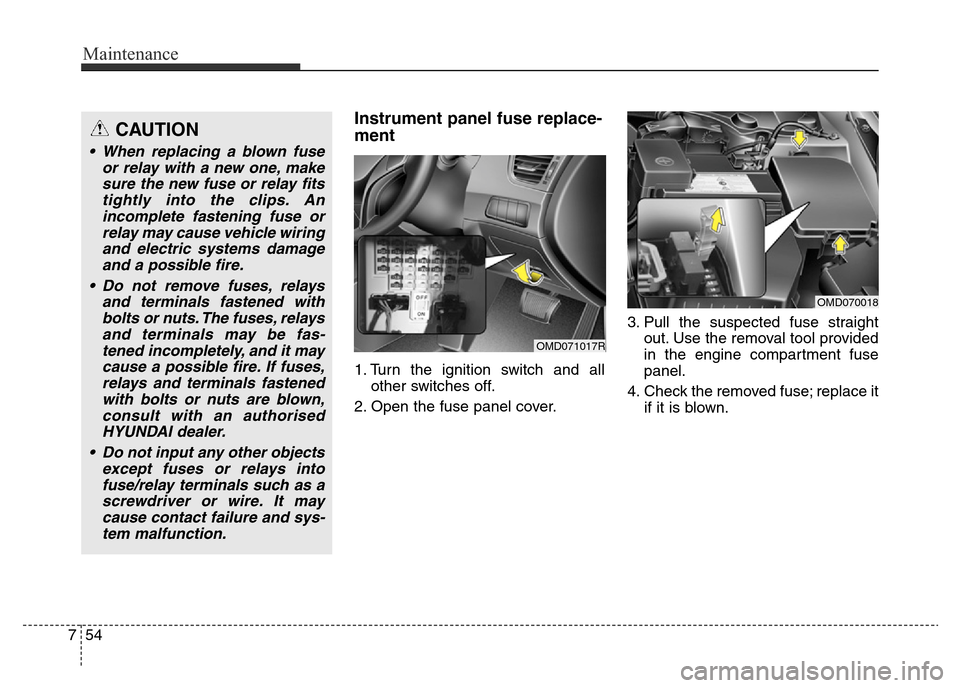
Instrument panel fuse replace-
ment
1. Turn the ignition switch and all
other switches off.
2. Open the fuse panel cover.3. Pull the suspected fuse straight
out. Use the removal tool provided
in the engine compartment fuse
panel.
4. Check the removed fuse; replace it
if it is blown.
OMD071017R
OMD070018
CAUTION
• When replacing a blown fuse
or relay with a new one, make
sure the new fuse or relay fits
tightly into the clips. An
incomplete fastening fuse or
relay may cause vehicle wiring
and electric systems damage
and a possible fire.
• Do not remove fuses, relays
and terminals fastened with
bolts or nuts. The fuses, relays
and terminals may be fas-
tened incompletely, and it may
cause a possible fire. If fuses,
relays and terminals fastened
with bolts or nuts are blown,
consult with an authorised
HYUNDAI dealer.
• Do not input any other objects
except fuses or relays into
fuse/relay terminals such as a
screwdriver or wire. It may
cause contact failure and sys-
tem malfunction.
Page 450 of 498
755
Maintenance
5. Push in a new fuse of the same
rating, and make sure it fits tightly
in the clips.
If it fits loosely, we recommend that
you consult an authorised HYUNDAI
dealer.
If you do not have a spare, use a
fuse of the same rating from a circuit
you may not need for operating the
vehicle, such as the cigarette lighter
fuse.
If the electrical components do not
work and the fuses are OK, check
the fuse panel in the engine com-
partment. If a fuse is blown, it must
be replaced.
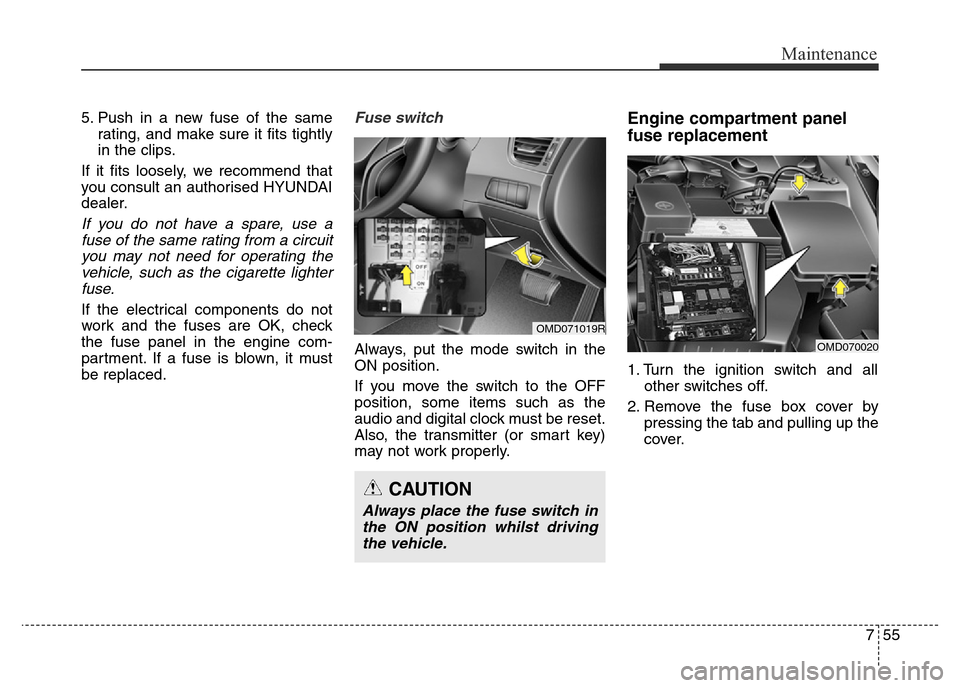
Fuse switch
Always, put the mode switch in the
ON position.
If you move the switch to the OFF
position, some items such as the
audio and digital clock must be reset.
Also, the transmitter (or smart key)
may not work properly.
Engine compartment panel
fuse replacement
1. Turn the ignition switch and all
other switches off.
2. Remove the fuse box cover by
pressing the tab and pulling up the
cover.
CAUTION
Always place the fuse switch in
the ON position whilst driving
the vehicle.
OMD070020
OMD071019R