Page 121 of 473
Features of your vehicle
44 4
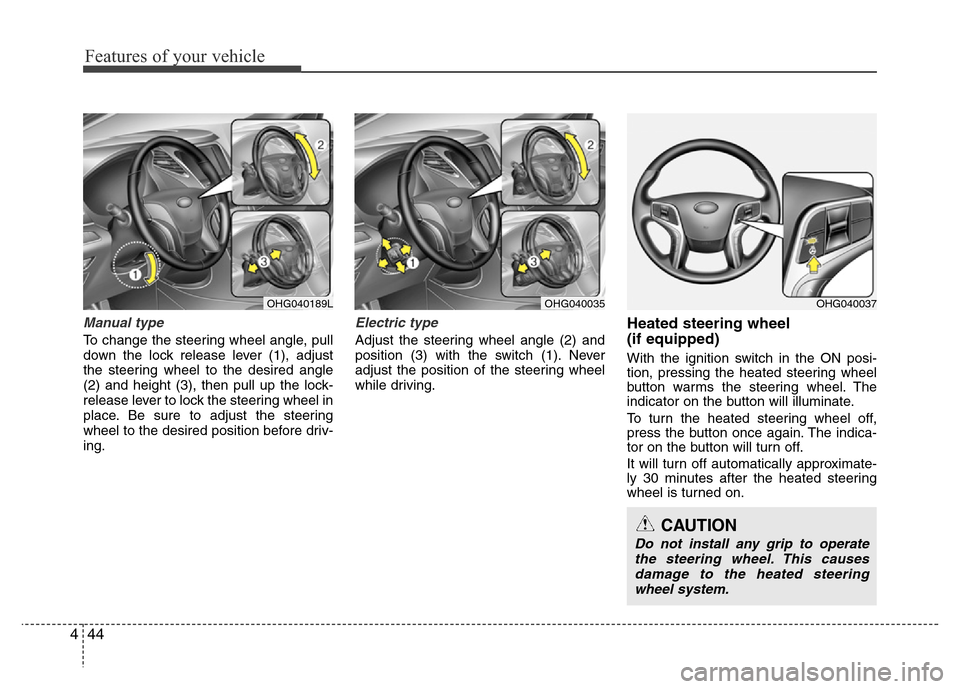
Manual type
To change the steering wheel angle, pull
down the lock release lever (1), adjust
the steering wheel to the desired angle
(2) and height (3), then pull up the lock-
release lever to lock the steering wheel in
place. Be sure to adjust the steering
wheel to the desired position before driv-
ing.
Electric type
Adjust the steering wheel angle (2) and
position (3) with the switch (1). Never
adjust the position of the steering wheel
while driving.
Heated steering wheel
(if equipped)
With the ignition switch in the ON posi-
tion, pressing the heated steering wheel
button warms the steering wheel. The
indicator on the button will illuminate.
To turn the heated steering wheel off,
press the button once again. The indica-
tor on the button will turn off.
It will turn off automatically approximate-
ly 30 minutes after the heated steering
wheel is turned on.
OHG040189LOHG040035OHG040037
CAUTION
Do not install any grip to operate
the steering wheel. This causes
damage to the heated steering
wheel system.
Page 122 of 473
445
Features of your vehicle
Horn
To sound the horn, press the horn sym-
bol on your steering wheel. Check the
horn regularly to be sure it operates
properly.
✽NOTICE
To sound the horn, press the area indi-
cated by the horn symbol on your steer-
ing wheel (see illustration). The horn
will operate only when this area is
pressed.
OHG040038
CAUTION
Do not strike the horn severely to
operate it, or hit it with your fist. Do
not press on the horn with a sharp-
pointed object.
Page 139 of 473
Features of your vehicle
62 4
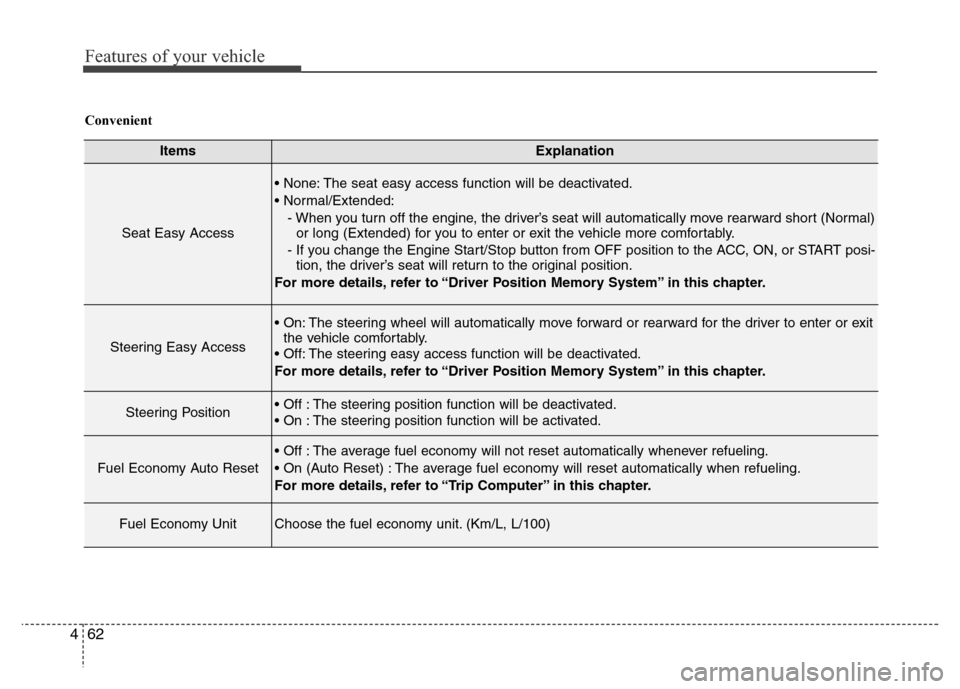
ItemsExplanation
Seat Easy Access
• None: The seat easy access function will be deactivated.
• Normal/Extended:
- When you turn off the engine, the driver’s seat will automatically move rearward short (Normal)
or long (Extended) for you to enter or exit the vehicle more comfortably.
- If you change the Engine Start/Stop button from OFF position to the ACC, ON, or START posi-
tion, the driver’s seat will return to the original position.
For more details, refer to “Driver Position Memory System” in this chapter.
Steering Easy Access
• On: The steering wheel will automatically move forward or rearward for the driver to enter or exit
the vehicle comfortably.
• Off: The steering easy access function will be deactivated.
For more details, refer to “Driver Position Memory System” in this chapter.
Steering Position• Off : The steering position function will be deactivated.
• On : The steering position function will be activated.
Fuel Economy Auto Reset
• Off : The average fuel economy will not reset automatically whenever refueling.
• On (Auto Reset) : The average fuel economy will reset automatically when refueling.
For more details, refer to “Trip Computer” in this chapter.
Fuel Economy UnitChoose the fuel economy unit. (Km/L, L/100)
Convenient
Page 141 of 473
Features of your vehicle
64 4
Overview
Description
The trip computer is a microcomputer-
controlled driver information system that
displays information related to driving.
✽NOTICE
Some driving information stored in the
trip computer (for example Average
Vehicle Speed) resets if the battery is
disconnected.
Trip modes
To change the trip mode, press the
MOVE switch “▼” on the steering wheel.
Trip A/B
(km or mile, km/h or MPH)
Tripmeter (1)
• The tripmeter is the total driving dis-
tance since the last tripmeter reset.
- Distance range: 0.0 ~ 9999.9 km or
mi.
• To reset the tripmeter, press the [OK]
button on the steering wheel for more
than 1 second when the tripmeter is
displayed.
TRIP COMPUTER
• Tripmeter [A]
• Average Vehicle Speed [A]
• Elapsed Time [A]
TRIP A
• Tripmeter [B]
• Average Vehicle Speed [B]
• Elapsed Time [B]
TRIP B • Distance To Empty
• Average Fuel Economy
• Instant Fuel Economy
FUEL ECONOMY
Digital Speedometer
OHG045328L
■Type A■Type B
Page 142 of 473
465
Features of your vehicle
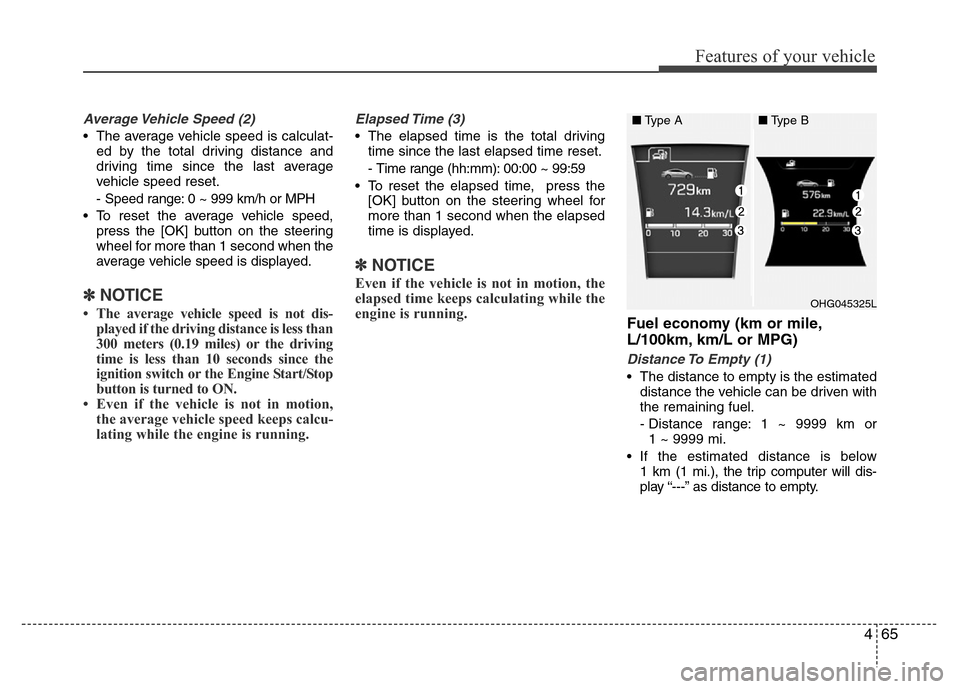
Average Vehicle Speed (2)
• The average vehicle speed is calculat-
ed by the total driving distance and
driving time since the last average
vehicle speed reset.
- Speed range: 0 ~ 999 km/h or MPH
• To reset the average vehicle speed,
press the [OK] button on the steering
wheel for more than 1 second when the
average vehicle speed is displayed.
✽NOTICE
• The average vehicle speed is not dis-
played if the driving distance is less than
300 meters (0.19 miles) or the driving
time is less than 10 seconds since the
ignition switch or the Engine Start/Stop
button is turned to ON.
• Even if the vehicle is not in motion,
the average vehicle speed keeps calcu-
lating while the engine is running.
Elapsed Time (3)
• The elapsed time is the total driving
time since the last elapsed time reset.
- Time range (hh:mm): 00:00 ~ 99:59
• To reset the elapsed time, press the
[OK] button on the steering wheel for
more than 1 second when the elapsed
time is displayed.
✽NOTICE
Even if the vehicle is not in motion, the
elapsed time keeps calculating while the
engine is running.
Fuel economy (km or mile,
L/100km, km/L or MPG)
Distance To Empty (1)
• The distance to empty is the estimated
distance the vehicle can be driven with
the remaining fuel.
- Distance range: 1 ~ 9999 km or
1 ~ 9999 mi.
• If the estimated distance is below
1 km (1 mi.), the trip computer will dis-
play “---” as distance to empty.
OHG045325L
■Type A■Type B
Page 143 of 473
Features of your vehicle
66 4
✽NOTICE
• If the vehicle is not on level ground or
the battery power has been interrupt-
ed, the distance to empty function
may not operate correctly.
• The distance to empty may differ
from the actual driving distance as it
is an estimate of the available driving
distance.
• The trip computer may not register
additional fuel if less than 6 liters (1.6
gallons) of fuel are added to the vehi-
cle.
• The fuel economy and distance to
empty may vary significantly based
on driving conditions, driving habits,
and condition of the vehicle.
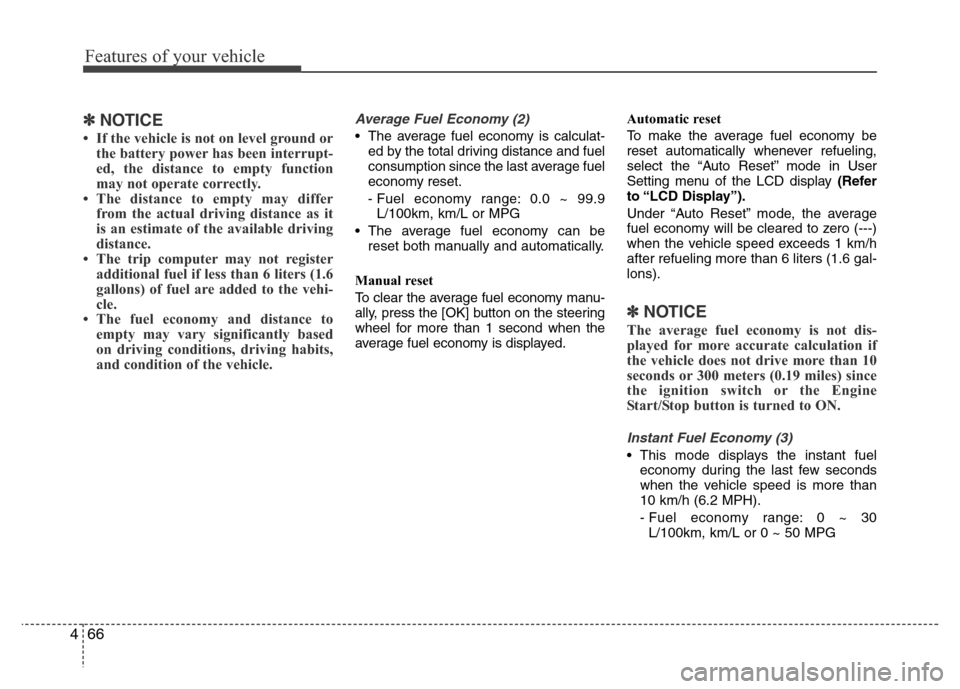
Average Fuel Economy (2)
• The average fuel economy is calculat-
ed by the total driving distance and fuel
consumption since the last average fuel
economy reset.
- Fuel economy range: 0.0 ~ 99.9
L/100km, km/L or MPG
• The average fuel economy can be
reset both manually and automatically.
Manual reset
To clear the average fuel economy manu-
ally, press the [OK] button on the steering
wheel for more than 1 second when the
average fuel economy is displayed.Automatic reset
To make the average fuel economy be
reset automatically whenever refueling,
select the “Auto Reset” mode in User
Setting menu of the LCD display (Refer
to “LCD Display”).
Under “Auto Reset” mode, the average
fuel economy will be cleared to zero (---)
when the vehicle speed exceeds 1 km/h
after refueling more than 6 liters (1.6 gal-
lons).
✽NOTICE
The average fuel economy is not dis-
played for more accurate calculation if
the vehicle does not drive more than 10
seconds or 300 meters (0.19 miles) since
the ignition switch or the Engine
Start/Stop button is turned to ON.
Instant Fuel Economy (3)
• This mode displays the instant fuel
economy during the last few seconds
when the vehicle speed is more than
10 km/h (6.2 MPH).
- Fuel economy range: 0 ~ 30
L/100km, km/L or 0 ~ 50 MPG
Page 148 of 473
471
Features of your vehicle
Your vehicle is equipped with dual-diago-
nal braking systems. This means you still
have braking on two wheels even if one
of the dual systems should fail. With only
one of the dual systems working, more
than normal pedal travel and greater
pedal pressure are required to stop the
car. Also, the car will not stop in as short
a distance with only a portion of the
brake system working. If the brakes fail
while you are driving, shift to a lower gear
for additional engine braking and stop the
car as soon as it is safe to do so.
To check bulb operation, check whether
the parking brake and brake fluid warning
light illuminates when the ignition switch
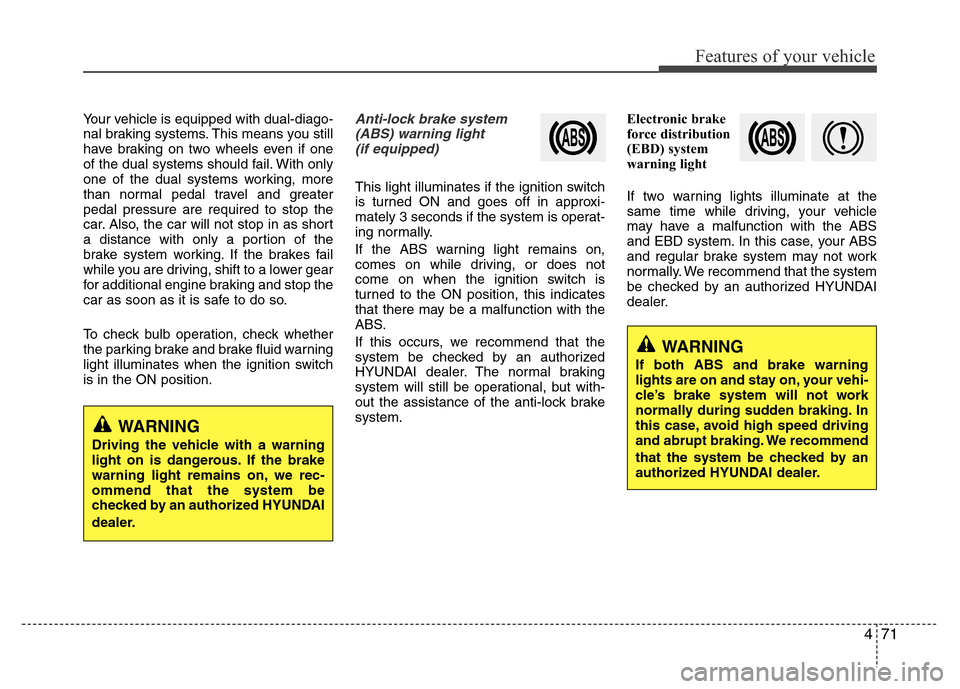
is in the ON position.Anti-lock brake system
(ABS) warning light
(if equipped)
This light illuminates if the ignition switch
is turned ON and goes off in approxi-
mately 3 seconds if the system is operat-
ing normally.
If the ABS warning light remains on,
comes on while driving, or does not
come on when the ignition switch is
turned to the ON position, this indicates
that there may be a malfunction with the
ABS.
If this occurs, we recommend that the
system be checked by an authorized
HYUNDAI dealer. The normal braking
system will still be operational, but with-
out the assistance of the anti-lock brake
system.Electronic brake
force distribution
(EBD) system
warning light
If two warning lights illuminate at the
same time while driving, your vehicle
may have a malfunction with the ABS
and EBD system. In this case, your ABS
and regular brake system may not work
normally. We recommend that the system
be checked by an authorized HYUNDAI
dealer.
WARNING
Driving the vehicle with a warning
light on is dangerous. If the brake
warning light remains on, we rec-
ommend that the system be
checked by an authorized HYUNDAI
dealer.
WARNING
If both ABS and brake warning
lights are on and stay on, your vehi-
cle’s brake system will not work
normally during sudden braking. In
this case, avoid high speed driving
and abrupt braking. We recommend
that the system be checked by an
authorized HYUNDAI dealer.
Page 153 of 473
Features of your vehicle
76 4
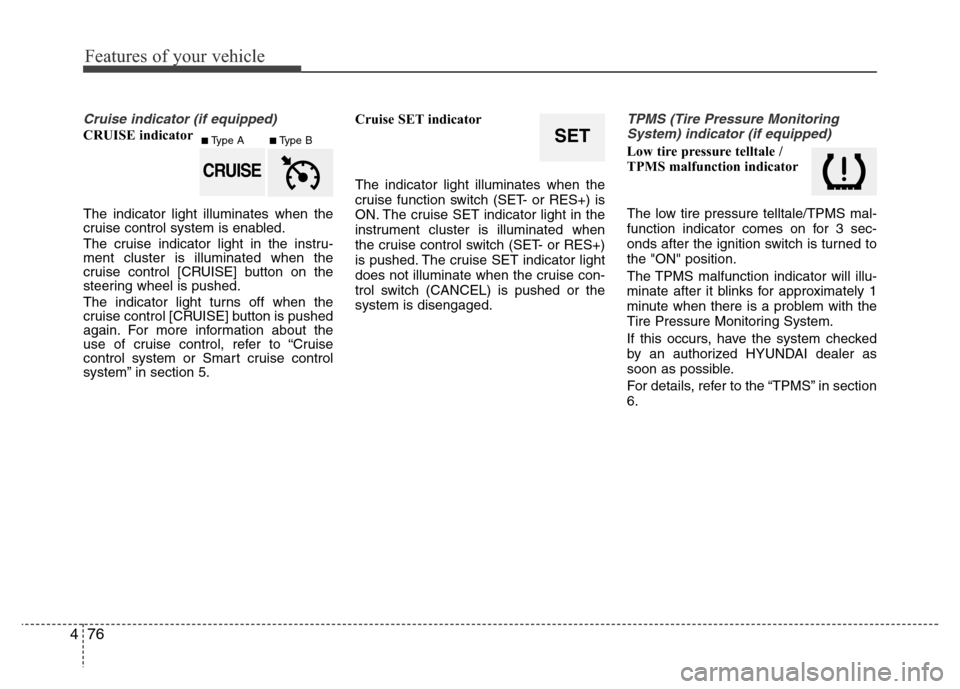
Cruise indicator (if equipped)
CRUISE indicator
The indicator light illuminates when the
cruise control system is enabled.
The cruise indicator light in the instru-
ment cluster is illuminated when the
cruise control [CRUISE] button on the
steering wheel is pushed.
The indicator light turns off when the
cruise control [CRUISE] button is pushed
again. For more information about the
use of cruise control, refer to “Cruise
control system or Smart cruise control
system” in section 5.Cruise SET indicator
The indicator light illuminates when the
cruise function switch (SET- or RES+) is
ON. The cruise SET indicator light in the
instrument cluster is illuminated when
the cruise control switch (SET- or RES+)
is pushed. The cruise SET indicator light
does not illuminate when the cruise con-
trol switch (CANCEL) is pushed or the
system is disengaged.
TPMS (Tire Pressure Monitoring
System) indicator (if equipped)
Low tire pressure telltale /
TPMS malfunction indicator
The low tire pressure telltale/TPMS mal-
function indicator comes on for 3 sec-
onds after the ignition switch is turned to
the "ON" position.
The TPMS malfunction indicator will illu-
minate after it blinks for approximately 1
minute when there is a problem with the
Tire Pressure Monitoring System.
If this occurs, have the system checked
by an authorized HYUNDAI dealer as
soon as possible.
For details, refer to the “TPMS” in section
6.SET
CRUISE
■Type A■Type B