Page 131 of 453

130
uuOperating the Switches Around the Steering Wheel uAdjusting the Steering Wheel
Controls
Adjusting the Steering Wheel
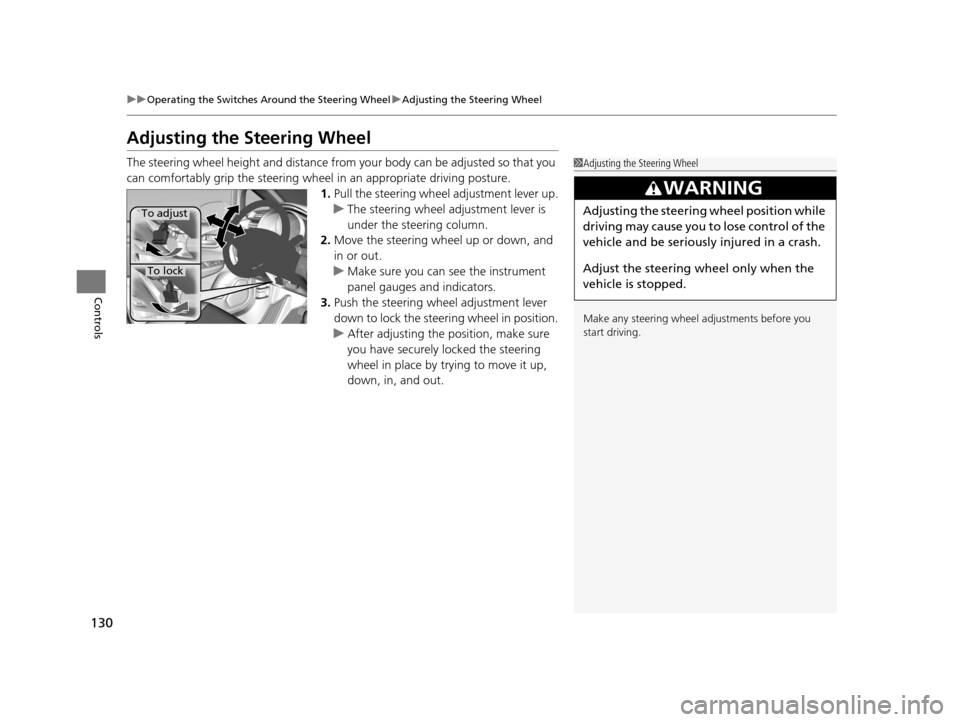
The steering wheel height and distance from your body can be adjusted so that you
can comfortably grip the steering wheel in an appropriate driving posture.
1.Pull the steering wheel adjustment lever up.
u The steering wheel adjustment lever is
under the steering column.
2. Move the steering wheel up or down, and
in or out.
u Make sure you can see the instrument
panel gauges and indicators.
3. Push the steering wheel adjustment lever
down to lock the steering wheel in position.
u After adjusting the position, make sure
you have securely locked the steering
wheel in place by trying to move it up,
down, in, and out.1Adjusting the Steering Wheel
Make any steering wheel adjustments before you
start driving.
3WARNING
Adjusting the steering wheel position while
driving may cause you to lose control of the
vehicle and be seriously injured in a crash.
Adjust the steering wheel only when the
vehicle is stopped.To adjust
To lock
15 US FIT-31T5A6000.book 130 ページ 2014年3月6日 木曜日 午後7時5分
Page 140 of 453

139
uuAdjusting the Seats uAdjusting the Seat Positions
Controls
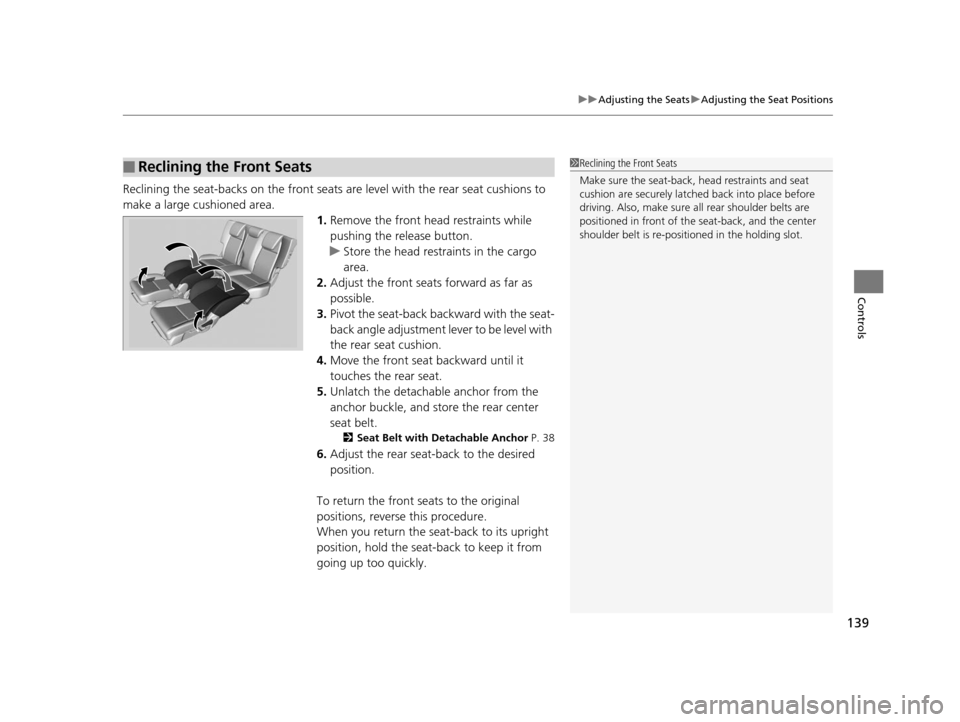
Reclining the seat-backs on the front seats ar e level with the rear seat cushions to
make a large cushioned area. 1.Remove the front head restraints while
pushing the release button.
u Store the head restraints in the cargo
area.
2. Adjust the front seats forward as far as
possible.
3. Pivot the seat-back backward with the seat-
back angle adjustment lever to be level with
the rear seat cushion.
4. Move the front seat backward until it
touches the rear seat.
5. Unlatch the detachable anchor from the
anchor buckle, and store the rear center
seat belt.
2 Seat Belt with Detachable Anchor P. 38
6.Adjust the rear seat -back to the desired
position.
To return the front seats to the original
positions, reverse this procedure.
When you return the seat-back to its upright
position, hold the sea t-back to keep it from
going up too quickly.
■Reclining the Front Seats1 Reclining the Front Seats
Make sure the seat-back, head restraints and seat
cushion are securely latche d back into place before
driving. Also, make sure all rear shoulder belts are
positioned in front of the seat-back, and the center
shoulder belt is re-posit ioned in the holding slot.
15 US FIT-31T5A6000.book 139 ページ 2014年3月6日 木曜日 午後7時5分
Page 142 of 453

Continued141
uuAdjusting the Seats uRear Seats
Controls
The rear seats can be folded down separa tely to allow for additional storage space.
■To fold down the seat
1. Store the center seat belt first. Insert the
latch plate into the slot on the side of the
anchor buckle.
2. Retract the seat belt into the holder on the
ceiling.
2 Seat Belt with Detachable Anchor P. 38
3.Lower the head restraint to its lowest
position.
4. Pull the release lever and fold down the
seat-back.
To return the seat to th e original position, pull
up the seat-back in the upright position.
■Folding Down the Rear Seats1 Folding Down the Rear Seats
Make sure all items in the cargo area or items
extending to the rear seats are properly
secured. Loose items can fly forward if you have
to brake hard.
Remove any items from th e rear seat cushion and
floor before you fold down the rear seat.
To lock the seat-back upri ght, push it backwards until
it locks.
Make sure the seat-back, head restraints and seat
cushion are securely latche d back into place before
driving. Also, make sure all rear shoulder belts are
positioned in front of the seat-back, and the center
shoulder belt is re-posit ioned in the holding slot.
Make sure that the folded seat-back does not press
against the front passenger seat, as this can cause the
weight sensors in the front passenger seat to work
improperly.
2 Passenger Airbag Off Indicator P. 52
Anchor
Buckle
Latch Plate
Release Lever
15 US FIT-31T5A6000.book 141 ページ 2014年3月6日 木曜日 午後7時5分
Page 143 of 453

uuAdjusting the Seats uRear Seats
142
Controls
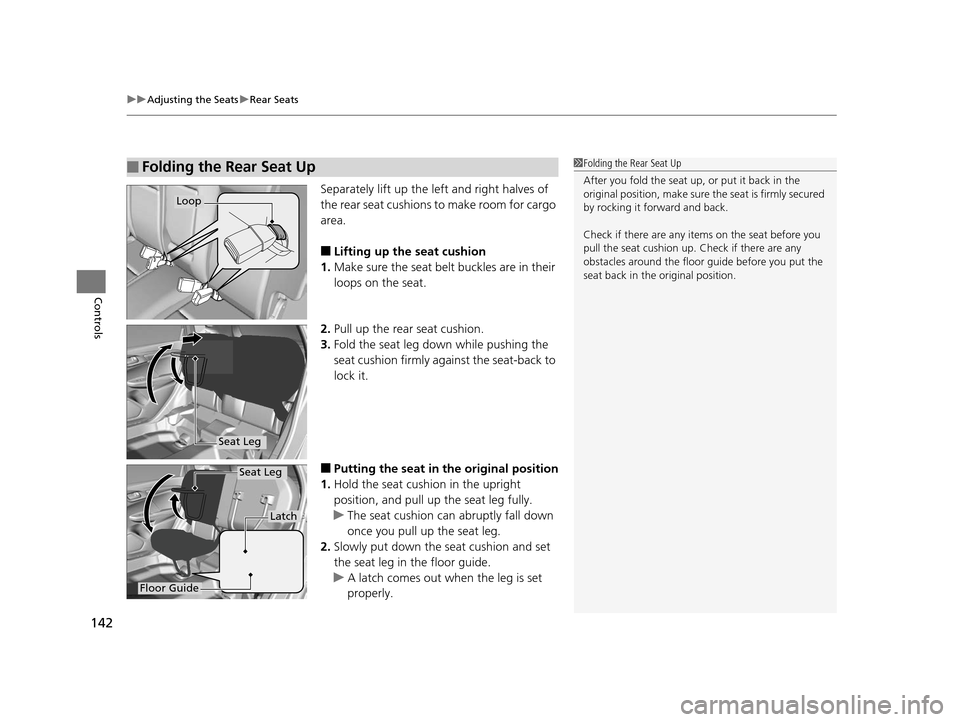
Separately lift up the left and right halves of
the rear seat cushions to make room for cargo
area.
■Lifting up the seat cushion
1. Make sure the seat belt buckles are in their
loops on the seat.
2. Pull up the rear seat cushion.
3. Fold the seat leg down while pushing the
seat cushion firmly ag ainst the seat-back to
lock it.
■Putting the seat in the original position
1. Hold the seat cushion in the upright
position, and pull up the seat leg fully.
u The seat cushion can abruptly fall down
once you pull up the seat leg.
2. Slowly put down the seat cushion and set
the seat leg in the floor guide.
u A latch comes out when the leg is set
properly.
■Folding the Rear Seat Up1Folding the Rear Seat Up
After you fold the seat up, or put it back in the
original position, make sure the seat is firmly secured
by rocking it forward and back.
Check if there are any items on the seat before you
pull the seat cushion up. Check if there are any
obstacles around the floor guide before you put the
seat back in the original position.
Loop
Seat Leg
Floor Guide
Latch
Seat Leg
15 US FIT-31T5A6000.book 142 ページ 2014年3月6日 木曜日 午後7時5分
Page 152 of 453
151
uuInterior Lights/Interior Convenience Items uInterior Convenience Items
Continued
Controls
The tie-down anchors on the cargo area floor
can be used to install a net for securing items.
■Tie-down Anchors
Front
Anchors*
Rear Anchors
* Not available on all models
15 US FIT-31T5A6000.book 151 ページ 2014年3月6日 木曜日 午後7時5分
Page 153 of 453
uuInterior Lights/Interior Convenience Items uInterior Convenience Items
152
Controls
The cargo area cover may be removed to give you more cargo room.
■To remove the cargo area cover
1.Open the tailgate.
2. Remove the strap on each side of the
tailgate.
3. Disengage the support rods, then remove
the cargo area cover.
Reverse this procedure to install the cargo
area cover.
After reinstalling the cargo area cover, make
sure it is latched securely.
■Cargo Area Cover*1 Cargo Area Cover*
Do not place items on the cargo area cover, or stack
objects higher than the top of the back seat. They
could block your view and be thrown about the
vehicle during a crush or sudden stop.
Do not apply excessive pressure to the cover, such as
leaning on it to retrieve an item.
* Not available on all models
15 US FIT-31T5A6000.book 152 ページ 2014年3月6日 木曜日 午後7時5分
Page 226 of 453

225
uuGeneral Information on the Audio System uCompatible iPod, iPhone, and USB Flash Drives
Features
Compatible iPod, iPhone , and USB Flash Drives
•Use a recommended USB flash drive of 256 MB or higher.
• Some digital audio players may not be compatible.
• Some USB flash drives (e.g., a device with security lockout) may not work.
• Some software files may not allow for audio play or text data display.
• Some versions of MP3, WMA, or AAC formats may be unsupported.
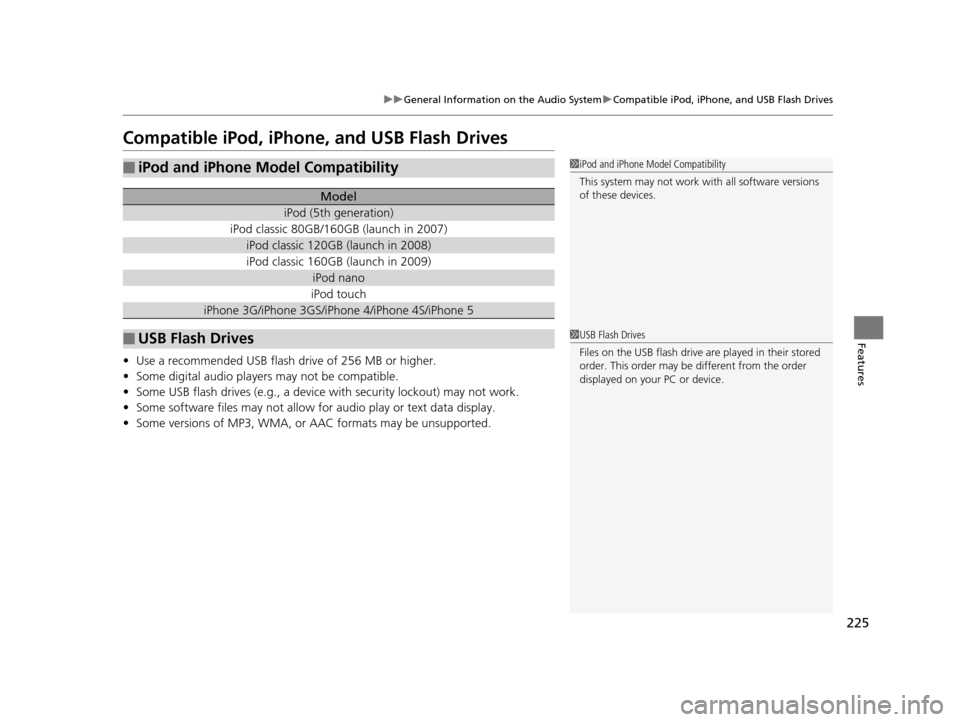
■iPod and iPhone Model Compatibility
Model
iPod (5th generation)
iPod classic 80GB/160GB (launch in 2007)
iPod classic 120GB (launch in 2008)
iPod classic 160GB (launch in 2009)
iPod nano
iPod touch
iPhone 3G/iPhone 3GS/iPhone 4/iPhone 4S/iPhone 5
■USB Flash Drives
1iPod and iPhone Model Compatibility
This system may not work with all software versions
of these devices.
1USB Flash Drives
Files on the USB flash drive are played in their stored
order. This order may be different from the order
displayed on your PC or device.
15 US FIT-31T5A6000.book 225 ページ 2014年3月6日 木曜日 午後7時5分
Page 247 of 453
246
uuCustomized Features u
Features
*1 : Default Setting
Setup
GroupCustomizable FeaturesDescriptionSelectable Settings
Bluetooth Bluetooth On/Off Status
Changes the Bluetooth® status. On
*1/Off
Bluetooth Device List Pairs a new phone to HFL, edits or deletes a
paired phone, or creates a security PIN.
2
Phone Setup P. 279
—
Edit Pairing Code Edits
Pairing Code .
2To change the pairing code setting P. 280Random/Fixed*1
Default Cancels/Resets all customized items in the
Bluetooth
group as default. Yes
/No
15 US FIT-31T5A6000.book 246 ページ 2014年3月6日 木曜日 午後7時5分