2015 HONDA FIT motor
[x] Cancel search: motorPage 3 of 453

Contents
This owner’s manual should be considered a permanent part of the
vehicle and should remain with the vehicle when it is sold.
This owner’s manual covers all models of your vehicle. You may find
descriptions of equipment and features that are not on your
particular model.
Images throughout this owner’s manu al (including the front cover)
represent features and equipment that are available on some, but
not all, models. Your particular mo del may not have some of these
features.
This owner’s manual is for vehicles sold in the United States and
Canada.
The information and specifications in cluded in this publication were
in effect at the time of approval for printing. Honda Motor Co., Ltd.
reserves the right, however, to discontinue or change specifications
or design at any time without notice and without incurring any
obligation.2 Safe Driving P. 27
For Safe Driving P. 28 Seat Belts P. 32 Airbags P. 41
2Instrument Panel P. 69
Indicators P. 70 Gauges and Displays P. 82
2Controls P. 87
Clock P. 88 Locking and Unlocking the Doors P. 90
Opening and Closing the Windows P. 113
Operating the Switches Ar ound the Steering Wheel P. 116
Interior Lights/Interior Convenience Items P. 144
2 Features P. 161
Audio System P. 162 Audio System Basic Operation P. 170
Customized Features P. 226 Bluetooth® HandsFreeLink ® P. 248
2 Driving P. 301
Before Driving P. 302 Towing a Trailer P. 307
Multi-View Rear Camera P. 345
2Maintenance P. 353
Before Performing Maintenance P. 354 Maintenance MinderTM P. 357
Checking and Maintaining Wiper Blades P. 380
Heating and Cooling System
*/Climate Control System* Maintenance P. 397
2 Handling the Unexpected P. 403
Tools P. 404 If a Tire Goes Flat P. 405
Overheating P. 417 Indicator, Coming On/Blinking P. 419 Fuses P. 423
2 Information P. 431
Specifications P. 432 Identification Numbers P. 434
Emissions Testing P. 437 Warranty Coverages P. 439
15 US FIT-31T5A6000.book 2 ページ 2014年3月6日 木曜日 午後7時5分
Page 59 of 453

uuChild Safety uSafety of Infants and Small Children
58
Safe DrivingMost child seats are LATCH-compatible (L ower Anchors and Tethers for CHildren).
Some have a rigid-type connector, while ot hers have a flexible-type connector. Both
are equally easy to use. Some existing and previously owned child seats can only be
installed using the seat belt. Whichever type you choose, follow the child seat
manufacturer's use and care instructions as well as the instructions in this manual.
Proper installation is key to ma ximizing your child’s safety.
In seating positions and vehicles not equipped with LATCH, a LATCH compatible
child seat can be installed using the seat belt and a top tether for added security.
This is because all child seats are required to be designed so that they can be secured
with a lap belt or the lap part of a lap/sh oulder belt. In addition, the child seat
manufacturer may advise that a seat belt be used to attach a LATCH-compatible seat
once a child reaches a specified weight. Please read the child seat owner’s manual
for proper installation instructions.
■Important consideration when selecting a child seat
Make sure the child seat meets th e following three requirements:
• The child seat is the correct type and size for the child.
• The child seat is the correct type for the seating position.
• The child seat is compliant with Federal Motor Vehicle Safety Standard 213 or
Canadian Motor Vehicle Safety Standard 213.
■Selecting a Child Seat1Selecting a Child Seat
Installation of a LATCH-co mpatible child seat is
simple.
LATCH-compatible child s eats have been developed
to simplify the installati on process and reduce the
likelihood of injuries caused by incorrect installation.
15 US FIT-31T5A6000.book 58 ページ 2014年3月6日 木曜日 午後7時5分
Page 116 of 453

115
Controls
Opening and Closing the Moonroof*
You can only operate the moonroof when the ignition switch is in ON (w*1. Use the
switch in the front of the ceiling to open and close the moonroof.
■Automatic operation
To open: Pull the switch back firmly.
To close: Push the switch forward firmly.
The moonroof will automatically open or close
all the way. To stop the moonroof midway,
touch the switch briefly.
■Manual operation
To open: Pull the switch back lightly, and
hold it until the desired position is reached.
To close: Push the switch fo rward lightly, and
hold it until the desired position is reached.
■Tilting the moonroof up
To tilt: Push on the center of the moonroof
switch.
To close: Push the switch forward firmly,
then release.
*1 : Models with the smart entry system have an ENGINE START/STOP button instead of an ignition switch.
■Opening/Closing the Moonroof
1Opening/Closing the Moonroof
NOTICE
Opening the moonroof in below freezing
temperature or when it is covered with snow or ice
can damage the moonr oof panel or motor.
The power moonroof can be operated for up to 10
minutes after you turn the ignition switch to LOCK
( 0*1. Opening either front door cancels this function.
When resistance is detected, the auto reverse
function causes the moonroof to change directions,
then stop. Auto reverse stops sensing when the
moonroof is almost closed to ensure that it fully
closes.
3WARNING
Opening or closing the moonroof on
someone's hands or fingers can cause
serious injury.
Make sure all hands and fingers are clear of
the moonroof before opening or closing it.Open
CloseTilt
* Not available on all models
15 US FIT-31T5A6000.book 115 ページ 2014年3月6日 木曜日 午後7時5分
Page 128 of 453

127
uuOperating the Switches Around the Steering Wheel uWipers and Washers
Controls
The rear wiper and washer can be used when
the ignition switch is in ON
(w*1.
■Wiper switch (OFF, INT, ON)
Change the wiper switch setting according to
the amount of rain.
■Washer ( )
Sprays while you rotate the switch to this
position.
Hold it to activate th e wiper and to spray the
washer. Once released, it stops operating
after a few more sweeps.
■Operating in reverse
When you shift the transmission to
(R with the front wiper activated, the rear wiper
operates automatically as follows even if its switch is off.
*1 : Models with the smart entry system have an ENGINE START/STOP button instead of an ignition switch.
■Rear Wiper/Washer1Wipers and Washers
If the wiper stops operating due to any obstacle such
as the build-up of snow, pa rk the vehicle in a safe
place.
Rotate the wiper switch to OFF, and turn the ignition
switch to ACCESSORY
( q or LOCK (0*1, then
remove the obstacle.
The wiper motor is equipped with a breaker that may
stop motor operation temp orarily to prevent an
overload. Wiper operation will return to normal
within a few minutes, once the circuit has returned to
normal.
INT: Intermittent
ON : Continuous wipe
OFF
Washer
Front Wiper PositionRear Wiper Operation
INT (Intermittent)Intermittent
LO (Low speed wipe)
HI (High speed wipe)Continuous
15 US FIT-31T5A6000.book 127 ページ 2014年3月6日 木曜日 午後7時5分
Page 250 of 453

249
uuBluetooth ® HandsFreeLink ®u Using HFL
Features
The audio/information screen notifies you
when there is an incoming call.
Certain manual functions are disabled or inoperable while the vehicle is in motion.
You cannot select a grayed-out option until the vehicle is stopped.
Only previously stored speed dial entrie s can be called using voice commands while
the vehicle is in motion.
2 Speed Dial P. 261
■HFL Status Display1Using HFL
Bluetooth ® Wireless Technology
The Bluetooth ® word mark and logos are registered
trademarks owned by Bluetooth SIG, Inc., and any
use of such marks by Honda Motors Co., Ltd., is
under license. Other tradem arks and trade names are
those of their respective owners.
HFL Limitations
An incoming call on HFL will interrupt the audio
system when it is playing. It will resume when the call
is ended.
HFL Mode
Battery Level Status
Signal Strength
Bluetooth Indicator
Appears when your
phone is connected
to HFL.
Roam Status
Call Name
■Limitations for Manual Operation
1HFL Status Display
The information that appears on the audio/
information screen vari es between phone models.
You can change the system language to English,
French, or Spanish. 2 Customized Features P. 226
15 US FIT-31T5A6000.book 249 ページ 2014年3月6日 木曜日 午後7時5分
Page 273 of 453

uuBluetooth ® HandsFreeLink ®u Using HFL
272
Features
button: Press to display Speed Dial, Call History , or Redial on the Phone
screen. / button: Press to select an item displayed on the Phone screen.
SOURCE button: Press to call a number listed in the selected item on the Phone
screen.
To go to the Phone menu screen:
1. Select HOME .
2. Select Phone to switch the display to the Phone screen.
3. Select MENU .1Using HFL
Up to six speed dial entrie s can be displayed among a
total of 20 that can be entered. If there is no entries
in the system, Speed Dial is disabled.
2 Speed Dial P. 261
Bluetooth ® Wireless Technology
The Bluetooth ® word mark and logos are registered
trademarks owned by Blue tooth SIG, Inc., and any
use of such marks by Honda Motors Co., Ltd., is
under license. Other tradem arks and trade names are
those of their respective owners.
HFL Limitations
An incoming call on HFL will interrupt the audio
s y s t e m wh e n it is p la y i n g . It wi ll r e s u m e w h en t h e c a l l
is ended.
15 US FIT-31T5A6000.book 272 ページ 2014年3月6日 木曜日 午後7時5分
Page 309 of 453

308
uuTowing a Trailer uTowing Your Vehicle
Driving
Towing Your Vehicle
Your vehicle is not designed to be towed be hind a motorhome. If your vehicle needs
to be towed in an emergency, refe r to the emergency towing information.
2Emergency Towing P. 428
Your vehicle can be towed behind a motorhome.
Perform the following procedure before towing your vehicle.
1. Shift to
(N.
2. Release the parking brake.
3. Turn the ignition switch to ACCESSORY
(q*1.
u Make sure the steering wheel does not lock.
4. Turn off all the electric devices. Do not use any accessory power sockets.
u This can prevent the battery from running down.
*1 : Models with the smart entry system have an ENGINE START/STOP button instead of an ignition switch.
■When Your Vehicle is Towed Behind a Motorhome
1Towing Your Vehicle
Do not exceed 65 mph (100 km/h).
Consult your towing parts sa les or rental agency if
any other items are recommended or required for
your towing situation.Automatic transmission (CVT) models
Manual transmission models
15 US FIT-31T5A6000.book 308 ページ 2014年3月6日 木曜日 午後7時5分
Page 334 of 453

333
uuWhen Driving uVehicle Stability Assist (VSA ®), aka Electronic Stability Control (ESC), System
Driving
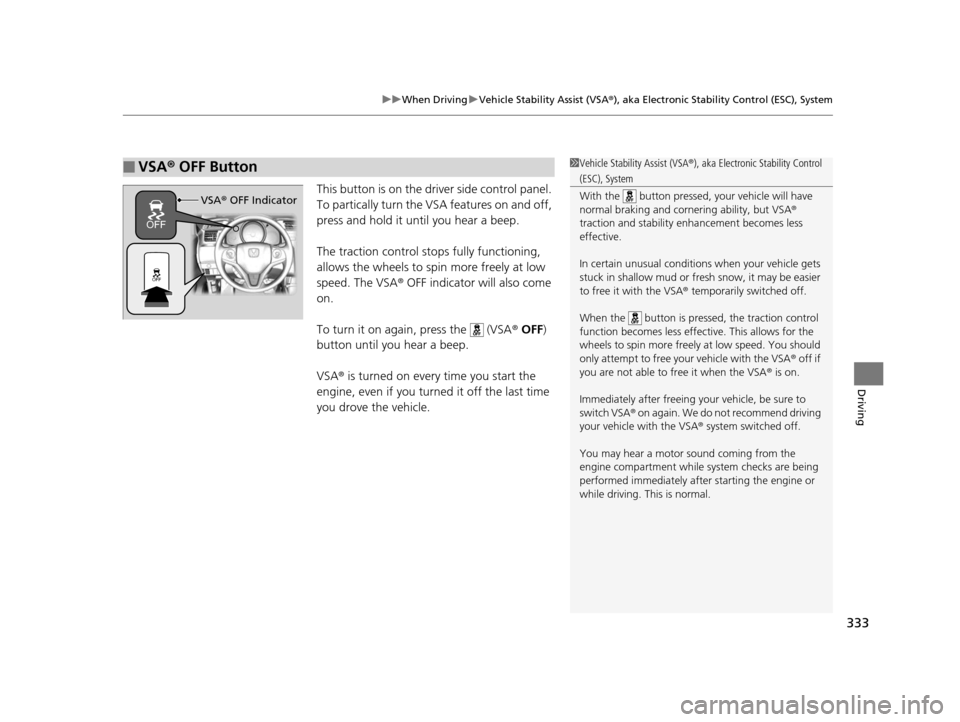
This button is on the driver side control panel.
To partically turn the VSA features on and off,
press and hold it until you hear a beep.
The traction control stop s fully functioning,
allows the wheels to sp in more freely at low
speed. The VSA ® OFF indicator will also come
on.
To turn it on again, press the (VSA ® OFF )
button until you hear a beep.
VSA ® is turned on every time you start the
engine, even if you turned it off the last time
you drove the vehicle.
■VSA ® OFF Button1 Vehicle Stability Assist (VSA ®), aka Electronic Stability Control
(ESC), System
With the button pressed, your vehicle will have
normal braking and corn ering ability, but VSA®
traction and stability enhancement becomes less
effective.
In certain unusual conditions when your vehicle gets
stuck in shallow mud or fr esh snow, it may be easier
to free it with the VSA ® temporarily switched off.
When the button is pressed, the traction control
function becomes less effective. This allows for the
wheels to spin more freely at low speed. You should
only attempt to free your vehicle with the VSA ® off if
you are not able to free it when the VSA ® is on.
Immediately after freeing your vehicle, be sure to
switch VSA ® on again. We do not recommend driving
your vehicle with the VSA ® system switched off.
You may hear a motor sound coming from the
engine compartment while system checks are being
performed immediately after starting the engine or
while driving. This is normal.
VSA ® OFF Indicator
15 US FIT-31T5A6000.book 333 ページ 2014年3月6日 木曜日 午後7時5分